If Windows 7 won't start. Why won't Windows boot? Ways to fix the problem. Boot files corrupted
Unfortunately, sometimes you can encounter quite serious problems with turning on computers and starting operating systems, although nothing foreshadowed trouble until a certain point. It happens that but most often the computer turns on, but the operating system does not start. It is these situations that will be discussed below. Consider questions related to why the computer does not boot, and what to do in such situations. There are several universal solutions here.
The computer turns on, but the operating system does not start: reasons
Among all the possible situations when failures occur at the boot stage, there are several typical cases.
There are three options here:
- a black screen appears;
- a blue screen BSoD occurs;
- The operating system starts but cannot fully boot.
In the first case, when the computer does not start (boot does not turn on), messages may appear on the black screen, indicating physical or software problems. In the simplest case, when nothing serious happens, the system may report that, for example, there is no keyboard (for desktop PCs). The simplest solution would be to plug it in and reboot.
If the computer turns on, but the boot does not start, and instead warnings about software failures or missing files appear on a black screen, there can be quite a few reasons for this system behavior. Among them, first of all, one can single out problems with the hard drive, damage to the operating system (accidental or intentional deletion of system components or registry entries), exposure to viruses, incorrect boot sector entries, RAM conflicts, etc. By the way, if a blue screen pops up, this is more related to the “RAM” or recently installed drivers devices that cause conflicts to appear not at the software level, but at the physical level.
What to do if the computer does not boot and the operating system does not start for the above reasons? There are several solutions depending on the situation. To an uninitiated user, they may seem quite complicated, but in certain situations, only them can be used to resuscitate the system. Therefore, you will have to spend both time and effort.
The computer turns on but does not boot: what to do first?
So, let's start with the simplest. Let's assume that the system has experienced a short-term technical failure, for example, due to an incorrect shutdown or power surges.

As a rule, almost all Windows modifications used today usually automatically activate the startup upon restart. If this did not happen, you will have to use the F8 key before starting the system to call an additional boot menu (Windows 10 uses a different method).
The computer turns on, but the operating system does not start? It's not worth getting upset. Here, in the simplest version, you can select the boot line of the last working configuration. If everything is in order with the system components, the system will boot without problems. If this does not help, you will have to use the troubleshooting section, and sometimes even trying to boot in safe mode may be successful.
Possible viral infection
Unfortunately, viruses can also cause such situations. What to do if the computer does not turn on? Ways to solve this particular problem come down to using a powerful one that could check for threats even before the start of the OS itself.

Among the variety of anti-virus software, it is worth noting the disk utilities that start directly from an optical media or USB device, have their own boot records, and even a graphical interface like Windows. One of the most powerful tools is Kaspersky Rescue Disk. Its use can guarantee almost one hundred percent detection of viruses, even hiding in RAM.
RAM conflicts
Now let's see what to do if the computer does not boot, and instead a blue screen appears. As already mentioned, most often this indicates problems with drivers and RAM. We don’t touch the drivers yet, but let’s look at the “RAM”.
The proposed solution to the question of if the computer does not boot is mainly designed for stationary PCs. In this situation, you should remove all the memory sticks, and then insert them one by one and check the load. Perhaps one of them is the link that causes failures. This can be observed when trims from different manufacturers are added.

If the system can somehow boot using the same safe mode, the “RAM” should immediately be checked with the Memtest86 + utility, which will help identify the true cause of the problem.
The system does not see the hard drive
Now the worst situation is when the computer does not boot. Causes and solutions may be related to the hard drive.

A hard drive can have both software and physical problems, although sometimes that's not even the point. The problem can be quite banal: the user in the BIOS settings is set to boot priority from a removable device, for example, from an optical disk that is currently in the drive, but is not a system one. You just need to extract it and re-download it.
On the other hand, another problem that the computer does not start (the system does not start) may be due to the fact that the bootloader and the records of the corresponding sector are damaged. The solution to this situation will be discussed later. But in the simplest case, you can try to recover disk data using Recovery utilities.

Sometimes changing the settings of the primary I / O system BIOS helps. Here you need to find the section related to setting up the hard drive, and deactivate the use of AHCI mode in the SATA configuration parameters.
Finally, a hard drive can also have purely physical damage, and outside interference is indispensable here.
Using the installation disc
Many users clearly underestimate the help that the installation or system image can provide in solving problems associated with situations when the computer turns on but the operating system does not boot.

Firstly, almost any kit includes the so-called recovery console, with which you can fix many software failures, and secondly, you can use the command line here. By the way, this is the most efficient method. Further it will be clear how it works.
Problems with the bootloader BOOTMGR
It is believed that the most common problem when a computer turns on, but the operating system does not start, is damage to Windows bootloader(boot manager). In this case, the system just writes that there is no system partition (it simply does not see the hard drive).
You can fix this problem by starting from a boot disk and going to command line in the recovery console, to open which you should press the "R" key. Next, you must first use the check disk command, and then fix (repair) the boot records.

The whole sequence looks like this:
- chkdsk c: /f /r;
- Bootrec.exe /FixMbr;
- Bootrec.exe /FixBoot.
After entering commands, punctuation marks are not put, but the enter key is pressed. If for some reason the execution of these commands did not have a positive effect, as an option, you can use the complete rewriting of the boot sector, which is performed by the Bootrec.exe /RebuildBcd command. If the hard drive is not physically damaged, this should work, as they say, one hundred percent.
You can also use some third party utilities. The most suitable program seems to be a tool called MbrFix, which is included with Hiren's Boot CD. After calling it, for example, for Windows 7, provided that this particular system is installed, and only on one disk (there is no partitioning), the following should be written:
- MbrFix.exe /drive 0 fixmbr /win7.
This will save the user from having to make changes to the boot records, and the boot will be restored.
Problems accessing the NTLDR file
When a message appears that this component is not present in the system, the boot fixation is applied first, as in the previous case.

However, if the result is not achieved, you will need to copy the original file to the root of the system partition. For example, if the drive is "C" and the drive is "E", the command would be:
- E:\i386> copy ntldr C:\ (after copying, the system will boot without problems).
Corrupted or missing HAL.dll file
In the case when the computer turns on, but the operating system does not boot in normal mode, the reason may be a damaged HAL.dll component (the corresponding notification may be displayed on the screen).
In this situation, you need to boot the system in safe mode, call the command console and write the following line in it:
- C:\windows\system32\restore\rstrui.exe (then press the Enter key and restart).
Instead of total
Here is briefly everything related to solving the problem of the impossibility of starting the operating system. Naturally, the issues that the cause could be low power, CMOS battery failure, loose cables, dust inside the system unit, or other malfunctions were not addressed here. But in software terms, the above methods work flawlessly.
Safe mode (English - Safe Mode)- diagnostic mode, in which all unnecessary drivers and Windows functions are disabled. It is used to fix problems that arise in the operation of the PC. It is enough just to start safe mode and fix the errors, after which the PC will work as it should again.
When might you need to enter safe mode? For example, to solve the problem when .
Also in this way, you can remove viruses, reset your password, fix errors (including the blue screen of death), restore the system, etc.
There are several ways. Plus, they are slightly different depending on what operating system you have. Therefore, below we will consider all available ways how to enter safe windows mode.
There are 2 universal methods that work for everyone Windows versions- XP, 7, 8 and 10. In addition, they are the most simple. Perhaps we will start with them.
Login via msconfig utility
The first way is through a special utility. To do this, you need to follow a simple instruction:
- Press Win + R (the button between "Ctrl" and "Alt") and enter the word "msconfig".
- In the new window, select the "Download" tab, indicate the desired OS and put a bird in the "Safe Mode" item. There are a couple of sub-items here - it is recommended to choose either “minimal” (the standard option) or “network” (in this case there will be access to the Internet).
- Click "OK" and restart the PC - now it will turn on in safe mode.
When you fix the errors, do not forget to return the computer to the normal startup mode! This is done in exactly the same way - using the msconfig utility (only now you need to uncheck it).
There is a small nuance here: in this way you can enable safe mode in Windows only if your OS boots normally. If you can’t even load the desktop, then use the second method.
Login with F8
This method is suitable for those whose PC or laptop does not turn on (the desktop does not load, the monitor goes out, etc.). In this case, do the following:
- Turn on the PC (or laptop) and immediately press the F8 key repeatedly until the menu appears (in some cases, you need to press Shift + F8).
- If the Windows logo appears or the screen goes out, you didn’t succeed. Wait for the system to fully boot, then restart your PC and try again.
- When everything is done correctly, a menu will open where, using the arrows, select the “Safe Mode” item (the best option).

P.S. On Windows 10 this method does not work! This feature has been disabled by the developers.
Special boot options for Windows 10
If Windows starts, then you need to do the following:


What to do if Windows 10 won't start? If the PC boots before the login screen, then "Special Boot Options" can be opened in another way. To do this, click on the power button icon (in the lower right corner), hold down Shift and select the "Restart" item.
Use disk or flash drive
This is the most reliable way boot windows 10 in safe mode. But in this case, you need a DVD-ROM or (they can be burned on any PC or laptop).
Connect a USB stick or insert a disc, boot them (), and then do the following:
- After loading, press Shift + F10.
- After opening the command prompt, enter - bcdedit / set (default) safeboot minimal.
- Then close it and restart your PC. It will turn on.
To return the PC to normal startup, write the following on the command line: bcdedit / deletevalue (default) safeboot.
You can do this in the same way (or as an administrator ) .
You can also enable the mode in Windows 8 in 4 different ways
The first two are described in detail at the beginning of the article. The other two are quite similar to the options that are suitable for Windows 10, but we will still look at them in more detail to make it easier for you to navigate.
Diagnostic Tools
So, the first way is to activate the buffer format (suitable only if the OS is working properly). To do this, do the following:


The PC will start in Safe Mode, and you can carry out the necessary manipulations.
And another simple option for starting safe mode in Windows 8 is through a bootable USB flash drive or DVD with Windows files. The procedure is as follows:

How to be on Windows 7 and XP
You can enter Safe Mode in Windows 7 or XP using one of the universal methods described at the beginning of this article. The first option is suitable in cases where the OS is working fine, and the second if the PC or laptop does not turn on.
It is worth noting that the operating system is in no way related to the BIOS. It also doesn't matter what brand of laptop you have - Samsung, Asus, Lenovo, HP, Acer, LG, etc.
What to do if Safe Mode won't start?
Sometimes a PC or laptop stubbornly does not want to enable safe mode. The reason is banal - viruses damaged the Windows registry. In such situations, there are only 2 options:
- restoration of the PC (system rollback to a checkpoint);
- installation of special programs.
The best, of course, will be the first way - restoring the computer from a checkpoint. If you have not saved them (for example, they are disabled), then the only option left is to install programs to restore the Windows registry. In this case, you can use the free Safe Mode Repair or SafeBootKeyRepair.
The topic that I want to discuss in this article is very popular and to talk about it in detail so that you understand how and what to do is not so simple. However, I will try to describe possible ways what to do if Windows 7 does not boot on a laptop or computer. We will also find out why this could happen ?! The task ahead of us is not an easy one, namely, to correct the current situation, but there is no need to be afraid. Just follow the clear instructions and you'll be fine! Some points may be suitable for other operating systems, but I will focus on Windows 7.
Dear reader, if you really want to solve a problem, I strongly recommend that you read it in full, and then draw some conclusions. I cannot cover all the details in one paragraph.
Safe Mode and Last Known Good Configuration
This is a must try! We restart the computer, press the F8 key continuously.
Attention! In Windows 8, entering Safe Mode is a little different, so it's best to follow the link below to find out all the details. In the list that appears, we are interested in an item called "Last Known Good Configuration (advanced)". Select and press Enter.
About how to enter safe mode on different systems:
What to do if the information above did not help you? We repeat the steps described in the previous paragraph, but select “Safe Mode” already.
Next, you can make a choice: fix the problem due to which Windows 7 does not boot manually, or try to do it in semi-automatic mode. Usually I do everything manually, for example, if Windows does not boot after installing the drivers, then I remove the drivers and try to boot. I think you understand that the manual method requires more knowledge from you, so Windows offers you another option, which I will describe below.
If everything loads, go to the Start menu, Control Panel, System and Security. In the "Action Center" tab, click on the inscription "Restore the computer to a previous state". See the "Start System Restore" button? Great, then you've come to the right place.

Now click it and follow the instructions.
Next, you will need to select a restore point. In my case, I am offered to choose a point on the 23rd, and now the 29th is on the calendar. Therefore, you need to click on "Search for affected programs" to find out what actions you will need to take after the restoration.


So, you have familiarized yourself with the affected software during system recovery and now you can close this window. After the window closes, click Next.
If you were unable to enter Safe Mode to restore Windows work, there is no need to despair. A little lower we will analyze another way.
Note: at the very beginning, when Windows 7 was just coming out, there was one strange glitch that you might have. When you turn on the computer, a welcome screen follows and a black screen appears. As I remember, there still seemed to be an arrow, but nothing else was visible. It was treated very simply - go into safe mode and restart the computer as usual. After that, I was able to enter my account without any additional manipulations with Windows.
You may need to reinstall Windows
This option should be considered when you have tried to revive Windows, but all attempts failed.
The very first thing that comes to mind for many, and for me too, is Windows installation 7. But this way, you see, it is very long, and if you are a busy person, then access to the computer should be almost constant. Reinstallation is suitable for those who have a lot of free time, or do not have time to understand faster methods, or for those who will not be helped by any of the methods I have listed below to restore the operating system Windows systems.
I will not dwell on installing Windows in detail, since I wrote about this on my blog:
Here is a brief instruction: since you do not have access to the desktop, go to the BIOS, look for the Boot or Advanced BIOS Features tab, or look for it yourself. Then we find the line “1st Boot Device” in it, set the value to CD-ROM. What have we done? And what we did is that now the computer will boot from the disk that is installed in your CDRom, and not from the hard drive. After turning on, when the inscription appears on a black background: "Press any key ...", press any button and get into the Windows setup wizard. Then follow the instructions on the screen.
You can read more about how to boot from disk in my article: "".
I decided to talk about the installation at the very beginning, because if you were going to reinstall Windows, then perhaps this is some kind of sign to implement this))). But as I said at the very beginning, we will now try to bring your Windows back to life without reinstalling it.
System Restore
First of all, you can use the function that is in the "System Restore" installation disk. I will give an example of a Windows 7 system, but if you have a different system, then this is not a reason to think that you cannot do it on your system. The names of the buttons may differ, but the principle remains the same.
So, for this procedure, we need a Windows installation disk or its image (you can download it on the Internet). If you do not have the opportunity to download the image or do not have a disk, then write to me by mail [email protected] or contact your friends who have already installed Windows on their own.
If you do not have a working drive, or if it is completely absent, then the article "" will help in creating a bootable USB flash drive.
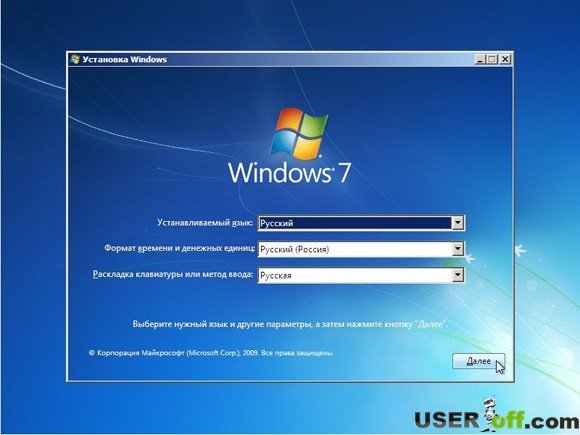
When you have a Windows distribution available, then insert it into the drive and restart the computer. If the BIOS is configured to install, then you will have a line:

When it appears, press any key.
In the event that it is not there or Windows boots as usual, then you need to manipulate the BIOS. Namely, set download priorities. Usually, the hard drive is set in the BIOS settings, since it is on it that your Windows is installed.
In order for the computer to start booting from the disk that is in your drive, you need to go into the BIOS and specify CDRom as the first device to boot. I have already talked about this above, if you have not read this moment, then it's time to do it.
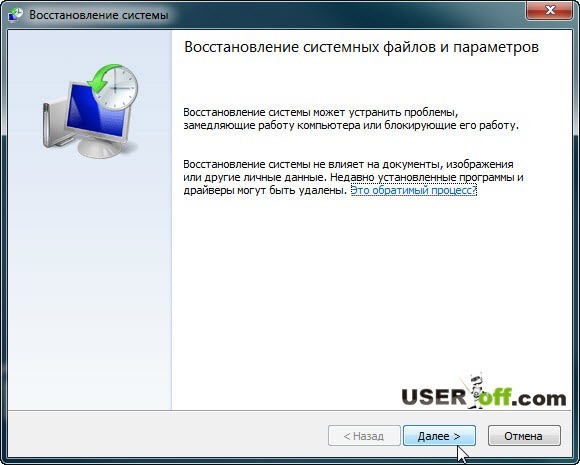
So, you pressed any key, now a window will appear where you click "Next".
In the next window, you need to click "System Restore".

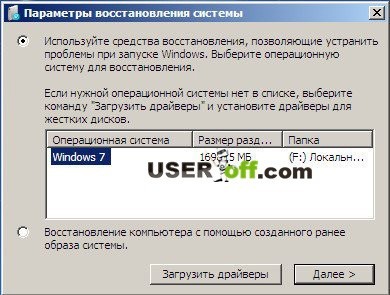
It will search for installed systems. If you have one system installed, then there will be one operating system in the list accordingly. Select it and click Next.

Often at this stage, a message may appear asking you to restore the system. If this message is displayed on your screen, then click "Fix and restart." After that, try to log into your account.
If the message does not appear, then in the next window you select your system and click "Next".
After that, a window will appear where you can choose how to restore the system.

- Automatic problem solving.
System Restore - You can use this method, but on condition that given function was included.
Restoring a system image - if you have Windows image recovery.
Command line- with the help of certain commands you can revive Windows. This method will be discussed next.
Now click on Startup Repair. Now we need to wait a bit for the utility to try to automatically find the problem and solve it.
System restore via command line
Then enter and click Enter.

A list of commands that can be used in this utility will appear, now you need to enter: Bootrec.exe /FixMbr and press Enter.

Now enter . exe / , then clicking on Enter. Next, exit the utility by typing exit and pressing Enter. Now you can try to boot into your account, as the restoration work is completed.
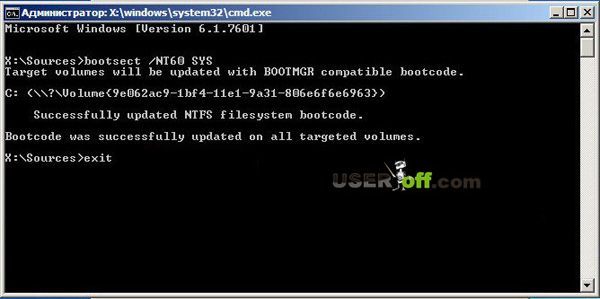
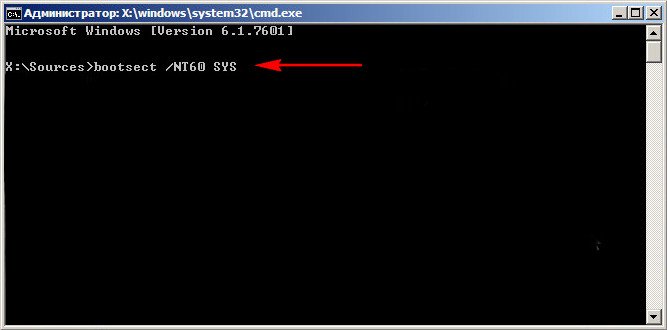
You can also try to update the boot code by entering the command bootsect /NT60 SYS. Then exit with the command exit.
If the above commands did not help you, then go to the command line and enter Bootrec.exe /RebuildBcd. With this command, you will scan your hard drive to find the systems installed on it.

When the scan is finished, a list of installed operating systems on your hard drive will appear. To add it to the download list, click Y and Enter. After successful completion of the operation, enter exit and press Enter.

So, with the command line, we figured it out. In principle, this should help to get your system to start booting.
Inactive hard disk partition
This situation does not occur often, but still it is necessary to talk about it, otherwise the article can be said to be cut off. Let's give an example, after which you will understand what's what.
Let's say you have several Windows operating systems installed on your computer, which are installed on different hard drives. If sections hard drives assign the wrong attributes, then you will have problems loading one or another version of Windows.
To check or fix this, you can use the Acronis Disk Director boot disk to change partition attributes. So, download and burn bootable Acronis disk Disk Director and boot from it. How to do it? Insert the disc into the drive, restart your computer, and it will start booting from the disc in the drive. But before that, check your download priorities. It should be CDRom, like when installing Windows. We have already talked about this in this article above.
When the program loads, pay attention to the flags that are on the hard disk partitions.
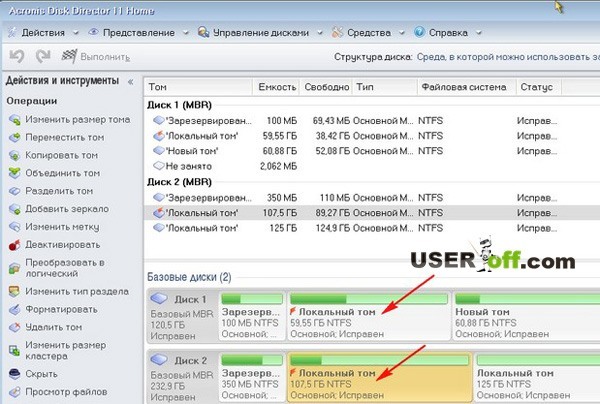
In the image above, we can see that the checkboxes are on the second partitions of the hard drive. You need to make sure that these flags are on the first sections. We got to practice;). You need to click on every first hard section right-click the drive and select "Mark as active".
A message should appear asking you to click OK. This is what it looks like after the whole process:
Now it remains to click on the "Run" checkbox, wait for the operation to complete and restart the computer. Be sure to remove the disc from the drive.
Hardware problems, BIOS and viruses
HDD. If your system unit, or rather, the hard drive makes suspicious sounds: clicks or taps, that is, it is likely that the hard drive needs to be replaced. To verify this, you need to open the cover of the system unit, turn on the computer and listen to work hard disk. Also check the wiring to the hard drive. It is possible that the wires are disconnected and the computer does not see the hard drive.
If there is a suspicion that the problem is with the hard drive, then you need to copy all important data to another medium. Otherwise, you may lose them altogether.
BIOS. Go to BIOS settings and put the hard drive in the first place so that the download starts from it. Above, we analyzed the example when we exposed the CDROM, you do the same with the hard drive. Just do not forget to save the changes in the BIOS by pressing the F10 key.
The second way - you will not believe it, but it really works! Just go into the BIOS and, without changing anything there, exit, saving the changes that actually didn’t exist (by pressing the F10 button). I personally fixed a friend's laptop this way once, and when they asked me how I did it, my answer was: "Magic and nothing else 😉". So give it a try, it might turn out to be much easier than you think.
Viruses. Sometimes viruses prevent Windows from booting. If there are viruses on your computer, then you need to check the entire disk for viruses. Here are articles that will be useful to you: "" and "".
Of course, if you check your hard drive for viruses, then you will need to disconnect it and connect it to another computer, since in your case you will not boot Windows. Or you can use special boot programs, with which you can check your computer for viruses even if you cannot boot your Windows. Here are a couple of them: and.
Attention! There are cases when, after installing updates, Windows 7 stopped loading! Therefore, you can try uninstalling recent updates that were installed before the problem appeared. Windows boot.
Important! If you have some specific error displayed on the screen, then I recommend using a search in Google or Yandex. You can enter into the search not only the error code, but also the words that are used in it. Thus, you will save your time searching for a problem and its solution.
Important! If the system unit emits squeaks when turned on, then it is necessary to determine the problem by this squeak. Ask how? Here is an article on this topic for you: "".
That's all I wanted to say. The article turned out to be great, and I sincerely hope that at least one of the methods I have described helped you.
Says too much, but there is useful information for you:
Need good advice how to produce Windows 7 bootloader recovery if the startup recovery using the installation disk of the seven did not help. I’ll briefly explain what’s the matter: Windows 7 was first installed on the computer, then Windows XP was needed as the second system, after installation it naturally started alone, I used the EasyBCD program to load two operating systems. In the future, XP became unnecessary and I formatted the partition on which it was located from Windows 7. Now, when loading, there is nothing but a black screen. What can be done in this case? More details if possible. Sergey.
Windows 7 bootloader recovery
Hello friends! Most importantly, do not worry, your problem is simple and, in principle, a simple tool "Restore Windows startup 7" described in our article should help, but! If this article does not help you, then two others should help:
These articles describe a few more good ways restore the boot of your operating system, besides them there is one more, so try it and just don't give up.
Let me remind you that you cannot install an older operating system after a younger one, Windows 7 will in no case boot after installation on Windows computer XP, since the latter overwrites the Master Boot Record (MBR) with itself during installation. Therefore, you installed an additional boot manager, which is used to configure the boot of several operating systems and has its own bootloader in turn.
- I also want to say that file system errors are often to blame for unsuccessful loading of Windows 7, you can fix them even when the operating system does not load, all the details in our other article " "
- Friends, in this article we will work with the environment Windows recovery 7, or more precisely with the command line of the recovery environment. I will give you the necessary commands, but if it is difficult for you to remember them, you can. This will greatly facilitate your work.
- The Master Boot Record (MBR) is the first sector on the hard drive that contains the partition table and a small bootloader program that reads data from which partition in this table. hard drive boot the OS, then the information is transferred to the partition with the installed operating system to boot it. If the master boot record contains incorrect information about the location of the system, then we will receive various errors during boot, here is one of them "BOOTMGR is missing press CTR-Alt-Del for restart" or we will observe a black screen. The problem is being fixed Windows 7 bootloader recovery.
When you uninstalled old XP along with EasyBCD, you left your computer to fend for itself with a boot record that it did not understand, and it gives you a black screen as a token of gratitude. To remedy the situation, we will boot recovery zchika Windows 7namely, we will overwrite the master boot record using the utility Bootrec.exelocated on the recovery disk or on the installation Windows disk 7 (friends, if you have a netbook and want to use the recovery environment located on the flash drive, then read the comments first). Also with this utility we will write a new boot sector understood by Windows 7.
Windows 7 Boot Repair Automatically
We boot from the recovery disk or the installation disk with Windows 7, in the initial phase of booting the computer, when prompted to boot from the disk "Press any key to boot from CD ...", press any key on the keyboard for 5 seconds, otherwise you will not boot from the disk

There is a short search for installed Windows systems and an analysis of problems that prevent them from loading

Usually problems are found quickly and the recovery environment offers to fix them automatically. Click on the "Fix and restart" button, after which the computer will restart and the Windows 7 boot will be restored.

If the system boot problems continue or you are not prompted to fix the problems automatically, then in this window you need to select the operating system that you want to restore, you most likely have one and Next.

Choose a tool firstLaunch Recovery, it can also solve problems with loading Windows 7

Restoring the Windows 7 bootloader manually
If this remedy does not help, choose the remedy Command line

We enter the commands:
diskpart
lis vol (we display a list of hard disk partitions and see that “Volume 1” is a hidden partition System Reserved (Reserved by the system), the volume is 100 MB, it should contain Windows 7 boot files and it should be made active). We also see a section with installed Windows 7, it has the letter D:, the volume is 60 GB.
sel vol 1 (select Volume 1)
activ (make it active)
exit (exit diskpart)
bcdboot D:\Windows (where D: is the partition where Windows 7 is installed), this command restores the Windows 7 boot files (the bootmgr file and the boot storage (BCD) configuration files)!
"Download files created successfully"

Restoring the Windows 7 bootloader manually (method number 2)
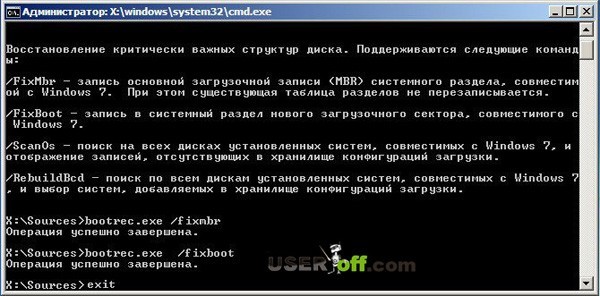
In the command prompt window, enter the Bootrec command and Enter

comes full information about the capabilities of the utility. Select the MBR entry Bootrec.exe /FixMbr .

Operation completed successfully. A new boot record has been written to the first sector of the boot partition.
The second command Bootrec.exe /FixBoot writes a new boot sector.

Operation completed successfully. exit. Next, we try to load our Windows 7.

Friends, if the Bootrec.exe /FixMbr and Bootrec.exe /Fixboot commands do not help you, do not despair, there is one more tool.
Method number 3
We enter the command Bootrec /ScanOs, it will scan all your hard drives and partitions for the presence of operating systems, and if such are found, an appropriate warning will be issued. Then you need to enter the command Bootrec.exe /RebuildBcd, this utility will offer to add the found Windows to the boot menu, agree and enter Y and press Enter, all the Windows found are added to the boot menu.
In my case, two OS. Everything is visible on the screenshot.

In addition to the above method, there is another one, enter bootsect /NT60 SYS on the command line, the main boot code will also be updated.
exit
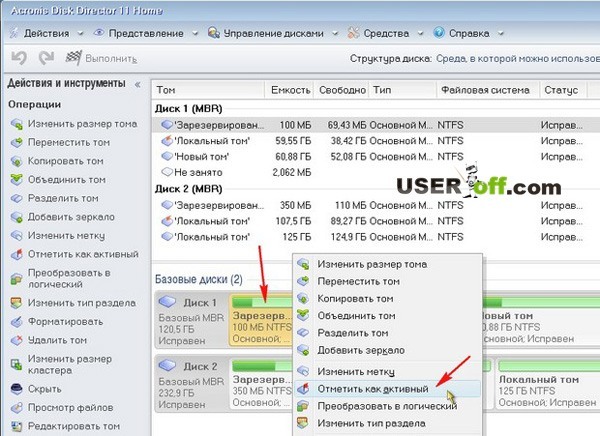
So, the mistake is that on both of us hard drives the first hidden partitions System Reserved should be marked with a red flag. On Windows 7, the volume of such a partition is 100 MB, and on Windows 8 350 MB, these partitions have the following attributes: System. Active and it is on these partitions that the boot storage configuration (BCD) files and the system boot manager file (the bootmgr file) reside. And we get these attributes are other sections. Because of this, Windows 7 and Windows 8 won't boot.

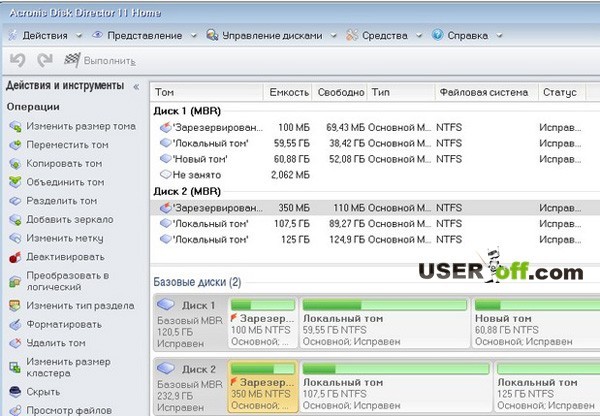
Select the first hard Disk 1, click on the first partition System Reserved (Reserved by the system) with the right mouse and select "Mark as active"

The "System Reserved" volume will be marked as active. We press OK.

We do the same with Disk 2. Acronis Disk Director runs in pending operation mode, so that the changes take effect, click the "Apply pending operations" button

Continue.

As you can see, after our changes, those sections that you need have become active.

Exit the program and reboot. The result of the work is positive - both operating systems are loaded in turn.
The Windows 7 operating system is reliable and stable in operation, but it happens that it can also be subject to various errors and failures, or even “at one fine moment” stop starting. There can be a lot of reasons for this: this is the incorrect installation of drivers that conflict with the hardware of the computer, the breakdown of individual components, software, not properly optimized for the possibilities of your configuration, or a simple virus attack. Reinstalling Windows is not always the best way out of this situation, since it will inevitably lead to the loss of all data, drivers, programs and applications located on system drive(and not only on it).
Below are four ways to most effectively restore the Win 7 OS. The first three are needed when a failure has already occurred, while the fourth method will be useful to those who have not yet encountered such troubles and want to protect their computer in advance from loss of performance and reliably save all important data.
Method 1: Restore the System by Loading the Last Known Good Configuration
It often happens that even in the evening the computer worked fine, and in the morning it gives an unpleasant surprise in the form blue screen or a constant reboot with no ability to start the operating system. This may be a consequence of "cleaning" the PC from viruses and spyware, and incorrect termination of the session (for example, due to a sharp drop in mains voltage or a power outage). The most rational action in this situation would be to load the "Last Known Good Configuration". In many cases, this simple step will help get your computer back up and running, but even if it doesn't solve the problem.
Method 2: System restore using standard Windows 7 tools
This option will also not take you much time, and in general does not cause any difficulties in implementation.

Important: so that the situation does not repeat itself in the future, it is strongly not recommended to disable the "System Restore" option, it can be very useful to you.
Method 3: Restoring the Windows 7 operating system without "Restore Points"
A "restore point" is, in simple terms, a saved copy of the operating system that works without failures and errors. In other words, Windows "on its own" remembered its optimal stable state just in case it needed to be rolled back during a critical failure. So, if you, for example, have already tried the previous method and made sure that the “System Restore” option on your computer was disabled and there are no “Access Points”, respectively, then follow the following algorithm:

Method 4: optimal
For this method, you will need, first of all, to create a "Restore Point". The well-known principle “prepare the sleigh in the summer” works here. The fact is that if you independently perform a similar procedure at least once every one and a half to two months, this will help to avoid many possible problems, in particular, reinstalling the operating system with the loss of most important data.
This is important: why do "restore points" disappear?
Even if you took care of the security of the operating system in advance and kept a stable a copy of Windows by creating an "Access Point", this does not guarantee that it will not disappear in the future. This trouble can occur for the following reasons:
- Various utilities for optimizing and cleaning the system, such as Ccleaner or FreeSpace, can “demolish” the access point, mistaking it for unnecessary trash. To prevent this from happening, it is best to configure them (utilities) yourself. The System Volume Information folder must be added to the exceptions.
- If your HDD works in the FAT 32 or FAT system, then the “Restore Point”, unfortunately, will not be saved, since these systems, in principle, do not save information about the changes made.
- Some laptops, being disconnected from the network, in order to save energy, can automatically delete information about "Access Points".
- If you have two operating systems installed on your PC at the same time, for example, Windows 7 and earlier Windows XP, then when you decide to run the "younger" version, it will most likely delete all Win 7 "Access Points". Therefore, before starting XP make "Seven" inaccessible for changes.
Returning to the fourth way
So, now you know how to create an "Access Point" and how best to secure it from accidental deletion and reset. Therefore, we return to our method.
