Windows Update 8.1 errors. How to fix errors when installing Windows updates using built-in component repair. Results of verification and recovery
- CO (Update Center) problems arise for many reasons. One of them is an old version of the update center itself. When updates are released, they are signed with a certificate and the old version of CO cannot verify the certificate, which causes an endless search for updates. The latest version of the CO agent for Windows 8.1 is 7.9.9600.18628, for Windows 8 is 7.8.9200.16693, the version for Windows 7 and earlier versions up to XP is 7.6.7600.256. Now look what version do you have? You can view the version of the CO by going to the Windows directory (folder):
- 1.) We go along the path C:\Windows\system32
- 2.) In the System32 folder we find the Wuaueng.dll library
- Right-click on the file and select properties from the context menu. In the Properties window, go to the Details tab. Where is all the information.
- By comparing the information of your update center and the information on the support.microsoft.com website exactly the version of the library. If the version is outdated, then proceed to the next step, installing tso.
- To install the latest version of Windows Update, you must first go to Control Panel -> Windows Update -> Settings. Next, set it as in the picture below or check that it is like this:
- After you have everything correctly set by referring to the picture above, you need to restart the tso service. To do this, press the Win + R keys in the Run window, type services.msc, thereby making it clear that we need a services console. In the services console window, find the Windows Update service:
- Having previously selected the left mouse button, right-click and select properties in the context menu. The Windows Update properties window will open in it, click on the "stop" button, wait for the service to stop:
- After stopping the service, restart it by clicking the "start" button next to it. Wait for the service to start and check that it works correctly. Thus, you set all the default settings and restarted the Windows Update service.
- All links lead to the official website and can only be downloaded from there:
- To install a new version of TCO, you first need to install an additional update:
- After installing an additional update for your OS manually, you must restart your computer.
- After downloading and installing CO, check the performance of the center. If errors occur during the installation of CO 8.1 and server 2012 r2, go to the page where there is some information on the error code: 0x80071a91, 0x80070005, ERROR_SXS_COMPONENT_STORE_CORRUPT 0x80073712
- The Microsoft website has a Windows Update Troubleshooter that diagnoses and fixes errors, of course not in all cases, but to show how it works is my duty to you. Go to the site, namely to the page where you can download the WindowsUpdate.diagcab.exe utility for your version of the OS, I will post the link at the end of the note in this article. After downloading and running the utility for execution, you will be presented with a window, if your system is below version 10, then you may need to disable the antivirus. I have a 8.1 system and CIS cursed at the downloaded file, although it was downloaded from the official Microsoft website. I tried to download for version 10 of the OS, everything downloaded perfectly and the antivirus missed it, change the output to a newer version 10.
- In the first window, you do not need to select anything, as in the subsequent ones, unless of course you want to read the privacy statement, just click the "Next" button and wait for the utility to fix the problem. The picture below is the execution process, waiting for completion:
- After the completion of the corrections, if everything went well, then "Fixed" will be shown; otherwise, a red dot will be lit and the display is not completed. In the second case, we look at additional options.
- You can download the utility from the official website at the link below:
- You can find and view WindowsUpdate.log in a text editor, for this we press the key combination:
- Win+R
- In the "Run" window that opens, type the command "Windowsupdate.log" after confirming by pressing "Enter", Windowsupdate.log will open in a text editor, in notepad or set on your system by default:
- The format of the columns in the file will be as follows:
- On the official Microsoft website you will find information about the components in the file and examples of use:
Install a new version of Windows.
Some Windows Update packages can be downloaded from the links below:
Windows 8 and Windows Server 2012
x 86-bit versions of Windows 8 (KB2937636)
Windows 8 64-bit Editions (KB2937636)
Windows Server 2012 x64 (KB2937636)
Windows 7 SP1 and Windows Server 2008 R2 SP1
x86-based versions of Windows 7 SP1
x64-based versions of Windows 7 SP1
x86-based versions of Windows Server 2008 R2 SP1
x64-based versions of Windows Server 2008 R2 SP1
Itanium-based versions of Windows Server 2008 R2 SP1
Windows RT 8.1 and Windows Server 2012 R2
x 86-bit versions of Windows 8.1
x64-based versions of Windows 8.1
x64-based versions of Windows Server 2012 R2
Download and install Windows RT 8.1 and Windows Server 2012 R2 Update
x86-based Windows 8.1 update
x64-based Windows 8.1 update
x64-based Windows Server 2012 R2 update
Get an archive with a BAT file that will fix the update center error on its own? If you want the methods described in the article to be done automatically?
Wait 10 minutes, do not close this page. At the end of the time below, you will receive a link to download the archive.
Wait: sec.
Windows Update Troubleshooter (WindowsUpdateDiagnostic).
Select a utility for your OS version.
How to view the update log (WindowsUpdate.log)
This article covers several ways you can fix Windows Update errors.
Sometimes, when installing Windows updates, various problems and errors can occur. The most common errors that the user encounters are too long to scan or download updates, as well as an error downloading or installing an update.
CONTENT:1
How to Fix Windows Update Errors Using the Troubleshooter
If you have problems installing updates, use the Windows Update troubleshooter built into your operating system.
Run the troubleshooter by opening:
Windows Settings ➯ Update & Security ➯ Troubleshoot
On the right side of the window, in the section Run and troubleshoot select Windows Update and press the button Run the troubleshooter

This will launch the troubleshooting tool.
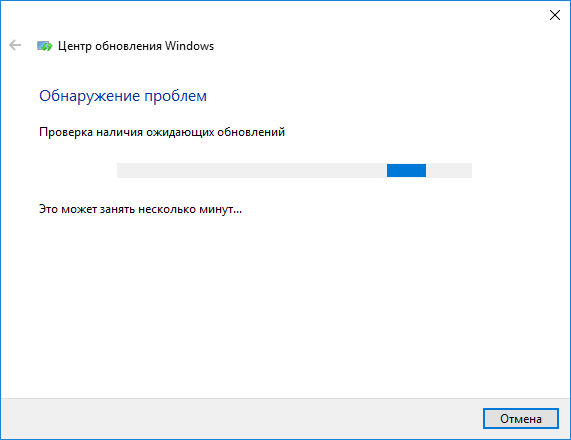
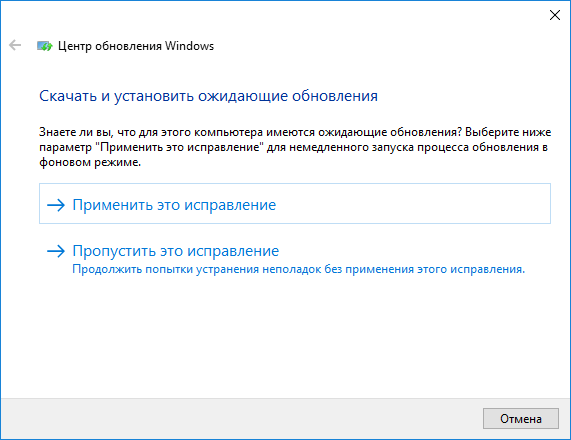
When the scan is completed, some of the problems may be fixed automatically. For other problems, you can choose Apply fix or Skip fix for other troubleshooting or exit the wizard.
At the end of the utility, information about detected and fixed problems, as well as problems that could not be fixed in automatic mode, will appear. Click the Close button and restart your computer. After the reboot, try installing the updates again on Windows Update.

If the built-in troubleshooter failed to fix Windows Update errors, use the following method.
How to Fix Windows Update Errors by Restarting Services
If the update takes too long to download (hangs), then you should try stopping and starting (restarting) the services associated with Windows Update.
Stopping services:
How to Fix Windows Update Errors by Clearing the Update Cache
The operating system saves update files to the "SoftwareDistribution" folder in the Windows system directory
To clear the update cache, run the following commands as an administrator and sequentially:
attrib -r -s -h /s /d "%SYSTEMROOT%\SoftwareDistribution"
del "%SYSTEMROOT%\SoftwareDistribution" /q /s

How to Fix Windows Update Errors Using "Reset Windows Update Agent"
"Reset Windows Update Agent" is a tool that will help you fix errors and problems when updating Windows. This script will be useful when system updates are not detected, downloaded or installed.
"Reset Windows Update Agent" allows you to fix errors in related components, instead of using more drastic measures, such as before
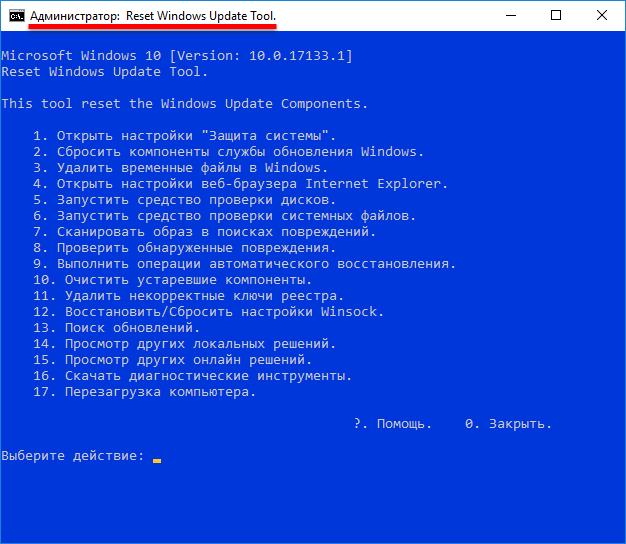
Run the script as an administrator, after that the tool will offer the following options for fixing problems and errors updating the Windows operating system:1. Open the "System Protection" settings.
2. Reset Windows Update Service Components.
3. Delete temporary files in Windows.
4. Open Internet Explorer web browser settings.
5. Run the disk checker.
6. Run the System File Checker.
7. Scan the image for damage.
8. Check for any damage found.
9. Perform automatic recovery operations.
10. Clean up obsolete components.
11. Remove incorrect registry keys.
12. Restore/Reset Winsock settings.
13. Search for updates.
14. View other local solutions.
15. View other online solutions.
16. Download diagnostic tools.
17. Reboot the computer.
The "Reset Windows Update Agent" can be especially useful in cases of data corruption, such as when a hard drive crashes or services and registry keys are modified by malware. This script is compatible with all Microsoft-supported Windows server and client operating systems.
The above methods should help you fix Windows Update installation errors.
At the next automatic update of the Windows 8 / 8.1 operating system, you may stumble upon error 80246013. Errors when updating the OS are already quite familiar, and when you install it, the thought always appears in your head that something will happen now .
So, for this error, there are a huge number of reasons why it can occur on your computer. However, most often it manifests itself due to corrupted files or problems with certain permissions.
One way or another, let's immediately move on to possible solutions to error 80246013. There will be two of them in this article: restarting the Windows Update Service and resetting the Windows Update components.
Ways to solve error 80246013
Method #1 Reset Windows Update components
- Right-click on Start and select "Command Prompt (Admin)".
- Next, you need to enter the following commands at the command prompt to stop the BITS and Windows Update services:
- net stop bits
- net stop wuauserver
- net stop appidsvc
- net stop cryptsvc
- Now you need to delete the file qmgr*.dat. Enter the command on the command line Del "%ALLUSERSPROFILE%\Application Data\Microsoft\Network\Downloader\qmgr*.dat" and press Enter.
- Next we need to rename the folders Software Distribution And catroot2. Just enter the following two commands on the command line: Ren %systemroot%\SoftwareDistribution SoftwareDistribution.bak And Ren %systemroot%\system32\catroot2 catroot2.bak.
- The next step is to reset the BITS service and Windows Update. Enter the following commands on the command line:
- exe sdset bits D:(A;;CCLCSWRPWPDTLOCRRC;;;SY)(A;;CCDCLCSWRPWPDTLOCRSDRCWDWO;;;BA)(A;;CCLCSWLOCRRC;;;AU)(A;;CCLCSWRPWPDTLOCRRC;;;PU)
- exe sdset wuauserv D:(A;;CCLCSWRPWPDTLOCRRC;;;SY)(A;;CCDCLCSWRPWPDTLOCRSDRCWDWO;;;BA)(A;;CCLCSWLOCRRC;;;AU)(A;;CCLCSWRPWPDTLOCRRC;;;PU)
- Then enter on the command line cd /d %windir%\system32 and press Enter.
- Now you need to re-register the BITS and Windows Update components. To do this, enter the commands:
- regsvr32.exe atl.dll
- regsvr32.exe urlmon.dll
- regsvr32.exe mshtml.dll
- regsvr32.exe shdocvw.dll
- regsvr32.exe browseui.dll
- regsvr32.exe jscript.dll
- regsvr32.exe vbscript.dll
- regsvr32.exe scrrun.dll
- regsvr32.exe msxml.dll
- regsvr32.exe msxml3.dll
- regsvr32.exe msxml6.dll
- regsvr32.exe actxprxy.dll
- regsvr32.exe softpub.dll
- regsvr32.exe wintrust.dll
- regsvr32.exe dssenh.dll
- regsvr32.exe rsaenh.dll
- regsvr32.exe gpkcsp.dll
- regsvr32.exe sccbase.dll
- regsvr32.exe slbcsp.dll
- regsvr32.exe cryptdlg.dll
- regsvr32.exe oleaut32.dll
- regsvr32.exe ole32.dll
- regsvr32.exe shell32.dll
- regsvr32.exe initpki.dll
- regsvr32.exe wuapi.dll
- regsvr32.exe wuaueng.dll
- regsvr32.exe wuaueng1.dll
- regsvr32.exe wucltui.dll
- regsvr32.exe wups.dll
- regsvr32.exe wups2.dll
- regsvr32.exe wuweb.dll
- regsvr32.exe qmgr.dll
- regsvr32.exe qmgrprxy.dll
- regsvr32.exe wucltux.dll
- regsvr32.exe muweb.dll
- regsvr32.exe wuwebv.dll
- After the re-registration is completed, you need to delete the damaged entries from the Windows Registry. To do this, do the following:
- Click Win+R and do regedit.
- Go through the left panel to the section HKEY_LOCAL_MACHINE\COMPONENTS
- Delete PendingXmlIdentifier, NextQueueEntryIndex And AdvancedInstallersNeedResolving and then restart your computer.
- Let's move on to resetting Winsock. To do this, enter on the command line netsh winsock reset and press Enter.
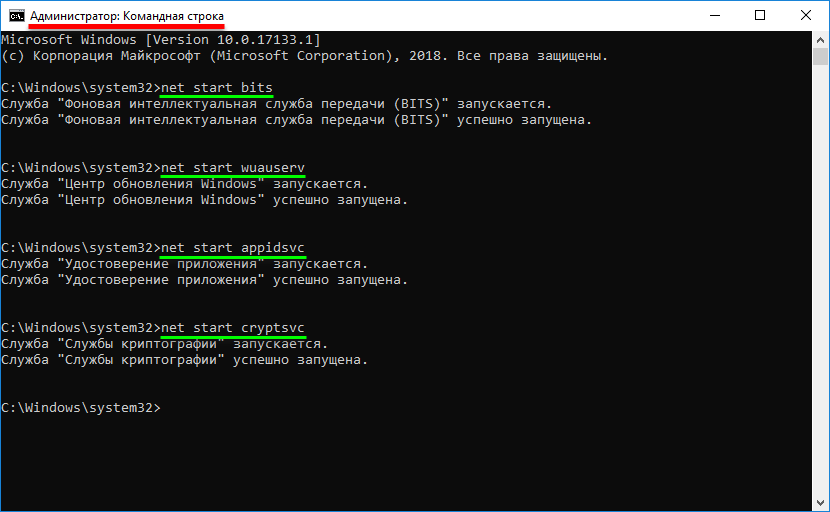
- Now you need to restart the previously stopped BITS and Windows AC services. Type in the command line:
- net start bits
- net start wuauserver
- net start appidsvc
- net start cryptsvc
Method #2 Restart Windows Update Services
- Click Win+R and do services.msc
- Locate the BIST and Windows Update services in the list, and double-click each of them.
- Check if these services are running. If not, then click on the "Run" button, and also select the "Startup Type - Automatic" setting.
That's all. These methods are already widely known and can be found in a very large number of different articles that describe problems similar to error 80246013. Simply put, the error numbers may be different, but the solutions for them are almost the same.
As you know, developers are constantly working on improving their applications, and regularly publish updates to them. However, in practice, it often happens that for some reason programs in automatic mode stop updating. Therefore, we will devote this article to an analysis of the issue, which is why Windows 8 updates are not downloaded, and what can be done to fix this problem.
For information about updating PC software, see Windows Update for all the information you need.
You can view its log in the following way:
- By clicking on the Win + C desktop, go to the "Settings" tab, and then sequentially: "Change computer settings" - "Update and recovery".
- Clicking on the link "View update history" will open the required window.
 First of all, if problems of this kind are found, it is necessary to resort to the help of the troubleshooting tool of the Update Center, which checks automatically. Often such actions lead to the desired result.
What to do if applications do not update
If you still cannot update any individual or several programs automatically, you should:
- try doing it manually. In practice, it happens that errors occur due to poorly chosen execution time, caused by the load of Internet sites, low network connectivity, or a number of other factors;
- if the terms of the license agreement for the use of the software in question were not initially accepted, reinstall it, read and accept the terms of the license;
- check if there is enough free space on the device to download the change package for a particular program. You may need from temporary Internet files, unused files, unnecessary programs, etc., and then repeat the installation. You can check the amount of available disk space by using the Disk Cleanup tool included with Windows;
- check the Internet connection, and whether the process of downloading changes was stopped on its own;
- analyze which Windows 8 applications are not updated. Quite often, updates to device drivers, for example, video adapters, cause errors because the files being installed either do not match the OS installed on the user's computer or are damaged. A list of all the latest drivers for the operating system installed on the computer in question should be generated automatically by Windows Update, so if you have any difficulties, you should contact the device manufacturer.
Windows 8 updates not installing: Video
Computer freezes while searching for and installing updates
In Windows 8, application update problems come in a variety of ways, and PC freezes are among the most common.
Therefore, if the computer stops responding to user requests while searching for updates, you must:
- re-check for suitable updates;
- if this step does not work, try troubleshooting through Windows Update;
- look for the answer in the documentation for the device or on the websites of the developers.
If the computer stopped responding after the system was rebooted as a result of installing updates, you must use the "" function and roll back the OS to a previously saved state.
Windows 8 apps won't update: Video
Since the release of the first Windows 10 update, Microsoft has been very intensive in supporting the operating system. Releasing two patches every month to update. One patch for security, the second for system maintenance (fixing bugs, lags, interface improvements, design, etc.). However, many users have to solve problems every month when installing windows 10 updates. After some time from user complaints, Microsoft released a tool that fixes a large number of errors when installing updates in Windows 10/8. You can fix common error codes in windows update: 0x80073712, 0x800705B4, 0x80004005, 0x8024402F, 0x80070002, 0x80070643, 0x80070003, 0x8024200B, 0x80070422, 0x8007 We will cover more methods than one tool from Microsoft and solve many errors when updating or installing Windows 10 updates.
How to fix windows 10 update errors
Let's start with the built-in version for fixing errors when updating. To do this, open " Parameters" > "Updates and Security" > "Troubleshooting" > "Windows Update" and press " Run the troubleshooter".
Windows 10 Update Troubleshooter
Microsoft has released a tool to fix errors when updating Windows 10, Windows 8.1, Windows 7. I have collected all the popular ones in the system. Just follow the link and download or follow below steps.
- Go to microsoft website and download the diagnostic program.
- Select system version and download Troubleshooter in Windows Update.
- For other versions of Windows 8.1, Windows 7, follow the points on the site, check the points, and then you will solve many problems related to the network update.

Resetting the Update Cache in Windows 10
Sometimes it happens that the update cache in Windows 10 can become corrupted, which causes a bunch of errors with various codes. This method is especially helpful when.
- Run command prompt as administrator. (see how to start below).
- Copy the commands below, paste them all at once into the "command line" and press Enter.
net stop wuauserver
net stop cryptSvc
net stop bits
net stop msiserver
ren C:\Windows\SoftwareDistribution SoftwareDistribution.old
ren C:\Windows\System32\catroot2 catroot2.old
net start wuauserver
net start cryptSvc
net start bits
net start msiserver pause
If your process stops at the line net start msiserver pause, click Enter. After a successful operation, close Command Prompt, open Settings > Update & Security and click " Check for updates".

Fix Windows 10 Update Errors with DISM
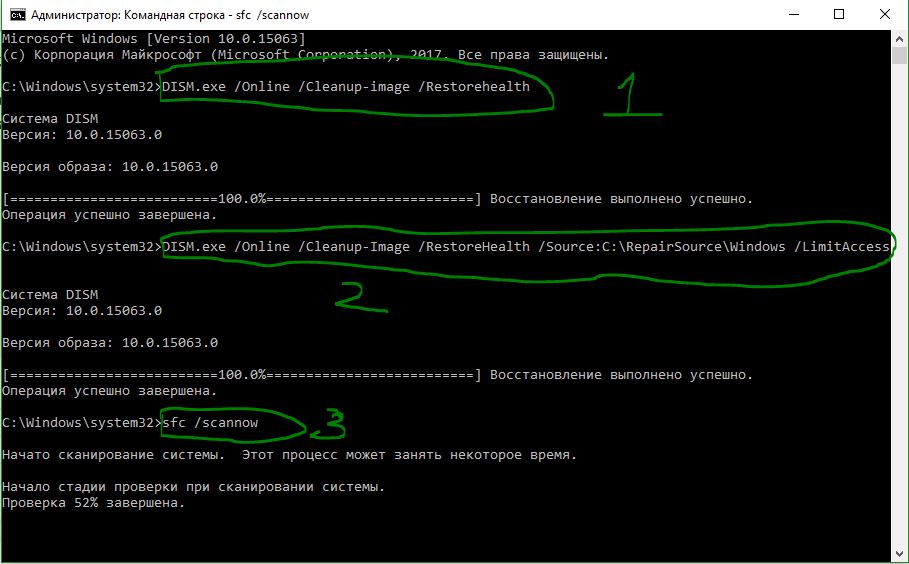
We will fix it using the command line and the DISM parameter. Open command prompt as administrator.

Enter or copy the following commands in order:
- DISM.exe /Online /Cleanup-image /Restorehealth
- DISM.exe /Online /Cleanup-Image /RestoreHealth /Source:C:\RepairSource\Windows /LimitAccess
- sfc /scannow
Wait after each command for 100% of the result and do not turn off the Internet and the computer from the network.
Stopping and starting services will fix windows 10 update errors
One of the common reasons that Windows cannot update or install updates may be that services are blocked by other software processes. You can try restarting your computer and free some processes. If it doesn’t help, then we will analyze the method using the command BITS, stop and restart the services associated with the windows update center. Open command line as administrator and enter the following commands in order:
Stopping services:
- net stop bits
- net stop wuauserver
- net stop appidsvc
- net stop cryptsvc
Starting services:
- net start bits
- net start wuauserver
- net start appidsvc
- net start cryptsvc

Clear SoftwareDistribution Folder in Windows 10
The problem sometimes lies in the folder Software Distribution where the windows update files themselves are stored. When the system downloads updates, they are stored in that folder. After successful installation of updates, WUAgent deletes all old content from this folder, but sometimes these processes go astray and the folder remains with different files. We will manually clear the SoftwareDistribution folder so that there are no crashes and errors when installing windows updates. Open a command prompt as an administrator and enter the following commands:
- net stop wuauserver
- net stop bits

Now let's go to the folder itself and delete all the contents in it. Navigate to the computer along the path C:\Windows\SoftwareDistribution and delete all files in that folder. If for some reason the files are not deleted, then try restarting the computer, or better, repeat the above steps again. After deleting the files, the problems should disappear, but as we remember, we stopped the two Update and WUAgent services, now we will start them back. Open CMD and enter the following commands:
- net start wuauserver
- net start bits
Reset and restore the catroot2 folder
Catroot and catroot2 are Windows operating system folders that are required for the Windows update process. When you run Windows Update, the catroot2 folder stores the Windows Update signatures and helps you install it. Resetting and restoring the catroot2 folder solves many errors when updating or installing Windows 10 updates. To reset the catroot2 folder, run a command prompt as an administrator and type the following commands, pressing enter after each one:
- net stop cryptsvc
- md %systemroot%\system32\catroot2.old
- xcopy %systemroot%\system32\catroot2 %systemroot%\system32\catroot2.old /s
Delete now all the contents of the catroot2 folder along the path C:\Windows\System32\catroot2
After removal, enter the command net start cryptsvc .
If you run Windows Update again, the catalog folder will be reset.

Do not delete or rename the folder Catroot. The Catroot2 folder is automatically recreated by Windows, but the Catroot folder is not recreated if it is renamed. If you find that the catroot or catroot2 folder is missing or not recreated if you accidentally deleted it, you can create a new folder with that name in the System32 folder, restart your computer, and then run Windows Update.
