Operative test. Program for testing RAM MemTest86: how to use? Instruction. The most reliable option for testing RAM is
If you began to notice the unstable operation of the system, the reason may be the presence of errors in the performance of RAM. And to make sure that the problems are with the RAM, I suggest you use the following methods: with a hidden tool, which is part of Windows or a third-party, but more advanced and informative program, which will be discussed later in this article.
The operation algorithm of both tools is the same: first, data is written to each sector of the RAM in repetitions, i.e. again and again. Then the program reads and compares the received data, and if at least one discrepancy is found, we can assume that the RAM is faulty. And how to fix it?
Method 1: Run Memory Diagnostics in Windows 7, 8, 10
To run the built-in memory tester in Windows, start typing the word "diagnostics" in the search box, and select "diagnose computer RAM problems."
After that, to run the test, you need to accept the offer and restart your computer:

After the reboot, the Windows memory test screen will open and testing will begin. At this point, you don't have to do anything, just wait for the scan to finish, which will take a few minutes. If any errors are found during the process, in paragraph "condition" it will be written about.

After completion, the computer will automatically restart and display the results of the scan.
But! In some cases, in particular in Windows 10, the result may appear after some time or not appear at all.
If you have such a situation, the result must be searched manually. To do this, right-click on the Start menu and select . If you have Windows 7, press the combination Win+R, in the dialog box that appears, enter eventvwr.msc and press Enter.

A window will open where you need to select Windows Logs > System and you will see a list of a large number of events. Click "Find" in the right pane.
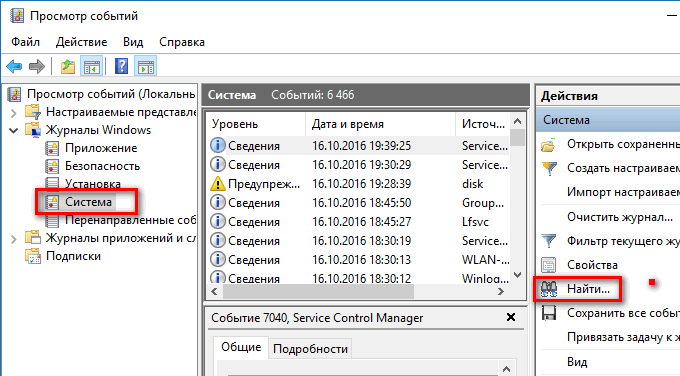
Enter "MemoryDiagnostic" in the field, click Find Next and you will see the details of the results.
Method 2: Program MemTest86
If you want a more powerful memory test tool, you can download and use MemTest86. The utility can perform a wide range of different tests, unlike the previous tool. For your purposes, the free version of MemTest86+ should suffice (the free version has a plus sign at the end of the name, the paid version doesn't). However, the program is not being actively developed and it is reported that it does not work properly on some newer computers.
Both versions are standalone and bootable. You can download the ISO image from the official website (I recommend) and burn it to a CD / DVD disc, or you can copy the USB image to a USB flash drive. To do this, just run .exe file(find among the files that you downloaded), and connect a blank USB flash drive to the computer. Otherwise, all content will be deleted.
After you make bootable media, restart your computer and boot from the USB flash drive (after connecting it to the computer). After that, the program will automatically start and start the scanning process one by one, informing you about errors if any. The process will continue until you decide to stop it, allowing you to check how the RAM behaves over a longer period of time. Details of any errors will be displayed on the screen. If you want to end the test, just press the key ESC.

If the tests reveal errors, then the RAM is faulty and needs to be replaced. It is also quite possible that it is not compatible with the motherboard. Try to pull out the RAM sticks, clean the slots and contacts of the RAM itself (as an option, try installing RAM in other slots), or it's best to buy a new one, especially if you have a problem with insufficient memory, besides, today their price is not high.
It is worth noting that these tips also apply to the so-called "parity error" of the RAM, which emits 2 short beeps when the computer is turned on.
After making changes, run the check again to make sure that the problem does not reoccur.
It may be necessary to check the performance of RAM in cases where there is a suspicion that the blue screens of death of Windows, oddities in the operation of the computer and Windows are caused precisely by problems with RAM.
This guide will look at the main symptoms of failing memory and walk you through the steps to test your RAM to see if it's the problem using the built-in memory test utility in Windows 10, 8 and Windows 7, as well as using third-party free program memtest86+.
Symptoms of RAM errors
There are a significant number of indicators of RAM failures, among the most common symptoms are the following
- Frequent occurrence of BSOD - Windows blue screen of death. It is not always connected with RAM (more often with the work of device drivers), but its errors can be one of the reasons.
- Crashes during heavy use of RAM - in games, 3D applications, video editing and graphics, archiving and unpacking archives (for example, an unarc.dll error is often due to problematic memory).
- A distorted image on the monitor is more often a sign of video card problems, but in some cases it is caused by RAM errors.
- Computer won't boot and beeps endlessly. You can look up the beep charts for your motherboard and see if the audible beep is consistent with memory failures.
Once again, the presence of any of these symptoms does not mean that the matter is in the computer's RAM, but it is worth checking it. The unspoken standard for this task is the small memtest86+ utility for checking RAM, but there is also a built-in Windows Memory Diagnistics Tool that allows you to check RAM without third-party programs. Both options will be discussed next.
Windows 10, 8 and Windows 7 Memory Diagnostic Tool
The Memory Checker (Diagnostic Tool) is a built-in Windows utility that allows you to check RAM for errors. To launch it, you can press the Win + R keys on your keyboard, type mdsched and press Enter (or use the Windows 10 and 8 search and start typing the word “check”).

After running the utility, you will be prompted to restart the computer to perform a memory check for errors.

We agree and wait for the scan to start after a reboot (which in this case takes longer than usual).

During the scanning process, you can press the F1 key to change the scan settings, in particular, you can change the following settings:
- The type of check is basic, normal, or wide.
- Cache usage (on, off)
- Number of test passes

Upon completion of the verification process, the computer will restart, and after logging in, it will display the results of the verification.
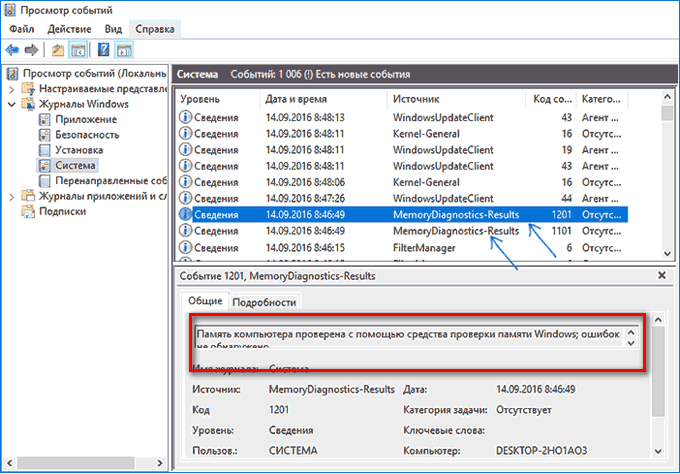
However, there is one caveat - in my test (Windows 10), the result appeared after a few minutes in the form of a short notification, it is also reported that sometimes it may not appear at all. In this situation, you can use the Windows Event Viewer utility (use search to launch it).
In the Event Viewer, select "Windows Logs" - "System" and find information about the results of the memory test - MemoryDiagnostics-Results (in the details window by double-clicking or at the bottom of the window you will see a result, for example, "Computer memory was checked using the Windows Memory Tester; no errors found."

Checking RAM in memtest86+
You can download memtest for free from the official website http://www.memtest.org/ (download links are at the bottom of the main page). It is best to download the ISO file in a ZIP archive. This option will be used here.
Note: there are two sites on the Internet at the request of memtest - with the memtest86+ program and Passmark Memtest86. Actually, it's the same thing (except that the second site has a paid product in addition to the free program), but I recommend using memtest.org as a source.

- The next step is to burn the ISO image with memtest (after extracting it from the ZIP archive) to disk. If you want to make a bootable flash drive with memtest, then the site has a kit for automatically creating such a flash drive.
- Best of all, if you check the memory, you will be one module at a time. That is, we open the computer, remove all the RAM modules, except for one, and perform its check. After the end - the next and so on. In this way, it will be possible to accurately identify the failed module.
- After the boot drive is ready, insert it into the disk reader in the BIOS, set the boot from the disk (flash drive) and, after saving the settings, the memtest utility will load.
- No action is required on your part, the check will start automatically.
- After the memory check is complete, you will be able to see what RAM memory errors have been found. If necessary, write them down so that you can later find on the Internet what it is and what to do with it. You can interrupt the scan at any time by pressing the Esc key.

Checking RAM in memtest
In case there are errors, it will look like in the picture below.

RAM errors identified by the test
What should I do if memtest finds RAM errors? - If failures seriously interfere with work, then the cheapest way is to replace the problematic RAM module, besides, the price is not so high today. Although sometimes a simple cleaning of the memory contacts helps, and sometimes a problem in the operation of the RAM can be caused by malfunctions of the connector or components of the motherboard.
How reliable is this test? - reliable enough to test the RAM on most computers, however, as is the case with any other test, you cannot be 100% sure of the correctness of the result.
Problems associated with RAM are very diverse. Computer stopped turning on? One of the likely culprits is the RAM. Ripples on the screen? Perhaps she is too. Programs won't start, files won't open? And here it was not without her. What can we say about the blue screens of death (BSoD), because this is the most important symptom of a RAM malfunction. Let's talk about what causes RAM failures and how to check it for errors.
If the failure manifested itself immediately after installing a new RAM module on the computer, it can be caused by:
- Incomplete installation of memory in the slot.
- Oxidation of the surface of the contact comb of the memory strip due to long-term storage. Oxidized contacts usually look dull and darkened.
- The incompatibility of RAM modules with each other (if there are several) or with the processor (chipset on older PCs), more precisely, with the memory controller built into them.
- Inoperability of the new module due to manufacturing defects.
- Malfunction of the RAM slot on the motherboard.
What to do to diagnose and fix the problem:
- Check that the memory is installed correctly in the slots. The side fasteners must be latched.
- To remove the oxide layer from metal contacts, gently clean them with a school eraser.
- Install the bar in the adjacent slot (if any).
- Reset your computer's BIOS to default settings.
- To rule out incompatibility of memory modules, try starting the computer with only one of them, as well as with several in different combinations.
- Update the BIOS with a known-good and correct memory stick.

The cause of a RAM failure that occurs after the computer has been working normally for a while can be:
- Changing the timings and frequency of RAM in the BIOS, setting the wrong XMP profile, overclocking.
- Strip falling out of the slot (often found on laptops).
- Contact oxidation.
- Factory marriage (sometimes it makes itself felt after months of using the device), degradation.
- Mechanical or electrical failure of the memory subsystem components.
What can be done:
- Make sure the module is installed correctly in the slot.
- Reset BIOS settings to default.
- Remove the module from the socket and clean the contact comb with a rubber band.
- Check the memory for errors using special programs. This is what will be discussed further.
Checking memory for errors using programs
- Turn on the computer at least half an hour before the start of testing to “warm up” the unit and power circuits.
- Test under the same conditions under which the failure occurs.
- If your computer has multiple memory modules, test the entire set the first time you run the test program. If errors are found, repeat testing each bar separately.
The average duration of a complete test cycle is 6-8 hours, the number of passes (repetitions of test sets) is 8-15. As practice shows, the bulk of errors are detected already during the first or second pass, but some - only after multiple passes. If errors are found, further verification can be omitted.
How to interpret the results
Even one identified error indicates a potential malfunction of the RAM. However, this is not a reason to immediately throw it in the trash. Sometimes errors are caused by something that interacts with the memory, such as a bad slot, a power failure, or a defect in the data lines. Often the memory is “buggy” due to poorly chosen timings and frequencies. To make the errors disappear, it is enough to return the default settings to it.
Windows Memory Checker
Sometimes you hear that the RAM checker built into Windows cannot be trusted. It never reveals anything. This is an incorrect statement: if the program is configured correctly, its results are no less reliable than those of specialized utilities, which will be discussed below.
So, to run the built-in Windows memory checker, save open documents and enter the name of the utility in the system search box - mdsched. Select it from the list of found ones.

After clicking on the first item in this window, the computer will restart and the checker will begin its work. Unfortunately, it is not optimally configured by default. To stop the current testing and go to the utility settings, press the F1 key.
The screenshot below shows the parameters to be set:
- The set of tests is wide.
- Cache (processor memory) - disabled.
- The number of passes is 8-15.
To go to each subsequent item, press the Tab key.

Press F10 to save the setting and start the testing process.
The list of found errors is displayed directly on the screen - in the "Status" field, but you do not need to monitor the operation of the program and continuously look at the monitor. After the scan is completed, the computer will restart, and a message with the results will open on the desktop.
GoldMemory
The GoldMemory PC RAM health check utility is considered one of the best in its class. It is built on non-standard algorithms that are able to catch errors that competitor applications miss. It implements full support for 64-bit architecture and compatibility with all types of legacy and modern RAM, including the DDR4 generation. The maximum amount of memory tested is 64 GB/1 TB.
GoldMemory operates in three main test modes - fast, normal and advanced, as well as a custom one, where the duration of testing and sets of test groups are set manually. In addition, the program saves history, maintains reports and supports management using batch files.

Unfortunately, GoldMemory is a paid product intended for commercial use. The 30-day demo version, available for free download, works with significant limitations and does not allow you to evaluate the full functionality of the program.
Checking RAM using GoldMemory is carried out outside the operating system, more precisely, in DOS mode. That is, before using the program, you must write it to a USB flash drive, floppy disk or CD / DVD disk from which you will boot the computer. Ready-made images for writing to removable media are posted on the official website. There is also a brief instruction on how to use the utility.

After booting the PC from the drive on which GoldMemory is recorded, testing starts automatically. Found errors are recorded in reports and displayed in the program interface in red symbols.
Memtest86
Behind the "shoulders" of the Memtest86 memory test tool is a 20-year history of development. This is, perhaps, the most famous product in its class, which has become a kind of benchmark that competing application developers are guided by. Unlike GoldMemory, Memtest86 has a free full version for home users. Paid editions (yes, they also exist) additionally include several advanced tests, also have support for reporting and management functionality using configuration files.

Memtest86 is even easier to use than both of the tools above. The free edition is optimally configured by default, so the user only needs to run a scan and glance at the screen from time to time. Found errors are also displayed in red.

Memtest86, like GoldMemory, runs from bootable media. Ready-made images for transferring the utility to an optical disk or USB flash drive are available for download on the official website. By the way, in the archive with the program there is an instruction for its use in English.
At the end of the article, I cannot fail to mention one more tool that was once very popular. This is Memtest86+ . The utility is very similar in structure to Memtest86 and is based on the same technologies, but is now hopelessly outdated, since it has ceased its development since 2013.
RAM ( RAM) is one of the most important parts in a computer. Without it, he simply can not turn on. Due to problems with it, various problems with the performance of the system often occur. Below I will list the most common problems related to RAM.
- Computer freezing during active use and loss of information.
- Blue screen or screen of death ( may be one of the reasons for this).
- Computer won't turn on usually makes a sound that indicates a problem).
- Frequent, unexpected computer restarts that happen on their own.
Please note that the methods below do not fix the problems, but only notify you that they exist.
If errors are found in the memory, you can try to contact the seller for a guarantee ( if she is), but most likely you just need to replace it with a new one. Sticks with RAM are not very expensive and the replacement process is quite simple.
There are two ways to check for problems with it. If you have Windows 7, 8 and later versions, then you can use the check in the operating system itself. There is a special utility for this. There is no need to download it.
For earlier versions ( e.g. XP) you can use a solution like Memtest86. However, I recommend using this particular program in any case, as it is regularly updated, unlike the built-in Windows diagnostic tools.
Memory check in Windows
Find a utility that will test.
Go to Start Menu >> All Programs >> Administrative Tools ( or standard) >> Memory Checker.
In the window that appears, select "Restart and verify" and restart your computer.

You will see the RAM check process window. If errors are found, a corresponding warning will appear. Wait for the end. It took me about 15 minutes. You may have longer. It depends on the parameters of the test and the computer.

By pressing the "F1" key you can open the options. They have additional settings. There are 3 types of tests in total:
- Base.
- Usual.
- Wide.
The longest and most revealing is the wide one. It uses all functionality. Normal works by default. For a quick check, it is recommended to use the basic one. You can also set the number of checks here. Switching between items is carried out by arrows on the keyboard.

Checking with Memtest86
Download the free Memtest program on your computer ( in English). It is constantly updated and can more effectively check the RAM, unlike the utility in Windows.

And transfer the installation file to a USB flash drive. Then run. In the window that appears, select the letter of your device and click Create. If an error appears, try checking the box for formatting. If there is no flash drive, then you can download and burn the image to disk.
Attention! All data will be deleted and there will be ( if ticked). You will receive after the end of the process.


Errors will be highlighted in red if they exist). I didn't find them. If you want to stop checking, press the Esc key.
I suggest watching a video on working with this program.
Did you find errors in RAM?
As you know, the RAM of any modern computer device, be it a stationary terminal, laptop, netbook or mobile gadget, involves the use of temporary data storage for the same clipboard or currently running applications. Its functioning can drastically affect the entire system as a whole. Let's see which RAM test program is the best.
Why do you need to check the "RAM"?
The main problem associated with diagnosing the state of RAM is that today there are quite a lot of viruses in the world that can programmatically affect its performance.

Not that they penetrated the "iron" component itself, no. But the result of the impact at the level of a computer system can manifest itself in the most unusual way.

You don't have to go far. Probably, many users have seen the so-called blue screen of death, which displays an error like “Dump of physical memory”. This is an overload of "RAM". In other words, it simply cannot handle a very large number of concurrent requests.
This could be due to many reasons. And even the viral impact is not always the key. In stationary computers, contacts may even come off if the memory stick is not inserted correctly. Nevertheless, any, even "native" program for testing RAM in the system itself, allows us to draw a conclusion about its condition.

Not to mention the latest generation of Windows OS tools, it is worth noting that utilities such as CPU-Z or Everest allow you to get maximum information about the device.
Initial settings
If you are already wondering which program for testing RAM for errors is best, you first need to change some settings of the computer system related to the BIOS.

It is strongly recommended that you reset all settings to their default settings. In principle, almost all BIOS versions provide such a function. In extreme cases, in stationary computers, you can remove the battery on the motherboard (a tablet similar to the one that is inserted into an electronic watch). After removing it, you need to wait 5-10 minutes, and then insert it back and turn on the system.
For laptops, this option is not applicable. Here you have to use only the software method in the BIOS settings. After rebooting the system, the program for testing the computer's RAM will be able to make the most of all its main and hidden functions. Note that for a full test of the “RAM”, preliminary settings in the BIOS are required.
Program for testing RAM Windows XP
Unfortunately, the version of Windows XP does not provide its own "RAM" diagnostic tools. Therefore, to begin with, you can use at least anti-virus utilities such as Kaspersky Rescue Disc, which are loaded from optical media even before Windows starts. Viruses "living" in RAM or affecting it in one way or another will be found and destroyed.

On the other hand, you can also use such utilities, for example, as a program for testing RAM in Russian Memtest or CleanMem. By the way, according to many experts and users, they are the most relevant today.
Program for testing RAM Windows 7
Users of Windows versions of the "seven", "eight" or the long-awaited "tens" were more fortunate in this regard. There are built-in diagnostic tools. The easiest way to call the program for testing RAM is to use the command line or the "Run" menu, where you need to register mdsched, after which the utility will start.

Two options will be offered here: either restart the system with a subsequent check (which is recommended), or check the “RAM” the next time you turn it on. In principle, both methods do not differ much from each other, so here the decision of the issue remains with the user himself.
Virus problems
Virus attacks can also lead to the fact that some malicious programs, so to speak, settle in RAM, and extracting them from there is not so easy.
The fact is that when loading the “OS”, one way or another, it still accesses the RAM, so the program for testing the computer’s RAM in the form of the same antivirus should start even before the entire system starts. Naturally, such utilities should be launched from removable media such as a CD / DVD disk or USB device.
Third Party Utilities
As for the diverse software that runs in the Windows environment, it is worth noting programs like MemTest 4.1, Mem Reduct 3.0.436, RamSmash 2.6.17, CleanMem 2.5.0, SuperRam 6.7.13 (the most popular and effective assemblies are indicated), etc. . Most of these utilities are free. Naturally, among the Pro-versions, you can also find quite expensive applications with advanced features, however, it seems that the free set is enough for the average user.
How it works
Now a few words about how the means of checking "RAM" work. For example, antiviruses or standard utilities use a purely software method, scanning the “RAM” for calls to it by some application or system process.

More serious programs are even capable of performing tests for connecting brackets to the motherboard.
What to do if you find problems when buying a new bar
Now you can dwell on the question of which program for testing RAM is best suited when going to the store. It is clear that immediately, like this on the fly, you cannot insert a new bar into a laptop. In this case, we are talking about stationary terminals, where additional memory can be installed on the "motherboard" in special PCI slots.
It does not play a fundamental role which utility will be launched to conduct the test. In any case, it will determine both the bar model and its state in terms of performance. If the memory is not detected, or characteristics are given that are obviously different from the specified factory ones, it is better to simply return the product, since, most likely, this is some kind of fake. With the Chinese, you need to be doubly careful. The stamp of a well-known brand does not yet guarantee that the quality will be at the highest level. How many cases are known that when buying a 2-gig memory stick, it actually turns out to be a gig or even 512 MB (although the marking claims that this is exactly 2 GB). As it is already clear, it is better to contact authorized representative offices or salons, where you can definitely trust the quality of the purchased products.
Conclusion
One last piece of advice. Today, many people use smartphones to communicate. Do not be lazy, download some barcode scanner, and the problem of recognizing low-quality goods will disappear by itself. It will be enough just to point the main camera at the label and scan. After that, all information about the product will be displayed.
As for the purchase of RAM sticks from your hands, it is better to immediately test for its performance. At the very least, you should at least trust the source of the purchase.
