Zyxel keenetic ultra ii connection. Setting up Zyxel Keenetic in repeater mode (amplifier). We use a Zyxel router to expand the Wi-Fi network. Possible malfunctions and ways to eliminate them
Almost every modern Wi-Fi router can work in repeater mode. Zyxel routers are no exception. All router Zyxel Keenetic can be used to expand the coverage area of an existing network. You just need to make some settings. Thanks to Alexey, who in the comments to this article told me what and how, I figured it out, tested it, and now I'll tell you how to set up the "Amplifier" mode on Zyxel devices.
The article is suitable for all devices starting with NDMS V2.05 firmware. In any case, if during the setup process you see that you do not have the opportunity to select the desired mode of operation, you can.
A little theory:
What is repeater mode? This is when the router amplifies an existing Wi-Fi network. It’s better to tell with an example: you already have one Wi-Fi router installed. It doesn't matter which one. It can be Zyxel, Tp-Link, Asus, D-Link, etc. But, wireless network coverage may not be throughout the house or apartment. Simply put, due to a weak router, Wi-Fi does not catch you in all rooms. Or catches, but not stable. There are special devices called repeaters (repeaters). They take the Internet via Wi-Fi from the first router, and transmit it further. That is, amplify the signal. Exactly the same function is available in Zyxel routers. It's called "Amplifier".
Our Zyxel Keenetic router will connect to an existing network and will strengthen it. At the same time, there will be one Wi-Fi network (with one name), throughout the house and, of course, with one password. Devices will automatically switch from one router to another (where the network is stronger). You won't even notice it. But the range of your Wi-Fi network will increase significantly.
Very often the question is asked: "Is there Internet via cable, in repeater mode?" I checked that the Internet via cable works on Zyxel Keenetic Start.
I will show the setup process using the Asus router as an example, it will be our main one. And, which we recently, will be with us as a repeater. As I wrote above, I tested everything, no problems arose.
Your main router must be configured, it must distribute the Internet via a Wi-Fi network. You do not need to perform any special settings on the main router.
Set up Zyxel as a repeater. Operating mode - "Amplifier"
First, you need to change the mode of operation of our Zyxel to "Amplifier". You can do this in the control panel of the router. And only if you have a Keenetic Lite III model, then you need to change the operating mode with a special switch on the back of the device. Select the "Amplifier" mode, and skip the mode selection in the control panel. If you do not have Keenetic Lite III, then do this:
In the settings, go to the tab System(bottom). And select the tab at the top Mode. Put the switch next to the mode Amplifier - extending the Wi-Fi zone, and click on the button Apply.
A window will appear prompting you to restart the router. Click the button "Now".

On the main router settings page, look for a section where you can view all connected devices. Something like "List of clients". On my old Asus it looks like this:

Our "repeater" will be in the list of devices. For some reason, his IP address was even active for me. I followed it, and immediately got into the settings of my Zyxel Keenetic Start. If you do not know what IP you need, then you can use the poke method :)

There you can see all the necessary information: operating mode, IP addresses, list of clients, Wi-Fi network status, etc. The menu in the "Amplifier" mode will be truncated compared to the standard "Internet Center" mode.
How to return the Zyxel Keenetic router to standard mode?
If you want to use your router in normal mode, for the usual distribution of Wi-Fi when connecting the Internet via cable, then we just need to change the operating mode to the main one. You can do this with the settings, as I showed above. Just open a tab System(bottom) then top tab Mode, select the mode Internet Center - Basic Mode and reboot the router.

Or, you can use a method that works 100% -.
After that, the settings page will be available at 192.168.1.1 .
Conclusion
Everything is very easy to set up once you figure it out. And everything works really well. My Zyxel router cloned the network of the main Asus router without any problems, and strengthened it. The range of the network turned out to be very large. By the way, it is very important to install the repeater correctly, in the right place. To make it as useful as possible. The main thing is that there would be a stable signal from the main router.
And what is very convenient is that the network remains alone, and devices automatically switch between routers. Well, all connected devices are on the same network. Which is very important, for example, for watching movies via DLNA, or setting up a local network.
Share your experience in the comments. And if something does not work out, then ask questions. Good luck!
The KEENETIC ULTRA II router was developed by ZyXEL for reliable connection of home appliances to TV and the Internet. The device is configured to work with provider companies that use different types of connection. To access the network, just use the built-in VPN server (you do not need to be at home). The device has many advantages, and in this review we will consider them in more detail.
Users are satisfied with their choice
- Management and configuration are carried out through special applications. Save time by using the utility for Android or iOS. Full network management is provided by the My.Keenetic program.
- IPSec VPN will help you connect networks or connect to an office network.
- NDMS 2 OS and managed switch allow you to connect to multiple providers at once. Such a solution will guarantee a constant Internet without unforeseen breaks. The router will switch to a normally functioning channel automatically. The main thing is to enable access checking and prioritize.
- IntelliQoS technology intelligently distributes the speed between all devices. You will be able to watch IPTV or video online without interruption (the system will not allow torrents and other applications to occupy the entire channel).
- Dual band access point. Thanks to signal amplifiers and KEENETIC ULTRA II antennas, the user receives high quality communication at high speed.
- USB ports for printers, drives and models. The maximum speed of devices connected via this interface is 50 Mbps. The presence of two such ports is an interesting feature of the new devices from ZyXEL. From the manufacturer, this will not require special costs inside the device (all ports are connected to the host built into the SoC), but for the user, such placement is very convenient.
- The VPN server allows you to access the network from mobile phone wherever you are.
- Filtering using Yandex.DNS will help protect you from visiting malicious resources.
- SkyDNS. The option works through a special service, with its help parents can keep an eye on how younger family members behave online. It is enough to select the categories available for viewing and apply filtering.
Specifications:
- RAM 256 Mb;
- 8 Ethernet ports;
- WiFi;
- 4G/3G connection;
- DLNA server;
- 0…40 degrees Celsius;
- Transmission program for working with torrent;
- weight 310 grams.
The kit includes instructions, a patch cord, a power adapter (batteries with a capacity of 15–20 mAh can be recharged from 1.5–2 A) and the ZYXEL KEENETIC ULTRA II device itself.
Connection
At the first stage, it is important to correctly connect the device to the PC. To do this, connect the network card of the “machine” and the router with a patch cord. The provider's cable must be connected to the instrument's WAN port. After that, you can connect the router to the mains and turn on the power.
Quick Setup
All settings are performed in a convenient web interface. It is not difficult to get into it: enter "192.168.1.1" in the browser, fill in the standard login / password fields (login - admin; pass - 1234).
After that, the system will invite you to the Setup Wizard. We recommend clicking on "Quick Setup" to understand the basic options.

In the quick setup mode, you must enter the MAC address (if provided by the provider's agreement), the type of IP address.
Having dealt with the addresses, you will be taken to the authorization parameters. The subsequent settings depend on the specific ISP.
If the company uses L2TP, PPTP, PPPoE connection (Dom.ru, most branches of Rostelecom, MTS, Beeline, TTK), then we recommend setting the following parameters:
- uncheck the box "I don't have a password";
- enter login/pass for ZYXEL KEENETIC ULTRA II;
- press the "Next" button.
Some providers (Rostelecom Udmurtia, TTK-Ural) use a dynamic address. For them, set the flag in the "I do not have a password" field, and proceed to the next paragraph.
This completes the quick setup, now you can proceed to manual setup through the interface.
Do not forget to change the information for authorization in the interface (the system itself will offer to change the standard login/pass). Now you can set the parameters for work.
Internet setup
Regardless of the provider, the initial procedure looks like this:
- Go to the "List" item of the "Internet" section.
- Broadband connection.
- Set up the WAN port. To do this, it is important to check the box next to the "Use connector" field.
- Check the box "Enable interface".
- Opposite "Obtain an address via DHCP", uncheck the box.

Connection for PPPoE:
- "Description" - come up with a name;
- protocol type - PPPoE;
- server address - by default;
- "Connect via" - ISP;
- password/login - issued by the provider.
Connection created!

Connection for L2TP (Beeline):
- L2TP protocol;
- "Enable" - check the box;
- "Description" - name the connection;
- login / password (see the contract issued by the provider);
- tp.internet.beeline.ru (server);
- "Connect via" - ISP.

Setting up a DHCP server and LAN
Enable "Home Network" in the interface. Here you will see several submenus. You can change the device address on the network in the “IP address” item. To enable the DHCP server, just check the box next to the “Enabled” position. Addresses from 1 to 32 are set statically, the rest will be assigned by the server in auto mode. The address pool can be changed if necessary. In addition, the user gets the opportunity to set their own DNS addresses.

WiFi setup
Go to the "Operating mode" item of the "Wi-Fi" section. Then select the "Access Point" mode, and fill in the fields as follows:
- recommended protection WPA/WPA2 - maximum level;
- network key - create your own password;
- name (SSID) - enter a name for new network ZYXEL KEENETIC ULTRA II;
- basic protection - do not change.
For the hotspot to start working, click "Apply".

If you want to improve wireless communication between the router and the network devices that are connected to it, we recommend that you perform the following steps:
- for greater coverage, move the router to the center of the wireless network;
- update the firmware;
- install the device away from direct sunlight and metal barriers;
- open the cooling holes of the router;
- try to place the router away from powerful engines, refrigerators, cordless phones, fluorescent lights.
Firmware
A review of this device would be incomplete without information about how to flash the router. So, the router system will check the components for relevance at the start of the connection. If there are updates, a message will appear in the interface about the ability to download them, then press the corresponding key. Thus, the device will download the updates on its own. The process status will be shown in a separate window.
The firmware of the router takes some time, you cannot reboot the device during this period, and you should not turn off the computer either. This can disable the router forever!

If the process was successful, the router will automatically reboot and connect to the network.
Installing the update manually is also easy: download the archive with the firmware from the manufacturer's resource, unpack it into a separate folder and enter the path to the folder in the interface.
Results
The KEENETIC ULTRA II router has rich functionality and a well-thought-out interface. The device has a good transmission speed. Setting it up is easy after reading this review.
In order to get into the web interface of the router, you need to open your Internet browser and type 192.168.1.1, User Name in the address bar admin (Username), Password - 1234 (provided that the router has factory settings and its IP has not changed).
Change factory password
For security reasons, it is recommended to change the factory password. Default: Login admin, password 1234. In the interface of the router, you need to go to the tab System;, Further password. In field New password; Enter a new password. It must be repeated in the next field. Next, save the settings by pressing the button Apply;.
Setting up Wi-Fi on the router
WiFi.
- In the window that appears in the field Network name (SSID) enter the name of your network (any).
- In field Network protection select WPA2-PSK.
- In field Network key enter your password to access the network (any).
- In field Channel: select Auto.
- Enable WPS - uncheck
- Apply.

Internet connection setup

NAT when automatically obtaining an IP address (DHCP)
- Select a section at the bottom of the page Internet.
- In the window that appears, click on Broadband connection (ISP).

3. In the field Configuring IP Settings select Automatic.
4. In the field MTU size enter 1500
. After filling in these fields, click the button Apply.
Setting up PPTP (VPN) when automatically obtaining a local IP address
Select the tab at the top of the page Authorization.
- In field Type (protocol used) select PPTP.
- In field Connect via select Broadband connection (ISP).
- In field Server address enter Server name or address(check with your provider).
- In field Username enter your login from the contract.
- In field Password enter your password from the agreement.
- In field Authentication method select Auto.
- - may not be completed.
- After filling in all the fields, click the button Apply.

Setting up a PPPoE connection (Rostelecom, Dom.ru)
Internet, in the list that opens, select Authorization:
- Type (protocol):PPPoE
- Username: Your contract login
- Password: Your contract password
- Setting IP parameters: Automatic
- Service Name, Hub Name, Description- may not be completed.
- In field Authentication method select Auto.
- Save settings with the button Apply.

Setting up an L2TP connection (Beeline)
In the router interface, select the tab on the left Internet;, in the list that opens, select Authorization:
- Internet Access Protocol: L2TP
- Description: connection name
- Server address: name or address of the server (specified in the contract)
- Username: Your contract login
- Password: Your contract password
- Authentication method: Auto.
- Save settings with the button Apply.

The Zyxel Keenetic Giga II Internet Center is a higher level product than its predecessors.
The router is designed to organize local cable and wireless wi-fi networks, receiving Internet provider information both via cable and from mobile operators. Provides support for IP-television. The Keenetic Giga 2 model is characterized by high performance, as well as the speed of receiving and transmitting information.
The hardware part of the model is designed to download information from file-sharing networks at speeds up to 1 Gbps over lines gigabit ethernet. Speeds up to 300 Mbps, according to the manual, are provided to wi-fi users.
The Zyxel Keenetic Giga 2 router has a high load capacity, is used as the main wireless network router, and also acts as an amplifier, adapter, repeater (repeater) to expand the w-ifi coverage area when routers work together.
 The presence of two USB ports allows you to connect to it various peripherals and external drives. As well as 3G / Internet operators of any type of connection.
The Keenetic allows you to set individual settings for some built-in functions, such as a torrent client or media server.
Unfortunately, the model does not support the ability to change the assignment of function buttons.
Appearance
 The indicators of the front panel of Keenetic "Giga" 2, corresponding to the description, with conditional symbols printed on them, help the user to control the state of the router, the enabled modes, the health of the communication lines with the local network devices. These include the following:
- "Status": steady light indicates that the product is powered on and is operating normally. A slow blink indicates either bootup or an internal fault.
- "0-4": connect to the network connectors on the back of the Keenetic Giga. Glow corresponds to an established connection, blinking informs about the transfer of information.
- Symbol wireless wifi– permanent glow – informs about the normal operation of the network. When data is being transferred, the indicator flashes quickly. Slow blinking indicates a quick setup session using WPS technology.
- "Internet Globe": a constant glow informs about the establishment of a connection and the receipt of the Keenetic Giga II IP address in the provider's network.
- Symbol for connecting to USB connectors: a “light” corresponds to a connected and ready-to-use device, frequent blinking indicates preparation for safe removal from the USB-drive connector. There are two multifunctional USB connectors on the right side panel of the Keenetic Giga II. Devices compatible with the Internet center are connected to them: 3G / 4G modems of mobile Internet operators, external flash drives, HDD or SSD, printers. The back panel of Keenetic Giga II is designed to place various connectors and control buttons on its surface:
- "Home network 1-4": RJ-45 type LAN network connectors for wired LAN subscribers, one of which is loaded with a switch.
- "Internet 0": WAN-type RJ-45 connector of the ISP cable.
- Two high-frequency RP-SMA connectors, where removable wi-fi antennas are screwed.
- "Power": a plug-in connector for connecting an AC adapter with an autonomous on / off button.
- FN is a multifunctional button whose properties are assigned in the Keenetic Giga II web interface. By default, performs the function of preparing to safely remove the USB device from the connector.
- "Reset": button for current user settings to factory defaults.
On the top cover of the Ziksel Giga II case there is a wireless network control button. It is used in two modes, depending on the time it is held down. A short press and release creates a quick router setup using WPS. Pressing and then holding for more than three seconds turns wi-fi on or off.
Giga connection and preparation for work
 If the provider has stored in the database the MAC address of the computer used before installing Keenetic Giga, you need to inform the technical support service of the new physical address. Information about it is on the product label in the form of a 12-digit set of letters and numbers. The address is assigned by the manufacturer and is a unique identifier.
 The provider's cable is connected via a dedicated Ethernet line to the RJ-45 connector of the router with the designation "0" on its rear panel. When connected to the Internet mobile operator using a 3G/4G USB modem and one of the universal connectors. It is possible to connect the modem via an additional adapter cable and place it in the zone of reliable radio signal reception.
To configure the Keenetic Giga, we use a computer (PC), the network card connector of which is docked with a “patch cord” (from the butt to the router) with any of the RJ-45 with the designation “1-4”. The manufacturer recommends "1". Network adapter power must be plugged into the "Power" socket, and its plug is plugged into a power outlet home network alternating current. The Power button is pressed last. Do not forget to screw the removable antennas into the Keenetic Giga RF connectors. To improve the conditions for the propagation of Wi-Fi radio waves, their vertical position is preferable.
Settings
After turning on the mains supply, we wait for the constant glow of the "Status" and "1" indicators. Then we check the setting of the PC network card to receive an IP address in automatic mode (properties of the TCP / IPv4 protocol).  For the Zyxel Keenetic Giga II router, we configure via the web interface. To access it, you need to use the information on the label of the Keenetic Giga-2 product. We are interested in the IP address on the Internet. The found value - 192.168.1.1 - enter in the address bar of any browser open on the PC, press the Enter key.
If the steps are performed correctly, the authorization page opens. After entering the standard default values: username and password - admin/1234 (admin), executing the login command, you are prompted to change the default password. The decision is made by the user. 
Automatic setting
On the main page of the Keenetic Giga interface, options for setting up the router are provided. When connected to the Internet via a dedicated line, you can use the services of the "Wizard" and carry out work in an interactive mode. To do this, press the "Quick Setup" button.  In the window that opens, we decide on the need to bind to the MAC address of the device. For Keenetic Giga II, this will depend on the selected Internet provider.
After continuing, the next page opens, where the mode for obtaining an IP address is configured. Leave the default value of "Automatic" or select the static IP mode, if one is used.  After executing the “Next” command, we get to the page for connecting Keenetic Giga to the Internet. Here you need to enter the login and password data from the contract concluded with the service provider in the appropriate fields or mark the box for the absence of the latter.
  After executing the "Next" command, a window will open with a summary summary and the result of connecting to the Internet.
  The "Wizard" has finished auto tuning.
Connecting to the Internet manually using some providers as an example
Manual connection is provided from the start page by clicking on the "Web configurator" stencil. First, you will receive an authorization proposal with standard values or with a new and confirmed user password. Click "Apply" and get to the start page of the Keenetic configurator with a horizontal row of tabs. For all providers, the user first sets up a connection to the "global network". To do this, in the "Internet" section, go to the "List" tab. 
"Home ru"
Select the item Broadband Connection (connection), click on it with the cursor.  Next, select the port to connect to the provider, ticking it. In Keenetic Giga II, you can choose any of the five possible ones. Then we assign a name to the new connection, mark the “Enable interface” item with a marker, leave the IP configuration mode “Without IP address”. Write the MAC address "Default", press the "Apply" button.
In the next step, click on the “Authorization” tab, select the “Add connection” item.  This provider uses the PPPoE type. We indicate it in the appropriate field, check the boxes "Enable", "Chap authentication". We write down the name and password issued by the provider, execute the "Apply" command.
  There is a transition to a page with a list of created connections and YES marks in the last cell. On the front panel of Keenetic Giga II, there is a constant glow of the indicator with the "Internet globe" symbol.
Rostelecom
In addition to the connection of the PPPoE format, the operator provides subscribers with a dedicated static IP paid on the basis of an agreement and a connection of the "Dynamic IP" type. PPPoE has been discussed above. A static IP address is allocated mainly to corporate clients of companies at the request of organizations. In this case, information about the assigned address, the provider's subnet mask, and the default gateway is added to the settings.  In addition, the checkbox "Obtaining an address via DHCP" is unchecked.
"Dynamic IP" does not require when setting up a connection the information provided by the provider in the contract, but the Zyxel Keenetic rule on binding to the MAC address of the router or cloning the address of the PC used on this leased line must be observed. At the last step, the “Apply” command is executed, the created connection is controlled in the interface, and the glow of the indicator on the front panel of the Keenetic Giga is checked.
"Beeline"
To work with the operator in the "List" tab with the subsequent transition to creating a Broadband Connection, we control the installation of markers in the following points:
After clicking on the "Authorization" tab, we put a mark in the "Enable" item. The connection protocol used will be L2TP. In the server address line, write tp.internet.beeline.ru. Fill in the following fields with data (login / password) from the agreement with the provider, execute the “Apply” command.
The connection is controlled by obtaining an IP address from a DHCP server. On the front panel of the Keenetic Giga, the Globe will light up. 
NetByNet
PPPoE is the type of connection used by this operator. After concluding an agreement with him, choosing tariff plan setup should not cause difficulties for an ordinary user of Keenetic Giga II devices. You must first inform the provider of the physical MAC address used.
Backup connection via 3G, 4G
First, we use the USB port to connect the modem directly or through an adapter extension cable. Internet connection is created using mobile operators. To do this, on the start page of the interface, select the tab with the USB designation, when opened, it is possible to get acquainted with information about the connected modem, its technical specifications and software version. 
On the page in the upper right corner there is an additional tab "NetFriend Quick Setup", when clicked, the program built into Keenetic Giga will set the necessary connection parameters for the selected model, taking into account the inserted SIM card of the mobile operator. The procedure ends by pressing the "Go online" button. 
Wireless network
The setup begins with selecting a section with the designation Wi-Fi in the interface of the Keenetic Giga router. In it, click on the “Operating Mode” tab, tick the “Access Point” item to organize a local network based on the router used.  Execute the "Apply" command. After that, go to the "Access Point" tab.
On the new page, we assign a name to the network by which it can be identified among the rest. The 802.11n format is set by default, we leave the radio channel number in the “Auto” position, check the “Connection security” item and use its maximum level (WPA2). We write down the security key (password) in the corresponding field, to create which we use 12-15 characters. For reliability, it must be recorded and saved. We finish the procedure by executing the "Apply" command. 
Do not forget about Keenetic Giga support for quick setup mode using the WPS button. Its quick press without holding allows you to connect to any wi-fi network when using the router as a client, amplifier or repeater (repeater). A glowing indicator on the front panel with a Wi-Fi symbol indicates uptime.
Setting up as a repeater (repeater), amplifier, adapter or access point
Support for these Keenetic Giga II modes allows the router to expand the access zone to an existing wireless network. The new "grid" will have the same name as the existing one. Subscribers within its limits can move, automatically selecting the source, the radio signal strength of which is greater. In this case, the condition for reliable operation is the coincidence of the working channels of the devices of the main router and the Keenetic Giga, which works as a repeater. The name and channel number on both routers are set in their settings based on the analysis of the smallest number of nearby available networks.
You can switch Keenetic Giga II to the wi-fi coverage area expansion mode from its interface by selecting the "System" section, and in it - the "Mode" tab. In the drop-down list, mark the "Amplifier" item with an asterisk. Click on the "Apply" stencil.  After that, a window appears asking you to reboot the Keenetic Giga router. Click on the "Now" button and get an extended range of wireless wi-fi. To install a Zyxel router, the location is chosen empirically.
IPTV
The main providers deliver television traffic in an "untagged" form. This makes it easier to set up a connection. It boils down to allocating a LAN port (1-4), to which a set-top box will be connected using a cable with RJ-45 connectors at both ends. At the same time, the program built into Keenetic Giga will switch it to the mode of direct receipt of IPTV traffic from the WAN port of the provider used (transparent "bridge").
In the main menu of the interface, the icon "Internet" (globe) is selected. In the menu that opens, click on the "Connection" tab, where we find the Broadband Connection item and click on it. On the new page, activate the "Use connector ..." box by checking the box and executing the "Enable" command. After saving the settings made with the "Apply" button, the port is used only for broadcasting the television signal transmitted to the user from the Internet provider for the operation of the set-top box. 
Keenetic Giga supports the DyDNS function. It was created for Internet users who search for the resource they need through search string, introducing into it Domain name. When using a dynamic IP connection provider, the new assigned address will no longer match the previous "remembered" name, and this will cause difficulties for regular users of the site. Dynamic DNS keeps the domain name constant whenever the IP address changes.
The settings are entered by opening the "Internet" section and then clicking on the DyDNS tab. After the conclusion of the contract on the server site, the user fills in the appropriate fields of the page that opens. 
IPv6 protocol
The Keenetic supports IP version 6 only on NDMS v2 and higher firmware. It is recommended that you first go to the vendor's official website and check for the latest versions of the router's OS. How to update will be described below in a separate section of the article.
Security Settings
Any router that has an IP address on the Internet performs the function of protecting local network subscribers from various kinds of Internet attacks, being a kind of firewall. Keenetic Giga II is no exception. When configuring it, the user defines access rules for Internet users and their priority. This list includes both wired Keenetic Giga clients and mobile network members.
Certain hosts are assigned unfettered access, others are denied access. The page for creating rules opens after selecting the "Security" section on the main page of the interface, and in it - the "Firewall" tab. A list of interfaces opens with IP addresses and an indication of what to do if they are found. The list can be expanded or shortened. It also changes the actions applied to each participant. Finally, execute the "Save" command. 
Parental control
This function is for the most part the control of the boss over his employees in local networks subdivisions managed by them to create a work schedule for its participants. In addition, there is a filter for devices allowed to connect. This parameter is configured in Keenetic Giga in the "System" section of the main interface page and go to the "Schedule" tab. 
The new interface is presented in the form of a visual graphic image with the days of the week and the allowed work schedule with the time (hours, minutes). As well as devices operating according to the established schedule. After executing the "Apply" command on the "Schedule" page, Keenetic Giga will display a list of devices allowed to work on the network at a certain time. 
Printer setup
The Giga 2 model has two USB connectors, a printer is connected to them. It is also possible to configure a network printer using an internal DHCP server. We go into its configuration, select the section responsible for reserving IP addresses, enter the address of the printer.
Setting up DLNA on the router
The router supports the media server option. To do this, you need to connect an external media via the USB connector - a flash drive or an external HDD, for example. Go to the "Control Panel" of the network device. Go to the "Applications" section, item " DLNA server". Check the box next to "Enable". Leave the "TCP Port Number" field blank. Select media file directory: specify the path to the USB drive. 
The media server is only supported if the corresponding component is installed. Its availability is checked in the "System" section, "Components" item.
Setting up a torrent client on a router
The router supports the torrent client function built into the Keenetic Giga software. The user does not need to wait for the download to finish. He needs an external drive with a USB interface to which the received information will be loaded.
Before configuring the VPN server, make sure that the component is installed. To do this, go to the "System" tab, "Components" item. Check for the appropriate option. If it is present, there is a “bird” opposite, which indicates its activation. 
Possible malfunctions and ways to eliminate them
Usually, Giga router malfunctions are divided into points:
- operator errors in the process of setting parameters;
- malfunctions in the hardware of the device;
- failures in the operation of the software either during configuration or as a result of external influences.
Most faulty cases are resolved by rebooting the network device or resetting it to factory settings. In the first situation, simply turn off the power, wait 2-3 minutes, and then turn it back on. The second option is detailed below.
Sometimes the “culprit” is the service provider and the incorrect operation of its equipment. Analysis of each of the reasons is the topic of a separate article. If a malfunction occurs during the warranty period, contact the technical support of the Internet provider to explain all the steps taken.
Firmware update
Every router user knows about this operation. The firmware not only eliminates the failures that occur, but also adds new functions to the device, implemented by the manufacturer as a result of the analysis of operation statistics. When you go to the "System" section, select the "Firmware" item. For the need to update the software, we look at the current version of the Keenetic Giga II software and compare it with latest version for the current date on the site zyxel.ru.
Via web interface
To update, if required, download the .bin file from the Firmware section and save it to the PC. 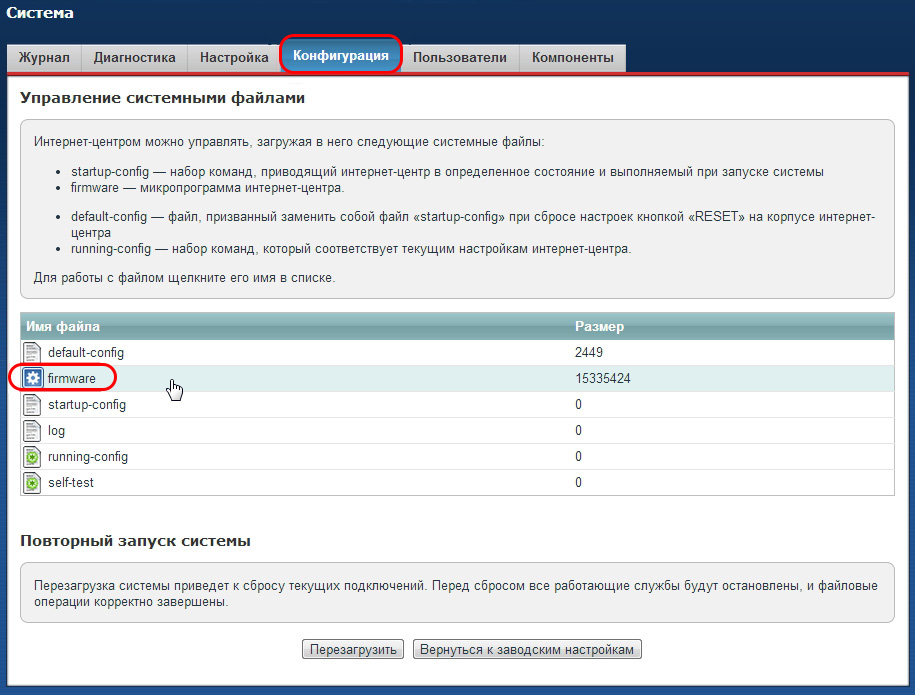 On the "Firmware" page, press the "Browse" key, find the path to the downloaded file.
  We execute the "Update" command. After the process is completed, the system will reboot with the new software.
  The entire procedure must be carried out with the system powered by a UPS, or an uninterruptible power supply. It is possible to check the version of the new Keenetic Giga firmware by returning to the “Firmware” item. After the procedure, the current Keenetic Giga settings have to be redone.
Via mobile app
The vendor has released an application for mobile platforms with support for Android and iOS called My keenetic. Installing the program on mobile device, let's run it. After connecting to the router, an update message will appear. Click on it, wait for the end of the process. 
Via USB device
Downloading current version firmware from the official website, copy it to a flash drive. Next, connect it to a network device.
We go to the “Router Control Panel”, go to the “Updates” section. Specify the path to the installed flash drive, start the update process. After it ends, the Keenetic will automatically reboot.
Reset router settings to factory settings
In all devices to factory values. They are used in cases of errors during settings, incorrect operation of the device or loss of a previously changed password for entering the product interface. For the first method (hardware), the Reset / Reset button is recessed into the case on the rear panel of the Keenetic Giga II. Its pressing and holding for 10-15 seconds. starts the update process. At the end of the blinking of the indicators, the interrupted setting is carried out again. 
Soft reset is carried out from the "Control Panel". In it, go to the "System" section, click the "Settings" tab.  At the bottom of the page, click the "Return to factory settings" stencil. With the subsequent warning about resetting the settings, click the “Yes” stencil, agreeing with this. After rebooting the router, you can continue working with Keenetic Giga.
Output
The Taiwanese manufacturer Zyxel, when releasing a new model, tried not only to give the product a new name, expanding the model range, but to make significant changes to the hardware and software stuffing. Using the latest components, Zyxel has achieved a significant increase in the speed of Keenetic Giga II, which especially pleased fans of downloading information from file sharing sites.
External antennas in combination with a powerful amplification module provided high-quality wireless communication anywhere in the consumer's living space. The addition of Giga (gigabits per second) in the name justifies itself.
pros
Users attribute the increased performance of Keenetic Giga II to the positive qualities due to the increase in the speed of writing and reading over the channel of external drives connected to any USB connector. If for predecessors it was 4-5 MB / s, for this model the speed is limited to 15 MB / s. This allows you to "download" HD movies, spending no more than half an hour on it, using the BitTorrent client built into the software. The Intelliqos smart consumer traffic distribution function has been implemented.
The ability to use a mobile 3G / 4G modem of any operator allows you to use Keenetic Giga II not only in urban areas, but also in country houses where the cable network is not developed. DLNA support gives you the chance to view and listen to video and audio content, as well as information from a connected external USB drive.
Minuses
Keenetic Giga-2 has few negative ratings. Those with access to the Internet only through a telephone line will not have to take advantage of the speed due to the limited speed of the provider. It can be noted that there is only one Wi-Fi band (2.4 GHz), which in urban conditions requires the search for the optimal channel and its bandwidth to ensure a minimum of interference. The remaining "cons" are associated with personal preferences and habits of users (color, body shape, and so on).
