How to increase the size of the system disk. What to do if disk space decreases? Why is disk space running out
This article can be successfully applied if you have an operating system Windows XP, Windows 7.
In this article, we will apply paid program Acronis Disk Director, but we have another article that does the same in it free program EASEUS Partition Master Home Edition, in the end you can choose what you work with.
So, here we will use Acronis Disk Director. Resort to the help of this program, if necessary, divide HDD into multiple partitions or you need to resize a partition. With the help of this program, you can find and restore a deleted partition. There are a lot of articles on our site that describe how to work with this program, you can find them here. In our case, we incorrectly partitioned the hard drive into sections when installing the operating system.
- Acronis Disk Director can be installed directly on Windows, but a lot of users work from the program's boot disk, so there are fewer errors. You can create a boot disk in Acronis Disk Director itself.
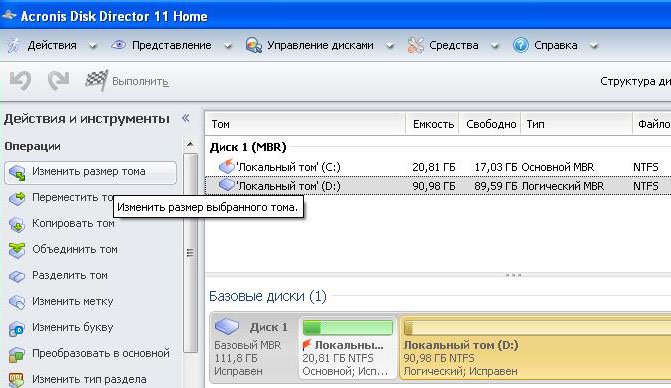
When installing Windows XP, the drive (C:), on which we have the operating system installed, turned out to be only 20.8 GB in size, and the drive (D:) turned out to be large 90.98 GB. Let's fix our mistake and increase disk space (C:) at the expense of the disk (D :), we will make them almost equal, all our files will naturally remain untouched, we will do this using the special program Acronis Disk Director 11, the site http://www.acronis.ru, you can download a free demo version. This program is very serious, with skillful use it can help, and with inept use you will lose all your data, but I think it will do without it.
How to increase disk space C
- The first thing we will do is reduce the disk partition (D:) and we will create unallocated space
- Second - attach the unallocated space to the disk (C:)
- Friends, if someone in the process of working with the Acronis Disk Director program, after allocating free space due to the disk (D :), this very space will disappear into nowhere and the disk (C:) will not increase in size, but the disk (D: ) becomes smaller, then first check the sections with which you are working for errors or two instructions at the end of the article will help you.
In general, for the future, it is better for you to perform the operation on the hard disk partition in the operating system setup program, immediately before installing Windows itself.
So here is our disk (C :), the total volume is 20.8 GB
Disk management

Launching our program

Move the mouse over the disk (D:) and right-click once (select it), then resize the volume
We resize the selected volume (D:) down so that the unallocated space is in front of the volume (D:), set it to 34 GB, then we add the freed volume to the disk (C:) and the two volumes will become approximately the same in size.

We set 34 GB and click OK

Our program works with you in the pending operation mode and all the changes we made will take effect when you click the Apply pending operations button


Proceed

As we can see, there is free space (Unoccupied) of 34 GB. It is the turn to increase the size of the disk (C :), select it and click Resize volume

We increase the volume size to 54.81 GB or to the maximum and check the box Add unallocated space to volume


In the main window of the program, click Apply pending operations, a reboot request appears, continue and reboot

Before starting the operating system, we see how the program works.

Windows boots up, go to disk management and see an enlarged disk (C:)

Attention: Friends, if someone in the process of working with the Acronis Disk Director program, after allocating free space due to the disk (D:), this very space will disappear into nowhere and the disk (С:) will not increase in size, but the disk ( D:) becomes smaller, two small instructions will help you.
How does this happen. For example, if we take our case, then initially we had a disk (C :) with a size of only 20.8 GB and disk (D:) with a size of 90.98 GB.
In the Acronis Disk Director program, we pinch off 34 GB from the (D:) drive, then attach this space to the (C:) drive. After this operation, the disk (C:) should be 54 GB, and the disk (D:) 56 GB.
In fact, we get the drive (C:) the same as it was 20.8 GB, and the drive (D:) 56 GB. In other words, the detached space from the (D :) 34 GB disk disappears into nowhere.
In this case, once again you need to boot into the Acronis Disk Director program and pinch off a small space from the disk (D :), about 1 GB and attach them to the disk (C:), then click the Apply pending operations button. After reboot, the missing space will be attached to the drive (C:)
Another instruction from our reader:
ATTENTION: maybe my advice will help someone. I also wanted to increase the "C drive", and also suffered from the loss of GB. One thing helped: I tore off once again a small piece from the “disk D” (100 MB) and left them as “not busy”. After rebooting the computer, I went to "My Computer" -> "Disk Management" and there I already added these 100 MB to the "C drive" (function: Extend volume). Then he admired his missing GB.
Good afternoon. Most people buy computers in a ready-made assembly, that is, a system is installed on it, all components and components of the computer, BIOS is configured, and so on. This, of course, is good. But, sellers very often sell a PC whose hard drive has only one partition.
Should the hard drive be partitioned?
In other words, there is a system on one partition, and people download movies, install programs, games, and so on on the same partition. Then, wanting to learn to better understand computers and their programs, people consider installed programs, files, and more.
Some of them are deleted, some are edited, etc. But, since Windows is installed on the same partition, it is quite difficult for a person to distinguish where the program that he himself installed is and where the system software is.
But, if the user inadvertently deletes one of system files, then it may very well be that the computer simply will not start. Hence, it is very bad and inconvenient when the hard drive is not divided into sections. So when you buy a computer, ask the seller to have the hard drive divided into a couple (or three) partitions. At least two. Although, in my opinion, three is more convenient. On one, the system is installed, on the other, working software, on the third, various videos and games.
In my opinion, this is the most convenient option. But, if you have already bought a computer with a single partition, it does not matter! The Winchester can be divided into three parts (or more if you like). Of course, this can be done during OS installation.
But, this is not very convenient, especially if your OS is functioning perfectly. Yes, and there is no desire to mess around with reinstalling the system. In this case, it remains to divide the hard drive into sections with a running system.
This is quite possible, as it will not seem strange to many users. There are a number of programs that can partition a disk into sections. But, the most convenient of them, in my opinion, is Acronis.
Acronis Disk Director 12 Description
This program specially designed to work with a hard drive. It can quite professionally divide your hard drive into parts, and, moreover, select a certain size for each section. Also, you can connect several sections together if you have a lot of them. Among other things, Acronis gives us the opportunity to move or copy the system to any disk partition, and even to another hard disk.
It is very comfortable. For example, you bought new computer and want to copy the system from the old system block on new. To do this, you simply remove the hard drive from the new system unit of the new computer, insert it into the old one, and copy the system. You can select the "Move" command. But, there is a threat that something will go wrong and you will lose the system. If you are copying the system, then if there is a problem, you will simply start copying the system again.
How to increase the size of the Windows system disk
In addition, it often happens that your system partition is small. For example, only 40 GB. It would seem a decent size, but by modern standards - this is not much! I would even say - not enough (especially during latest updates Windows 10, which took up a lot of space).
Since modern programs have a decent weight, over time, from their number, and from constant updates, the volume of the C drive increases greatly.
What should be done in this case? The most reasonable thing is to increase its size. And, better, in abundance. I advise you to set the size of the system disk to at least 100 GB, and preferably 120 GB, as I will do. For this, we need Acronis Disk. This program is paid. In general, its cost, taking into account all its functions (and there are a lot of them), is small. In addition, it has a Demo version with limited features.
Acronis Disk Director 12 free download from the official site (demo version). We install the program. I advise you to install Acronis on the C drive. we will work with disk D (we will take a little volume from it). After installing the program, the Acronis window opens.
Cut off some volume from disk D
From this window we see how many partitions we have, and how much they occupy from hard drive. So, our task is to increase the system partition. It has a capacity of 88.48 GB. Disk D has 360.3 GB. To increase the system disk, we must first cut off a small part from another disk, in particular, from D, and add it to the system disk.
Therefore, before the operation of separating a part of disk D, I recommend copying the most important information from this disk to another disk (just in case). Then, the disk needs to be defragmented. The best option is if drive D is completely free.
To do this, we select drive D, and with the right mouse button we select "Resize volume" from the context menu.
In the new window we see how much is on it occupied place, and how much is free. In the disk space, the brown color indicates the place occupied by information. In yellow, free space is shown. Then, with the mouse, we take the disk strip by the left side, and drag it to the right, up to about 30 GB. Please note that while the volume of the disk is 360.3 GB.

After dragging, the volume became 330 GB. At the same time, in the column "Unallocated space in front of the volume", we have the number 30.29 GB. Also, to change the size of the volume, you can simply write 30 GB in the "Unallocated space in front of the volume" column. Please note that in the lower menu, which shows our discs, a new disk, called "Unallocated space". We press Ok.
![]()
And, nothing happens to us, because we did not click "Apply Pending Operations" at the top of the menu. Let's click on this command.

We have a window "Pending operations". Where we also learn that a reboot will be performed. Click "Continue".

Reboot must be confirmed. We agree.

After the reboot, turn on Acronis Disk Director 12.
How to Attach Unallocated Space to C Drive
So, having turned on Disk Director 12, we note that now we have drive D equal to 330 GB, and next to it there is an unallocated space of 30.29 GB. Right-click on the C drive and select "Resize Volume".

We have a window where we see that while we have drive C occupies 88.48 GB. It is followed by an unallocated space of 30.29 GB. So, we take the right edge of the strip, and with the mouse draws the space of disk C to the entire interval of unallocated space. Or, in the "Unallocated space after the volume" column, you can simply write 0 GB (it will even be better). Next, MANDATORY put a tick over the command "Add unallocated space to volume."

We press Ok. After that, click "Apply Pending Operations". The OS tells us that a reboot is required. We agree. We press OK.

In the next window, click "Continue".

We are fixing transactions

After rebooting, open Acronis and examine the program window. We see that the system disk now occupies 118 GB, and the D disk 330 GB. Which is what we needed to do. Now the system disk has a decent size, and you can install small programs directly on it (I still recommend installing large programs on another partition of the hard drive).

How to partition a hard drive into partitions in Windows 10 if there is only one partition
Your situation may be different. For example, a system was installed for you, you started working with it, installing programs, downloading music, movies, games, and so on. Then, you realized that your friends have a hard drive of several sizes, and only one large section was installed in your store. What can be done in this case? How to split a disk into parts?
You can split the disk into parts during system reinstallation, but then you will completely lose all information from the disk. First of all, you need to defragment the disk. Transfer valuable information to removable media.
Next, launch Disk Director 12. Select "Resize Volume" (I'll show it on my C drive). Then, we take the right edge of our disk, and drag it closer to the center. Let me remind you that the dark green bar is the disk space occupied by information. Light green, free disk space. We put Ok.
If you don't like the volume letter, you can change it. Also, it is desirable to format the new disk in NTFS format. The cluster size is selected 4096 bytes.

Other program features
In addition, Acronis can move volumes, merge volumes, split volumes, change the cluster size, format, defragment the desired partition. Also, it has an interesting "Check" function.
That is, if you select this command, and in a new window check the boxes above the commands "Fix found errors" and "Repair bad sectors", the program will start checking and treating system files.

This function of the program works better than the built-in one, which fixes system errors.
Conclusion: Acronis Disk Director 12 is one of the best programs to increase the capacity of the local drive C. merging these partitions, adding capacity to the system drive. It has a user-friendly design, Russian language, easy to operate and it has many other additional features. Even a beginner can handle it. Good luck!
PS For three after the article, I rolled back the system using . The backup was made before the disk was enlarged. So, when you rollback, the system returned to its previous state. Including disk C. That is, its volume sent again 88.6 GB. A disk with unallocated space formed next to it. I used the Acronis program again.
The disk was restored to its original size quickly and efficiently. Why am I saying this? In addition, if you restore the system from backup, most likely, the disk will shrink again. But, Disk Director 12 will return the previous size without much effort!
Sometimes it becomes necessary to increase the volume of drive C at the expense of another partition. Most likely you need it, because there is almost no space on it, but you need to expand it. In this article I will analyze two programs that will help you do this and a small instruction.
We will talk specifically about increasing drive C at the expense of another partition, for example, drive D, while they must be on the same hard drive or SSD. If you have Windows 7, 8 or 10, then this guide will suit you.
How to increase the size of C drive with Aomei Partition Assistant
A wonderful program that will allow you to expand the C: partition of a hard drive or solid state drive is called Aomei Partition Assistant. This program does not install with it various garbage, which some programs are famous for. Also, the program is in Russian with a completely understandable interface. Works on all operating systems, starting with Windows 7.
The most important thing to pay attention to is that incorrect work with partitions can lead to data loss. If they are important to you, I recommend keeping them in a safe place.
Download and install the program, I think there will be no problems with this. After launch, you will see a nice interface, although for whom it is. All your disks and partitions are displayed there.
In our case, as I said, we will increase section C at the expense of section D. Now let's do this.
Right-click drive D and select "Resize Partition".
A window will open where we can change the slider and thereby change the size, or enter it manually. You need to make sure that the unallocated space of the partition after choosing the size is in front of it, as shown in the screenshot. Then we press OK.

Now, in the same way we change section C, only now we increase the size on the right. It will increase due to the free space that we took from drive D. Click OK again.

After the work done, at the top of the program, on the left, there is a button "Apply", press it.

Now the computer should be restarted, usually two of them need to be done. As a result, the size of disk C will be increased.
This is not the only function of the program. With it, we can. Also, you can create a bootable flash drive in the program and resize partitions there.
How to enlarge C drive with MiniTool Partition Wizard Free
So, there is another good program called MiniTool Partition Wizard Free. It is free, does not install third-party software, but its minus is that it is not in Russian, it may be difficult for some, but thanks to this article you will understand everything.
The interface of the program is somewhat similar to the previous one. In principle, there are almost no differences from the first option. We will increase the system disk in the same way.

To start, click on the D drive, and then click Move/Resize Partition up. Now take the desired size of disk D, highlight it on the left and click OK.


That's all, after the operation done in the explorer, you can already see the increased size of the system partition. Now you know how to do it.
You can download the program from here.
How to increase the size of the system disk as standard
Standard means with standard means Windows. You can do so, fortunately, like Windows 7, Windows 8 and Windows 10, there is such a function. But have this method Disadvantage: the data on the D drive will be erased, therefore, you will need to transfer them somewhere first. Perhaps you decide to use this method, then, first, press the combination Win+R, a window will open in which you need to enter the command:
| diskmgmt.msc |
This will open the tool. "Disk Management". There you will see all connected drives and partitions. If there are additional sections, they are also called hidden, then I do not recommend touching them.
So right click on partition D and select "Delete Volume". Subsequently, the data on the disk will be deleted, and free unpartitioned space will form to the right of the C drive.

To increase the size of the system disk, right-click on it and select "Expand Volume". Next, the volume expansion wizard will open, where we need to specify the volume by which we will expand the disk. There is not much to choose from if you still need section D.

We have increased the system disk, now we need to use the unallocated space that we have left. To do this, click on what is not distributed with the right mouse button and click "Create Simple Volume". The drive will be assigned the drive letter of your choice and will be formatted. That's all.

Now you can get all your important data back to the D drive.
It so happened that when working at a computer, the user is used to having a hard drive divided into two partitions D: / and C: /. Where a folder with the system is stored on one, and various media files are stored on the other, such as photos, music, movies, etc. But, sooner or later, everyone who works in the operating room Windows system I'm sure you've come across a situation where it was necessary to increase the size of disk C at the expense of disk D, due to lack of free space.
Usually, this disk is filled due to the fact that various programs and games are installed in excess on the computer. Also, this place fills up at an incredible speed if the user saves all possible files only on the desktop. Another reason for filling up free space is temporary files from the Internet and . As a result, due to lack of space on the system partition, you will not be able to download anything from the Internet and will not even be able to run more than one program.
A few suggestions below you will find detailed instructions About, how to enlarge c drive through a variety of methods ranging from third-party software and ending with the LiveCD, which I think a lot of people already know about with . Of course, we will by no means forget to consider increasing the size of the C drive using the standard Windows utility called "".
Before we get started, I want to note some nuances.
- We will increase the size of the C drive with the D drive. Therefore, make sure you have enough free space on the local drive D:/;
- Unfortunately, it will not be possible to increase space on drive C using a standard disk management program without losing data, so be extremely careful not to have to do it manually later;
- All the tips that I will describe below apply to absolutely all major operating systems of the Windows family (7/8/10);
So we free up disk space, from which we will bite off a piece and proceed to the practical part of the instruction on how to increase disk C at the expense of D.
Increasing Disk Space With Aomei Partition Assistant
First, we will use the program, which is distributed free of charge and will help us increase the size of the C drive, directly from the Windows working environment. But, before you use it, of course, you need to download it and install it on your computer. There is nothing to explain here, I think you can handle it with a bang.
The main thing during the download, do not forget to change the installed language to Russian.
Having launched the program, its interface should open before you, with various windows in which it will be displayed full information about the hard disk and about all the partitions into which it is divided.

So, as we came here in order to increase the size of disk C by taking free space from D, we perform the following steps in order.

If you simply resize the disks and don't click the apply button at the end, you won't get the expected result. After completion, the computer will restart several times and you will receive the additional space on the system disk that you specified earlier.
We increase the space on the system disk using Disk Director.
The next option is also not bad, but it is not very convenient, in that for its implementation we will have to boot from it.
You may ask if it is so complicated why am I showing it? Hmm, there are actually a lot of reasons, for example, you need to increase the size of drive C at the expense of drive D, but when using various programs, a message constantly appears that the system cannot lock the drive to complete the operation. So, just in such cases, LiveCD with the Disk Director program can help us out.
So, who does not yet have such a disk, you can download the one that I use: Link. Next, just write it to any disc, as a simple image and .
In the booted LiveCD, we find the Disk Director icon on the desktop and run the program. An interface will appear that is very similar to the working environment of the program we have reviewed just above.

To increase the size of disk C, perform the following steps:
- In the top panel, click on such an icon, which will launch a window to increase free disk space;
- In the dialog that appears, select the partition to which we want to add free space and click " Further»;

- In the next step, we will need to select a partition through which we will add free space;

- Next, the wizard to increase free space will ask you to specify the size of the expanded partition using the slider, in our case it is drive C. Having shifted the slider as you need, click " Farther", to continue;

- Before starting the process, the program will definitely show you the structure of the newly created partitions and ask you to click the " To complete»;

- Now, to apply all the changes, click on the checkbox;
- A list of operations that have been scheduled will appear. After reviewing them, click on "", to start performing all the processes to increase the size of drive C;

- It will take several minutes to convert, although the procedure itself can be delayed even for an hour, depending on hard size disk;

- After the program is finished, we restart the computer and check if Disk Director coped with its task;

Maybe this method is not the most convenient due to the fact that you need to create a new disk, but it is not more effective for me than others, and it will always help out in those situations where programs from the system's working environment simply cannot cope.
Increasing space on drive C using Disk Management
And finally, as I promised, let's look at how you can increase the C drive at the expense of the D drive with your own Windows resources. Those who decide to use this method, I hope you have not forgotten that it has one rather serious drawback in that when the partition is enlarged, your personal data will be deleted from the disk. D". Therefore, I recommend this option use only on new machines and on clean hard drives.
If you still intend to use this particular method, then we call the window " Run» by clicking « Windows+R” and there we execute the command .

The window of the utility we need will open, which will display all the drives that are connected to the computer. In the same place, separately you will see your sections C and D, and a few hidden boot sectors, by the way, which I recommend not to touch in any case, so that later you do not have to restore the system.

Now, having selected the section with the letter D, right-click on it and press, "". Performing this action will remove both the disk itself and to and all the data stored on it, therefore, do not forget to save them somewhere else, for example, on a flash drive.

In the next step, we go to drive C and call the context menu in the same way, but this time we select " Extend volume...". A window will appear where you will need to specify the size of the added free space. Immediately, all the space that we freed up by deleting drive D will be displayed, but since we do not want to take everything, but only a small part, we indicate the number we need, for example, 4000MB.

Attention!!! If the disk you want to enlarge will have a button " Extend Volume”, I recommend using the first or second option.
By increasing the size of disk C at the expense of D, we return our donor back to normal. To do this, right-click on the unallocated space and select the first line " Create a simple volume» and then, according to the instructions, perform the actions, which will recommend utility. It will be formatted and assigned a volume letter, after which you can use it as before.

In this article, I did not try to show you different programs that do the same thing, here I wanted to tell you about three ways that can help you in completely different situations. For example, you can use the first option during normal system operation, the second in case of some kind of breakdown, and the third in the case of a new computer, you don’t have to download anything, but you can quickly do everything using Disk Management, spending only 5 minutes.
How to increase drive C with drive D in Windows 7, 8.1, 10
The modern market for electronic media is developing rapidly, manufacturers hard drives offer their customers ever faster and more capacious hard drives. However, even in our time, when a terabyte HDD is far from the limit, it is difficult to find a PC user who has not at least once encountered the problem of lack of free space on drive C. In such cases, increasing the space becomes a practical necessity.

If the task is, first of all, it is worth getting rid of the accumulated garbage and unnecessary files.
Emptying the trash
Removing not necessary files, you can easily not guess that they continue to take up space on the system partition while in temporary storage called the trash. It is located on the desktop by default. This windows function actually very useful as it allows you to restore randomly deleted files. You can empty the Recycle Bin to free up space on the HDD. To do this, right-click on it, click "Empty Trash" and confirm permanent deletion files.

Desktop cleaning
It is not uncommon for users to place many files directly on their desktop. Of course, this is convenient, but it should be remembered that the “Desktop” is a folder on drive C, which means that all files in it occupy the space of the system drive. That is why it is highly recommended to keep the desktop in order and leave only shortcuts to programs and folders there, and store the files themselves on other sections.

"Downloads" and "My Documents"
These folders are also located on the C drive, and this is where your documents and files downloaded from the Internet are saved by default. For active users, the volumes of folder data can be more than one dozen gigabytes. Of course, it is better to move the necessary files to other partitions and change the default save folders.

Moving folders to another partition
In fact, you can simply move the above folders to another hard drive partition. To do this, open the C drive, go to the "Users" folder, then select the operating system user folder. Here are the folders we need: “Desktop”, “Downloads” and “My Documents”.

Since these folders are system folders, they cannot be moved by simple drag and drop. To successfully move to a folder, right-click and go to properties. Here we need the "Location" item, where the "Move" button will be. By clicking the button, you can select a folder on another disk partition and free up system partition space. You can do this with all three folders, or with those that take up more space.

Cleaning with special programs
The Internet is literally filled with all kinds of computer cleaning programs, but, unfortunately, not all of them are effective and safe. If you do not want to get malware on your computer instead of increasing space on your C drive, it would be better to use a proven product from a reliable manufacturer, such as CCleaner.
The program is absolutely free, safe, and can be downloaded simply from the official website: http://ccleaner.org.ua/download/.

After downloading and installing, a simple and intuitive program interface will appear. For our task, only the "Cleaning" item is needed, however, if possible, it is recommended that you familiarize yourself with the rest of the functions of this program. This will not only free up disk space, but also increase the speed of your computer, as well as slightly increase security.
In the program window, select the necessary items, start the analysis first, and then clean up the system.

Free space unlock
On a note! Part of the free disk space is reserved by the system for its own needs. Some users reclaim part of it.
swap files
With a lack of operational Windows memory can use part of the disk space instead, swap files are created for this. If this solution is not relevant for a particular computer, you can free up space. To do this, you need to find the "Computer" icon on the desktop, and select properties from the context menu, in the window that opens, select the "Advanced" tab.

System recovery files
Sometimes these files can be a lifeline for the system, but if free space is a priority, they can be deleted. To do this, in the computer properties, select the "System Protection" tab, then the "Configure" item. A window will open in which you should select the "Turn off system protection" item, move the slider all the way to the left and click on the "Delete" button to delete already created files. After applying the changes, the space will be freed up.

Increasing the size of disk C by diskD
Unfortunately, without third party programs you can redistribute space between partitions only at the stage Windows installation. If it is necessary to do this with the already installed operating system, the use of software will be required. There are a lot of such products, some of them are paid, but a free program, such as Aomei Partition Assistant, can easily cope with this task.

Whichever way you choose to increase the size of your C drive, don't neglect security, create a live system image before making any major changes, and use only trusted software.
Video - How to increase drive C with drive D
