Mac OS training. How to use a Macbook: tips for beginners. How to enable dark theme on Mac
Apple is accustomed to surprising its consumers with amazing modern devices which are sometimes hard to keep track of. It is even more difficult to figure out how to use such gadgets, how to extract a lot of positive opportunities from them. If you have become the owner of a new MacBook, but do not understand anything about it, do not know even the most elementary steps that should be taken to start working, it will be useful for you to familiarize yourself with the instructions that can guide even a beginner regarding many useful functionality.
MacBook basics.
It is also important to take into account the fact that the manufacturer does not leave MacBook owners alone with the device, the company's developers systematically update the software, adding new features, as well as correcting the identified shortcomings. Given this circumstance, wanting to help your device work as efficiently as possible, you can update the software yourself. To do this, it is enough to select the "Software Update" option. With the updated version of the software, using the Macbook will be much more comfortable.

Initial information
Problems when using a Macbook appear for many users, since many have already many years of practical experience in the most common operating system. Windows environment. Unfortunately, on a MacBook, not only completely different rules can be dumbfounded, but even the interface. system windows, desktop.
If you need to install some kind of program, you can afford it, but it is only important to consider that you need to download software targeted specifically for the MacBook from the Internet. Such programs are most often accompanied by dmg-archives. Drag the downloaded program to the "Programs" folder, then extract it from the archive, and delete the downloaded file itself.
ADVICE. You will have to learn how to work with windows, because at first you will be confused due to a slightly different location of some buttons. In particular, the control buttons are located in the left corner, while in Windows we are used to finding them in the upper right corner.
However, it may also surprise you that when you try to close the program window, wanting to stop its work, you will press the “x” button, but at the same time you will not be able to completely close the program in this way. To do this, we recommend that you hold down the two keys Cmd and Q at the same time. You can do otherwise by right-clicking on the icon, and then select the “Finish” option.

You can perform actions on your MacBook using the mouse or the unique trackpad that the device is equipped with. The trackpad is unique in that its operation is accompanied by support for gestures, while they can be configured directly by the user himself. To do this, it is enough to go to "Settings" and go to the "Trackpad" section. In this section, it will be enough for you to check the checkboxes next to those gestures that you would like to activate.
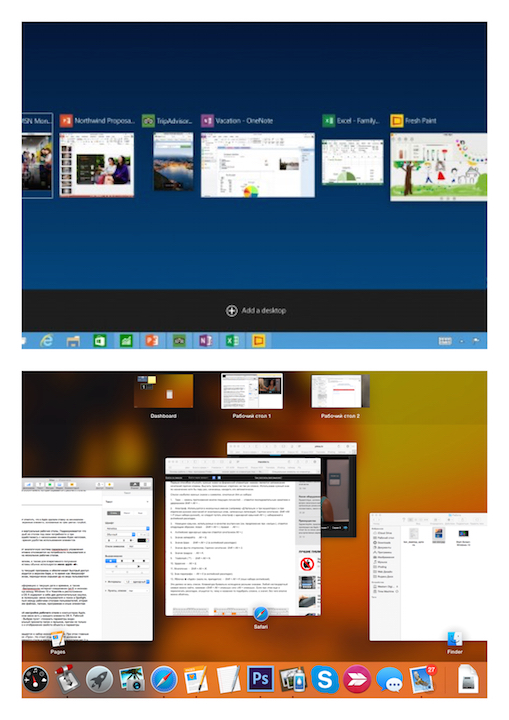
To get an idea of which programs are currently active, we recommend that you activate two useful features. A feature such as Expose just allows you to successfully show windows of active programs, but also, if necessary, it can show the desktop without any open tabs.
The second Spaces function allows the Macbook desktop to be conditionally divided into several parts. To speed up and facilitate the launch of these two functions, in the settings we suggest selecting and specifying keys for them, by pressing which the process of launching them will be carried out automatically.
Additional features
Using a MacBook, you can visit Internet sites in the same way, download any content. Of course, for this you will need to install and then use some Internet browsers. We recommend that you do not overload the operating system, opt for one of the browsers. Do not forget to be safe when working on the Internet, always remember that the global network is full of threats. Install a firewall to keep your device safe. He's the one who can keep track of everything. network protocols, protecting your device from unwanted attacks.

With a Macbook, you can successfully view video materials, all kinds of images, listen to your favorite audio files on it. And also there are no restrictions when working with archives, since the device successfully archives and unzips any archives.
Create folders
To keep content organized on your Macbook, you need to learn how to create folders. After creating them, it is useful to assign an appropriate name to each so that you can later find desired folder it wouldn't be boring for you. The creation of folders is provided by several methods, the easiest way to quickly create a folder is considered to be Finder.
Go to the "File" menu, there you will find the "New Folder" option, as soon as you click on it, you will immediately be able to create the desired object.

By the way, there is an amazing feature in the MacBook that will definitely delight the users of the device. In just a few seconds, it is possible not only to create a simple folder, but also one oriented for specific files. To do this, first select the files that you would like to define in one folder, then hold down the keys: Control, Command and N.
All the files you have designated will automatically be collected in one folder called "New Folder with Elements". Of course, it is better not to leave it in this form, because after time it will be difficult for you to figure out where and what is stored. Accordingly, you will have to rename the folder, giving it any name that suits you. It is not difficult to rename any object on a MacBook, but it is only important to consider that there is no “Rename” item in the context menu, as in Windows.
ADVICE. To assign a new name to a folder, just click on the old name once, click immediately after that on the Enter key, then enter any name and click on the Enter key again. No further action is expected.
As you can see, even a beginner will be able to rename objects on a MacBook, since it is not expected to encounter difficulties when performing such actions.
Working with removable drives
A modern user is accustomed to saving many documents on a USB flash drive, providing himself with the opportunity to have them always at hand, always quickly use them. However, many users are at a loss how to use a flash drive, if there is a device equipped with Windows that is not familiar to all.
- X-plore File Manager;
- ES File Explorer.
Connect your flash drive to the USB connector, wait a few seconds, after which your removable drive will be displayed. Double click on its icon, you will immediately be able to watch all the content placed on the drive.
If you are facing a more complicated task, you need to connect and then immediately open the USB flash drive on which the hidden files, we recommend that you take other steps. Initially, open the USB flash drive in the usual way for you, then find the "Service" section in the menu, enter it and find the "Folder Options" parameter. Next, you will need to make two more transitions, sequentially going to the "View" and "Advanced Options" folders.
Now you will find several "tempting" offers, opposite which there will be empty and filled checkboxes. Clear the checkbox located next to the line "Hide protected system files”, but next to the other parameter “Show hidden files and folders”, we recommend that you, on the contrary, check the box.
So, it will not be difficult for you to work on a MacBook if you carefully read the instructions, find out for yourself all the necessary nuances that are often encountered when working with such a device.
Today we are starting a series of articles dedicated to people who decided to leave the traditional Windows system and try their hand at Apple's OS X Yosemite.
Most people first encounter Apple technology with friends, classmates, colleagues, or just an unfamiliar passerby. The specific apple design involuntarily attracts the eye and lingers in the mind for a long time.
Then, as they walk past Apple products in chain stores, most potential buyers willy-nilly glance at the luxurious displays and mysterious Mac OC desktops. Still would! Windows Screensaver For most Russians, it has already become something ordinary and boring, we don’t even pay attention to it when choosing the next PC components. And here is a real mysterious country: iMac widescreen flat-panel monitors, weightless aluminum Macbook Air and fundamental Macbook Pro.
At the last stage, an internal struggle arises: is it worth risking finances and a familiar interface for the sake of unknown beauty? In order to answer these difficult questions, we suggest you read an article on the benefits of Mac OC.
And today we will talk about what difficulties we will face when moving from one operating system to another. The topic of transition from one system to another will be of interest not only to those who plan to do this, but also to those who have already crossed over to the other side of the barricades.
Apple computers and laptops have a single design set by the company - this is what distinguishes them from the gray mass of PCs and laptops that use the Windows platform. The buyer can only decide on the required power and technical specifications.
When choosing a "box" for Windows, the user has to study tons of information beforehand - in the literal sense, it is necessary to select each component separately: video-audio cards, processor, memory chips and much, much more. A computer for windows is a constructor cooler than Lego. Of course, many will now want to argue with me, they say, there are a lot of ready-made kits in stores. But if you give the issue a little more time, you understand that manufacturers save a lot on components, sacrificing one or two parameters in favor of an attractive price. And the result is most often very sad: the given production capacity is not used even by half. Consequently, literally in the first year of using the technology, the user is faced with the need to upgrade: the video card stops “pulling” the graphics, the cheap cooler starts to make a menacing noise, or from the first days there is an acute shortage of memory. We have to admit that buying a Windows PC is a task for people who are enthusiastic, ready to devote themselves to a series of updates and modifications.
PRICE POLICY
Reading the subtitle, Windows fans rub their hands in glee: here it is! Yabloko, they say, went crazy with their expensive gadgets. Let's do a little marketing research and find out how much you have to overpay to become a member of the apple club.
Monoblock
Monoblock - computer all-in-one: all the necessary filling of the computer is enclosed in the rear panel of the monitor. The main advantage of the monoblock is its compactness and the ability to work on a high-resolution display. The disadvantages of the gadget include possible problems with component upgrades.
We will compare according to the basic parameters: the size of the display (21 inches) and the power of the processor (for example, Intel core i5). In this segment, the Windows platform is represented by Lenovo and MSI. The price for the first ranges from 40,500 rubles to 53,990 rubles, depending on the narrow specifications and internal policies of online stores. For an MSI monoblock, you will have to pay about 60,000 rubles. Apple iMac prices start at Rs. The total difference ranges from 18,000 to 37,000 rubles.
Notebook
Notebook – portable Personal Computer, which, unlike a monoblock, combines not only a monitor and system components, but also a keyboard and mouse (trackpad). Laptops are compact devices that are preferred by people whose activities require constant mobility. These same characteristics become their advantages: light weight, size and versatility. The disadvantages of this type of technology include a short battery life and rapid heating of the device.
In this case, you will have to reduce the sample and select models as close as possible to the characteristics Macbook Air 13. For comparison, we again take the display diagonal (13), the processor ( intel core i5), weight (up to 1.5 kg) and battery life (up to 12 hours). Lenovo laptops (from 39.990 - 44.990 rubles), HP (38.290 rubles), Panasonic (from 103.000 rubles), Fujitsu (from 37.590 - 125.100 steering wheels) can boast of a similar set. Against the backdrop of such a huge price analysis, the cost of the Apple MacBook Air (from 57,000 rubles) pales and we understand that the pricing policy is not something Cupertino should be reproached with.
WORK IN OC
So, with the costs and external characteristics figured out, let's move on to the issues that most scare potential buyers of Apple computers - work in the Mac operating system.
Desktop
Microsoft has been experimenting with the Windows desktop for the past two years. The most unpredictable - and as experience has shown unsuccessful - was the decision to remove the "start" button in win 8. Then there was an incomprehensible castling with the name of the operating system and Windows 10 was born (release date October 1, 2014). We will compare it with Mac OS Yosemite, which was also released in the fall of 2014.
In Windows 10, an interesting design feature appeared - the color of the start menu adjusts to the desktop background. Apple uses translucent textures and blurred backgrounds to create a unified atmosphere.
Windows users have little choice in how they work. You can use the start screen as the main control, or return to the classic form of using the desktop. This choice determines the overall design concept of the latest Windows versions. The start screen is a set of colorful tiles that creates a festive atmosphere on the desktop. It is difficult to judge how much such a color scheme contributes to work and concentration, how much eyes get tired from a bright set of colors - only owners of the latest Windows OS can answer this question.
The most striking detail of Mac OS are the icons in the DOCK-panel, which is hidden from the desktop while working with the system. At the same time, it is worth noting that Apple relied on minimalism - along with OS X Yosemite, flat screen elements based on three colors came: blue, white and gray.
Another feature of Windows 10 is virtual desktops. It is understood that the user will be able to customize each of the tables to suit their needs and, if necessary, interact with several zones at the same time. The idea is not bad, but so far it looks raw in terms of usability of controls.
Fortunately, OS X has long used a similar parallel program management system - Spaces, which intuitively responds to user needs and ensures efficient work on multiple desktops.
For quick access to system folders, as well as for quickly obtaining information about the status and operation of the system, the apple “” menu is usually used, which is located in the upper left corner of the screen.
The program menu displays the operation of the current program and provides quick access to its functionality. It is constantly in the top bar, while Microsoft chose to leave this element in the windows, periodically hiding it from the user's view (Windows seven example).
The status menu contains information about the current date and time, as well as the selected language, sound settings, wireless Internet connection (wi-fi) and status icons for some programs. The difference between Windows 10 and Yosemite is the location of this element. In addition, the OS X bar contains two additional links that are actually extremely useful: the user menu and Spotlight search. The first allows you to quickly navigate between user desktops, the second is responsible for searching for information on all files, folders, programs and other elements of the Apple computer system.
Separately, I would like to talk about fine-tuning the desktop in Apple computers. As mentioned above, every element of OS X has a program menu. The desktop is represented by the Finder program. By selecting the “show view options” item, the user can configure the visual viewing of folders and shortcuts, and not only the size of icons, grids and labels, but also the display of object properties and sorting options.

Usually working Windows table turns into a set of icons and labels. At the same time, the main control element was and remains "Start". But you have to give Microsoft credit for a few years they have moved away from the folder-letter style and introduced visualization(so-called "live tiles") as recently open programs(central column) and windows with universal applications.
On Mac OS, the desktop field usually remains empty: shortcuts and folders appear there randomly and for a short time. Although, of course, this is a matter of taste, but the Mac OS environment provides for convenient navigation through programs, files, and documents. At the bottom of the desktop, there is a Quick Access Dock that is customizable based on user preferences.
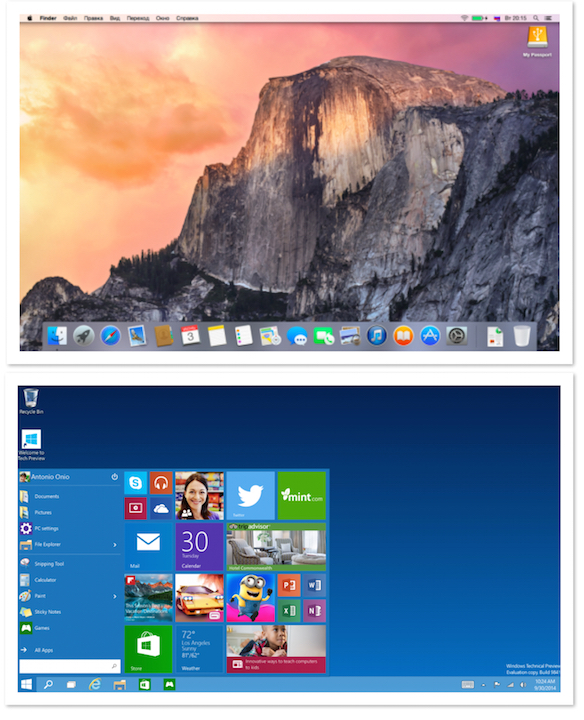
Let's talk more about Dock panel in fact, this is the main element that a beginner will have to work with immediately after switching from windows to mac os. This is where the most commonly used software shortcuts are found.

The user can customize its content and size at his discretion, but at the first stage it is worth understanding the features and basic elements of the OS. Over time, each poppy driver forms it to suit their working and creative needs. By default, the Dock contains Finder, Dashboard, Launchpad, Safari, iMovie, iPhoto, Mail, Calendar, Contacts, iMessage, Facetime, iTunes, MacStore, Trash, and Settings.
In the following articles, we will take a closer look at these elements.
Given the fact that not so long ago was released a new version Mac OS High Sierra, and with so many student discounts on MacBooks, it's safe to assume you're one of the lucky Mac owners out there. Perhaps you just switched from Windows or Linux, or perhaps this is your first computer at all - in any case, this article will allow you to learn a lot of new things.
1. Smart unit conversion with Spotlight
If earlier using Spotlight it was possible to carry out various calculations, then with the release of the new Yosemite operating system, this application has acquired an additional function - unit conversion. This program is so smart that in many cases it not only answers your query, but also offers a conversion to alternative units of measurement.
Enter "$1299" and the program will immediately show you how many rubles are in this amount (building its assumption based on which national currency you selected in "System Settings" in the "Country\Region" section), and a little lower by page, you will see other results, for example, in euro, yen, and so on.
2. Improved version of Siri
Before the release of Mac OS Sierra installed On the Mac, Voice Recorder has performed at its best, surprising us time after time with its speech recognition abilities. But the long-awaited return of Siri to Apple desktops and laptops has smashed it to smithereens.
Siri, which we are all used to on iPhones, can be invoked by pressing and holding Command + Space or by clicking on the corresponding icon in the Dock or Menu. However, the new version of Siri looks much more efficient.
In addition to answering the usual questions, for example, “What is the weather like now?” and “Who won the last playoff game?”, Siri on Mac OS Sierra can turn system features such as Wi-Fi or Bluetooth on and off, and locate individual files on your system based on the file information you provide. you tell her.

At your request, Siri can even open and close applications, and save the results of your requests in the notification area so that you can use them in the future. Just press Command + Spacebar and ask her anything.
3. Start Windows
Yes, yes, we foresaw the question: who wants to run Windows? In fact, sometimes it is extremely convenient and even necessary, for example, to play the latest version of a recently released game or run a certain program that does not have a Mac equivalent.
You can run Windows alongside Mac OS using applications such as VMware Fusion, Parallels Desktop, or VirtualBox. It can also be done by splitting hard drive into sections and further Windows installation- in this case, you will need Boot Camp, located in the Utilities folder.
4. Create screenshots of any size
For a person who uses Windows, taking a screenshot can be quite a challenge. For example, you can use the PrtSc key to capture an image from the entire screen, or use the Windows Snipper tool to capture a portion of an image. In addition, some keyboards do not support this function, and opening a special application to take a screenshot is too long and complicated. Luckily on Mac this process simplified as much as possible.
To take a screenshot of the entire screen, simply hold down Shift+Command+3 at the same time and the screenshot will be saved to your desktop. To take a screenshot of some part of the screen, hold down Shift + Command + 4 - the screenshot will also be saved on the desktop, and to take a screenshot of a separate window, hold down Shift + Command + 4, then press the space bar and click on the window you want to take a screenshot.

And finally, if you happen to own a new MacBook Pro with Touch Bar, then hold down Shift+Command+6 to take a picture of that little OLED strip. One way or another, all you need to take screenshots on a Mac is just remember a few simple key combinations.
5. Automatic appearance and hiding of the menu bar
The menu bar has been fixed in place since the release of the Mac in 1984, but with the release of OS X El Capitan, users have the option to hide it. To do this, open System Preferences, go to the General tab, and select Auto Hide Menu Bar. Now it will only be displayed when you move the pointer up the screen.
6. Using Unusual Symbols and Emoticons
Along with the letters and numbers that are marked on the keyboard, you can also use a huge number of special characters. You probably already know how you can put an accent over a letter, as in the word “café” (press Option + E and E again, in OS X 10.7 and later - just hold E until you see a menu with additional options) . But this is not all the features available to you.
Go to the "Edit" menu, which is found in most applications, and at the bottom you will see the "Special Characters" panel with a huge number of very different characters that you can include in the document if you wish. Unfortunately, not all applications and operating systems support them, but they - in their majority - conform to the Unicode cross-platform standard.
However, emoji (bright and colorful image symbols available in OS X 10.7 and later) are a rare exception to this rule. Although they are available not only in Apple devices, but in the case of them, there is a chance that the recipient will not be able to see them, since his device does not support these characters.
7. Create a signature on PDF documents right in Mail
Although we live in the 21st century, we still put our stroke on paper when we officially agree to something. If you have been sent e-mail A PDF document that you need to sign, now you don't have to worry about first printing it, then signing it, and finally scanning it to send it back. Now you can sign it directly in the email.

Drag the PDF file to email, which you are going to send, hover over it - a small button will appear in the upper right corner. Click on it and you will see a number of available options, one of which will be "Sign a document". The most convenient way to add a signature is to use the webcam on your Mac: just hold a piece of paper with your signature near it and wait until the camera captures it. At the same time, the camera perfectly recognizes the signature, excluding everything unnecessary in the background. In addition, you can use your own touchpad, which is much more convenient to sign with a stylus.
8. Using Split View
Using two side-by-side Mac programs has become much easier with the release of OS X 10.11 El Capitan. This was made possible thanks to the Split View mode. In order to switch to this mode, you must hold down the green full screen button located in the upper left corner of the screen, as a result of which the window will be minimized, and it can be dragged and pinned to the left or right side of the screen.
After that, you need to select another window or application and click on it to attach it to the opposite side. When using this mode, the launcher and OS X menus are hidden, which allows you not to be distracted by third-party trifles and get a larger workspace.
Thanks to the vertical line between the windows, you can effortlessly change the width of the windows, as well as their position. This format will be extremely convenient, for example, if you want to simultaneously monitor the progress of a sports game and at the same time continue to do work / other things.
9. Annotate PDFs and Pictures
The Preview program has an excellent set of tools that make it easy to annotate images and PDF files. And, most importantly, the annotations added by this program use standards that are compatible with the PDF application. Adobe Acrobat. This application ubiquitous by companies and Windows users, making annotated documents extremely easy to share with colleagues.
Before creating an annotation, make sure the "Toolbar" is visible (if not, correct it in the "View" menu). Thanks to this panel, you can draw various shapes, arrows, comic bubbles and bubbles with thoughts. In addition, you can highlight text in different colors, add strikethrough text, notes, and also different types text fields.

10. Adding your signature to the required documents
In OS X 10.7, thanks to the Preview program, it became possible to add your signature to a document. To do this, launch the program and go to the "Signatures" tab in the "Settings" section, after which we click on the "+" or on the "Create a new signature" option. After that, take a small piece of white paper and write your signature on it with a black pen. Bring a piece of paper with your signature to the webcam. Once you are satisfied with the result in the preview window, click the "Accept" button. If you want to use this signature in the future, make sure you save it.
Now open the document where you want to paste this signature, go to the toolbar and select the signature icon - it looks like an italic x S with a small dash at the bottom. Select the location where you want to insert the signature. Once you paste it, you can scale and move your autograph.
11. Image editing
In our opinion, Preview is one of the most underrated Mac programs. Especially it concerns latest versions OS X, in which she received a huge number of great features. In fact, with this program, you can do many of the things that we are used to using more complex and expensive applications like Photoshop. Just try opening a picture in this program and see what a wide range of image editing tools it offers.
For example, you can crop a picture. To do this, click the "Select Rectangle" button and use it to select the area you want to save. Then press Command + K or click on the "Crop" button in the "Toolbar". There you can also find more complex and interesting options, such as, for example, the Instant Alpha tool, which allows you to select and remove a background or other object in an image, as well as Smart Lasso, which allows you to extract an image.
If you have multiple Apple devices (for example, a Mac at home and at work, a Mac and an iPhone, or multiple iOS devices), turn on iCloud Keychain. This will synchronize on all your devices the logins and passwords that you enter in the browser, information about credit cards and Wi-Fi connections.

This means that if you, for example, save the password and login of a site on your iPad, you can then quickly log into that site from your Mac. Or, by saving credit card details on your Mac, then safely use them on your iPhone. Using this function may seem a bit difficult at first glance, but the benefits that it will bring to you later are definitely worth the time and effort spent.
13. Create hotkeys for any required function
Keyboard shortcuts are an incredible time saver, but you don't have to settle for just the options that were built into your Mac by its developers. If there's a menu option that you use all the time that doesn't have a keyboard shortcut, you can always set that shortcut yourself.
Select the "System Preferences" menu item, click "Keyboard", and then select the "Keyboard Shortcuts" section. Click "+" to add a new combination and select an application from the list that opens. However, you must know exactly the name of the menu command, which you will need to enter in the next step. And finally, select a key combination that has not been used before, which will open the application you need, then simply click "Add".
14. Using Automator to do more with less effort
Automator is a program built into OS X that lets you create a series of standard actions that run without your intervention and make complex tasks easier to complete. In this program, you can create small applications that will store the script of the finished action, or you can add the necessary actions to an existing application as a service - in this case, you can access the functions by right-clicking. With Automator you can simultaneously rename a large number of files, convert images to another file format, convert text documents to audio files and much more.
- To get started with the program, open it and then select the type of document you would like to create. Each type is used for a different purpose, so click on each one in turn for a brief description. Choose the option that suits you best and click the "Select" button.
- Start adding elements of your future operation one by one by dragging the available actions from the left side of the screen to the right side, where the process area is located. The available actions are arranged according to the type of application and file type - just click on the action you are interested in to find out what it is responsible for.
- After you add all the necessary actions to your operation, you can try to start the service you created by clicking on the "Run" button in the upper right corner. If any inaccuracies are found that interfere with the task, the program will underline in red the part where the problems arose.

15. Quickly import pictures using "Image Capture"
Although you can import photos from your iPhone manually, it's easier to do this using the Image Capture program. This feature has been available on Mac OS for quite some time, but as a rule, many users who are just switching to Mac do not know about it. With this program, you can directly transfer all the photos taken with your camera to a folder of your choice at the same time. Or, even more convenient, view photos one by one on your computer and immediately delete the originals from your iPhone in case you no longer need them.
In addition, you can connect to the scanner wirelessly and transfer scanned documents and photos to a directory of your choice. You can also link your camera to any Mac OS application. Therefore, you can set the Image Capture program so that a certain program, such as Photoshop, opens every time you connect your iPhone.
The MacBook is not only Apple's ever-fashionable laptop, but also countless features...
Indeed, the MacBook is a real dream! Someone dreams of a MacBook in order to get a stylish "thing" with such an attractive apple from Apple, and someone (and most of them) seeks to get their own set of design - functional characteristics who know no equal.
Now there are a lot of MacBook models on the Russian market, of which the most common is Macbook Pro- laptop from Apple for professional activities. It is the best alternative to a desktop computer, as it has a wide screen, high resolution display, excellent graphics, enhanced processor and light weight. Such a computer will never let you down - it can become your best assistant, in whatever field of activity you use it. Another model - Macbook Air- ultra-thin and ultra-light brainchild of Apple. This is one of the thinnest laptops in the world, powered by the latest generation of processors.
The heart of the MacBook is the Macintosh operating system (Mac OS).
Learning how to use this system on your own is not easy ...
If you, like millions of other users, are planning to buy a MacBook but think it will be difficult to use, we suggest you go MacBook training in our courses with professional teachers. If you already own a MacBook, then our offer will be even more relevant for you!
After completing our MacBook courses, you will avoid many torments!
Our instructors can teach you Mac OS in just a few lessons, so you can enjoy the rest of the time on one of the most advanced laptops in the world.
Training in our individual computer courses is based on the system of on-site consulting. What does it mean? It means that:
You do not have to waste time and effort on the road to the training center, as our teacher himself will arrive at the place and time appointed by you;
an individual program will be developed for you, as a result of which you will know the MacBook exactly as much as you need it, and not the average user.
MacBook - perfect technologies, which you simply do not have the right to use to the full extent!
Operating principles in OS X are somewhat different from Microsoft Windows, so users who recently bought a Mac, to replace a computer with a Redmond OS, experience some difficulties. If in the USA and Europe people start getting acquainted with a computer with both PCs and Macs, then in our country and the CIS there is no particular alternative. With a probability of 99%, the first computer experience will be Windows. Relearning, as you know, is much more difficult than relearning, but following our simple tips, you can minimize all the difficulties of the transition.
Installing and uninstalling applications
Your first search term in Safari is likely to be "How do I install apps on my Mac?". This simple operation, which you will inevitably encounter, is fundamentally different from that in the OS from Microsoft. And what is remarkable, installing the application will take less time than you spend on a search query.
Most programs are distributed in dmg-archives (images) and are installed in just a couple of clicks:
- open the downloaded .dmg file (it will be visible in the Finder as a removable disk);
- drag the directory with the application to the system folder "Programs";
- the application will appear on Launchpad in a couple of seconds (pinch gesture to open) and will immediately be ready to work;
- now you can extract the distribution image in the Finder sidebar and delete the .dmg file;
You can install the application from the .dmg file to any folder convenient for you, but then the program icon will not appear in Launchpad. Therefore, I recommend using the "Programs" folder, especially since it is intended for this.
Some applications have their own installer and are installed through it. In this case, you will see a dialog box with the buttons "Accept", "Next", "Install" (hello, Windows!).
Starting with version 10.7, OS X introduced the Mac App Store App Store, similar to the App Store on iOS. It is even easier to work with it, for installation - just click the "Install" button on the page with the application.
Similar to installation, uninstalling an application consists in removing it from the Applications folder. We drag the directory with the application to the "Basket" - and the job is done. If the program has its own installer, then uninstallation also occurs through it.
Interaction with windows. Close or collapse?

Windows users are shocked at first: not only are the window control buttons on the left, they also work differently. Indeed, the "x" button does not close the program, but only closes its window. This is due to the fact that in OS X applications can have several windows, and after we close the window, the program continues to work. The "+" button does not expand the window to full screen, but scales it to the size of the displayed content.
In order to completely close the application, you should press "Cmd + Q" or right-click on the icon in the dock, and select "Finish".
It is convenient to monitor running programs by the indicator in the dock. This feature is enabled in the system settings, in the Dock section.
Also since version 10.7, OS X applications can run in full screen mode when the dock and menu bar are hidden. To activate this mode, you need to click the arrow icon in the upper right corner of the screen.
Using multi-touch gestures

One of the main features of OS X is support for multi-touch gestures. There are a lot of them here (I counted more than 10 gestures), and most importantly, thanks to the wonderful trackpad, they work just great.
Open the system settings and go to the "Trackpad" ("Mouse") section, turn on the necessary gestures and watch a demonstration of their work. In addition to the banal imitation of the right mouse button, scrolling and dragging windows, with the help of gestures we can: search for the selected word; rotate, scale images; open Launchpad, Mission Control, Notification Center.
Spending a few minutes learning gestures will make your work in OS X more productive and much more enjoyable.
Useful Functions of the Fn Key

The Fn button provides quick access to many system functions. Here are some useful shortcuts:
- Fn+Ctrl+F2 allows you to navigate the menu without using the mouse;
- Fn+Backspace replaces the Delete button;
- Fn+F11 show desktop;
- Fn+up arrow replaces the Page Up button;
- Fn+down arrow replaces the Page down button;
- Fn+left arrow replaces the home button;
- Fn+Right Arrow replaces the End button;
These shortcuts are very easy to remember and I recommend using them in your daily work. By the way, there is a tiny CheatSheet utility that will help you remember and use all the available abbreviations. After installation, it is built into the system and when you press the "Cmd" key, it displays the full list of abbreviations available in the open application.
Adding Apps to Startup

Some applications during installation are immediately added to the list of programs that will be automatically loaded at system startup. You can edit this list as you wish, for more fine tuning under yourself.
Open "Settings" - "Users and groups" and on the tab "Login objects" edit the list using the "+" and "-" buttons. On elderly poppies, it makes sense to remove unnecessary elements, this will speed up the system boot.
Detailed information about your Mac

In a Windows environment, in order to get full information about the computer hardware you have to use third party utilities, like AIDA 64. Operating system from Apple, in this regard, compares favorably with a competitor. OS X includes the System Information utility, which gives us a detailed report of absolutely all hardware and software. Here we can see the frequency of the processor, the number of slots and the type of memory, the poppy address of wifi and bluetooth, as well as a lot of other service information.
"System Information" can be found in the "Utilities" folder on the "Launchpad" or by clicking on the "Apple" icon in the menu bar and selecting "About This Mac".
Quick File View

My favorite built-in feature in OS X is Preview. In the Finder, on any file or folder, pressing the space bar will open a quick view window. All types of files known to the system are supported: images, videos, documents. The preview window is closed by pressing the space bar again. Fast, simple and convenient.
Force Quit Applications

It happens that programs stop responding or, in other words, freeze. For example, you have opened a large number of tabs in Chrome or launched several "heavy" applications. Windows users familiar with the shortcut "Ctrl+Alt+Delete", which they regularly use. In OS X, to bring up the application termination dialog, you need to press "Command + Option + Esc", here we select the hung program and click "Finish".
While this rarely happens on Mac OS, if it does, you'll know what to do.
Enable support for all video formats

Built-in QuickTime supports major video formats and for the needs of most users, this is more than enough. But if you are the owner of a diverse video collection, you will have to expand the list of supported formats. This can be done with the Perian codec pack or by installing a third party media player like VLC. Both solutions are free.
Don't forget to make backups
The last advice, banal and hackneyed, which nevertheless is constantly neglected. To ensure that your data is always completely safe, use backup, and make regular backups with Time Machine . It will also allow you not to be afraid to experiment with the system, which will be inevitable at first.
