How to make a bootable flash drive. Creating a bootable flash drive (easy way) Favorites. What to do if you have two logical drives
If your operating system crashes or it gives a lot of errors during operation (buggy), then you need to reinstall the system. Since a huge number of different laptops, netbooks and other devices with a missing CD / DVD drive have appeared on the market, the need for a bootable USB flash drive is greatly increasing. Since the purchase of an external CD / DVD drive is quite expensive and not particularly in demand. And now I will tell you how to create a bootable USB flash drive with your own hands, at home, in the three most common ways.
Bootable flash drive using Windows 7 USB/DVD Download Tool
Let's first talk about the easiest and fastest way to create a bootable USB flash drive from Windows 7 USB / DVD Download Tool - this is a good utility from Microsoft, designed to easily create a bootable system on various types of removable media. This makes it easier to create a bootable flash drive for users of laptops, netbooks and owners of personal computers with a faulty drive. Next, consider the step-by-step creation of a bootable USB flash drive using this program:
- Download and install Windows 7 USB/DVD Download Tool.
- We run our program as an administrator. To do this, right-click on the program shortcut and select "Run as administrator".
- The Microsoft Store window will appear in front of you. You must click the "Browse" button to select the operating system to create the ISO image.

- After selection, press the "Next" button.

- Next, the following window will appear in front of you, in which you will be offered the choice of recording to a DVD disc or a USB drive. Since we want to create a bootable USB flash drive, we need to select the "USB devise" item.

- The program will then prompt you to select the USB drive on which you want to burn the operating system image. You select the flash drive you need and click the "Begin copying" button.

- Next, the program will format and install automatically.
- After a while, the download bar will reach 100% and the inscription “Backup completed” will appear in front of you in the status, which in turn will signal the completion of creating a bootable USB flash drive.

- We close our program and now you can use the bootable USB flash drive for its intended purpose.
Bootable flash drive using the UltraISO utility
And now let's look at one of the most popular and common programs. UltraISO - a program designed to read, edit and create disk images. This program is very simple and convenient for ordinary users of a personal computer. This program will come in handy for your work, because it can work with more than 30 file formats. And now let's figure out how to create a bootable USB flash drive using the UltraISO program in step-by-step instructions.
- Download and install the UltraISO program.
- Right-click on the UltraISO program shortcut and select "Run as administrator".

- On the toolbar, click on the "File" tab and select "Open". Or press Ctrl+O.
- After we select the image of the operating system we need to create a bootable USB flash drive. For example, I have selected the image of the operating system Windows 7 Ultimate Ru x86-x64 Orig wBootMenu by-ovgorskiy.
- Left-click on the name of the operating system (thus we select it).
- Open the "Boot" tab. Select "Burn hard disk image".

- After that, a pop-up window will appear in front of you, where you need to check whether the correct flash drive is selected, whether the operating system is selected, as well as the method for recording a bootable flash drive. It must be installed in USB-HDD format. Check and click on the "Record" button.

- Next, the installation of data on the USB flash drive begins.
- After a while, you will see the inscription "Recording completed." This inscription will inform you that you have completed the creation of your bootable USB flash drive.

- Once completed, close the program and use your flash drive to install the operating system.
Bootable flash drive using Windows command line
This method of creating a bootable flash drive does not require additional programs and utilities. And only because of this he deserves to tell you about it. It is a little more complicated and will take you a little more time than with the programs we have reviewed above. Let's take a look at our steps step by step:
- We call the "Run" window. To do this, press both Win+R keys at the same time. Only you may have a different name. Vyacheslav will be your place.

- In the empty field, enter the command "cmd". This command will open a command prompt. We will continue to work on it.
- At the command line, enter the command "DISKPART".

- Then we enter the command "list disk". This command will give us the opportunity to see the drives connected to the PC.

- Enter the command "select disk 1". With this command we select our flash drive.

- Next, we clean our flash drive. To do this, enter the "clean" command.

- The next step is to create a primary partition. To do this, enter the command "create partition primary".

- We need to select the partition we just selected with the "select partition" command.

- Enter the "active" command. This command will make the selected partition active.

- Next, you need to format the flash drive in NTFS. To do this, type the command "format fs=NTFS".

- We are waiting for the system to format your flash drive to 100%.
- Next, give the letter name of our flash drive. To do this, use the command "assign letter = O". Choose the letter for the name of the flash drive yourself. I have an O.

- After that, you will open the "Removable disk O" folder.
- At the command line, enter the command "Exit". This command will close the command prompt.

- In the folder "Removable disk O" we transfer all the files of the operating system. Files must be copied (transferred) only in unpacked form. You should not just copy the image of the operating system in one file, such a flash drive will not work.
- The bootable flash drive is ready to use.
Gone are the days when you needed a DVD-ROM to install the system, which in turn could get scratched and freeze during installation. A bootable USB flash drive for Windows 10, Windows 7, Windows XP to install the system on a computer will be faster and more convenient. Create a bootable flash drive with Rufus and . When installing the system, I recommend inserting the drive into the rear USB ports of the computer.
Let's start the procedure for a PC with a UEFI bios, (you can read the types of bios) for older computers and laptops, they may not be suitable, for older PCs we will consider below. Using a proprietary utility from microsoft. Downloading Windows 10 Installation Media Creation Tool, run the downloaded program and select "Create installation drive".

- There should be a checkmark, then it will automatically adjust to your system.
- You can manually select what you need, for this you need to uncheck the box in paragraph 1.
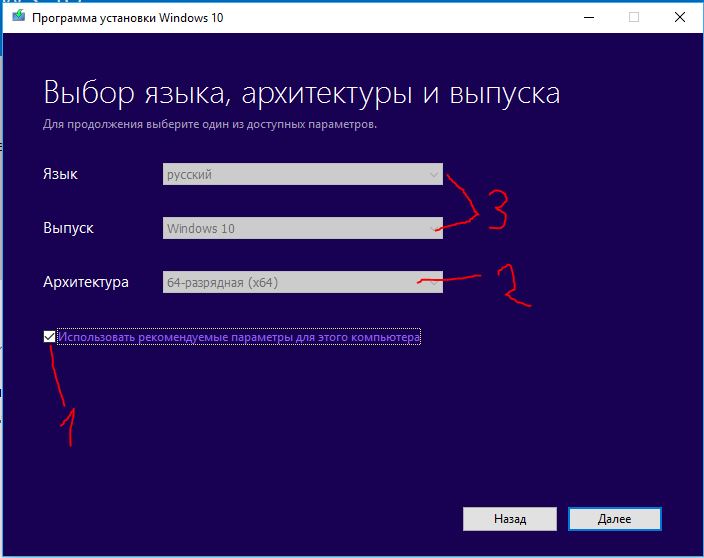

- Specify the media that will be a USB device.

- You specify (choose) the path to the device. We are waiting for the end of the download and recording. That's all!!!
Windows 8.1 installation media
Downloading Windows 8 Installation Media Creation Tool a similar situation. We do as described above with the tenth version.
Create bootable USB flash drive Windows 10 without programs
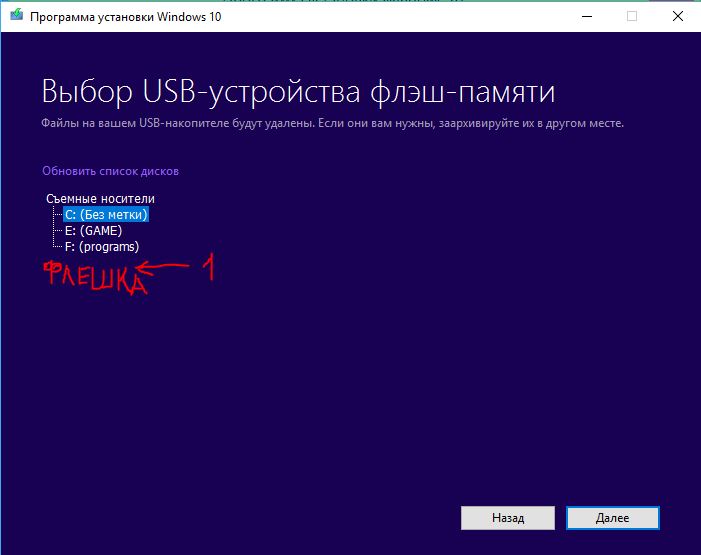
Let's analyze the option without programs (only suitable for UEFI bios). You will need a downloaded distribution in ISO format and a USB drive formatted in FAT32.
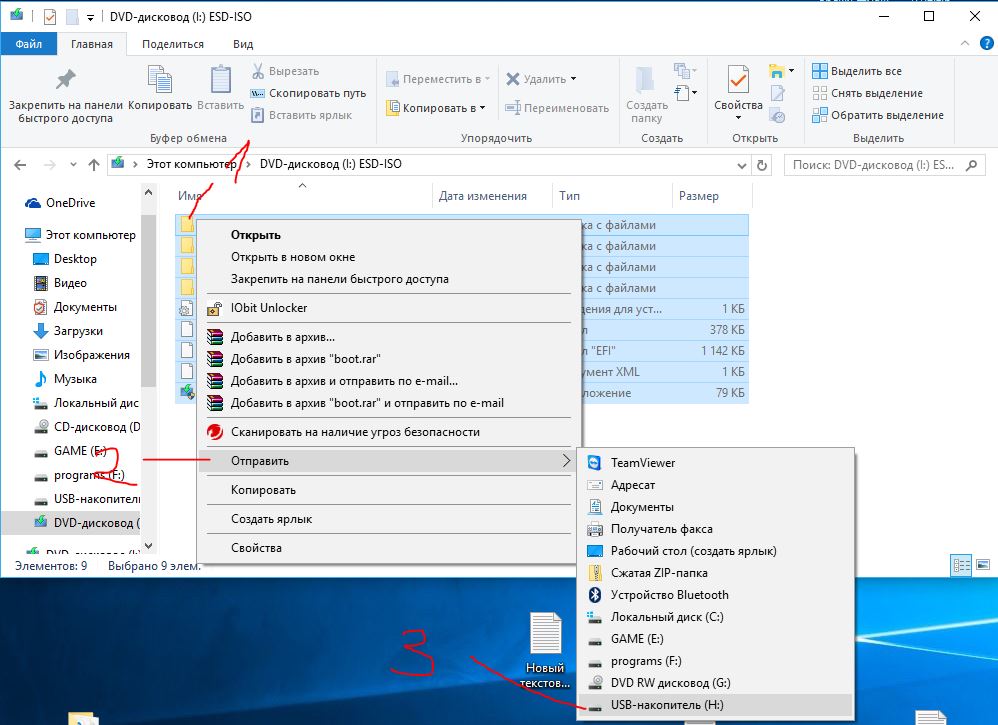
- Select the windows image and right-click on it.
- In the context menu, click "Connect".
- There will be such a disk as in the picture with windows files and folders.

- Circle (select) everything and right-click on the file or folder.
- Click "send" in the context menu.
- Select a USB device.

Create bootable USB flash drive Windows 10, 7, XP using Ultraiso
The seventh version is old, so we will create the windows 7 installation media using the UltraISO program. With this program, you can also write to a USB flash drive and windows 10 and XP. Download the software and install it.
- We open our downloaded image with the Windows 7, 8, 10, xp system.
- We look that the disk icon would be selected.
- Select "Burn Hard Disk Image".
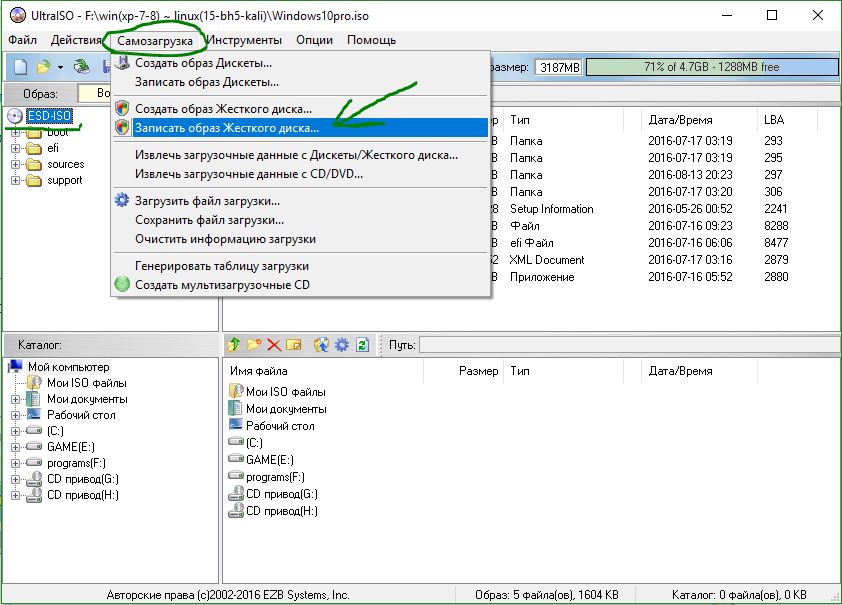

- We look carefully to stand USB stick so as not to format your hard drive.
- Select the recording method "USB-HDD+". (When booting the computer, select USB-HDD + in BootMenu).
- We press "record".

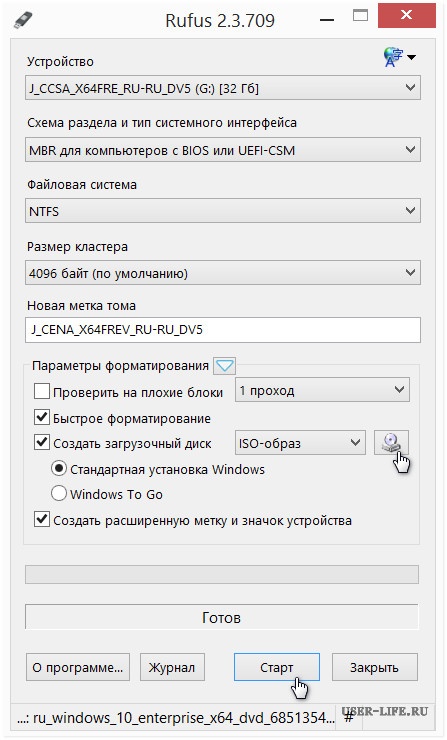
Bootable USB flash drive windows 7, 10, XP using Rufus
If your bios is old, not uefi, then Rufus is made for this. Suitable for all versions of windows. Select in the column "Partition scheme and type of system interface": For old BIOS, select MBR. For modern UEFI. Download and install rufus.

Bootable windows 7 flash drive using USB/DVD Download Tool
A utility from microsoft created a long time ago is very relevant to this day to create windows 7 installation media using the Windows USB/DVD Download Tool. Download and install on your computer.
- Select USB storage.


- Click "Erase".


- We squeeze "Yes", it formats the drive, writes, and you're done.


I can immediately please you, creating a bootable USB drive is quite simple.
I confess that I don’t know for 100% which is more correct ... a USB drive or a flash drive.
But this is not the point, but the main idea is simple or almost simple.
So, why do we need a bootable USB drive?
In simple terms, for peace of mind. And what are we going to accumulate there? Yes, everything to restore your computer!
For example, we combine several Live-CDs with various utilities or OS at once, write them in a special way to the drive and add a bootloader that will help start all this economy when the computer is turned on.
You may not believe it, but there are such glitches that your computer may not see your CD drive, where you will honestly insert your OS for recovery.
In the same way, we can create a universal USB drive with several installers for various operating systems at once.
Consider some programs that will help us in this matter.
And so, we have already agreed that you can install the operating system using a USB drive. To do this, you need to create a multi-boot USB flash drive or a universal USB drive ... ho, ho again I'm at a loss with the correct name.
The easiest and also official way to create a bootable USB flash drive, implemented by Microsoft. To use this method, you need to download a special utility for this link.
Additionally, you will need a flash drive on which the operating system will be recorded and, of course, the Windows 7 OS itself.
The next steps will look like this:
1. Run the downloaded Windows 7 USB/DVD Download Tool;
2. Specify the path to the ISO file with the image of the operating system;
3. Next, you must specify the letter of the removable disk on which the operating system will be written;
4. Wait for the utility process to finish.
On this, in fact, work with the official utility is over. Now the recorded flash drive can be used on a computer or laptop without a CD drive.
Next method, which implies the use of a third-party WinToFlash utility. This wonderful free utility has long established itself as a good helper. You can download WinToFlash for free by this link.

With WinToFlash, you can completely transfer the Windows XP, Vista, 7, 8, 8.1 installer to an external Flash drive in a few simple steps.
The program has 2 main modes of operation. Wizard mode and advanced mode. Wizard Mode is ideal for beginners as here all user actions are reduced to a simple step-by-step selection of specific parameters of the operating system and flash drive.
Main features of WinToFlash:
Transferring the Windows XP/2003/Vista/2008/7/8 installer to a USB drive.
Full support for editions of both 32-bit and 64-bit architectures.
Full support for ISO, RAR, ARJ, ZIP, 7z, CAB, DMG image formats.
Transferring recovery discs or mini-OS (BartPE on Windows XP/2003, WinPE on Vista/2008/7/8) to a USB stick.
Erase USB storage (format FAT16 or FAT32).
Transferring MS-DOS to a USB stick.
Detailed setting of any FAT options for better compatibility.
Select USB drive bootloader - GRUB or Standard.
Create an answer file for Windows Setup: add serial number, username, etc.
Detailed configuration of the Windows Setup transfer process.
Checking the USB drive for file system errors after migrating Windows Setup and much, much more.
Next method.
An equally popular method that PC users often resort to is creating a multiboot flash drive using the UltraISO program.
Many users are already familiar with this program, with which you can create images and burn to a variety of media. You can download UltraISO from this link. UltraISO is a sole proprietorship ISO document format analysis tool that works with almost all currently available image types, including ISO and BIN, and even supports new image files that are just being created.
UltraISO can open such image files, directly extract files and folders, edit them, and convert other image files to standard ISO format.
The process of creating a multiboot flash drive in UltraISO is as follows:
1. Run the program and open the ISO image with Windows 7. Connect a flash drive to the computer;
2. At the top of the program, select the "Boot" menu, and then the "Burn hard disk image" item;
3. Opposite the “Disk Drive” item, specify the letter of the flash drive;
4. Select the "Format" item, which will prepare the flash drive and clear all entries.
After formatting is completed, select "Write" and wait for the process to finish.
As you can see, there is nothing difficult in creating a multiboot flash drive or bootable USB.
You can’t talk about which program is better or worse for these purposes - here you need to focus entirely on your preferences.
Next method.
The free program Rufus will help us in creating a bootable USB flash drive, or a bootable USB drive.
Download here:

The utility can work with images of the following operating systems:
All Windows operating systems from XP to Windows 10
Linux OS, both popular Debian, Ubuntu, Red Hat, CentOS, and less common: Damn Small Linux, LiveXP, etc.
FreeDOS.
The main features of the program:
Of course, creating a bootable USB drive from a bootable ISO image (Windows, Linux, UEFI, etc.)
works on computers that do not have an OS installed
has the ability to flash the BIOS or other firmware from under DOS
runs as a low-level utility
according to the developers, it is the fastest utility among analogues.
Rufus does not require installation!
All you need to do is download the application, launch it as usual by double-clicking the left mouse button and answer just one question:

So, after installing the application, we will see the following window:

Here we need the following actions:
Select the type of operating system that we want to put on the flash drive in the drop-down list;
Select the ISO of the disk to write to the card / flash drive.
Press "Start".
However, the easiest-to-use utility for creating multi-boot removable drives is called xBoot.
Working in XBoot is elementary - just drag the ISO images of the necessary distributions or utilities into the main program window, and it will automatically extract all the necessary information and add it to the download list.
In the plate, you can edit the fields Name (name), Category (for more convenient navigation, you can scatter utilities into categories) and Help Text (a short description for each download item) at your discretion.
 Well, there is a spoon of no abilities!
Windows installation images, starting with XP, are unlikely to work correctly. For them, it is better to use the methods and programs described above.
Good luck Friends!
In this article, I will describe several ways to make a bootable USB flash drive for free and without much effort:
Let me explain why I chose these three options, so:
The advantages of creating a bootable USB flash drive using the UltraISO program is that even in the trial (free) mode, this program will help you create a bootable USB flash drive without any problems and it also has many different functions. Cons (if they can be considered as such) is that it needs to be downloaded and installed, the installation process itself consists in pressing the Next button 4 times. In my opinion, the ideal third-party solution for creating a bootable USB flash drive for Windows XP, 7, 8.
Creating a bootable USB flash drive using the utility from Microsoft - USB / DVD Download Tool, the advantage of this method is that without special skills and abilities, thanks to a few mouse clicks, you get a bootable USB flash drive. Minus - an official (downloaded from the Microsoft website) ISO image of the operating system is required, otherwise the utility may not accept your ISO image and refuse to write it to a USB flash drive, or it will give an error when creating the image (I personally encountered such problems, which is why I consider it necessary to indicate them ).
And finally, creating a bootable USB flash drive using the Windows 7 command line. A big plus of this method is that you don’t need to install anything, but simply by entering a few commands, get a bootable USB flash drive with Windows XP, 7, 8. I don’t even know the disadvantages of this method ... probably only in its ugliness, since all commands are executed on the command line.
So, to create a bootable USB flash drive, you will need:
1 Flash drive with a capacity of at least 4 Gb (everything must be deleted from the flash drive, as it will be formatted)
2 ISO system image
3 BIOS, which will allow you to start the installation from a USB flash drive
4 Image creation utility (UltraISO, USB/DVD Download Tool)
If you have all this, then let's get started:
Create a bootable USB flash drive using UltraISO.
First of all, download the latest version UltraISO .
After that, start the installation of the program, click "Further"

We agree with the license agreement

Choose or leave the default installation location of the program


After that, the UltraISO program will open, click "File-Open"

Choose an ISO image of the system, in this example Windows 8 will be used

After that we press "Boot - Burn Hard Disk Image..."

In the next window, select the device on which the image will be written and click "Record".

After that, a warning window will appear stating that everything will be deleted from the flash drive, click "Yes".

The recording process will then start and last for a few minutes.

After the process of writing to a USB flash drive is completed, it becomes bootable.
Bootable flash drives are used to install operating systems on personal computers and laptops. They work exactly like installation DVDs. The BIOS can recognize such a flash drive due to the presence of a special boot sector on it - MBR - and run the programs stored on it. This article describes how to make a USB flash drive bootable, how it differs from a regular media, what programs are needed, and so on.
What is a bootable flash drive
At the physical level, such a flash drive is no different from any other USB storage medium. You can create it from any device: make it from an external hard drive, removable solid state drive or a regular flash drive. The only requirement is that you have the required amount of space on your device.
A special image of the operating system is unpacked onto a bootable USB flash drive in ISO format. An entire structure is created on it: a boot MBR sector, a table with the addresses of the necessary files, directories with the services needed during installation, and so on.
Creation is usually carried out using special software. There are many paid and free programs that allow you to work with ISO images and make a bootable USB flash drive. However, you can create it manually: using the command line, mark the boot sector yourself, write the necessary files to it, and so on. 
This process is quite complicated. Ordinary users have no use for it. It is essential for experienced computer professionals who want to make a multi-boot USB. It allows you to record several operating systems and choose which one you want to install directly in the BIOS.
Programs for working with ISO images
There are quite a number of different programs that can help you create a bootable USB. With their help, you can often burn an image to a DVD disc or make an image from an already finished disc. For example, if you have a Windows 7 installation disk, you can simply copy its contents to a USB flash drive. This is much more convenient, as it allows you to install the operating system even on those computers that do not have a DVD drive.
Another way to get an image is to download it from the web. If you have a license key, you can download the original ISO directly from the official Microsoft website. To do this, you need to do the following: go to the page https://www.microsoft.com/ru-ru/software-download/windows7 if you want to create a USB flash drive for installing Windows 7, and enter your code in the text field. If it turns out to be correct, you will get permission to download from Microsoft servers.

Otherwise, you will need to find the image online. There are many sites called torrent trackers where you can find the files you need. You can burn the original Windows installer to a USB flash drive or disk, or use ready-made assemblies. They may include large sets of drivers for many devices, pre-installed useful programs, activators, and so on.
This article discusses exclusively free software with which users can easily and quickly make themselves a bootable USB flash drive.
Windows7 USB Download Tool
This is the official utility from Microsoft for creating bootable media and burning images to DVD. Working with it is completely free. Follow the provided instructions:

Please note that creating bootable media from a regular USB flash drive will destroy all data. It will be impossible to restore the lost. Therefore, it is highly recommended that you carefully check the USB media you are using.
WiNToBootic
Another free application with which users can make a bootloader for the operating system. It can be downloaded from the official website of the program - http://www.wintobootic.com/. Just follow the link and click on the green "Download" button in the upper right corner of the page. 
A zip file will be saved to your personal computer. To work with the program, you need to unzip it. You can use any free archiver, for example, WinRar or SevenZip.
The advantage of this utility over the Windows Download Tool is that it does not need to be installed. This is the portable version. You can burn it to your USB flash drive or place it on cloud storage so that you can access it at any time from any personal computer.
 The application interface is very clear at a glance. In the left part of the window, you need to select the devices that you want to make the bootloader. On the right side, specify the path to the location of the image in ISO format. After that, click on the “Do it! ", which is located in the center.
