Setting up a home media server is a complete guide. How to install, configure and connect the Home Media Server program as a DLNA server? With the help of programs
This article will talk about setting up on your computer. This technology is useful in that you can use it to view media content from your PC on your TV.
This can happen when the TV and computer are connected to the same network, or when connected directly. After that, it remains only to launch DLNA and turn on the viewing of the desired movie or photo. This is quite convenient, because it is much more pleasant to show a large company photos, videos, or make a presentation on the big screen.
There are many different programs that allow you to do this. Among them, it is often recommended "Home media server (UpnP, DLNA, HTTP)". Indeed, this application has shown itself well in practice. Therefore, in today's article, we will show an example using this particular program.
This home media server is quite versatile and is able to run a DLNA server that is compatible with any TV (and indeed with many devices, such as game consoles) that can work using this technology. If the TV is capable of connecting wirelessly, or it has a connector for connecting a network cable, then it is likely that it supports DLNA. In general, the program itself has many different settings, so standard applications, for TVs, are very much inferior to it.
Today's article itself will be useful to owners of TVs from almost any manufacturer. After all, as already noted, a home media server is a third-party program with great functionality and wide capabilities, which allows it to work with any technique. And also it's free.
Today we will consider in detail only ways to open access for TV to the necessary folders on the computer, instructions on how to create a server and watch movies using it.
For reference, this example uses an LG 32LN575U TV, an ASUS RT-N13U router, and an ASUS R56CM laptop.
Establishing a connection between the TV and the computer
As you already understood, in order to be able to watch video from a computer through a TV, you need to establish a connection between these two devices. If you already have them connected to each other, you can skip this step and proceed to the next one.
Well, if your TV is not yet connected to a PC, then you can do this through a router. Thus, without unnecessary troubles, you can connect the TV set to your computer via Wi-Fi. Another TV, you can connect with the help of a router. The most important thing is that both devices work with the same router.
In case there is no home Wi-Fi
When you do not have a router, and accordingly there is no wireless network at home, you can connect the TV to your laptop using a network cable, directly.
It will look like this:
This connection method is quite reliable, so there should not be any special problems. The downside is the presence of a cable that connects these two devices. Even if the TV does not see such a connection, you can still play multimedia files through the Home Media Server program.
It is possible that it is really possible to connect a TV to a computer. But we have not yet begun to check this and look for ways to implement such an undertaking. Most likely, you can do this using your laptop as a router.
After connecting the computer to the TV set, we proceed to the settings for the DLNA server.
Setting up a "Home Media Server"
Of course, first of all, we need the program itself. You can download it from the official resource https://www.homemediaserver.ru/index.htm and then install it. On the developer's site, click on the download button.
 After that, save the archive with the program to your PC. After that, it needs to be unpacked. There will be a “setup” file, run it and follow the instructions to install the application. When the program is installed, its shortcut will appear on the desktop. Start Home Media Server.
Now we will specify in the settings all types of media files and folders that will be available for viewing on the TV. We go in the settings, in the upper part of the program window there is a corresponding button.
In the settings window, go to the media resources tab. There will already be indicated several standard folders with music, pictures and videos. Here we can add our own and edit the type of files that will be displayed on the TV.
 In order not to rummage too much in folders, looking for the desired video or photo, it is better to open access to local disks. Check the box next to the corresponding item (or make sure that it is there).
Activating this option will provide the ability to access any files from the TV that are on all local drives.
 In order to add separate directories with files or, for example, an external HDD, click on the "Add" button on the right. Then find desired folder, or an external device and select it.
 The plate in the center displays all the folders for which the TV is accessible. This shows the type of files that can be viewed in these directories. In general, this is the main setting that is necessary for us, but the program has a lot of other useful parameters that can be configured.
After you've done everything, you will need to save these settings. Click on the "OK" button and agree to scan directories.
 For some time, the program will scan the selected directories. After that, you can start starting the DLNA server. On the top menu, click on the start button. You should see a message that the server started successfully.
Turn on your TV and open, on the computer, in the program, a tab with playback devices. In the right corner, click on the "Update" button. After that, the TV should appear in the list.
 If this does not happen and the Home Media Server does not find anything and the connected devices are not shown on the TV itself, then you need to check the connection itself. Make sure your TV and PC are connected.
In some cases, the operation of the media server can be blocked by antivirus programs and firewalls. In this case, add this application to the exceptions and try again.
If everything was successfully detected, you can start viewing media files. We'll start with photos. In the top menu, select the desired file type, in this case a photo.
Further, in the central part of the window, you can select the desired directory and find suitable files in it. When the desired photo is selected, just right-click on it and hover over the line “Play to” and then select your TV.
 This photo will instantly appear on the TV screen.
 In the same way, you can launch and play videos and music. This is just one way to play files by launching them from a media server. But this method is not very comfortable. In many cases, it is much more convenient to search for the desired files on the TV itself, and then launch them.
By the way, if the window of a running program is closed, it will be hidden on the notification panel.
 But the server itself will not stop and will continue to work.
Opening files on TV
After the server is launched, we return to our TV.
Typically, TVs have a special program that allows you to work with a DLNA server. In our case, this Smart Share. But perhaps, in other examples, it may be a completely different program.
If you have a TV, as in our case (LG), then you need to go to the Smart TV menu (press the blue button on the remote control) and then find and launch Smart Share. True, if, but supports DLNA technology, then everything can be completely different. Open it and go to the "My Computer" folder, where there will be all the available files and directories that are accessible.
 You can open any and run the desired video, view photos, or listen to music
Summing up
Like it or not, but "Home Media Server" is quite an interesting program that opens up new possibilities for your TV. And by the way, this program has a lot of other useful features. For example, if you watch a long enough movie, the computer may go to sleep and the TV will stop showing. Whatever it was, in the settings there is a special option with which you can prevent the PC from going to sleep.
In this article, you will learn how to connect a TV to a computer via DNLA, through a home media server. After you set up a media server on your computer, you will have a home media network. Through it, you can transfer video from a computer to a TV, as well as other media content (photos, music) and play in real time. This approach to playing video and audio files on your TV will save you from having to download media content to a USB flash drive every time and will create the conditions for selecting the desired file on the TV panel.
How to connect a computer to a TV via DLNA.
It should be said that in order to create such a network between a computer and a TV, your TV panel must support the DLNA standard set. What is DLNA?
DLNA (Digital Living Network Alliance) - The Living Digital Network Alliance) is a set of standards that enable all compatible devices (laptop, tablet, mobile phone, game console, printer, camcorder ...) to transmit and receive via wireless (Wi-Fi) and wired (Ethernet) networks to play photos, videos and audio files.
All famous brands such as Microsoft, Intel, Hewlett-Packard, Nokia, Samsung, LG, Sony… are members of this digital alliance, but Apple, together with BridgeCo, has developed its own AirPlay standard (technology and protocol), which is supported by devices from such manufacturers , like Bowers & Wilkins, iHome, Marantz, JBL. Therefore, if your TV or any other device is from Apple, then you will not be able to connect it to your existing DLNA network.
In one of the publications for Samsung TV owners, I already wrote about how to set up a media server through specialized programs from the developers of the same company. This is about . So, no jambs were noticed in the work of the PC Share Manager program, which cannot be said about the AllShare product. But most of the time it still works fine.
Numerous calls to the support service from different users did not give any results, and all as one received a very dry answer: “Our AllShare product does not work on a good half of the hosts.” Well, let's leave them alone with their buggy "product" and use the universal alternative, the Home Media Server program (UPnP, DLNA, HTTP). It works with TVs from Samsung, LG, Philips, Sony, Toshiba. You can find more details about the features of the program on the official website.
Connecting a computer to a TV through a router to transfer media files is better with a LAN cable () than with a wireless Wi-Fi connection (). Why? Of course, digital progress does not stand still, and with each new Wi-Fi wireless standard (), the coverage range increases, signal stability increases, data transfer speed increases ... All this is certainly relevant in our information age.
But in my opinion, it is still better to use a LAN cable to transfer multimedia files from a computer to a TV. The fact is that a wired connection has only one minus - wires, and from the pluses one can note a high data transfer rate, low ping (response time), minimal interference ... Despite the fact that in a wireless WiFi connection communication stability and speed directly depends on the power of the antenna, the influence of interference and the presence of obstacles ().
Therefore, for comfortable viewing (without brakes and freezes) of video standards such as Full HD, Ultra HD ... it makes sense to connect a computer to a TV in a multimedia network using a LAN cable. But this is just my recommendation and you can do everything on your own. So, how to connect a TV to a computer via DLNA? First of all, make sure that you have a router set up and that you have a connection to your TV (read here and set up Wi-Fi).
Installing and configuring a DLNA home media server.
As you already understood, in order to create a network between a computer and a TV, you need to install a media server. Run the distribution kit of the program downloaded from the official site and proceed with the installation.
All you need to do is specify the installation path, check the "Create a shortcut" box and click on the "Install" button. The installation process will be quick, and upon completion, launch the program.
After starting the program, you will be prompted to familiarize yourself with the list of changes. Click the "Close" button and in a new window "Initial Settings" in the drop down menu "Devices from the list" select your device type. Depending on the type of media device you have selected in the field "Integrated file support" will display a comma-separated list of supported formats according to the documentation.


If your device supports any other types of formats that are not in the list offered by the program, then you can switch to "Arbitrary Device" and in the field of extensions (movies, music, photos) add the required format separated by commas. Click the "Next" button.
In the next window "Catalogs of media resources" you need to share, that is, make visible folders or local, network, removable drives for your device. Here you can also add your directory with media content (specify the path to it) by clicking on the "Add" button and remove the already suggested folders by the program.


Green dots indicate what type of media content is stored in this directory. As a rule, I open access to local and removable drives because it eliminates the need to download and move files to specific directories. To do this, you need to tick off the necessary items and add your local drives. Click the "Finish" button. After that, the program will prompt you to scan media resources. Click the "Yes" button.
You can also add all local drives (or favorite directories) after installing the media server in the program settings on the Media Resources tab. To do this, click the "Add" button and select the local disk, and after "Scan". After that, the program interface will display the entire list of video files that are stored on your hard drive (see image below). Keep in mind that due to the large volume of media information scanned during server startup, the program will take longer to load.
So, decide for yourself how much media data will be available to the server. The less local disks (directories) are added, the faster the media server will start.
Move on. After the scan is completed, a window will appear. "Backup/Restore Program Data". Here, if you wish, you can specify a different path for the backup directory and set automatic scheduled backups. I'll leave everything as it is.


In field "Backup Directory" the path for saving and restoring program settings is displayed. After you click the "Run" button, the settings will be saved. That's it, click the "Close" button because all the basic settings have been completed and the computer-TV home network has been created.
I recommend you in the program settings on the tab "Additionally" check the box "Install Windows service Home media server (UPnP, DLNA, HTTP)" so that the media server starts as a service. After that, confirm your changes by clicking the "OK" button.
To start your DLNA home media server, just click on the button in the top menu of the program "Run". Pick up the remote control and select your media server from the list.


Now you have your own network between your computer and TV. By the way, if you need to check your TV for dead pixels and, if possible, restore them, then more about this. And that's all I have for today. Bye!
2019-06-13T18:31:00+00:00
TV LG49sk8500 does not see my desktop computer in the connection manager. The laptop sees, but the PC does not. I even tried the LG Smart Share stock program, the same thing. MGTS provider.
2018-07-24T14:09:39+00:00
The home media server sees TV in the settings. TV still does not see the PC.
2018-07-24T13:34:17+00:00
Antivirus off.
2018-07-24T13:32:05+00:00
Good day! TV TCL 43P6US on Linux. The TV is connected to the Internet via a Wi-Fi router, but the TV does not see the computer. The media server program is installed, did everything as written, but all in vain. Please help me figure it out. Thanks.
2017-09-18T11:51:04+00:00
We searched for a very long time and found you. Everything was done according to the description, there is a list of channels, but the image is temporarily not available. Samsung TV connected via LAN
2016-12-19T22:25:42+00:00
Goodnight. Philips TV pfs7309 / 60, both video, photo, and IPTV are turned on from the TV. It's annoying that the TV doesn't show up in the DVR's playback device menu. I can’t figure out how to make it visible and run files from a computer and not from a TV set. There is a second Samsung TV, so everything is fine, it is displayed and you can run files from your computer. What's the salt???
2016-11-30T18:06:19+00:00
Try resetting your router to factory settings and reconnecting. If there is an updated software, then it may make sense to update the firmware. P.S. Let me know if it helped or not. OK.
2016-11-30T17:20:50+00:00
Good evening, the problem is the following, the TV loses connection with the server after 12-16 minutes after the start of viewing, Samsung UE55K6550AU TV, before that there was Sony Bravia, there were no problems ...
2016-11-10T13:20:18+00:00
Dmitry, hello! Help, please, to understand. There is a laptop with a "Home Media Server", a Dlink 615 router and Philips TV. The router and TV are connected by a patch cord. In this connection, everything works. I replaced the router with Xiaomi mi nano and the TV stopped seeing the server - it asks to start it. At the same time, through smart TV there is an Internet connection and the router sees the TV in the devices. Tell me what could be the reason?
2016-09-02T19:44:35+00:00
2016-09-02T06:42:11+00:00
It would be better if they talked about the LG SMART SHARY program. How to run it separately through LAN, so that it does not affect the Internet and works separately.
2016-08-26T12:06:37+00:00
What is wrong with this media server?
2016-08-26T11:48:26+00:00
Hello, and who will tell you the name of the official program from Philips, which allows you to connect to a computer via a Lan network?
2016-08-19T15:43:41+00:00
Most likely blocking the FireWall network. Disable it for a while and if everything is in order, then add HMS to the exceptions.
2016-08-19T13:04:01+00:00
Hello! Has anyone experienced setting up HMS on a Samsung UE48H6400 TV. I set up the server myself, and I see a TV in it. But from the TV itself it is impossible to see the network. I can’t find Allshare functions on it, and there is no media server in Source. Everything is connected to one router. What can be done in such a case?
2016-05-15T14:09:38+00:00
A lot depends on the network equipment. I hope the TV does not receive such "heavy" files via Wi-Fi. P.S. Please, describe in more detail the scheme for connecting the TV to the home network.
2016-05-12T22:43:38+00:00
Hello! I could not watch 4K videos through the media server. What is the reason? What to include? Through the flash drive it shows normally, but through the server, as a simple HD. TV LG 49UB-830V
2016-05-01T16:27:28+00:00
But I have it differently. The LAZY IPTV program is installed in the android, there is already a built-in DLNA, I can watch different channels on the LG TV
2016-02-21T19:23:31+00:00
Better is a loose concept. You justify why it is actually better. P.S. In freedom, I can test.
2016-02-18T17:41:10+00:00
Used this program, but found a better Twonky server
2016-02-11T22:24:55+00:00
I haven't encountered such problems yet. Alas! If only I wouldn’t advise anything and I don’t have a clear answer yet.
2016-02-11T22:18:12+00:00
Moreover, when you go through the prefix to HMS, the folders are fully displayed there (Actors, Genres, Media Resource Directories, etc., but when you go to the Media Resource Directories folder, it is empty
2016-02-11T22:16:15+00:00
Thanks for the link, but computers see each other and go to each other (even connected to different routers). The set-top box also sees both the HMS and Windos "ovsky server, but does not see the files in them. But the Home Media Server itself does not see the set-top box at all. And before that, I connected the TV itself in the same configuration, everything worked fine. I think there is a problem in the set-top box, but I can't figure out what.
2016-02-11T21:07:02+00:00
Scanned automatically set, the result is zero. In the HMS itself, no prefix is displayed in playback devices and there is no "play to" item.
2016-02-11T21:36:48+00:00
2016-02-07T21:39:27+00:00
On the "Scanning" tab, is there a checkmark in the "Auto Scan" box? Is the program added to the firewall or Windows firewall exceptions (depending on what you use for network filtering)?
2016-02-07T21:30:09+00:00
Try turning off encryption on your wireless network. Also note if the devices are using the same IP address. P.S. If the IP devices are not tied to the MAC address, then I recommend doing this.
2016-02-07T16:43:20+00:00
Hello! Dmitry. Media prefix DOM.RU, the media server is running on the computer, but does not display playback devices, the prefix itself sees the server (both HMS and standard windows(win 10) but the media folders are empty (files are not displayed). The network is configured as follows - the main router with an Internet connection (192.168.1.1), an additional router in another room with the address 192.168.1.30, a computer 192.168.1.40, a media set-top box 192.168.1.35. On routers ports did not register.
The Home Media Server program is used as a DLNA server to view content and listen to music from a computer and laptop on a TV. Home Media Server is optimally suited for these purposes and has various useful settings.
What is DLNA?
In the English translation of the Digital Living Network Alliance (DLNA) - certain standards, thanks to which compatible devices can transmit and receive various media content over the home network and display it in real time using wired and wireless channels.
Thanks to this technology, home computers, mobile phones, consumer electronics, laptops are combined in a single digital network. When using devices that support DLNA certification, they are automatically configured and networked with users.
Thanks to the transmitting device (server), information is transmitted to the TV. A PC, phone, camera, camera can act as a server. The presence of DLNA support may mean that the device can receive video.
Such a wired or wireless network has its own advantages:
- The ability to instantly access materials located on all user's home devices. Watching a movie or photo is possible immediately after downloading, you can listen to music on the music center in the highest quality.
- For a wireless connection, there is no need to drill holes in walls and doors.
- With a wireless connection via Wi-Fi, it is possible to download entire files to the desired devices for further viewing.
The disadvantages of DLNA include:
- To make a wired connection (for example, through reinforced concrete walls that block the radio signal), it is necessary to drill holes in the walls and doors, which will negatively affect the interior.
- The wireless connection is significantly affected by various obstacles in the form of steel reinforcement or thick concrete (brick) walls.
- As with the Internet, there is a chance that a streaming file will be delayed if it is too large or if the connection speed is not fast enough.
- Using a weak router can affect the speed and quality of data transfer.
- Not all file types can be played, and HD video transmission may be of poorer quality.
Installing the Home Media Server (HMS)
HMS installation is carried out in the following sequence:

After the installation is completed, it is better to delete the unpacking files manually, because they are not automatically deleted.
General configuration of HMS as a DLNA server
The installed DLNA server at startup will prompt the user to continue the configuration process:
- At the first start, a window with the initial settings will appear. It will prompt you to select a device for broadcasting media content. The proposed list will include many templates with devices. If your own or similar device was not found, then you should stop at the standard DLNA Device. Having made a choice, you need to proceed to the next step.

- Select folders from which to take media content. The choice of folders with media content can be done at this stage or added later. After selecting the folders, you need to click on the "Finish" button.

- After the initial settings have been made, you will be prompted to create backup with settings, image cache and database. You will also be prompted to set up an automatic backup schedule. Then the "Close" button is pressed.

- The main window of the program will appear. Here it is worth paying attention to certain important settings. On the left side, the types of settings will be listed, and on the right side, there are sections with specific settings.
- On the left side, you need to go to additional settings and set up automatic loading of the DLNA server with the computer turned on. To this end, you need to select the second and third points.

- Next, you need to go to the "Server" tab and specify your DLNA server as it will be on the network.

- After changing the name, you need to return to adding folders (if this has not been done before or when adding other folders). To do this, click on the "Add" button, then select the folder you are going to add. Next, you need to perform its “Scan” to get files from folders to the server.

- If the actions are performed correctly, a list of these files will be on the right side of the screen. If this list contains the necessary files, all that remains is to launch and start using the program. To do this, press the "Start" key.

- In the case of the enabled “Windows Firewall”, the system will be prompted to allow access to the network. You should select which networks access will be allowed to, and click on the "Allow access" button.

Connecting and viewing media content
After starting the program, turn on the TV. When properly connected, it will be in " Home media server».
On the example of an LG TV
For example, a variant of the operation of the LG LN655V TV receiver with a DLNA server is presented. In the main Smart TV menu, go to LG SmartShare.
First connection:
- When you connect the unit to a TV for the first time, please refer to the "Connection Guide" located in the lower right corner.

- Next, you need to go to the "PC Connection" tab and click "Next".

- Next, there will be two more windows, where you also need to select "Next". If nothing is automatically set in the window with the IP address selection, then select your home network(wired or wireless, according to how you connect your TV).

- On the fourth press, the owner's computer should be visible. If it does not exist, you must restart the server.

After the initial connection, the device will be displayed at the end of LG SmartShare "Connected Devices". If it is not there, you need to restart the server on the computer. For example, for movies, the folder with "Movies" is selected, and then "Catalogs of media resources".
A list of folders that have been added to the HMS settings will appear. You can use any folder to start the movie.
Using the SONY Bravia TV as an example
In this case, a KDL-46XBR9 TV receiver was used. Action algorithm:
- The Home Media Server program is installed and launched on the computer. To go to the settings, use the corresponding key.
- On the right side you can see the "Add" button. In addition, it is possible to select a file for scanning during the program start. Scanning is necessary if the user has changed the contents of this directory. The green circle shows the scan.

- Next, you need to click on the button with file types on the right side. PAL video files cannot be played on certain TVs. Enter "NTSC" to enable content recognition (eg MPEG-PS_PAL_NTSC for avi).
- For the mkv container, select Transcoding (Core AVC). In DLNA, you need to write MPEG-PS_PAL or MPEG-PS_NTSC (depending on the TV).

- Then you need to go to "Categories", then select "Device". There you need to make a choice of the type and resolution of TV. Select DLNA1 or DLNA1.5. Which version is supported, you can find out in the instructions or by visiting the official website.

- Set up Web access to the server, for which you need to go to the next item in the categories.
- You must add your TV to the client devices. When you click on the icon with a lifebuoy, the program will automatically determine the name of the computer, and it will be added to the "Server" section, the "Name" field. To identify devices on the network that support DLNA technology, you need to use the "Search". You need to make sure that the TV set is turned on and connected to wireless or wired networks. After the network is scanned, the program will add network clients (TV and computer).

- You need to go into the individual settings of the TV receiver and insert the above-mentioned setup data.

- The key with "File Types" will take you to the registration settings for the intended corrections.

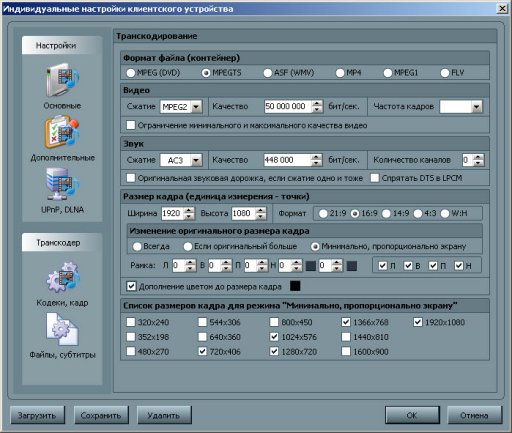
- You should return to the main settings window and go to the “Transcoder” category item. In the "File Format" section, you need to specify "MPEG (DVD)". In the "Video" section, select MPEG2 compression, quality 6000000. In the "Sound" section, select AC3, 448000, "Frame size" - 1280x720, 16:9. Changing the original frame size - always. Put a tick on "Complement color to frame size" and on all the boxes in the lower list.
- Next, go to the tab with subtitles. Here you can customize the subtitle image style according to your own preferences and other parameters necessary for their optimal display.

- In the final category "Advanced", check the box "Install the Windows service "Home Media Server" (UPnP)". This will facilitate the automatic loading of the program when turning on the PC as a service.

Possible problems (errors) and their solution
Possible problems when setting up the Home Media Server as a DLNA server include the following:
- Server found but not opening on media devices. Making settings in the "Home Media Server (UPnP)" will help eliminate this inconvenience. Setting the settings in the "Device" (specify the old and new version models): "Authorization Service" - "Russian names of the main folders" - in the "Server" section, specify a permanent port (from 1024 to 65535).
- Errors occur, stop, slow down when playing. You need to select "Transcode" for a smaller frame size and quality of video content, then stop watching the movie so that a sufficient amount of the transcoded file is formed, and set the storage of temporary transcoding files to a disk different from that used for the swap file. You also need to optimize the system as a whole (disk fragmentation, a list of automatically-loaded programs).
- In some cases, an inscription may appear on the screen that the file type is not supported. After two or three restarts, everything should be fixed.
DLNA technology makes it easy to transfer files between devices connected to the Internet. The process of setting up the Home Media Server as a DLNA server is simple, the main thing is to follow the step-by-step instructions in the article exactly.
Today you will learn how to properly connect a TV to a computer and about all the possibilities of such a connection, as well as how to organize viewing of your media library on Smart TV and other devices that support a home DLNA server.
What is DLNA?
The Integrated Digital Network Consortium (DLNA) is a group of companies that have come together to create a generally accepted open standard for connecting devices so that all DLNA-enabled clients can automatically receive media viewing from each other while on the same network.
What devices support DLNA?
DLNA technology is compatible with any device:
- smart TVs;
- smartphones and tablets;
- PC and laptops;
- media players and Blu-ray players;
- game consoles;
- home media servers (NAS);
- wireless printers;
- photo and video cameras;
- audio systems.
All DLNA-enabled devices have an appropriate logo or sticker indicating the type of digital content supported (eg audio, video, photos) and the destination: server, printer, player, etc. DLNA is supported by most devices from major manufacturers such as Intel, HP, Motorola, HTC, Microsoft, Samsung, Sony, LG, Panasonic, etc. Apple has developed its own standard - AirPlay. If you have an Apple device, then it is not possible to use it in your media network consisting of clients from other manufacturers.
How does the DLNA network work?
As you already understood, DLNA devices are designed for interconnection: creating a multimedia network between themselves. Each device is assigned its own type depending on its purpose. For example, any storage device: smartphone, media player, TV or PC can belong to both the Digital Media Server and Digital Media Player types, because they are capable of both receiving and playing digital content from another DLNA device.
How to create a DLNA network?
Wireless router (or wifi router) is the central element in the network and is used to connect devices to each other in a common home wireless network.
Equipment for building a home network with DLNA
You will need:
- TV with DLNA support;
- DLNA digital media server (such as a file server, PC, laptop or media player with HDD);
- wifi router.
I will talk about building a DLNA network not only with a wireless connection, you can also use the wired method of connecting devices, instead of a wi-fi router, use a regular router (switch) to connect the file source (home server - DLNA server) to the display device (DLNA customer). You can also use (to distribute the Internet through the power grid), in addition, you will need Ethernet cables to connect devices to your network.
How to set up a DLNA home media server?

1 Connecting a TV with DLNA support to a wi-fi router (for example, Samsung with Smart TV).
Option 1 - wired connection. Connect using an Ethernet cable to the router. It is enough to connect one end of the cable to the LAN port of the TV, and the other to a free port on the router (or switch, depending on the structure of your network).
Option 2 - wireless connection. If you are using a wi-fi router (wireless router), then it is enough to connect the TV to an existing wireless network via the built-in or external (USB) wi-fi adapter, directly to the router. If the TV is very far from the router, then you can install a wireless bridge (use the router in Bridge mode or buy) to connect the TV to the router. I also recommend reading the article about. The wireless bridge is connected to the TV to the LAN port, and to the router via a wi-fi access point.
Option 3 - Connecting with Powerline Adapters. This type connection uses the power grid without running Ethernet cables. This method will help you set up your home network using existing electrical wiring and cables to connect DLNA clients are no longer required. Powerline adapters are produced by almost all manufacturers of network equipment: TP-Link, Netgear, D-Link, etc. They are called Powerline devices. Next, you simply plug the router, TV and other devices into the power outlet as usual, but now all your devices will form a DLNA network.
2 Adding other DLNA compatible devices to your home network

Now you can connect DLNA servers (devices from which you want to play files on a smart TV) to the router - PC, laptop, phone or media player. All servers will be displayed on the smart TV, as they are on the same network, and you can play the content that is stored on their media. There are various ways to set up various types of devices on a DLNA network.
PCs and laptops on a DLNA network
Connect your computer or laptop to your router or router using any of the above options. The most important point in setting up DLNA on a PC or laptop is the need to install the appropriate program - the media center (media shell). The most popular of them (each program has a link with information about it and settings):
- Serviio
It is possible not to resort to installing media center applications to create a DLNA server, but to use Windows Media Player 11 or 12. To use them as a DLNA server, you must allow access to files on your laptop or PC: open Windows Media Player, go to Options menu, then click the Sharing tab Windows files Media and activate media sharing.
 Kodi media center interface window
 You can select a media shell to use as a DLNA server from the list above. After installing the program you like to create a media center (DLNA server), you should configure it and select files (photos, videos, music files) to transfer to a TV or other display device.
Mobile devices on a DLNA network
3 DLNA setup on TV
After you have connected all DLNA devices, turn on your TV and go to the home screen of your Smart TV (using Samsung TV as an example). Find and launch the AllShare app, which will allow you to find music, photos, and videos stored on DLNA devices on your network.
If you have a Sony TV (model before 2015), then you need to turn it on, press the "Home" button and turn on "Media Player". After you select the type of content: music, photos or videos, you will be able to see the DLNA servers on your home network.
4 Using DLNA on Android OS

To watch videos from your computer on smartphones and tablets with operating system Android, you need to install a special application. There are quite a few such applications, I can recommend MediaHouse or Bubble UPnP, which can be downloaded for free on Google Play.
After you install the application, you need to take a few simple steps:
- select the source - your computer or other device with DLNA support and installed from which you will watch the video;
- select a receiver, that is, your Android device;
- select a video from the list of available files.
In addition to universal applications, manufacturers mobile devices offer their own software with DLNA support. Samsung has AllShare, LG has SmartShare, etc.
Using DLNA-enabled apps on Android devices does not require any configuration. It is enough to launch a DLNA server (for example, Kodi on a computer), and it will immediately appear in the list of available connections in the application on a smartphone or tablet. Select your computer from the list, click "Browse" and select the required folder. Do not forget that your smartphone can also act as a DLNA server.
Local Service "Home Media Server" (HMS), deployed on the computer of the user with the ip address 192.168.1.2 will be available from playlists, but requires some additional configuration.
Installing and configuring HOME MEDIA SERVER (user manual baryon)
The advantages of watching video in this way over watching it with the built-in player via DLNA:
- lack of "brakes" when viewing files m2ts, while rewinding works;
- viewing files from a media server located outside your local network using all the features of HMS
I recommend version 1.19, it seemed to me that the WEB-interface works more stable in this version (in other versions, an empty browser window sometimes opens). Direct link to the file: http://www.homemediaserver.ru/files/119/ setup_ms.exe
If you have not come across this program, here are the main settings:
Select on the tab "Devices" "Samsung TV (DLNA, 16:9, 1920x1080)"
and click on the tools icon in the "Default device type" line. In the device settings window, check the box web

Here, on the bookmark "Additional" need to uncheck "Create Media Playlists in Web Navigation Mode"

HMS will now be available at: http://your IP:45397. The port number is defined on the tab "Server".
To definitely disable video transcoding, which turns on with or without a reason, I recommend deleting everything except tsmuxer And hmsmpeg in the window "Transcoder-Profiles", by setting the checkbox "Transcoding buffer - no disk"

Note: transcoder tsmuxer does not recode the video stream, but only changes the container of the original video file to MPEGTS (while the extension remains the same), which does not degrade the image quality at all; transcoder hmsmpeg in combination with tsmuxer re-encodes audio stream only (DTS, DTS-MA, AC-3) to AC-3 (helps when audio breaks on BD-Remux).
Transcoding loads the processor of the computer with HMS and if the computer is weak, it may not be able to cope with this task, which in turn will cause "brakes" on the image.
In most cases, for the built-in Samsung player, nothing needs to be recoded or transcoded, and in order to play the file unchanged, you need to move in the HMS directory tree in the following sequence:
Movies-Transcoding-Media directories-Directory name-(T)File name-Original-(O)File name
- It's important to know:
- rewinding is possible only when viewing files that are not transcoded;
- pause works when playing both original and transcoded files;
- in files m2ts with only one track DTS-MA pause and rewind not working
http:// ip of the computer with installed HMS:45397
The browser window should open with the directory structure:

If the IP address of the computer where HMS is installed is different from 192.168.1.2 , then in order for the HMS directory structure to open in the application, you must either change the IP of the computer to the specified one, or add a block with your own IP to the start playlist of the application: start.xml:
- For application nStreamLmod
<!]>
tsnakeman
http://website/widget/logo/hms.png - For application OVP (Online Video Player)
<!]>
Please note that the application message:
Not correct server response status: 1007!
may appear if port 45397 is blocked by a firewall.
