How to create a working group in a computer network. Setting up a home LAN in Windows7 How is it different from a network domain
For those who are just starting to build their own local network, it can be difficult to immediately navigate many issues that seem complicated at first glance. When you already know all this, you don’t even understand what scares people away from self setting networks. But this is only when you already know all this. But if you ask a person to remember how he himself at first poked through the settings and for a long time could not find what he had almost in front of his very nose, then he most likely will not admit to you that he was once the same as you are a "blind kitten". Some pretend that they knew all these settings, almost from infancy. And some don't remember anything at all. Personally, I perfectly remember all my first steps regarding the computer. And not only do I remember, but I am not ashamed to admit that there was a time when I simply did not know elementary things.
Once other computers on your network join the workgroup, their users can share those resources without having to manually configure sharing, permissions, and printers. Workgroups have some drawbacks: you can't set security or sharing permissions for computers in a workgroup, so everything is shared.
However, if security on your network isn't a concern, a workgroup is an easy way to get your network up and running quickly. Check the "Workgroup" radio button, and then enter the name of the new workgroup in the text box. Andrew McClain has been writing since he has written several articles for various websites and writes user guides and software guides for several freelance clients. He holds a Bachelor of Arts degree in journalism from the University of Missouri.
When I first had to connect a new computer to a local network, I could not find the name of the working group of this network. I searched through the entire computer already connected to the local network, but did not find anything.
And there was no one to ask, because. before me, this grid was deployed by incoming people from different services. And those programmers that I knew never worked on the network. And the internet was not the same back then as it is now. Not only was it very slow, but also there were almost no websites on computer topics. I wanted to drop everything and run away from shame and helplessness.
Computers on a network can be part of a workgroup or a domain. The difference between the two is how to manage resources on the network. While domains are suitable for corporate networks, home and small business networks can work very well using working group.
How is this different from a network domain?
Workgroups are small, peer-to-peer local networks where each computer has its own set of rules and settings controlled by that device's administrator. As a result, workgroups are used primarily in home or small business networks. To easily access and share resources with another computer on the same network, both computers must be part of the same workgroup. If you want to avoid this, users can share resources from their computers and set them up so that they don't require authentication from others.
But it's not in my nature. So I just went to the market and began to look for literature on local networks. Not immediately, but I found a good book. Almost all night I worked on it, and the next day I came and within an hour not only set up new computer, but even managed to connect several computers to the Internet via a local network. If you are interested in how to do this, then read the article and.
If you need help, please read this guide. However, the workgroup name can contain spaces. In contrast, domains are used in large networks that include servers along with desktops, laptops, network printers, and many other devices. In network domains, everything is managed and configured by the network administrator. Domain has standard set rules and settings that apply to all networked computers and devices.
There you will find the Computer name, domain, and workgroup settings section. If you click "Change Settings" you will be able to change the workgroup set up for your device. Next, let's learn how to change an existing workgroup for a new one.
So how do you define the workgroup of an already finished local network? Everything is outrageously simple!
Right click on the icon My computer(in Windows XP) or A computer(in Windows 7) on Desktop.
If you do not have such an icon on the Desktop, then in Windows XP you need to open the menu Start - Settings - Control Panel, and open the folder System(computer icon). In Windows 7 enter the menu Start and right click on the link A computer.
The System Properties window opens. You are now told that you must restart your computer for the changes to take effect. You will return to the System Properties window. At the bottom of the window, you will see a note reminding you that the computer must be restarted for the workgroup changes to take effect.
After the computer restarts, it will join the newly assigned workgroup and be able to communicate with other computers and devices that are part of the same workgroup. Having a different workgroup on the computers that make up your network is most often the root cause of many network problems.
Click on the link in the drop down list Properties(at the bottom). The window of the same name will open. Properties. Go to the tab Computer name and see the name working group to which this computer is connected. In my screenshot, the group is called S.E.ST.
With a simple change, they can be resolved and you can easily share folders, libraries, and devices. If you are looking for other useful networking tutorials, feel free to check out our recommendations below. Note that you need to assign a unique computer name to each computer, but you can group all home computers in the same workgroup for ease of access.
And so you can quickly and easily change the computer's workgroup
Note. Feel free to enter a description of your computer in the Computer Description field. If, for example, you joined another network on clan days or want to connect to home network with a laptop, you will soon come up with the idea of joining a local network workgroup. Only the way it is now is a little different. If you have a computer icon on your desktop, right-click it. In the context menu that appears, click the Properties link. A window will open with basic information about this computer.

It is always easier for readers to perceive information when it consists of small pieces. text, constantly alternating with each other and set out in a variety of fonts: bold or italic, color or black and white, small or large. It is not in vain that newspapers and magazines always use this technique, since to change format text in a computer program is very simple. To do this, you need any well-known text editor.
This, however, was only seen in the fields. This shows, however, that this window can also be accessed through the system control. If the basic information window is now open, click on the "Advanced system settings" link in the right field.
If it's not activated yet, click here on the Computer Name tab. At the bottom of the window, you will find Edit buttons by clicking Edit to rename this computer or whose domain or workgroup should be changed. A window for changing the computer name or domain name will appear. At the bottom of the window, not really overlooked, perhaps most of the options for the operation of the group. Below is a field where the workgroup name can be assigned again.
You will need
- Text editor, formatting panel.
Instruction
Launch a well-known text editor. It can be a simple "Notepad" or the initial editor "Word Pad". They are contained in the "Standard" group of the Windows operating system. To open them, click on the bottom menu "Start" on the desktop of your personal computer. Next, go to the "All Programs" section. This is where the group of standard commands is located. Click Standard.
How to change the computer name and workgroup?
For example, on clan days or other computer gatherings, it makes sense to place the computers in the same workgroup. New versions of operating systems usually improve on their predecessors. However, this comes with a number of incompatibilities with other systems that could speak a common language. These languages are the protocols by which machines are connected on the network.
For a network as shown in Figure 1 - be it an office, a family home, or a residential community - there are a number of components, including access to the Internet. There are already ready-made solutions for little money. Figure 1: Typical structure of a small mixed network. Click on it to start setting up. Both terms differ centrally at one point: in authentication - more on that later. If a service is down, it is often on a closed port. The share named "users" can be omitted. Its output displays a listing.
You can also use professional text editors such as "Microsoft Office Word", "Microsoft Publisher" or their free counterpart - text editor "AbiWord". The latter is distributed freely over the Internet and has free license General Public License (GPL). It can be downloaded from the local network at any time.
All the programs listed above for typing and processing text information have a special text formatting panel. This panel is most commonly found under the View menu and is part of the toolbar. Visually, this service looks like a long strip that contains command buttons: "Styles and Formatting", "Font", "Font Size", "Bold Font", "Italic" (i.e. italic font), "Underline Font" and other elements responsible for additional functions.
HomeGroup: This is how you create your home network
Select the part of the text you need to process with the right mouse button. Go to the formatting panel and click the appropriate button. The font will change according to the selected function.
Additionally, you can set the direction of the text. To do this, go to the top menu bar, the "Format" tab. Next, click on the "Text Direction" item and set the desired value. Return to the formatting panel, as you can change the text format there using additional functions. Adjust the text layout options on the document page: Align Left, Align Center, Align Right, or Justify.
A new pop-up window will appear where you can set up your home network. Now comes one of the most important parts of the process where you have to choose what to do on your home network. When you like it, click next. When you click it, click "Finish", you already have a . The window where you set up the group will close and you will be returned to changing the group settings in the home. In it, you can change any of the parameters of the homegroup you created.
Warning Before you change a subscription to a computer in a domain in a workgroup, make sure you know the username and password of the local account administrator groups. For more information, click the following article number to view the article in the Microsoft Knowledge Base.
Creating a workgroup on a large network of computers makes it easy to communicate with any workgroup and access files and folders for every member of the workgroup. This is an easy way to run a LAN between Windows XP machines.
Join a Windows XP Workgroup
- Click the button Start
- Click Control Panel
- Click " System and maintenance» on the left panel
- Click " System"
- Click the hyperlink " Change settings» in the lower right corner of the window, the dialog box " Computer name / domain name"
- Click Change …
- Choose an option Workgroup from the window and enter the team name you want to create or join. All PCs in a workgroup must have the same workgroup name.
- Click " OK". This option is located under " Member section"
- Disable three consecutive pop-ups by clicking the " OK" three times
- Click " Close» at the bottom of the window Properties"
- Restart your computer for the changes to take effect.
Now that you're part of a team, you can access your team's files and folders and easily communicate with each member. You can check the members of the working group by clicking " Start", then " Net" .
To open a shared file or folder on another PC:
- Click the button Start
- Click My computer
- In chapter " Other places" click " My online places
- Double click the name of another computer and you will see the shared file or folder.
Setting up a local home network can be divided into several steps:
1 Prescribe network settings on all computers / laptops / TVs on your home network (this step is used if there is no router on your local network).
2 Checking the name of computers and the working group specified in the properties of computers.
3 Enable Windows Firewall.
4 Check network operation.
We manually write the network settings on all devices on the home network (for networks that do not have a router / router)
Go to Control Panel (" Start - Control Panel”) and choose “ Network and Sharing Center».
After that, press " Change adapter settings». 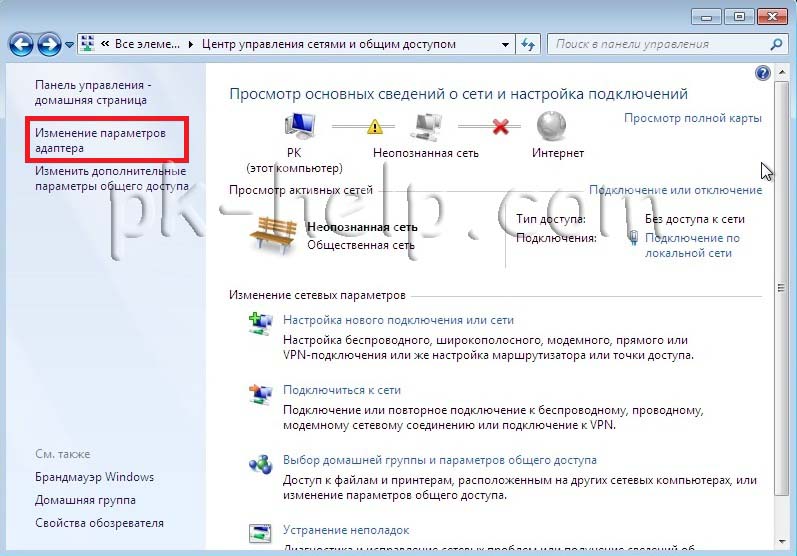
In the window network connections, select the connection we are interested in and right-click on it, select " Properties”, in the connection properties window, select “ Internet Protocol Version 4 (TCP/IPv4)» and press the active button « Properties". In the Internet Protocol Version 4 (TCP/IPv4) Properties window, enter the IP address 192.168.1.1
(on other machines we prescribe 192.168.1.2
, 192.168.1.3
etc.) All computers must have a subnet mask 255.255.255.0
. The gateway should not match the IP address of the computer; in the gateway, enter the IP of another computer on the network (if you do not have a gateway specified, you will not be able to specify the network, by default it will be Public, this will be discussed below). 
The first time you connect to a network, you must select a network location. This choice affects the firewall settings and security settings for the type of network you are connecting to. If your computer connects to more than one network (for example, your home network, your local coffee shop, or your work network), choosing a network location ensures that your computer is secure. 
There are four types of network placement.
home network to work in home networks or in networks whose users and devices are known and can be trusted. Home network computers can belong to a homegroup. For home networks, network discovery is turned on, which allows the use of other computers and devices connected to the network, and allows other users to access the computer from the network.
Working network to work in a network of a small office or other workplace. Network discovery, which allows you to use other computers and devices connected to the network, and allows other users to access your computer from the network, is enabled by default, but you cannot create or join a homegroup.
public network for networks in public places (such as cafes and airports). This network location is configured to make the computer "invisible" to other users and increase its protection against malware. software from the Internet. HomeGroup is not available on public networks and network discovery is disabled. This option should also be selected if you are using a direct Internet connection without a router or a mobile broadband connection.
Domain used for domain networks, such as those used in workplaces in organizations. This type of network location is controlled by the network administrator and cannot be selected or changed.
In practice, I would recommend choosing for a home network Working network, because unlike Home Network, you don't need to enter a password to share resources. Of course, you should not choose a Public network for a local network at home, I generally keep quiet about the domain, because in this case you need to install, configure a domain controller - for a home network - it's not worth it.
Checking the computer name and workgroup.
It is necessary to check that all devices on the home network are included in the same workgroup, while having different names. To do this, we go Start-Panel control- System
". A similar procedure must be performed on all computers / laptops in the network.  In the field Computer name, domain name and workgroup settings, we look at the registered computer name and workgroup.

Checking the operation of the Windows Firewall service.
The next step is to check if the Windows Firewall service is enabled. To do this, we go Start - Control Panel - Administrative Tools» 
In the window that opens, click " Computer management». 
Next go " Services and Applications - Services", find a service there Windows Firewall and see that it is enabled, if it is disabled, you need to run it and check that the Startup type is set to " Automatically”, To do this, double-click on this service and in the window that opens, look, and if necessary, correct the Startup Type. 
Checking network operation.
The last step is to check the operation of the home network, for this we launch the command line on one of the computers. Click " Start» in the search bar write cmd and press the key Enter». 
Will open command line, in it you need to enter the command ping and ip address of another computer on the home network, press the " Enter». 
If everything is done successfully, you should not have any packet loss.
This completes the home network setup, the next step is to configure network printer or do shared folders (network folders) This will be discussed in future articles.
In order to increase the level of investment attractiveness of the constituent entities of the Russian Federation through the preparation and implementation of long-term investment projects that are at an early stage of development, in various sectors of the real sector of the economy, I order:
1. Create a Working Group to increase the investment attractiveness of the regions of the Russian Federation (hereinafter referred to as the Working Group).
2. Approve the regulation on the Working Group in accordance with this order.
3. Approve the composition of the Working Group in accordance with this order.
4. Approve the work plan of the Working Group in accordance with Appendix No. 3 to this order.
5. Organizational, technical, informational support of the activities of the Working Group shall be entrusted to the Department of Administration (V.I. Sakharov).
6. I reserve control over the execution of this order.
Position
on the Working Group to increase the investment attractiveness of the regions of the Russian Federation
I. General provisions
1. This Regulation determines the procedure for formation, the rules of work and the powers of the Working Group to increase the investment attractiveness of the regions of the Russian Federation (hereinafter referred to as the Working Group).
2. The working group was formed in order to provide methodological support, expert assessment and assistance to the constituent entities of the Russian Federation in the preparation and implementation of long-term investment projects that are at an early stage of development in various sectors of the real sector of the economy (hereinafter referred to as projects).
3. The working group in its activities is guided by the Constitution of the Russian Federation, federal constitutional laws, federal laws, acts of the President of the Russian Federation, the Government of the Russian Federation and the Ministry of Regional Development of the Russian Federation, as well as these Regulations.
II. Tasks of the Working Group
4. The tasks of the Working Group are:
4.1. Selection and systematization of projects.
4.2. Development of proposals for attracting investments for the implementation of projects.
4.3. Structuring projects with the participation of external experts and developing financial mechanisms for their implementation.
4.4. Providing methodological assistance to the constituent entities of the Russian Federation in the development of projects.
4.5. Coordinating the activities of financial organizations to finance projects.
4.6. Creation and implementation of an optimized system for passing an application for a project in financial institutions selected by the Working Group in order to reduce the time for its consideration.
4.7. Creation of a "Library of Working Group Decisions" to be able to use the experience of successfully implemented projects in structuring selected projects.
III. Powers of the Working Group
5. The working group, in order to fulfill the tasks assigned to it, shall exercise the following powers:
5.1. Carries out consideration at the meeting of the Working Group of conclusions on projects.
5.2. Decides on the selection of the project for its implementation.
5.3. Develops standard forms of agreements and contracts concluded within the framework of project implementation, as well as other documents regulating the procedure for selecting and implementing projects.
5.4. Carries out control and monitoring of the implementation of projects selected by the Working Group, as well as the targeted use of funds allocated for the implementation of projects.
5.5. Carries out control over the inclusion of the selected project in the regional programs of the constituent entity of the Russian Federation in order to receive funds from state support of the constituent entity of the Russian Federation.
6. The working group has the right:
6.1. Inquire at in due course the necessary information from the state authorities of the constituent entities of the Russian Federation, local governments, as well as public and commercial organizations.
6.2. Invite representatives of interested organizations to their meetings.
6.3. Form committees and councils on certain issues, the composition and rules of work of which are approved by the decision of the Working Group.
IV. Project requirements
7. Projects considered at meetings of the Working Group must comply with the following requirements:
7.1. The project is envisaged for implementation on the territory of the Russian Federation.
7.2. The implementation of the project is aimed at achieving the goals of socio-economic development of the constituent entity of the Russian Federation.
7.3. The project aims to create financially sustainable business models that can operate on their own once funding is complete.
7.4. The share of project financing at the expense of the applicant is at least 10 percent.
V. Composition of the Working Group
8. The Working Group consists of the Chairman of the Working Group (by position the Minister of Regional Development of the Russian Federation), two deputies of the Working Group, the Executive Secretary and members of the Working Group (permanent and attracted, based on the content of the issue under consideration).
9. The composition of the Working Group is approved by the order of the Ministry of Regional Development of the Russian Federation on the basis of proposals from the interested federal executive authorities, executive authorities of the constituent entities of the Russian Federation, interested organizations.
10. Deputy Chairmen of the Working Group are appointed by order of the Minister of Regional Development of the Russian Federation upon approval of the composition of the Working Group on the proposal of the Chairman of the Working Group.
11. The executive secretary of the Working Group is appointed by order of the Minister of Regional Development of the Russian Federation upon approval of the composition of the Working Group on the proposal of the Chairman of the Working Group from among the employees of the Ministry of Regional Development of the Russian Federation.
The functions of the executive secretary are registration and distribution of incoming documents to the members of the Working Group, notification of the members of the Working Group about the appointment of meetings, convening meetings of the Working Group, drawing up conclusions, minutes of the meetings of the Working Group, preparation of other documents.
12. Membership in the Working Group is voluntary, open to all interested parties.
VI. Procedure for holding meetings of the Working Group
13. Meetings of the Working Group are held as needed, but at least once a quarter. The date of the next meeting of the Working Group is appointed by its chairman.
14. For the implementation of its activities, the Working Group forms a Work Plan approved by the Chairman of the Working Group.
15. Conclusions on the projects under consideration are submitted to the executive secretary of the Working Group no later than 10 (ten) calendar days before the start of the next meeting of the Working Group.
16. After receiving the conclusions, the Executive Secretary coordinates with the Chairman of the Working Group the agenda of the meeting of the Working Group.
Information on the date, place and time of the next meeting of the Working Group, as well as necessary materials are sent to the members of the Working Group by the Chairman of the Working Group (one of his deputies) no later than 5 (five) calendar days before the relevant meeting of the Working Group.
Interested parties are notified of the date, place and time of the next meeting of the Working Group by the executive secretary of the Working Group.
17. The meeting of the Working Group shall be considered competent if more than half of its members take part in it.
Members of the Working Group shall personally participate in the meeting of the Working Group. If a member of the Working Group cannot take part in the meeting in person, he has the right to take part in the meeting through a representative or in absentia by submitting a written opinion containing a decision on each of the issues on the meeting agenda.
The credentials of a representative of a member of the Working Group must be certified by a power of attorney issued by a member of the Working Group to participate in a particular meeting of the Working Group. The power of attorney is transferred to the executive secretary of the Working Group and kept by the executive secretary of the Working Group.
A written opinion on the issues considered at a meeting of the Working Group shall be sent to the Chairman of the Working Group no later than 2 (two) working days before the start of the meeting of the Working Group. The decision of a member of the Working Group on each of the items on the agenda of the meeting, indicated in the written opinion, is announced by the executive secretary or chairing the meeting of the Working Group before the start of voting and is attached to the minutes.
18. The working group at the meeting considers applications for projects, and also hears, among other things:
a) a representative of the organization - the initiator of the project;
b) a representative of the Ministry of Regional Development of the Russian Federation - on the results of the financial, legal and technological expertise of the project;
c) a representative of the federal ministry responsible for the development of state policy and legal regulation in the field of project implementation (as agreed);
d) a representative of the executive authority of the constituent entity of the Russian Federation in whose territory the project is being implemented (as agreed).
19. The meetings of the Working Group are chaired by its chairman, and in his absence, by one of the vice-chairmen.
20. Based on the results of consideration of each project, the Working Group, by voting, takes one of the following decisions:
a) on the selection of the project;
b) refusal to support the implementation of the project;
c) on the need to finalize the draft according to the comments of the Working Group and re-consider the draft based on the results of its finalization.
21. Decisions of the Working Group are made by a majority vote of its members participating in the meeting, including in absentia. In case of equality of votes of the members of the Working Group, the chairperson's vote is decisive.
22. Decisions of the Working Group are drawn up in the form of protocols.
The executive secretary of the Working Group shall keep minutes of each of its meetings, in which the following information shall be recorded without fail: date, time, place of the meeting, composition of the members of the Working Group participating in the meeting, agenda items, a reasoned decision on each agenda item indicating voting results for each issue.
The minutes of the meeting are drawn up in 1 (one) copy, which is signed by the members of the Working Group presiding and present at the meeting and the executive secretary of the Working Group.
23. On the basis of the decision of the Working Group on the selection of a project, an investment agreement is concluded with the applicants of the projects selected for implementation, the executive authorities of the constituent entity of the Federation, financial and credit institutions and investors for the purpose of implementing the investment project, the draft investment agreement is developed by the Working Group.
Compound
Working Group on Increasing the Investment Attractiveness of the Regions of the Russian Federation
| Slyunyaev Igor Nikolaevich | - | Minister of Regional Development of the Russian Federation (Chairman of the Working Group) |
|---|---|---|
| Kruk Mikhail Davidovich | - | Advisor to the Minister of Regional Development of the Russian Federation (Deputy Chairman of the Working Group) |
| Cherstnova Elena Alexandrovna | - | Deputy Director of the Department - Head of the Department for Programs in the Sphere of Transport, Communications and Road Facilities of the Department for Coordinating State Sectoral Programs of the Ministry of Regional Development of the Russian Federation (Deputy Chairman of the Working Group) |
| Permanent members of the Working Group: | ||
| Belichenko Anna Sergeevna | - | financial analyst of the Organizing Committee of the Competition "Annual public award "Regions - sustainable development" for interaction with public authorities (as agreed) |
| Golovanov Dmitry Sergeevich | - | Deputy Director of the Department - Head of the Department for Monitoring and Development of Territories with a Special Status of the Department for Development, Comprehensive Assessment of the Activities of the Subjects of the Russian Federation and Local Self-Government Bodies of the Ministry of Regional Development of the Russian Federation |
| Kodina Elena Anatolievna | - | Director of the Department for Development, Comprehensive Assessment of the Activities of the Subjects of the Russian Federation and Local Self-Government Bodies of the Ministry of Regional Development of the Russian Federation |
| Moguchov Sergey Viktorovich | - | Executive Director of the Office of State and Municipal Projects and Programs of the Department for Work with Major Clients of Sberbank of Russia Open Joint Stock Company (as agreed) |
| Potapenko Evgeny Anatolievich | - | Director of the Department of Investment Projects, Target and Special Programs for the Development of the Subjects of the Russian Federation of the Ministry of Regional Development of the Russian Federation |
| Starykh Elena Valerievna | - | Head of the Department for Expertise of Programs and Projects of the Department for Investment Projects, Targeted and Special Programs for the Development of the Subjects of the Russian Federation of the Ministry of Regional Development of the Russian Federation (Executive Secretary of the Working Group) |
| Tsybulsky Alexander Vitalievich | Director of the Department for Coordination of State Sectoral Programs Ministry of Regional Development of the Russian Federation | |
| Invited members of the Working Group: | ||
| Azanov Mikhail Valentinovich | - | General Director of the open joint-stock company "Angara Peipa" (as agreed) |
| Alekseev Alexander Nikolaevich | - | Vice President, Head of Directorate for Interaction with State Authorities and Public Organizations of Open Joint Stock Company "BANK URALSIB" (as agreed) |
| Kukushkin Igor Grigorievich | - | Managing Director of the Office for Interaction with Industry Associations of the All-Russian Association of Employers "Russian Union of Industrialists and Entrepreneurs" (as agreed) |
| Murashov Boris Mikhailovich | - | Deputy Head of the Federal Agency for Construction and Housing and Public Utilities (as agreed) |
| Polosin Andrey Vladimirovich | - | Deputy Director of the Department for the Formation of the "Open Government" System of the Government of the Russian Federation (as agreed) |
| Prozherin Oleg Mikhailovich | - | director of the non-profit organization "Russian Union of enterprises and organizations of the chemical complex" (as agreed) |
| Pruschak Sergey Fedorovich | - | Member of the Investment Policy Committee of the Chamber of Commerce and Industry of the Russian Federation (as agreed) |
| Simonyan Nikolay Kamoevich | - | Director General of Closed Joint-Stock Company "Direct Investment Agency" (as agreed) |
Document overview
A working group has been formed in the Ministry of Regional Development of Russia to increase the investment attractiveness of the constituent entities of the Federation.
Its goals, tasks and powers are defined.
In particular, it selects and systematizes regional projects, provides methodological assistance in their development, and coordinates the activities of relevant organizations to finance projects. In addition, the group prepares standard forms of agreements and contracts concluded within the framework of the project, and monitors the intended use of funds.
Established project requirements.
So, they should be implemented in Russia. Their goal is the socio-economic development of the region. They are financed by the applicant at least 10%. In addition, projects should be designed to create financially sustainable business models that can survive once funding is complete.
The work of the group is regulated.
It is headed by the Minister of Regional Development of Russia (Chairman). He has 2 deputies. In addition, the group includes an executive secretary and other members.
Meetings are held at least once a quarter. They are considered eligible if at least half of the members are present.
The composition of the working group was approved.
Why do you need to set up a home network? It would seem that a laptop works at home, a computer and a couple of smartphones are periodically used to access the Internet. What else is needed? But remember how often you have to transfer files from one device to another? You have to copy to a USB flash drive and back or use Bluetooth.
Even if you do this no more than once a month, everything will become much easier with a home local network. In addition, its customization will open up a lot of new possibilities. For example, files can not be transferred, but run directly on another computer or even a TV (if it has the ability to work on a local network with Windows 10). It will be possible to run games “on a grid”, print documents from any computer on one printer and use many other features.
Basic concepts
A home network is a set of computers connected by one network cable for data exchange. Today, most apartments have routers that distribute Wi-Fi. Thanks to them, setting up “locale” has become a simple task.
An approximate diagram of a home LAN with Windows 10 might look like this:
As you can see in the figure above, the Internet is fed through the Ethernet wire to the router, to which a PC is connected via a patchcord (the same wire with two-way connectors). Laptops and smartphone are connected to the router via Wi-Fi. Of course, such a connection does not create a local network by default. You need a specific setting on each of the devices. In the above example, different machines and gadgets, if they are not configured properly, will not be able to “see” each other.
The most important term in this whole process is the so-called groups. A Windows 10 workgroup can include a maximum of 20 machines that are sibling nodes, meaning they cannot control each other. In other words, in such a network, all computers are equal - there is no main server.
In addition, there is the concept of a homegroup, which can be formed if computers already belong to a workgroup. In a homegroup, it's easy to share photos, music, movies, and documents from other devices. Such a group, unlike a work group, has a password, but you only need to enter it once to add a new device.
Creating a local space step by step
Working group
First of all, make sure that all computers have the same workgroup name. It can be anything - you set it at your discretion. On Windows 10:
- Open Start and go to Utilities.
- Launch Classic Control Panel.
- Open the "System and Security" item.

- Go to the "System" section.
- Select "Advanced system settings" on the left.

- A small window will open in which you need to select “Computer name” and click on the “Change” button.

- In the new window at the bottom there will be an item “The computer is a member of ...”: select “working group” and write down the desired name.

This setting must be done on all Windows 10 computers (for 7 and 8 everything is done in the same way) that will be on the home network.
Visibility of computers on the network
The fact that computers with Windows 10 or other versions of the OS are in the same group is not enough for them to start “seeing” each other. Additional configuration required. To enable visibility, do the following steps on each of the machines:
- Open Control Panel.
- Select "Networks and Internet" and go to the Network and Sharing Center.

- Open "Change advanced settings...".
- Turn on File and Printer Sharing and Network Discovery.

- You need to do this in all profiles, in addition, enable the item “sharing so that network users can read and write files in shared folders”.
- Place a marker next to the item “Disable access with password protection”.
- Save.
Folder Sharing
Windows 10 network setup ends with sharing specific folders. To do this, just open the folder properties (right-click - as always), then select the Access tab and go to Advanced settings. Check the box next to “Open Sharing” and click on the “Permissions” button.

Where for full access it is enough to check the boxes next to “Full access”, “Change”, “Read” in the “Allow” column. But you can not put some checkboxes and thereby limit the capabilities of users of the local network.
Next to the “Access” tab is “Security”. Here, click the “Edit” button, and in the new window that opens, “Add”. In the empty box, enter the word "All", as shown in the photo:

Now the “All” group has appeared in the previous window. Select it and in the “Allow” column, check all the boxes for full access. Save all changes and reboot. Setup completed.
conclusions
After the manipulations have been done, your Windows 10 should see the computers in its group and gain access to all open folders. This is how the local network setup is briefly implemented using operating systems Microsoft. In reality, everything may look different: the article provides only general principles.
For example, without a router (with a DHCP server enabled and automatic distribution of addresses), two computers can be connected by a patch cord. In this case, after the first configuration step, you will need to manually enter the IP addresses. This is done in properties. network adapter and properties of the Internet protocol version 4. For Windows 10, 8, 7 and even XP the same.
IPs of the form 192.168.0.* are prescribed (for each computer, the last digit is unique, except for 0 and 1. You can use, for example, 5 and 7, Subnet mask 255.255.255.0 and default gateway 192.168.0.1. 192.168 are specified as DNS servers. 0.1 and 192.168.0.0 (optional) If the router has disabled DHCP, this setting must also be done.
(Visited 82 789 times, 12 visits today)
