How to tune different walkie-talkies to the same wave. Setting up a walkie-talkie: an overview, step-by-step instructions, features and recommendations. Interference rejection level
Enable / disable
hints
set up with the programming software.
On channel 10, press the "PTT" and "MONI" keys, then
turn on the radio. Now you can disable or
enable voice prompt.
On channel 15, press the "PTT" and "MONI" keys, then
turn on the radio. Now you can choose the language
voice prompt.
The VOX function eliminates the need for manual switching to
transmission mode whenever a transmission is needed. When
the VOX function circuits determine the start of speech into the microphone,
the radio will automatically switch to transmit mode.
When working with the VOX function, you must use
additional headset with microphone.
When using the VOX function, be sure to set
gain level of the VOX function giving the radios
ability to recognize sound levels.
If the microphone is too sensitive, the radio
will start transmitting even if there is background noise.
If the microphone is not sensitive enough, the radio
will not "hear" your voice when you start talking. Not
forget to set the gain level of the VOX function to
level suitable for starting transmission.
On channels 1-5, press and hold the PTT and
"MONI", then turn on the radio. This
turns the VOX function on or off.
ADDITIONAL FUNCTIONS
INTERFERENCE REDUCTION LEVEL
suppression
is
shutdown
speaker when there is no signal. With the right
setting the noise reduction level, you will hear sound only when
actual signal reception. The noise suppression level can
be configured using the programming software.
TIME LIMIT TIMER (TOT)
The purpose of the transmit time limit timer is to
preventing any caller from using the channel
for a long time, which can lead to heat
damage.
built-in
restrictions
limits each transmission to a certain time. Broadcast
continues for a predetermined time, after
which the warning signal will be given.
SCANNING
Scanning is a useful feature for automatic
control of your favorite frequencies. When the radio is tuned to
scanning
programming
switch the channel selector to channel 16. By scanning,
the radio will automatically detect activity on channels 1-15.
(You can set another channel).
The radio will stop scanning on a frequency (or channel from
memory) on which activity is detected. Then
scanning continues or stops.
If there are less than 2 channels, scanning is not possible.
On channel 16, press the "PTT" and "MONI" keys. This will turn on
or disable scanning.
Scanning is not possible when VHF mode is on.
radio receiver.
Sound notification of low battery, blocking a busy channel
Griffin G 44 is a budget UHF radio station. The radio works with 16 communication channels and has a low price. G-44 is a full-fledged portable radio station at a bargain price from a domestic manufacturer. Reliable communication is guaranteed by the name of the market leader (ARGUT company), and stable operation and ease of use are guaranteed by Russian-language software developed specifically for Russian all-weather conditions.
For 15 years, the Argut company has been developing high-quality inexpensive portable walkie-talkies for radio communication enthusiasts. The Griffon G44 model turned out to be quite small and light, it fits perfectly in the hand, the radio station controls are located in quickly accessible places. For its low price, the Griffon G44 radio station received an output of no more than 3 watts, but a sufficiently capacious 1500 mAh battery, allowing the Griffin G44 to work autonomously for over 20 hours. 44-ka, like all Arguts, are assembled from shock-proof ABC plastic, an aluminum chassis is taken as the basis. The Griffin walkie-talkie is very similar in appearance to the Kenwood Tk-F6 radios. The griffin has 5 controls, in the upper part there is a Volume Switch and Turn on the walkie-talkie, Switching channels 1-16, in the side of the PTT button, and two programmable buttons (one by default is responsible for turning off the automatic noise suppressor, the second for the LED lamp mounted on the top.
Portable radio stations GRIFON. is a balanced combination of low price, reliability, quality and attention to Russian realities. Griffin walkie-talkies are made using modern technologies and great professionalism, therefore they are of high quality and reliability. G44 is designed specifically for Russian users, taking into account climatic conditions and GOST standards.
Programming of radio station is carried out by means of the personal computer. Software (software) for flashing the radio Griffin G-44 is available in Russian. This model is covered by an official one-year warranty from the manufacturer - the company Argut.
When testing on rough terrain, the G 45 model is up to 5 km, the Griffon 44 model is up to 4 km. In open areas, the G-45 model is up to about 10 km, the Griffon G44 model is about 7 km. WARNING The test and range data was made with a fully charged battery and at maximum power.
Despite its low cost, the Gryphon G44 radio has all the technical characteristics typical for professional equipment. The easy-to-use G-44 radio station will provide you with stable and economical communication In the forest, on the road, in the mountains, at work and at leisure - stable communication is in demand in many everyday and extreme situations. Mobile communication can be extremely unreliable, and when the exact performance of important tasks, time, money and even human life depend on the quality of communication, there is simply no alternative to portable radios.
Functional features of the novelty Griffin G 44
- Frequency range: 400 - 470 MHz
- 16 memory channels (LPD channels 30 to 46 preset) *
- 50 CTCSS + 83 DCS encodings
- Power up to 3 W
- Transfer timer (TOT)
- VOX voice activation function
- Adjustable SQL squelch
- FM broadcast receiver
- Busy channel lock
- Programmable emergency channel key
- Low battery sound alert
- Saving battery power
- Voice prompts
Technical characteristics of the radio station Griffin 44
Complete set of station Griffin G44
- Walkie-talkie Griffin G 44
- Antenna
- Charger
- Battery
- Belt clip
- User's manual
GRIFFIN G-44 PORTABLE RADIO
License-free walkie-talkie Gryphon G-44 operates in the range of 400-470 MHz, including LPD and PMR channels, with an output power of up to 3 watts. The walkie-talkie was developed on a modern element base specifically for the Russian user: a durable case, compact dimensions for carrying in a pocket, perfect for traveling around Europe and communicating at ski resorts. Without a doubt, the main plus of the Griffin walkie-talkies is an affordable price.
walkie-talkie Grifon G-44 programmed from a computer. When programming, it is possible to set the reception and transmission frequencies for 16 memory channels, adjust the CTCSS / DCS tone and select the level of threshold noise reduction, activate and deactivate the VOX voice transmission activation mode with a choice of sensitivity level, set or disable blocking work on a busy channel, select the transmission power for each channel, assigning a function to a programmable side key, selecting a wide or narrow channel band and other classic analog radio functions. 3 functions can be assigned to the programmable side key: manual deactivation of all types of noise reduction (MONI), switching of output power modes or the "Alarm" signal, in which a loud emergency signal is played from the radio speaker, attracting the attention of others.
walkie-talkie Gryphon G-44- A great solution for a weekend trip. You can stay in touch with friends while walking and traveling. A built-in LED flashlight will help you in the dark, and a Kenwood-standard universal headset jack will ensure compatibility with a wide range of headsets and PTT for optimal communication without interrupting your daily activities.
Technical characteristics of the radio Griffin G-44:
- frequency range: 400-470 MHz;
- output power: up to 3 watts;
- 16 programmable memory channels;
- programmable function button;
- selection of high and low transmission power;
- VOX voice activation (with and without headset);
- power saving mode;
- universal connector standard "Kenwood";
- CTCSS/DCS noise reduction;
- transmission time limit;
- VOX sensitivity levels;
- sound indication and voice prompts;
- emergency siren playback mode;
- wide/narrow channel bandwidth selection;
- built-in LED flashlight;
Modern means of communication allow you to maintain contact at a distance, regardless of the weather, cellular coverage or type of terrain. This was made possible by radio waves of different frequencies. For the correct operation of the device, you need to know how to set up the radio. It should be noted that the market offers a wide range of devices focused on universal use or a narrower specialization (automobile, hunting, railway radio stations).
general information
Any walkie-talkie must be tuned to a certain frequency. If the configuration is incorrect, the amateur or professional device will work with interference or at partial power. The latest modifications of digital devices do not require special adjustments, since they have an automatic tuning function. The rest of the devices are divided into portable (portable) or stationary (car) walkie-talkies. The configuration of both modifications has its own nuances, although the general principle is largely similar.
How to set up a walkie-talkie type?
Amateur portable radio stations operate in the range of 433-434 MHz. They do not need to be registered by the radio frequency center, so setting them up is quite simple. If you plan to increase the power of the device, please inquire about the possibility of using a detachable antenna before purchasing. Another important point is the aggregation of radios among themselves. To do this, it is necessary to set the same numbers and subcode on each device.
After carrying out these manipulations, the selected devices will work smoothly with each other. To communicate, you just need to press and hold the call activation key. After releasing the button, the device switches to a signal from another radio. An important point in setting up a portable device is the choice of an individual signal for identification (call sign). It can be any numeric or alphabetic code that has a unique origin for the selected communication system.

Antenna tuning
Let's consider general recommendations on how to set up a portable type walkie-talkie in terms of the antenna. To accurately correct the element, a special analyzer is required. Alternatively, you can use an SWR meter. It will allow you to tune the antenna to the minimum stable wave ratio. Most often, a ratio of 1.5 or less is considered optimal.
It should be borne in mind that the higher the SWR value, the greater the loss of signal transmitting power. Ideally, this parameter should approach unity, but in practice it is almost impossible to achieve such a result. If the FAC exceeds three units, it is quite possible to disable the transmitter stage. From this we can conclude that an unconfigured walkie-talkie can quickly break down.
car modification
How to set up a (stationary) type? Beforehand, it is necessary to perform a number of mandatory procedures that will increase the efficiency of further configuration and minimize the likelihood of damage to the transceiver during operation. The device under consideration is a stationary unit fixed in the vehicle interior and a remote antenna. It is the last element that plays a significant role in the reception and transmission of a signal. Therefore, it is necessary to know the basic rules for mounting a receiving remote device.

Installing a car antenna
It is not allowed to mount the element on load-bearing parts, the body will be the best option. This will protect the air from possible losses in receiving and transforming the signal.
In addition, the following points are important:
- Try to install the antenna at the highest point of the body. This will improve the reception quality.
- The working part of the antenna is installed at a distance of at least 500 millimeters from any parallel metal surfaces. This will make it possible to avoid absorption and reflection of the incoming signal.
- Placement on the roof of a car has a certain effect on the stable wave ratio. Therefore, fix such an element after removal in one position.
After the correct installation of the antenna, proceed to its adjustment.
Setting up an antenna for a fixed radio
To tune the channel of a stationary type walkie-talkie, the antenna is first configured. For this, it is best to use a professional analyzer. If not available, use an SWR meter. Work is carried out on a clean and even surface, away from metal or concrete interference, as well as other analogues of the 27 MHz band.

First connect the SWR meter. Then measurements are made on channels and grids to display an extensive picture. Calibrate the SWR meter by setting the toggle switch on the front panel to FWD mode. Channel number 20 of AM modulation is set on the radio. Then, the talk key is activated and held while simultaneously turning the CAL knob clockwise until the device pointer is set to the extreme right position SET.
Without releasing the button on the PTT, switch the toggle switch of the SWR meter to the REF position. Capture the data provided by the device. After finding the minimum SWR, tune the antenna to the desired frequency. If the limit is lower or higher than the required frequency, the antenna is shortened or lengthened, respectively. Measurements are repeated until the SWR ratio reaches 1.5 or less.
How about a wave of truckers?
Consider this procedure using the Sirio T3 Mag antenna as an example (range within 5 km):
- The antenna is mounted on the central part of the roof, after which the protective cap is removed, the adjusting screw is screwed in until it stops.
- An SWR meter is installed between the radio and the antenna.
- The radio is turned on, the “long-range” mode is set (channel No. 15 on AM).
- After pressing the tangent, adjust the SWR knob to bring the arrow to the SET position.
- While holding the PTT, move the SWR lever to the REF position, observe the current value of the device on the upper scale. If the coefficient is higher than 1.5, with the help of an adjusting screw, the readings are adjusted within 1-1.5.
- The correcting screw is fixed with a lock nut, put on the cap and re-check the SWR readings.
Knowing how to set up a trucker's walkie-talkie, it must be borne in mind that these elements are narrow-band. Therefore, it is better to perform settings on the main working channel.

"Megajet"
First, the radio is switched to 240 channel mode using the AM / FM-ON combination. You can switch to the Russian grid by typing DW/M2-ON. Domestic frequencies end in 0, European waves end in 5.
How to set up the radio "Megajet"? You can do it yourself by reading the instructions. Briefly, the following points can be noted:
- First turn on the radio with the VOL / Off knob and set the desired sound volume.
- The SQ control adjusts the noise suppression threshold.
- Use the UP/DN switch buttons to select the desired channel.
- To set the transmission mode, hold the PTT control, speak into the microphone at a distance of 50 mm.
- To receive, release the PTT and listen to the received message, adjusting the volume and squelch level.
"Baofeng"
Next, let's look at how to set up a Baofeng walkie-talkie. By default, the operating frequency of the device is 2.5 kHz. General settings are identical for portable radios. The following are ways to program the device.

Simplex channels:
- Go to VFO A.
- Pressing the Band button selects the VHF mode.
- In the menu, type ‘27’ and press menu.
- Then use a free memory cell, which is searched using the UP / DOWN buttons.
- The selected frequency is confirmed by pressing the menu key again.
- To exit - Exit.
Channels with repeater shift:
- Switch to VFO A mode.
- Select UHF or VHF using the Band key.
- Select a receiving frequency.
- In the menu find ‘27’, then back in the menu.
- They are looking for a free memory cell, as in the previous case.
- The menu button confirms the selection.
- Press EXIT.
- Then enter the menu again, select ‘27’, press “menu” twice.
Finally
Above is how to set up the radio. The wave should be selected, depending on the type of device, as well as the country where the device is used. The antenna plays an important role in the configuration of portable and stationary radios. Therefore, its installation and configuration should be given special attention. If the device is adjusted correctly, you will be able to freely communicate with the respondent at the distance indicated in the instructions for the device.

There are many portable and car radio transmitters on the market today. Among them, you can easily choose the option that best suits your needs. It is worth noting that modern digital models are configured automatically, but their price is an order of magnitude higher than the considered analogues.
Modern technologies allow us to always stay in touch, regardless of the place of stay, weather, the presence or absence of cellular networks. All this is possible thanks to radio communication - a type of communication that uses radio waves of different frequencies as a carrier of information. Today, most of the radio equipment market is represented by walkie-talkies and radio stations that can be used as a means of communication for motorists and the military, security guards and hunters, fishermen and skiers. A simple solution buy a walkie-talkie sometimes it saves in difficult situations when you need to call for help or convey particularly important information. But not always, it turns out, to achieve excellent signal quality for receiving and transmitting a walkie-talkie.
This is largely due to the fact that the selected radio must be tuned to the desired wave. That is, initially any walkie-talkie, whether amateur or professional, may not work at full capacity or work with interference. Modern digital walkie-talkies do not need to be tuned, as they have a built-in button that allows you to automatically adjust the device to the required radio wave. The remaining walkie-talkies can be conditionally divided into portable (wearable) and automobile (stationary). Setting up walkie-talkies These two types are similar in many ways, although they have their own characteristics.
Setting up walkie-talkies
Portable walkie-talkies in the amateur band (433-434 MHz) do not require registration with an RF center, so setting them up is a fairly simple process. Before buying, you need to find out if the radio supports interchangeable antennas, in case you want to increase the power of the radio. Also, an important point in the operation of portable radios is their adjustment to each other. To do this, on each radio you need to set the same channel number and subcode. Only in this case, the selected radios will work smoothly with each other. To send a message, just press and hold the start button. After releasing the button, the radio waits for reception from another device. An important element of setting up a portable radio is the choice of a call sign (identification of an individual signal). This can be any alphabetic or numeric alias that is unique to the selected radio system.
Further walkie-talkie setup includes setting up the radio antenna. We will consider in more detail the tuning of the radio antenna below for car radios. For now, just note that you will need an antenna analyzer to fine-tune the antenna. But in many cases, to set up a walkie-talkie as a first approximation, a device called an SWR meter is enough. With it, you need to tune the antenna to the minimum standing wave ratio. Generally, an SWR value of 1.5 or less is considered optimal. It is also important to understand that the higher the SWR value of the wave, the greater the percentage of power loss during signal transmission. But in practice, achieving SWR = 1 is almost impossible. If the standing wave ratio is greater than three, then operation in such conditions can disable the transmitter stage. Thus, an unconfigured walkie-talkie can easily fail.
How to set up a car radio

Before as set up a car radio, you need to perform some required steps. They will not only increase the efficiency of subsequent tuning, but also minimize the likelihood of a transceiver breakdown in the future. Usually, a car radio is a stationary unit that is fixed in the car and a remote antenna. It is the car radio antenna that plays a key role in signal quality in many ways. Therefore, you need to know the basic rules when installing a car antenna.
Rules for installing a car antenna
- It is not allowed to install the antenna on the supporting elements. Always try to install the car antenna on a load-bearing body. Thus, we will protect ourselves from possible losses in the efficiency of radio signal transmission.
- It is important to install the antenna on the highest part of the body, usually the roof. The higher the antenna is installed, the stronger the signal.
- The antenna web must be installed at a distance of at least 0.5 meters from any metal surfaces parallel to the emus. This will prevent possible reflections and absorption of the signal.
- The position of the magnetic antenna on the car roof has little effect on the standing wave ratio. Therefore, always try to fix the magnet in the same position after removing it.
After the antenna is properly installed, it must be tune. Only after tuning the antenna can you safely use the radio at full power.
Setting up a car antenna
The best way to tune your antenna is to use a professional antenna analyzer. But since the prices for such devices are quite high, many motorists find an alternative in SWR meters. With this device, you can adjust radio antenna in the first approximation. This is what the simplest SWR meter SWR-430 looks like

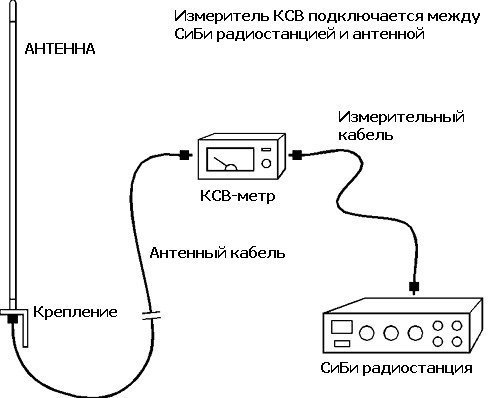
So, antenna tuning must be performed on a flat and clean surface devoid of any interference: metal, wooden or concrete objects. It is also important that when setting up the antenna there are no other 27 MHz antennas nearby. Armed with an SWR meter, you can begin to tune the antenna. The first step is to connect the SWR meter between the station and the antenna in a special way (as shown in the figure below).
- It is important to take measurements on different channels and grids to see the big picture.
- We calibrate the SWR meter. To do this, set the toggle switch on the front panel to the FWD position. We set the AM modulation channel 20 on the radio. After that, we press and hold the button to start the conversation, while turning the CAL regulator clockwise, so that the arrow of the device becomes in the extreme right position SET.
- While holding the button on the PTT switch, switch the toggle switch on the front panel of the SWR meter to the REF position. We take readings of the device.
- We find the minimum SWR and tune the antenna to the desired frequency. If the minimum is below the required frequency, then the antenna is shortened. Conversely, if the minimum is higher than the required frequency, then the antenna is lengthened.
- All manipulations are performed before re-tuning the antenna.
- We repeat the measurements until the result is achieved (SWR is not more than 1.5)
As mentioned above, achieving SWR = 1 is largely problematic, precisely because of the characteristics of a particular antenna-body pair. But even if SWR = 2 in the desired section of the radio frequency range, the loss in efficiency will be no more than 10%. That is, for comfortable communication and transmission of messages without interference, SWR = 1.5 is quite enough.
