Move app to sd android. How to transfer an application to a memory card on Android. Some tricks to free up main memory
In older versions of Android, without having root rights, it was impossible to use the SD card as internal memory. This feature appeared only in Android 6.0 Marshmallow (works on Android 7, 8 and 9) and allowed you to transfer installed applications to a memory card. In order for games and programs to launch quickly and work without failures, it is advisable to use a high-end SD card.
In some firmwares, the function is missing, despite the appropriate version of Android. But this does not mean that the memory card cannot be used as internal storage - it's just that the SD will have to be formatted using ADB.
After formatting the memory card, it will not be read by other mobile devices. If you need to install the SD in a new smartphone or connect it to a card reader in a laptop, format the card as portable media.
Setting up an SD card as internal storage
After connecting a memory card, a notification will appear in the notification area about the detection of a new SD card. Click "Setup" and format it as internal memory following the instructions. Files stored on the SD card will be deleted, so take care of creating a backup beforehand.

Also, the memory card is formatted through the settings menu. To do this, go to "Storage" (in some firmware it is called "Storage and USB drives", "Drives" or "Memory") and click on the item "SD card".

Expand the menu and select Storage Settings.

Click on "Internal Memory" and in the next window click on "Empty and Format". Remember to save the data from the memory card before doing this, because it will be deleted.

If, after formatting is completed, an alert appears on the screen that the SD card is slow, then the memory card used is low-class. Such SDs are not recommended for use, because they are many times slower than drives in mobile devices. Applications transferred to a card with slow read/write speeds may run slowly.

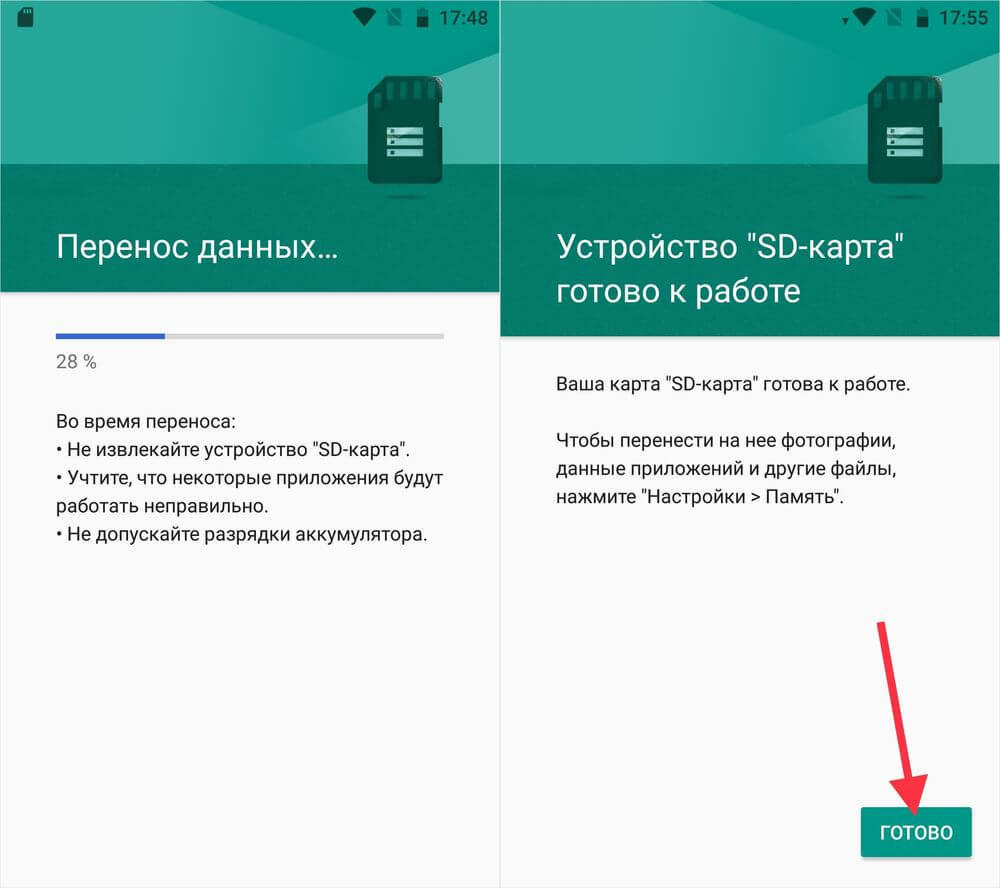
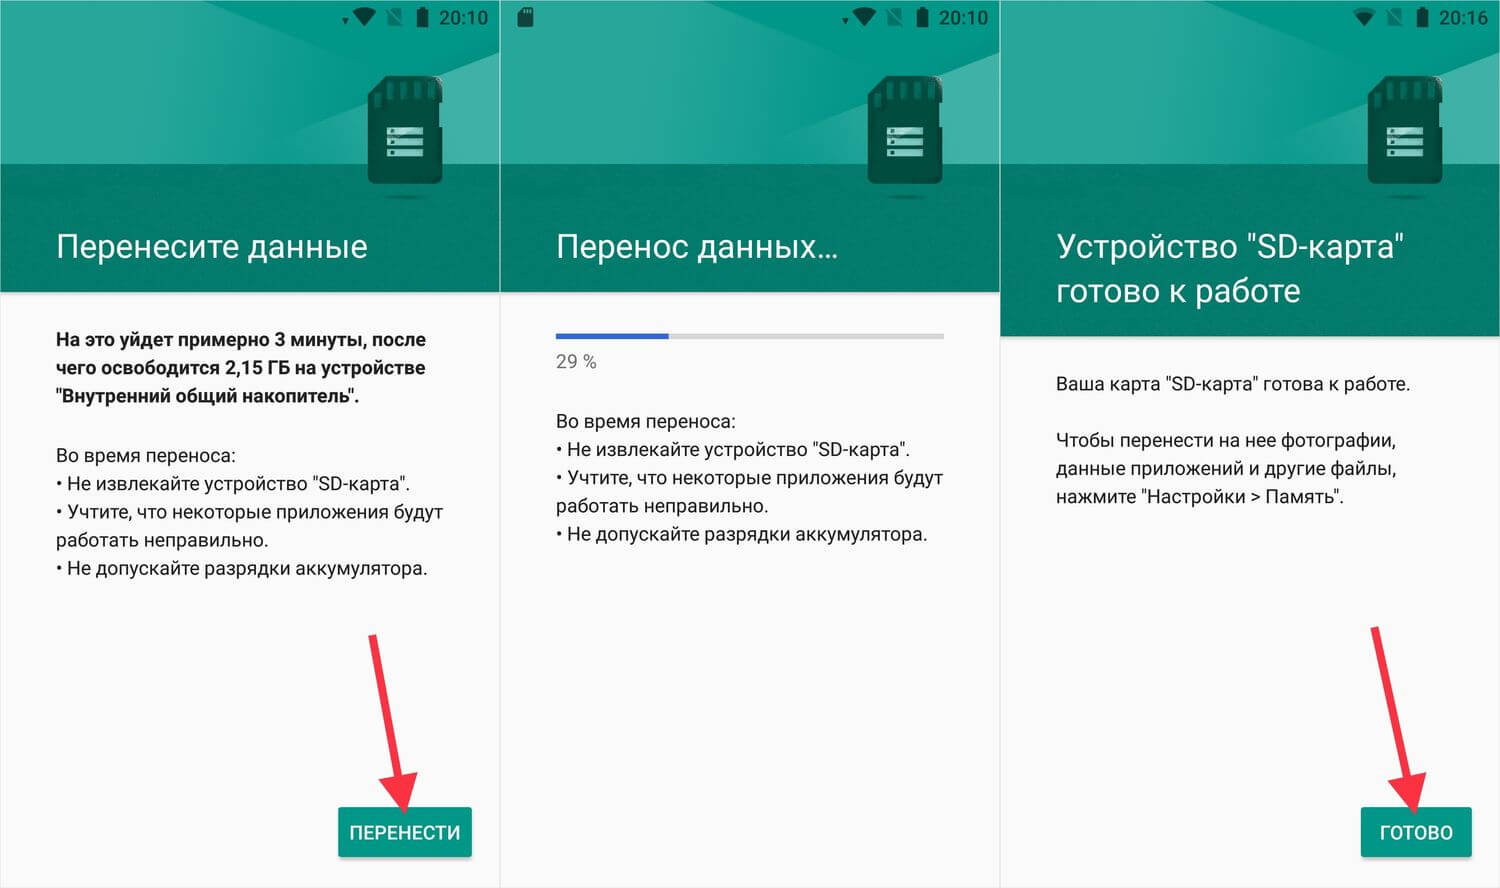
Next, you will be prompted to transfer some applications, photos and files to a formatted card. Select Transfer Now, click Next, and in the next window, click Transfer.

The data transfer process will take some time. At the end, a message will appear that the SD card is ready for use.
How to format a memory card using ADB
If the function to format the memory card is not available in the settings menu, despite the appropriate version of Android, then the manufacturer of the mobile device has not added this option to the system. At the same time, the ability to format the memory card has not gone away, but for this you need ADB.
ADB (Android Debug Bridge, Android Debugging Bridge) is a tool included in the Android SDK that communicates with the Android console. ADB works from the command line (cmd.exe) or from Windows PowerShell (available in the latest builds of Windows 10). Simply put, by connecting a mobile device to a PC via USB and activating debugging, you can control your smartphone from a computer using ADB commands.
To download ADB, follow the link, download the "platform-tools" archive and unzip it on the "C:" drive. ADB will be inside.

Also, go to this page of the official Oracle website, check the "Accept License Agreement" checkbox and download the Java Development Kit installation file corresponding to the bitness of the operating system on the computer. Once the download is complete, run the installation.
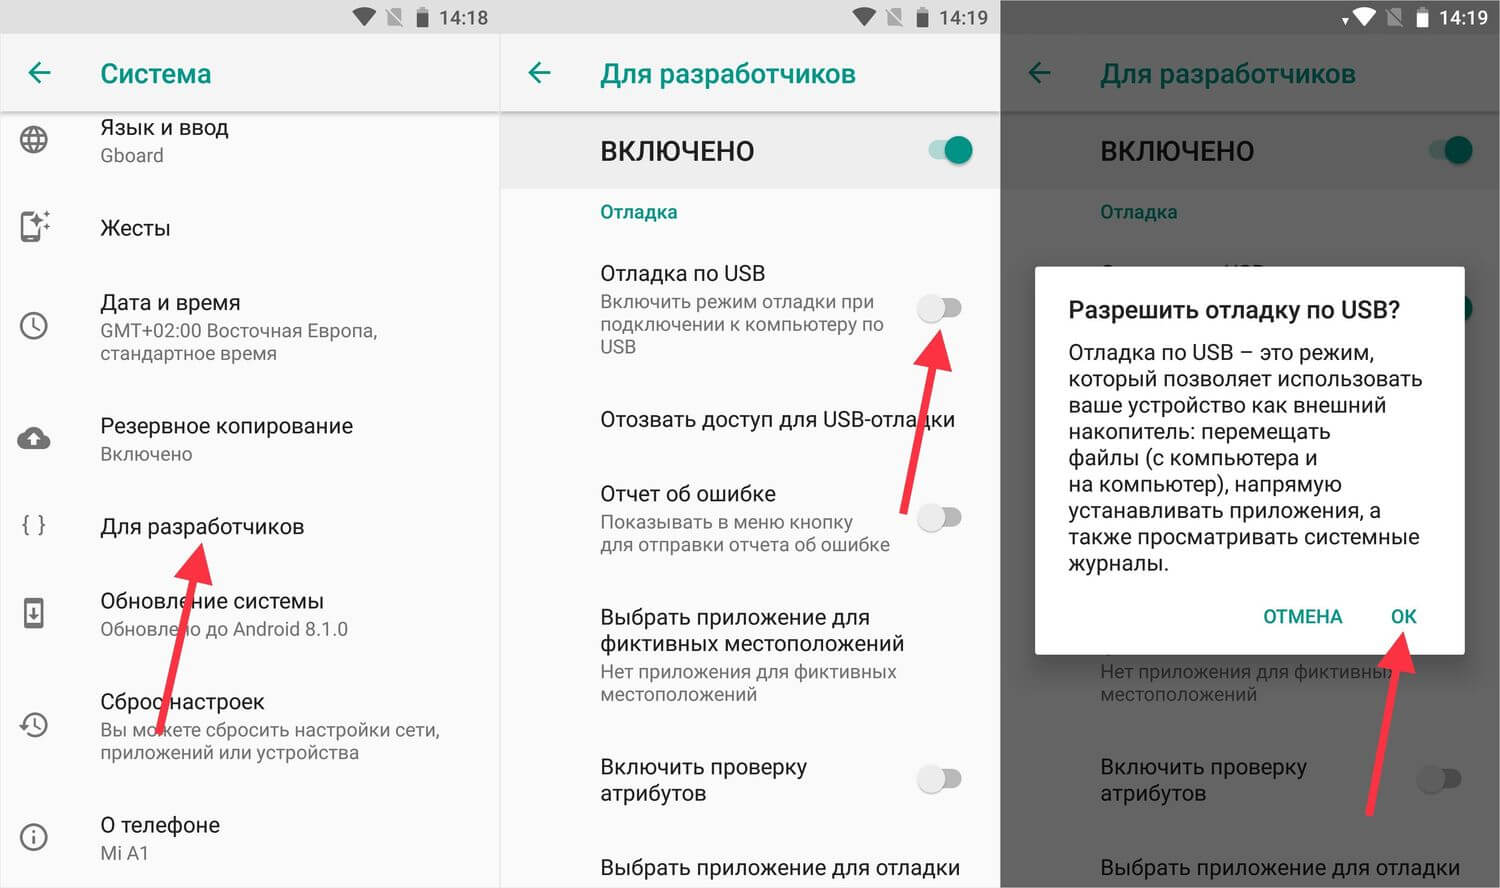
Enable USB Debugging on your device. This feature is located in the hidden "For Developers" section. To make the section visible, open "Settings" → "About phone" (Settings → "System" → "About phone" in Android 8 Oreo and Android 9 Pie) and click 5-7 times on "Build number".


After the steps have been completed, the “For Developers” item will appear in the settings menu (“Settings” → “System” in Android 8 Oreo and 9 Pie). Go to the "For Developers" section, activate the "USB Debugging" item and confirm by selecting "OK".
Connect your smartphone to PC via USB. If this is your first time doing this, the USB drivers will be installed on your computer. Usually, drivers are loaded automatically, but if this does not happen, download the driver from the device manufacturer's website or install the generic driver. If the driver is without an installer, go to the "Device Manager" on the computer, select the device (the device will be detected incorrectly with a question or exclamation mark), right-click on it and click "Update Drivers". Select "Search for drivers on this computer", specify the path to the folder with the drivers, click "Next" and wait for the installation to complete.


Now go to the "platform-tools" folder and hold down the "Shift" key and right-click on an empty area. From the list of options, select "Open Command Window" or "Open PowerShell Window Here" (on Windows 10). The command prompt or PowerShell will start.

Your smartphone will ask you to allow debugging from this computer. Select "OK" to confirm. If the prompt does not appear, it will happen later - during the execution of the first command.

Type the following command and press Enter (in PowerShell add ./ in front of the command):

The "$" sign will appear in the console. Enter the command:

The ID of the memory card will be given disk:NNN,NN. Copy the following command, replace in it NNN,NN to the received numbers and run the command:

Now go to "Storage", select the memory card, open its settings and click "Transfer Data".

How to transfer applications to a memory card in Android 6, 7, 8 and 9
After formatting the SD card, it remains to transfer the installed applications to it. Open Settings, select Apps & Notifications, click Show All Apps or App Details (if there are no menu items, skip) and click on the game or program you want to transfer.

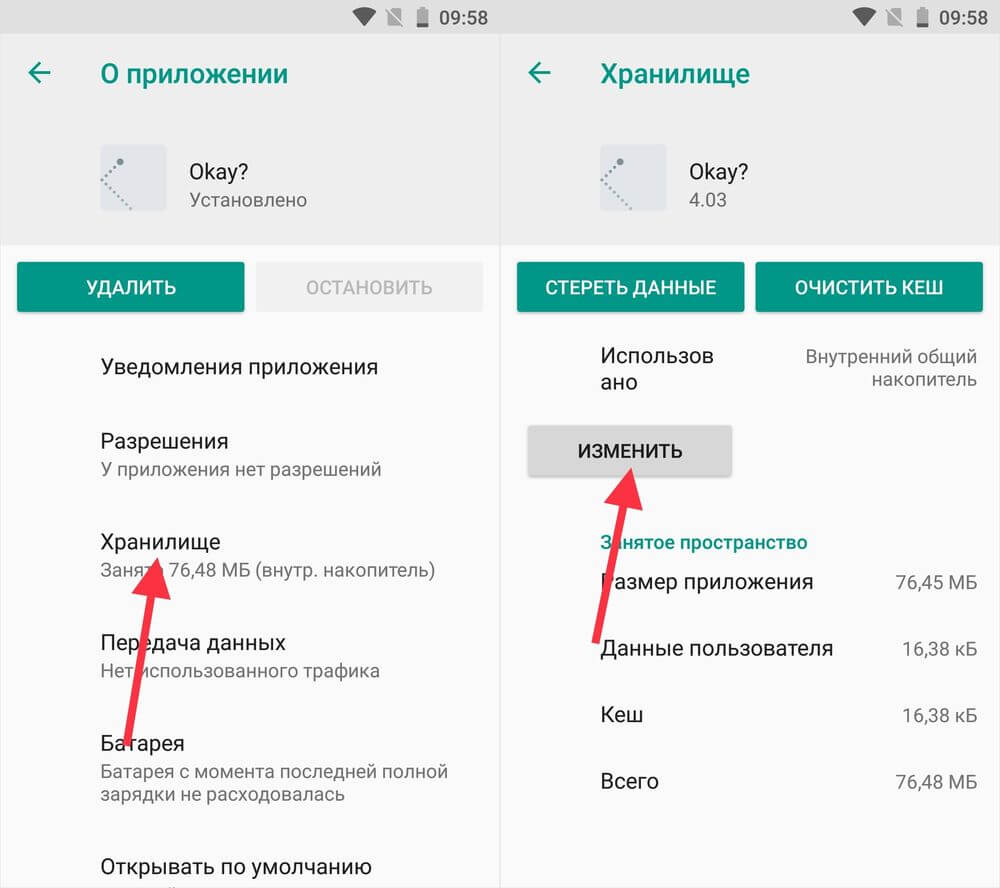
Open "Storage" (or "Memory"), click "Change" and select a memory card.
In the window that appears, click on the "Move" button and wait while the application is transferred.

AppMgr III (App 2 SD) - application migration tool
If you don't feel like manually moving each app, download a program that makes the process easier. Using AppMgr III (App 2 SD), you can transfer an unlimited number of applications to a memory card in a couple of taps.
If your smartphone is running Android 8 or 9, grant AppMgr III the following permissions:

Then launch AppMgr III, select the applications you want to move and click on the folder icon.

In the next window, click on the "Play" button to start the transfer process.

If some applications fail to migrate, it will show up in AppMgr III.
Many smartphone owners regularly face a lack of memory. Installing a memory card can partly solve this problem. Then it remains only to transfer all the programs to it, after which the device will stop complaining that it does not have enough space to perform certain operations. But doing this is not as easy as it seems.
The Android operating system, as we have already written more than once, is famous for its openness. It seems to many that there are no restrictions at all. But actually it is not. The mobile operating system created by Google does not like memory cards very much. It allows you to easily place videos and photos on them. There are already some problems with music. And sometimes it is not allowed to install applications on the SD card at all. Sometimes such a strict restriction is imposed by the smartphone manufacturer, while in other cases it is not allowed by the developers of a particular program.
All these problems are caused by the fact that earlier memory cards were too slow. In comparison with the built-in memory, they lost hopelessly. And the smartphone manufacturer wants the customer to get the best experience. If applications with games open for too long, the user will blame the manufacturer, and not the previously installed memory card. No big company needs this. Fortunately, now the situation is changing, as the creators of smartphones are changing their attitude towards microSD.
Transferring an application using built-in tools
If you are thinking about how to transfer applications to an Android memory card, then we are in a hurry to provide you with an answer to this question. Do the following:
Step 1. Go to the section " Settings».
Step 2 Select " Applications».
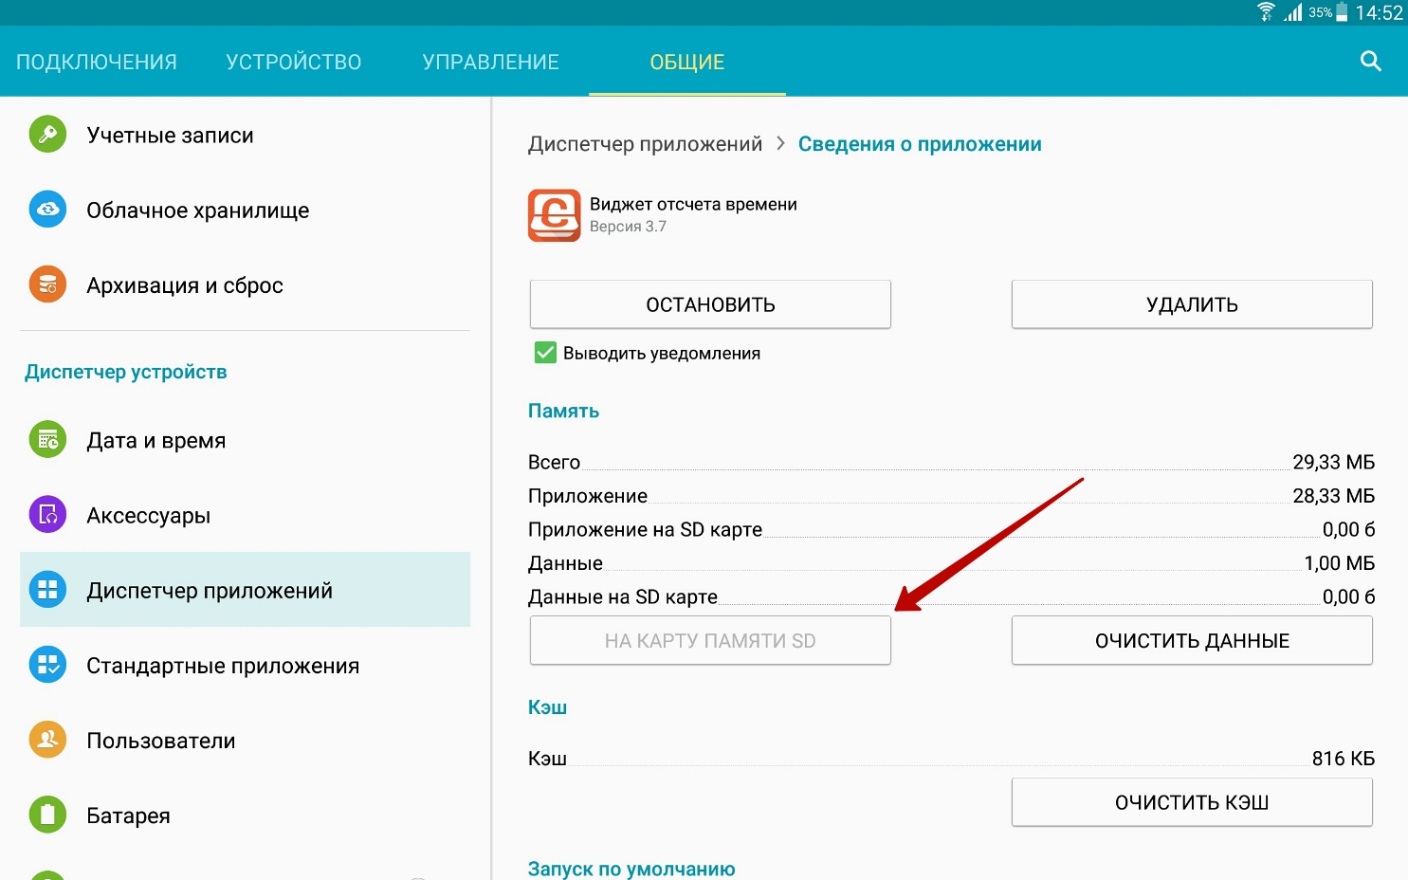
Step 3 Click on the program or game you want to move to the SD card. On Samsung smartphones, before this, you will have to take an intermediate step in the form of a transition to " Application Manager».
Step 4 If the button " Move to SD card» is active, then click it. If not, then it is impossible to move this application using the built-in Android tools. In some versions of the operating system, the card may be referred to as a USB drive.
Using the AppMgr III utility
If the operating system has disappointed you or if you are going to move a large number of applications, we recommend that you try using the AppMgr III utility. In addition to everything, she can:
- Notify about the end of the installation of the application;
- Sort programs by their current location;
- Hide pre-installed applications in the menu;
- Clear the cache at the click of a button.
Also, the utility automatically determines whether a particular application supports transfer to a memory card. If this process is not supported by the program, then next to it there will be an icon “ phone only».

Moving an Android app to a storage card using AppMgr III is easy. Instructions for these purposes are not required - the utility itself will carefully tell you everything.
Moving the cache
If you want to move the game, then get ready for the fact that AppMgr III will cope with this task, but it will almost not free up space in the built-in memory. This is due to the fact that games often use a cache. It is he who takes up the most space, since it contains graphics and musical accompaniment. And the aforementioned application does not know how to move the cache. But on the other hand, the FolderMount utility is capable of this. Its main problem is that it requires root access to function. If you don't have one, you won't be able to move the cache. If you have superuser rights, then follow our instructions:
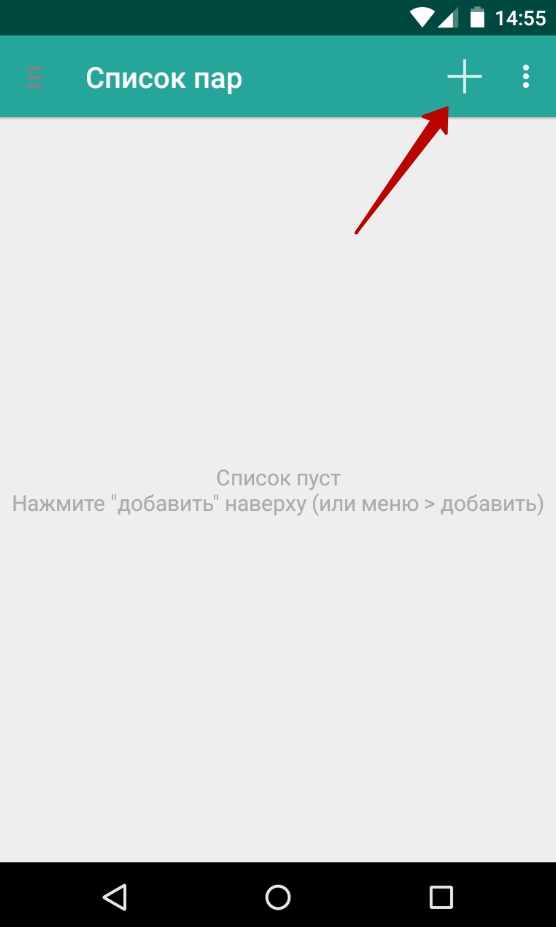
Step 1. Install and run FolderMount, then click on the " + " in the upper right corner.
Step 2 A menu will open in which you must specify the name of the application whose cache you want to transfer.
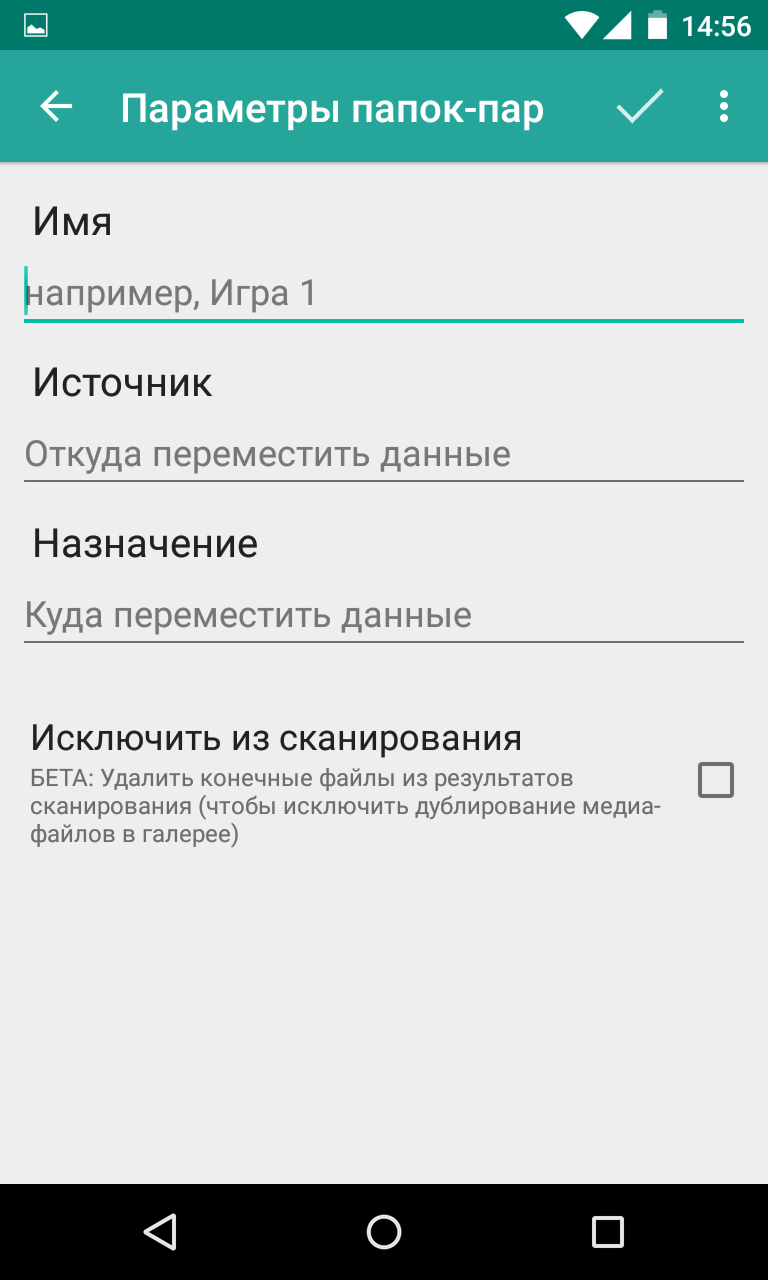
Step 3 In the column " Source» you should specify the path to the folder with the cache. Most often, the corresponding folder can be found in Android/obb/».
Step 4 In the column " Purpose» you must select a folder on the memory card, where the cache will then be moved.
Is the transfer worth it?
Many people try to install applications on a memory card without even thinking about the further consequences. But in fact, experts do not recommend doing this. It is possible that your card is slow, and this makes the functioning and opening of the program not the fastest. Therefore, you should save applications to a memory card only if your drive belongs to the standard Class 10 or, much better, UHS-I.
Also, do not forget that any card is less reliable than the built-in memory. And if it fails, it will entail the deletion of all information recorded on it. Including all applications moved to it will be deleted. Therefore, leave the most important programs in the built-in memory. For example, it should store instant messengers and utilities designed to track expenses and income.
With the development of technology, content is becoming more and more voluminous, which leads to a constant lack of free space on our devices. Fortunately, many smartphones have a special slot for a memory card, with which you can significantly increase the amount of free memory on your phone. Some users refuse to purchase SD cards and hope that they will have enough internal memory of the device. Often they make mistakes and still get microSD, without which, perhaps, it is difficult to do. As a result, there is a need to move all the data accumulated over months (and possibly years) to a memory card. Just about this and will be discussed further. This article will take a detailed look at how to move apps from internal storage to SD card in Android. Let's figure it out. Go.
Consider popular utilities
The ability to transfer applications, unfortunately, is not available on all versions of the Android operating system. Therefore, only Android owners above 2.2 Froyo (inclusive) and below 4.4 KitKat will be able to do this operation. Also, this will not work with every application. It is necessary that the developers provide for such an opportunity, otherwise you will not succeed.
Now let's move on to how it's done. First of all, you need to open "Settings" and go to "Applications". Select the utility or game you would like to move. If the program is installed in the main memory, then you can move it by clicking the "Move to SD card" button. In this way, in turn, one by one, transfer each available program.
![]()
You must click the appropriate button in the application properties
If there are a lot of applications on a smartphone, this method can be tedious, because you have to open each utility in turn and add it separately. So, this process can take you a whole day. Fortunately, there are more comfortable ways to solve this problem.
For example, use a special utility called FolderMount. With its help, it will be possible to move even those programs that are not available for transfer in the standard way.

For the correct operation of the application, do not forget about root-rights
To install and use FolderMount, you need to get root rights. Then download and install this utility on your smartphone. Next, you will need to grant the program root rights at its request. Through the "Application Analyzer" you can see a list of all games and programs that are available for transfer. FolderMount will then prompt you to create a folder on the SD card that matches the internal storage folder. Agree to this action to start the data movement process. All this may take some time. Depends on the size of the folder being moved. When FolderMount completes the operation, tap on the pin icon next to the folder. As soon as it turns green, you can close FolderMount, as this indicates that the partition has been mounted.

Keep following the instructions
The application cache is a very important component and often takes up even more free space than the program itself. Fortunately, the cache can also be moved to a memory card using FolderMount. After launching the application, tap on the "+" icon located at the top right. In the input field, write the name of the game or program whose cache you want to transfer. Then select the folder with the cache, which you will find along the path "SD / Andoid / obb / utility name". Next, in the "Destination" section, select the folder on the SD card where the cache will be moved. After filling in all the points, tap on the pin icon, as in the previous case, and wait until it turns green.

Usually the cache size is rather big, so you will have to wait
The absolute advantage of this utility is that it is available for all versions of Android. In some cases, you may need the full version of FolderMount. However, do not rush to get upset, it costs only one dollar. Agree, this is very little money for a comfortable and full-fledged expansion of the memory of your phone.
In addition to FolderMount, there are other programs that allow you to transfer games and utilities from internal memory to microSD. One such program is Link2SD. Very easy to use, handy utility that also does the job well.

The application displays information on the size of programs in the list and a card for each of them
Another great software product is AppMgrIII (App 2 SD). It is also free and perfectly solves the problem of transferring data. In addition, using AppMgr, you can clear the cache and remove junk files from your smartphone. In AppMgrIII, all programs on your smartphone are divided into groups:
- On phone. Those that are stored in the internal memory and can be transferred to microSD.
- On SD card. Those that are already stored in external memory.
- phone only. Here are those applications that cannot be moved.

First of all, pay attention to the “Moveable” tab (On Phone, Movable) and the cache size
If you want to immediately install games on a memory card, then, unfortunately, this will not work. In any case, the game will be installed on the main memory, and from there it will have to be transferred to the SD card. This feature is available only through the Move2SDEnabler utility.
These are the ways to move games and applications from the main memory of a smartphone to an external one. As you can see, this is done quite simply and quickly. Working with microSD is much more convenient and enjoyable, so feel free to copy all your data there. Write in the comments if this article helped you figure out the issue and share your experience with other users of such operations.
Today we will analyze the answer to the question of how to move files to a memory card. In fact, this is a very simple task, but not all users immediately understand how to complete it.
1. Method number 1. Using a file manager
Important! To move files on Android, in any case, you need a file manager. It is impossible to do this without him.
This axiom is relevant for those cases when you want to use only your smartphone or tablet. If you allow the possibility of using a computer, then everything is much simpler and you can do without additional programs.
But now we will focus on using managers, that is, on performing a task directly from the phone. To begin with, we will analyze the procedure for moving photos in the Samsung file manager (you can download it - this is so that you understand what we are talking about).
In this program, you need to do the following:
- Go to the "Pictures" folder. It's on the main screen of the My Files app.
- Select the photos you want to move. To do this, hold your finger on any picture. There will be an opportunity to put checkmarks in front of several photos. Do it. If you need to select everything that is in the phone / tablet memory, use the “All” option, which is located in the upper left corner. Then ticks will appear everywhere.
- Click "Options" in the upper right corner.

Rice. No. 1. Highlight photos in the file manager
- After you tap on the inscription "Properties", a drop-down menu will appear. It will give you options on what to do next. Select the "Move" function.

Rice. No. 2. "Move" function in dropdown menu
- After that, you have to choose which folder the previously selected information will fall into. First you need to click "Memory card".

Rice. No. 3. Travel Path Options
- Then just go to the same folder where you want to see the pictures. There will be a "Done" button in the upper right corner. When you are in the desired folder, tap on it. Everything you choose will go to this place.

Rice. No. 4. Folder Done Button
That's all! The selected photos will be placed on the SD card.
If you want to do the same for other file types, the procedure is exactly the same. And the principle itself remains unchanged for any file managers. That is, which program you would not use, just follow three simple steps:
- select files;
- press the move button;
- choose the place where they will go.
If you install Total Commander, ES Explorer or any other manager, the steps will be the same. Moreover, a long press is almost always used to select. After that, it becomes possible to check the boxes next to what you will move.
Some managers have a copy function, which can also be successfully used. For example, if you take the same ES Explorer, then there The above procedure can be done as follows:
- Highlight the desired file. As before, just long-press it and check the box.
- If you turn your smartphone or tablet horizontally, buttons for various functions will appear on the right. Otherwise, they are at the bottom. So, there is a button "Copy".

Rice. No. 5. Copy button in ES Explorer
- Don't be surprised if nothing happens next. Then you need to return to the window for viewing available storages on your own. To do this, just swipe to the right. Select the location where the information will be copied.
- Once in the desired folder, click Paste. This function will appear where the "Copy" button used to be, that is, on the right or at the bottom. Just click on it and in a moment the data will appear in a new location.

Rice. No. 6. Paste button in ES Explorer
- Accordingly, now the files need to be removed from the place where they were before. To do this, go to the folder where they were originally. In the function menu, select "Cut" or "Delete". After that, you will have one file in the new folder.
As you can see, everything is also quite simple.
2. Method number 2. We use a computer
If for some reason it is impossible to complete the task through the phone or tablet itself, you will have to resort to using a computer. For this you will need a USB cable.
When you're all set, do this:
- Connect your gadget to a PC or laptop via USB.
- In the Computer, This PC, or My Computer window, depending on your version of Windows, open the connected device. It is quite possible that it will open by itself or a window will appear in which you will need to choose what to do with it next. In any case, you need to ensure that you see the contents of the memory.
- You will see two disks - "Card", that is, a memory card and "Phone", that is, the device's memory. Go to Phone.

Rice. No. 7. Memory card and phone in the computer
- Select the file you want to copy. Then there are two options - move or copy. If you like the first one more, open “Card” in a separate window, that is, launch “Computer” again and go into the memory of the connected device. Then simply move the file from one window to another with the mouse cursor. And if you want to copy, right-click on the file, select "Copy" in the drop-down menu, go to the folder where it will be located, right-click again, select "Paste". After all, also remove it from the folder where it was originally.


Rice. No. 8. Copy and paste in Windows
Everything happens in almost the same way as with the usual movement from folder to folder on Windows. Good luck!
Almost all phones and tablets released in 2018-2019 have a large amount of internal memory, which is expanded with a microSD card of 32 GB or more (in mid-range and flagship models). But among owners of older and inexpensive devices, with internal storage of 4 GB or less, the issue of lack of free space on the smartphone is especially acute. In this article, we will analyze in detail all the ways to transfer applications to an SD memory card in Android.
The instruction is intended for both beginners and experienced users, so it tells about transferring applications not only with standard tools, but also with the help of special programs that require root rights.
You can also free up space in the internal memory by deleting system applications.
How to transfer applications to a memory card using available means
Starting from the earliest versions of Android, the system had the ability to transfer most installed applications to the SD card. Instead, Android 6.0 Marshmallow introduced the ability to use a memory card as internal storage (this method is also described in the article).
Consider the function on the example of a Samsung phone running Android 5.0:
Go to "Settings" and select "Apps". Depending on the manufacturer and firmware, the item may be called "Application Manager", "All Applications".

Select the downloaded game or program. If the application can be moved, the "Move to SD card" button will be active. Click on it.

If the button does not work, the developer has forbidden the installation of the application on the memory card and it will not be possible to move it using regular means.
AppMgr III (App 2 SD) for app migration
In order not to open the settings of each game or program and not watch whether they can be transferred or not, use the AppMgr III (App 2 SD) utility - in it, the transferred applications are collected in a separate tab.

Hold your finger on the application cards to mark them. Select the ones you want and click on the folder icon at the top. In a new window, click on the red arrow, and then you will be taken to the application details page. To go to the settings for the next selected program or game, press the back button.

AppMgr III will also tell you which applications should not be installed in external memory so that all their functions work correctly.
Using SD card as internal storage
This feature was introduced in Android 6.0 and works in Android 7 Nougat, Android 8 Oreo, and Android 9 Pie. It allows you to use a memory card as built-in storage. Since SD replaces internal storage, it makes sense for the flash card to be larger than the built-in storage. And for applications to work quickly, the SD card must have a high write speed.
Data from a memory card formatted as internal storage will not be read if you install the SD in another smartphone or tablet. To use the card in a new device, you will need to format it as portable media.
After connecting, a message will appear in the notification shade that a new memory card has been detected. Just click "Settings", in the window that opens, select the "Internal memory" item and follow the further instructions. Don't forget to transfer the files from the SD card to another media, as they will be deleted during the formatting process.

Detailed instructions for setting up the map:
1. Go to "Settings" → "Storage" (may be called "Storage and USB drives" or "Memory").

2. Click on "SD card".

3. In the upper right corner, open the menu, select "Settings" (in some firmware "Memory").

4. Click "Internal Memory".

5. A warning will appear on the screen that all data stored on the SD card will be deleted during the formatting process. Therefore, first copy them, and then click "Clear and Format".

6. If the smartphone uses a low-class SD (for example, microSD Class 6), a message will appear on the screen that the memory card is working slowly.

7. Before completing the formatting process, you will be prompted to transfer some files and applications to the SD card. Select the option you want, click "Next" and then "Transfer".

8. At the end, click "Finish" and manually restart your phone.

Now open "Settings" → "Applications" → "Application Details" (if this item is not there, go to the next step) and select the installed program or game.

Click "Storage" (may be called "Memory"), then click the "Change" button and select the SD card.

In the window that appears, click "Move" and wait for the transfer to complete.

Format the memory card as an internal drive using ADB
If the smartphone has Android 6, 7, 8 or 9 installed, and there is no option to format the SD card as internal storage in the settings menu, the manufacturer has not added such an option to the firmware. But users can format the memory card themselves using the utility.
To do this, activate on Android, connect the mobile device to the PC and run ADB from the command line or from Windows PowerShell if one of the latest builds of Windows 10 is installed on the computer. Type the following command and press Enter (in Windows PowerShell, add ./ before the command).

The console will start and the "$" sign will appear in it. Type the command and click Enter:

The line below will display the ID of the SD card of the form disk:NNN,NN. Replace NNN,NN to the value of the received identifier and run the command:

Wait for the command to complete. Then go to "Settings" → "Storage" and select the SD card. Expand the list of options by clicking on the three dots at the top and click Transfer Data.

Select Transfer and wait for the process to complete. At the end, click Finish.

How to Move Multiple Apps to SD Card in Android 8 Oreo and 9 Pie
In order not to perform the same steps for transferring applications individually, use the AppMgr III (App 2 SD) program, which was described at the beginning of the article. Only on Android 8 Oreo and Android 9 Pie you will need to give AppMgr III a couple of permissions.
Launch the application. A notification will appear that the program needs access to the usage history. Click "Allow", select "AppMgr III" from the list of applications, activate the switch and return to the program. You can also configure access to the usage history by going to "Settings" → "Apps and notifications" → "Advanced settings" → "Special access" → "Access to usage history".

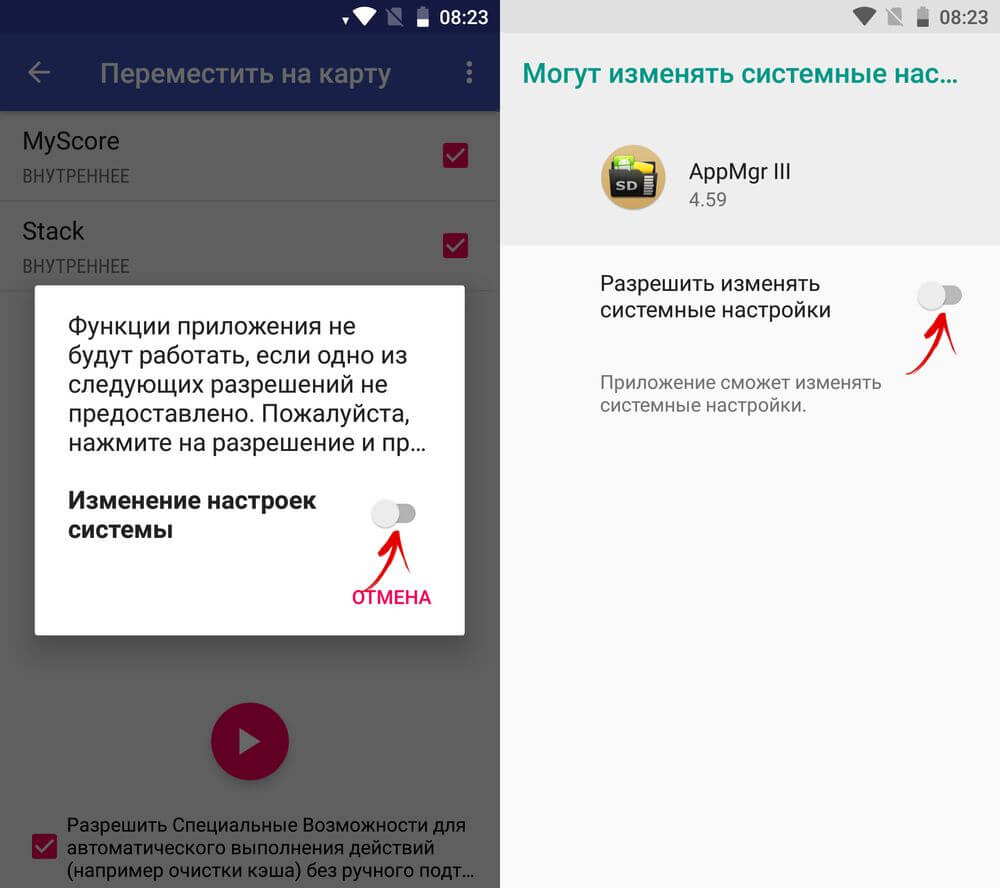
Select the games and programs you want to move to the flash drive and click on the folder icon with an arrow inside. In the "Move to map" window, click on the red button at the bottom.

A message pops up that AppMgr III needs permission to change system settings. Click on the switch, and then you will be taken to the settings. Activate the toggle switch and return to the application. The options for this permission are located along the path "Settings" → "Apps and notifications" → "Advanced settings" → "Special access" → "Change system settings".
Next, you will be asked to allow AppMgr III to automatically perform actions without manual confirmation for each application. Click "YES", go to the "Accessibility" section, select "AppMgr III", switch the toggle switch to the "ON" position and confirm by clicking "OK". Then return to the program.


Application transfer will begin immediately. Just wait for it to complete.

At the end, it will show that the applications have been moved to the memory card.
Transfer games to SD card in Android
Most of the user memory is occupied by the cache of installed games. To move it, we will use the FolderMount program, which can mount directories from internal memory to external. For her work are required.
Download FolderMount from Google Play, run and grant Superuser rights.

In the "List of pairs" tab at the top, click on "+".

Think up and enter the name of the folder-pair in the first line.

Click on the second one, after which the built-in file manager will open. The cache of games is located in the "Android/obb" directory, and the cache of applications is located in "Android/data". Navigate to the folder you want to mount and click on the checkmark.

A screen will ask you if you want to create the target folder automatically. Click "YES" if you agree. In this case, FolderMount will copy the path from the internal storage and create the same one on the external drive. Click "NO" if you want to manually set the mount end point and select the folder where to move the files.

To start copying, click on the checkmark and confirm the transfer by selecting "YES" in the next window.

The process will be displayed in the notification bar.

Upon completion of copying, switch the toggle switch in the "List of Pairs" tab to mount.

At the bottom there is a button with the image of a pin, by clicking on which, all directories will be mounted at once.

To move files back from the destination folder to the source folder, first unmount the pairs: to do this, turn off the toggle switch or click on the crossed-out pin, then hold your finger on the pair and click on the trash icon.
How to move apps using Link2SD
Link2SD is a program that can mount application data on a memory card. In order for it to work, it is necessary to create an additional partition on the SD in the ext3 / ext4 file system on the mobile device. Partitioning a memory card into sections is done in one of the following ways.
(!) Before creating a new partition, copy all the files that are on the SD, as they will be deleted after the memory card is divided.
Partitioning a memory card on Android via TWRP
If the smartphone is installed, mark the SD card through it. To do this, click "Advanced" ("Advanced").

Select "Partition SD card".

Check "Micro SD card" and click "OK".
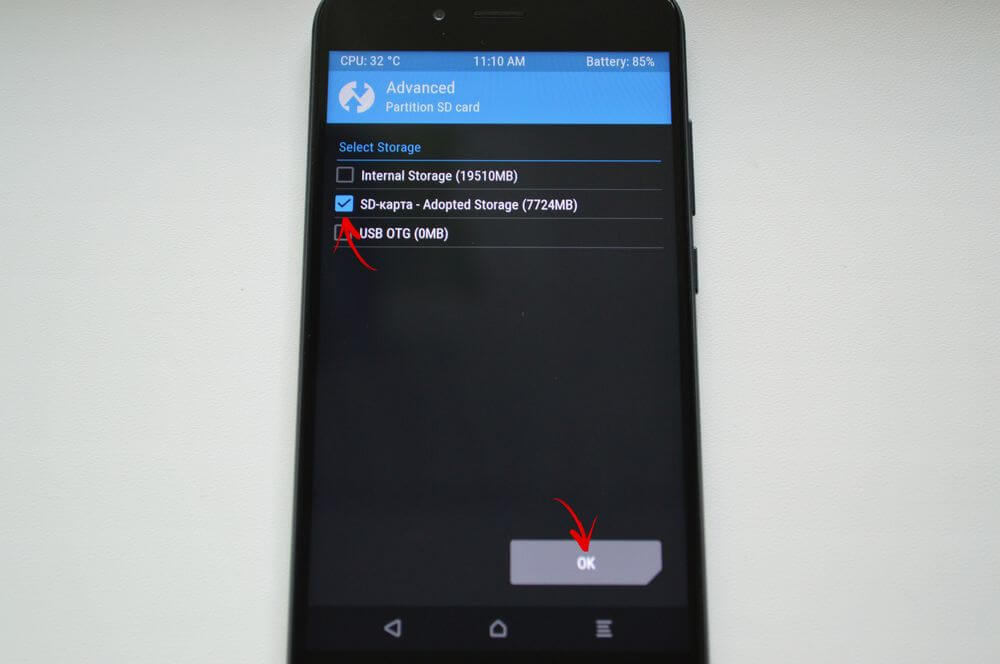
Select the file system of the ext partition to be created and specify its size. For example, 2048 MB - this memory will become available for transferring applications and the size of the SD card will decrease by that much. Leave the size of the Swap partition (swap file) at 0.
Drag the slider to start SD layout.

At the end click "Reboot System" and "Do Not Install" if you don't want to download the official TWRP app.


The device will reboot. If you go to "Settings" → "Memory" (or "Storage" in the latest versions of Android), you will see that the size of the SD has decreased. The second section "sees" only Link2SD, App 2 SD and similar applications.
Create a hidden partition on SD using AParted
The second way to split the memory card into 2 sections, if you have Superuser rights, but no TWRP:
Go to "Settings" → "Memory", click "Disable memory card" and confirm the action.

Start AParted and grant root access.

The Create tab has 2 bars: the top one will display the new partition, and the bottom one will show the current size of the SD and its file system.
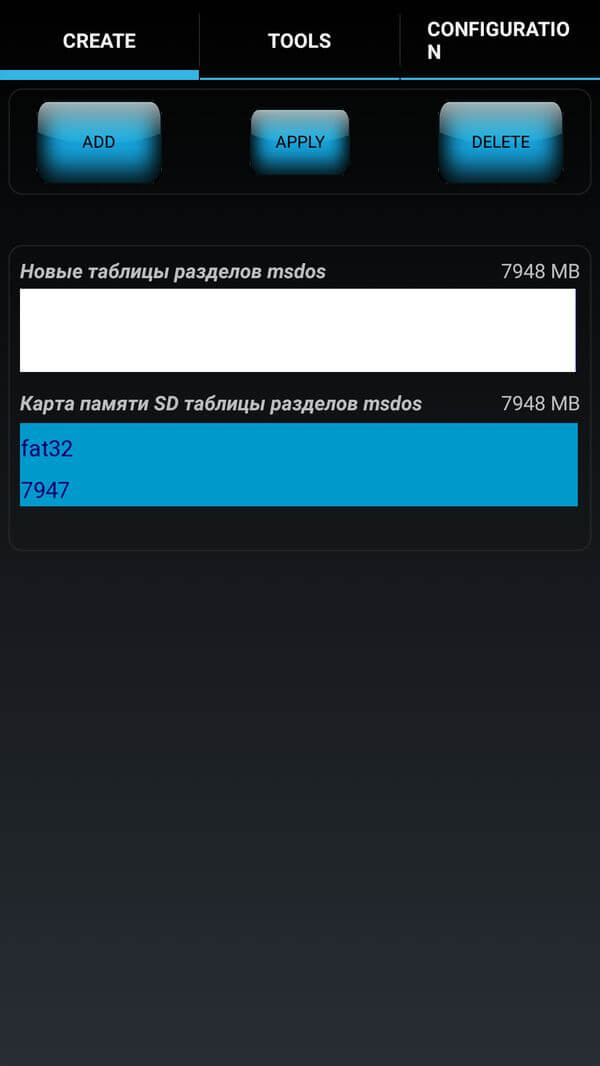
Click "ADD" to create the first partition. This will be the new size of the memory card where you can save photos, music, videos and other files. Leave the checkbox next to "Format", the fat32 file system and use the slider to select the size. To specify it more precisely, click on the number next to MB, enter the desired value and click OK.


Click "ADD" again and create a second hidden partition to which games and applications will be transferred. Pull the slider all the way down, leave "Format" checked, and select the ext file system.

Click APPLY and select OK in the warning window that appears.

The SD splitting process will start.

When completed, the second line will display 2 sections.

Now connect the memory card through "Settings" if this did not happen automatically. The new SD size should be displayed there.
Working with Link2SD
Open Link2SD and give the program Superuser rights.

A window will immediately appear with the choice of the file system of the hidden section of the SD card. Check the appropriate ext version and click OK. If the window does not appear, expand the menu on the left and click Regenerate Mount Script.


Then click "Reboot device" to mount the second partition of the memory card. The device will reboot.

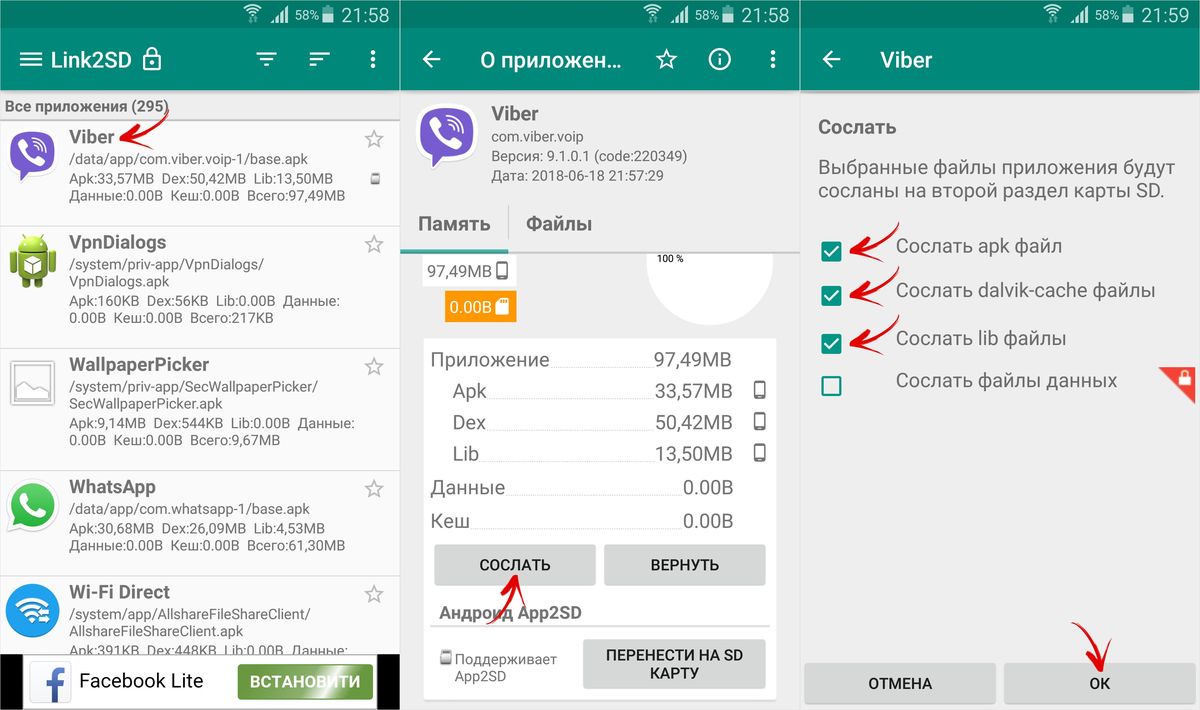
After Android starts, go to Link2SD, click on the 3 dots in the top right corner and select "Multiple".

Check the desired applications and re-open the menu. Click Submit.


There is also a "Move to SD card" feature that moves apps using the standard Android method, which is not available to users without Link2SD.

If you need to move a single game or program, find it in the list, click on it and select Send or Move to SD Card.


To move applications back, select them and click "Return" or "Move to phone". If you need to merge partitions, just format the SD card in the menu "Settings" → "Storage".
