Change the order of printed forms in document 1c. Publications. We connect external processing to the configuration
As is known - without a paper.. no serious business can do without. And when we say that there are some electronic documents in 1C, the question immediately arises of how to print them in paper form.
The process of printing an electronic document 1C is called a 1C printable.
Each document can have several 1C printables. For example, the document Sale of goods and services (i.e. sale) is printed in 1C printable forms: TORG-12, Invoice, Waybill, Act of Services Rendered, and so on.
The essence of the 1C printable is a template (of the Excel document type) in which variables are set. During the printing process, the text from the electronic document is substituted for the variables. The template is usually stored in the configuration.
The problem of changing the standard 1C printing form is that it is usually not desirable to change the standard configuration, otherwise it will be more difficult to update. Therefore, various methods of using external printing forms 1C appeared and began to reinvent the wheel.
The external printing form 1C is a print template that is stored somehow separately from the configuration itself.
However, this is all theory. How to create your own printable? And even better - how to make changes to the existing one?
How a 1C document is printed
To print any 1C document (which can be printed) - you need to click the Print button in the document. 1C will prompt you to select a 1C printable for this document from the list.

To the left of the Print button, there is usually a button for quick access to the last selected 1C printable.
The print result looks like this. To print it to the printer, you need to put the cursor in the 1C printable, press Ctrl + P or the button with the printer on the button bar or in the File / Print menu.
Print settings (margins, paper orientation, etc.) are located in the File/Page Setup menu. Also in the user settings, you can make sure that printing is done directly to the printer.
Where does this printable come from?
Where is the printed form 1C
Let's go to the configurator. Find the desired document in the configuration window. Let's open its Layouts branch. It is they who turn into a 1C printing form when printing.

However, it will not be enough - we were offered to choose many more options when printing. The fact is that many layouts of 1C printing forms are hidden elsewhere.
Let's go back up the 1C configuration window. Open the General branch, and then the General Layouts branch. This is where most of the layouts are located. This is especially true for state-regulated printing forms 1C - TORG 12, Invoice, etc.
By the way, it is not difficult to notice that you will see several layouts of TORG12 or Invoice. Why? It's easy to explain. Laws and requirements change periodically. But we can't just change the same layout - and if we have to print the document from a date that is earlier than the date of the change. Therefore, several layouts are made and, depending on the date of the document, the correct one is used.

But that's not all! There are also external layouts. Where are they stored?
Let's return to the 1C Enterprise mode. Through the menu of a user with administrative rights Operations / Directories, select the External processing directory.

The lines of this directory, which look like a Printable, add printing options for the document specified in the table Accessory of the printable (in the picture, this is the Sale of goods of services).
In order for this to work, you must do an external processing that has in its object module a Print() procedure marked Export that organizes the printing process.
But we are getting ahead of ourselves. Let's first see how the 1C printable layout is organized.
Layout of the printed form 1C
The layout of the printed form 1C is as follows.

As you can see, it is divided into blocks. Blocks can be horizontal (name on the left) or vertical (name on the top).
The layout itself, in the form in which it is, is not printed. Individual blocks are printed. The programmer in the print processing procedure specifies the order of the blocks and the number of repetitions of each block. The result is a printed form.
To assign a region, select several rows (or several columns) and select Table/Names/Assign Name from the menu. To remove - there is also a Remove name command.

The name is needed so that the area can be accessed from the program code. The title can be assigned not only to rows or columns, but simply to several cells. To do this, select the cells and select the same menu.
However, by default, arbitrary cell names are not displayed. To see them, select the menu item Table/Names/Show named cells.
So, today we learned that the 1C printing form is formed using a layout. The layout consists of blocks - cleverly - named areas.
Typical (usually used) blocks for printing form:
- Header - displays the title of the document
- Line - one line of the table is displayed, this block is repeated as many times as you need to print lines
- Footer - displays the end of the document.
Now we need to deal with
This article describes how to connect an external printing form to the 1C database using the Trade Management 10.3 configuration as an example.
The “Trade Management 10.3” configuration is a configuration on the so-called “NORMAL” forms, and not on “MANAGED” ones like “Trade Management 11.2”, for “MANAGED” forms we recommend reading.
Our instruction "shows" how to connect an external printing form in 1C with a configuration on "NORMAL" forms, namely:
- "Accounting 2.0"
- "Trade Management 10.3"
- "Salary and HR 2.5"
- "Integrated Automation 1.1"
- "Manufacturing Enterprise Management 1.3"
- "Retail 1.0"
- and other similar configurations.
In order to connect an external printing form in 1C, we need to go through 11 steps.
1 — Service menu. 2 - Select "External printing forms and processing." 3 - Next - "External printing forms" (see figure below ↓)
In order to convince you that this instruction is suitable for other configurations on "NORMAL" forms - we will present the same initial 1-2-3 step, but no longer in "Trade Management 10.3", but in "Accounting 2.0" everything is the same there, with the exception of slightly changed words in the subparagraphs, namely ...
1
- Menu "Service" (as well as in "UT 10.3", and in others).
2
- Here "Additional reports and processing", and not "External printing forms and processing" as in "UT 10.3",
but all the same, the meaning is the same and is located in the same place in the "Service" menu.
3
- And then - "Additional external printing forms", i.e. extra word "Additional", when compared with "UT 10.3" (see figure below ↓)

Further, we will continue all the same on the example of "Trade Management 10.3" without unnecessary comparisons.
4
- Press the "+" button, i.e. "Add". 5
- The button where the folder is drawn (when hovering, a hint will appear: "Replace external processing file").
In new versions of 1C (starting from August 2016), the program has a built-in warning mechanism about the danger of using unknown external processing that may contain "viruses", in earlier versions of the program the warning will not appear! If it has arisen, then to connect external processing it will be necessary - 6 - click the "Continue" button. (see pic below ↓)

7 - We select the directory in which the file of the external printing form we need is located. 8 - Select our file. 9 - Click "Open" (see figure below ↓)

10 - An external printable can have auto-registration parameters, as in our case, it makes sense to click “Yes” here - thereby using these parameters during registration, i.e. automatically select those objects (documents or maybe, for example, directories) in which it will be possible to use a plug-in external printing form (see the figure below ↓)

That's all, we have filled in the table “Ownership of the printed form”, thanks to the auto-registration parameters, we see the name of the connected external printable, perhaps the “Comment” field will be filled in, etc. You can add your objects to the table “Accessibility of the printed form”, for example, for our processing “Universal printable form of the contract”, which supports the printing of many documents and directories, but the auto-registration parameters are set only for the main ones: 10* - Click on the green "Add" button and choose which objects to place in processing. Now all that's left is - 11 - click on the "OK" button and (see the figure below ↓)

Now it's worth checking - did we do everything right?
To do this, we select an object for verification, for example, the document “Sales of goods and services”, which is indicated in the table “Accessibility of the printed form”, which means that the connected printing form can be used in this document! Let's check… (see the picture below ↓)

To check the possibility of printing, open any document of the form: "Sales of goods and services." 13
- Click the "Print" button.
We see - a window for selecting printing forms has appeared, among them there is - 14
— an external printing plate connected by us (see the figure below ↓)

It is carried out in accordance with the standard layout of the printed form built into the application by developers (it is called the "supplied" layout).
If necessary, you can change the standard layout and, in the future, print the document based on your personal ("custom") layout. To edit the layout of the printed form, a mechanism for uploading to a local computer is provided. The layout is edited in the local version of the 1C:Enterprise application (in particular, you can use the free application 1C:Enterprise - Working with files).
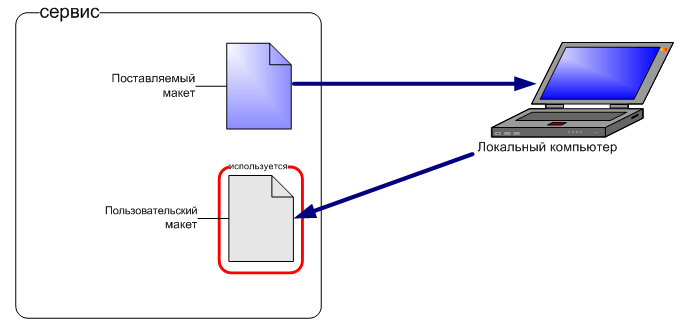
Follow the steps below to change the printable layout.
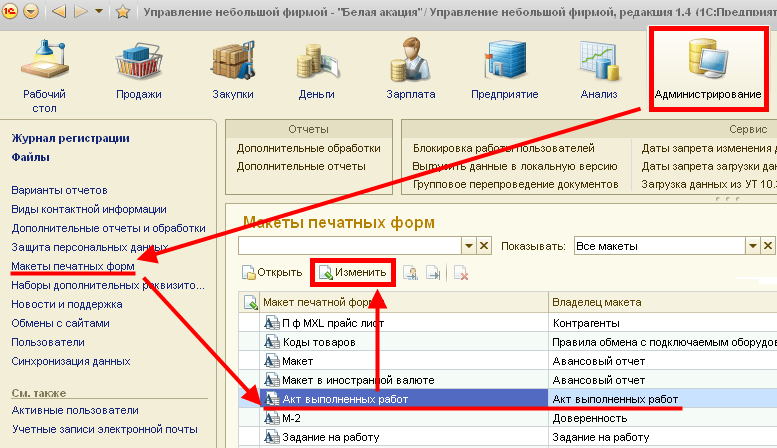


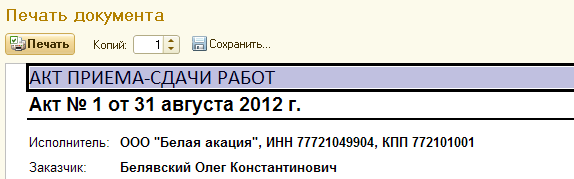
Editing the layout of the printable is completed, when printing the document, the layout to which the changes were made will be used.
If you would like to return to the previous printable layout, click the button Use Standard Layout. In this case, the edited layout will still be present on the server, and it can be re-enabled by pressing the button Change.
We wish you pleasant work!
How to insert a company logo into the layout of the printed form?
Let's give a specific example of editing a printable layout Invoices for payment, namely, consider how to insert an image into it, for example, a company logo (this image must first be prepared and saved as a graphic file, for example, in png or jpg format).

Thus, now the invoices for payment that you prepare for transfer to your counterparties will have your company logo. In order to add the logo to other documents, you will need to repeat the described steps for the corresponding printed forms of these documents.
We wish you pleasant work!
Instruction
Open the program "1C:Enterprise" version 8. Pay attention to the menu item "Service" - "External processing and printing forms". With it, you can store external reports, processing, printing forms, as well as processing the filling of tabular elements. You can also connect an external form instead of changing an existing one, which will interfere with the program configuration.
Launch 1C:Enterprise in the configurator mode, then create an external processing, to do this, execute the command "File" - "New". In the window that appears, select "External Processing". A new external processing form will appear on the screen. Give it the name " External». Then add a new attribute called "Object Link", specify the type for it - "Document. Link. Realization of goods and services”. To create a printable for a different kind of document, use the appropriate link type.
Add a new layout by clicking on the appropriate button in the new form window. Name it "Layout", create an area named "Header", give it a "Header Text" option. Then click on the "Actions" button, select the "Open object module" command. Then insert the text of the module, you can use the example posted on the site http://www.uasoft.com.ua/content/articles/315/.
Launch 1C:Enterprise, go to the Tools menu, select External Printables. Make a new entry in the list of forms. To do this, select the created processing file, and in the tabular section indicate that the form belongs to the document "Sales of goods". Verify that the new printable is working properly. To do this, open the created document, swipe it, then click on the "Print" button at the bottom of the screen, select the "External printing form" option.
Sources:
- how to change the printing form in 1s
In order to create and edit object forms, 1C:Enterprise provides a special form editor (or Form Designer). Forms of objects of the applied solution are intended for visual presentation of data while working with the program. The form editor contains several tabs that provide the ability to edit all form elements.
You will need
- computer, program 1C
Instruction
Using the form editor, you can add one or more "Group - Pages" elements to the form, to do this, click on the green plus sign in the upper left corner of the editor, while on the "Elements" tab.
In 1C:Enterprise mode, all existing elements of a group will be displayed on a separate tab each. To place it above or below the working one, in the "Properties" window of a particular group in the item "Display"Select the appropriate command.
You can also add elements to the form by dragging the necessary details into the element tree. For ease of traversing form controls when editing or entering data, set the order that suits you by arranging elements in the tree and subordinating them to other elements, as well as setting the properties of group elements according to your needs.
To edit form attributes - change them, create new ones or delete them, use the panel in the attribute tree area on the corresponding tab.
To edit the command interface, go to the corresponding tab. You will have a command tree in front of you, the main branches of which are the “Navigation Bar” and “Command Bar”. Some commands are added to the command interface tree automatically, but you can also add them yourself by dragging the commands you need from the list of global (common) commands or from the list of form commands.
Form commands are edited in the corresponding list. You can add them, remove them from the list, set properties for each command using the properties palette, which you can call by clicking on the pencil icon in the command line of the list.
To edit the form parameters, go to the "Parameters" tab, where you can also add, delete, and set the desired properties.
Related videos
The chart of accounts used in accounting to display the economic activity of an enterprise supports a multi-level hierarchy: account - sub-accounts. So that the user can view the data contained in the chart of accounts and correct them, the 1C system allows you to change the account form. In addition, the printed form of the invoice can be changed in any other document in 1C.

You will need
- - personal computer with 1C.
Instruction
Analytical accounting is provided for each account or sub-account. Therefore, when creating and subsequently editing the chart of accounts in 1C, the required number of subconto, that is, objects of analytical accounting, can be supplied. Moreover, adjustments to accounts and sub-accounts can be made by both the user working with the automated accounting system and the software developer.
Today we will tell you how to work with printing forms in 1C.
Now we will analyze how to manually edit a printable in 1C, depending on the versions. In general, if there are no additional complicating factors, this procedure is simple and fast. But there are subtleties here. For example, actions are simple only when you need to edit data that will then be printed on the form. In some cases, in order to edit a printable in 1C, you will need the help of a programmer or an experienced user, for example, when:
it is necessary to correct the location of various elements;
need to add multiple columns;
it is necessary to change the inscriptions or add the missing ones.
Now let's change the user data in the printed form. For example, let's take any account.
To get started, open the invoice journal, then select the invoice for the buyer to pay and generate printable 1C forms.

As an example, you can edit the invoice amount. Proceed to editing the printed form that opens in front of you. To do this, click on the "View only" button on the panel, which is located in the upper corner of the printed sheet.

To go to the edits, you need to sequentially click the sections in the menu: table –> view –> editing.

As soon as the editing ban is lifted, you need to double-click on the cell with the data in which you are going to change the information. The printable in 1C 8.2 after double-clicking will be available for editing.

The above cases, when you need to change the printed form in 1C, are used for one-time edits in a printed document. That is, in the future, all these changes will not be saved. If you want to keep the changes made, and so that they are present in the future, then this requires qualifications and certain skills. When needed, for example:
change the order or name of the columns;
make changes to the names of the fields;
change the number of fields;
enter additional information, etc.
