Online system check for errors. SFC and DISM: Check and Repair System Files in Windows. Using Third Party Applications
). In this case, some begin to worry and look for all sorts of causes and ways to fix freezes.
I will not repeat myself and write why this happens, because. the article is not about this and I already gave a link to solving problems above.
I'd rather show you one interesting way that will help you check the system for errors.
Few people know, but in Windows there is one useful "trick" that can itself search And correct errors in the system itself. Moreover, it will not touch third-party programs, but will only check its system files. This is useful and interesting in that many do not think that the reason may be hiding in the system itself, but start frantically, and so on. All in all . Yes, this is useful and can lead to good results, but with all these actions, it is good to remember something else that I will write about below.
I already wrote a little about this function in the article, which can also occur due to a failure in system files, which are often forgotten about. But still, in the framework of this article, I will repeat ...
So let's run:
and enter into it sfc /scannow:

The system check will start:

You just have to wait.
For those who are interested, here is a description of the command and keys.
sfc
where:
/scannow – all protected system files are scanned immediately.
/scanonce - one-time scan of all protected system files at the next system boot.
/scanboot - scans all protected system files on every boot
/REVERT - Sets the original default options.
/ENABLE - Enable normal operation of Windows File Protection
/PURGECACHE - Purge file cache and check files immediately
/CACHESIZE=x - Sets the file cache size
In the command line (Start -> Run -> cmd) we write the command sfc / and the desired key.
After the check is completed, the system will report the results and ask you to reboot.
That's all for me. Thank you all for your attention.
In any operating system, including Windows 10, errors occur during operation. The reasons for their appearance are different: errors on the part of the user (forcibly turned off the computer during the update), errors associated with the operation of installed programs, errors arising due to a malfunction hard drive, viral activity, etc. In fairness, it should be noted that, starting with Windows 7, Microsoft's operating systems have become more stable and easier to recover from failures. More and more users install the system partition on an SSD drive, which increases reliability and speed compared to a hard disk drive (HDD). Windows work. How to check Windows 10 for errors - this will be discussed in this article.
How to independently check Windows 10 for errors and fix them
Use the method below to check Windows 10 for errors. We will not use third-party utilities, but will use the tools that Microsoft offers us to check. Let's trust the developers of the system - after all, they know better how Windows works, what problems it can have, and how best to troubleshoot the problems that have arisen.
How to find errors with the SFC utility in Windows 10
The SFC utility is a command known to computer specialists that checks system files, detects damaged ones and, if necessary, restores them. To run it run command line(as administrator) and type sfc /scannow  . Be sure to wait until the job is completed.
If everything is in order, the scan will complete without errors or with a message about their correction, otherwise, if a message appears about errors found in system files (for example, Windows Resource Protection found damaged files, but could not restore some of them), you will need to use another utility.
DISM will help the user to check Windows 10
Windows 10 includes a useful recovery utility called DISM. Before using it, restart your computer, turn off external storage devices (flash drives, external drives, memory cards), close programs that have autorun (including Anti-Virus). You can check still running programs, for example, through the "Task Manager" and, if found, terminate their work there. Make sure that you are connected to the Internet and the computer will not go into sleep mode if the user is idle, but hard drives do not turn off to save energy.
Launch Command Prompt again as an Administrator and enter the command: DISM.exe /Online /Cleanup-image /ScanHealth . Application start: 
Be patient and wait for the results of the program check. At the end, you may receive a message that "the component store is recoverable" 
in this case, enter the command: DISM.exe /Online /Cleanup-image /RestoreHealth
From the names you can understand that in the first case we checked the system installed on the disk, and now we are restoring it.
Upon completion, you will receive the message "Restoration completed successfully."
If the work of DISM at the first stage revealed critical errors that cannot be corrected, then the most optimal solution Windows will be reinstalled. Before doing this, make sure that your HDD in order, for example, using the CristalDiskInfo or Victoria program - they scan SMART - service information that the disk stores about its work, and the chkdsk command run from the command line (as administrator) will check and fix possible disk errors.
Not all errors are expressed in windows that appear on the desktop and the inability to perform any action. Much more often, they imperceptibly accumulate on your computer and gradually slow down its work. Periodically it is worth checking the device for possible errors, and not only the system, but also the hard drive and the registry. All the methods described below include the automatic correction of the faults found.
How to check the system for integrity and errors
As a result of incorrect shutdown of the computer, exposure to viruses and other problematic situations, system files may be damaged or changed. The consequences of this, as a rule, are expressed in problems when starting individual programs or turning on the computer, but sometimes they can be invisible to the user. Scanning the system for integrity is the first thing we recommend doing when you encounter problems with Windows 10.
Through the sfc command
This is the main way to check operating system for integrity. It is intended for cases with problems with the performance of the computer. Through the sfc command, only a superficial analysis is carried out, with the help of which it will not be possible to find and fix all possible errors. However, this method is quite fast and is ideal for preventive computer scans. A deeper analysis is possible through the DISM utility, which is described below.
The sfc command cannot fix errors in files that are currently in use by the system. If you receive a notification about such failures, be sure to run the DISM utility.
Through the DISM utility
The DISM utility performs a full system scan for errors and integrity violations. The analysis launched by it lasts quite a long time, but it allows you to identify and correct all violations in the system. Internet is required for verification.
Before starting the utility, disable the antivirus and all running programs, and try not to use the computer during the analysis.
Open command prompt as administrator and type dism /Online /Cleanup-Image /RestoreHealth.
 For a complete analysis of the integrity of the system, enter the command dism /Online /Cleanup-Image /RestoreHealth at the command line
 There are a few more commands of this utility that you may find useful:
- dism /Online /Cleanup-Image /CheckHealth for information about the status and presence of damage to Windows components;
- dism /Online /Cleanup-Image /ScanHealth to check the integrity and corruption of the component store.
How to check hard drive for errors
All data written to the computer is divided into small fragments, which are placed on sectors of the hard disk. During the operation of the computer, these sectors can be damaged. Bad sectors are hard disk "errors". When the hard drive tries to read information from a bad sector, the reading process "stops". The result of this is unnecessarily long turning on the computer and launching some programs.
You cannot fix bad sectors, but you can prevent the hard drive from working with them. The process of finding and eliminating these sectors is called defragmentation. Even if no errors are found, as a result of defragmentation, the space on the hard disk will become more ordered, which will also speed up the process of reading information.
Through the "Explorer"
This is the main way to check the hard drive. Windows 10 should do it automatically, without the knowledge of the user, in order to keep the hard drive in order. Defragmentation will take you about an hour, so it's best to leave it overnight.

Through the "Control Panel" (storage diagnostics)
Many mistakenly believe that through the storage diagnostic utility, you can analyze the hard drive. Actually it is not. The storage diagnostic utility is indeed present on the hard drive, but it starts automatically, and you won't be able to do an analysis through it. In this way, you can only find out the results of the last hard disk status check.
If you just want to analyze, use the previous method, but instead of "Optimize" click "Analyze".

Through the command line
This method eliminates the restoration of order on the hard disk, which is performed during normal defragmentation. This makes the process much faster. Correcting errors in this way is recommended if you need to quickly recover information from bad sectors.

To check without using the Internet, use the chkdsk C: /F /R /offlinescanandfix command.
Via PowerShell
Windows PowerShell is a powerful new shell for the command line. She does the same as her predecessor, but has much more powers. PowerShell allows you to quickly and easily perform those actions that are difficult or impossible for a conventional command line. In our case, this will help to avoid the need to restart the computer to check the sectors in use.

To check without using the Internet, use the Repair-Volume -DriveLetter C -OfflineScanAndFix command.
Video: how to check a hard drive for errors
How to check the registry for errors
The Windows Registry is a complex database of the operating system that stores all settings, changes, information about the computer and installed programs. In the event of a registry error, the consequences can be very different: from blue screen when turned on and the system is completely inoperable to an unremovable shortcut and other trifles.
The most annoying feature of registry errors is their layering. One minor error in the registry can lead to several others, which will ultimately lead to sad consequences. This is why regularly scanning your registry for errors and fixing them early is extremely important to keep your computer running at a high level.
Via built-in
Windows 10 has a built-in utility for checking the integrity of the registry, but it is rather weak and does not find most errors. Your best bet is to use one of the third party programs that are described below.
Only critical errors can be fixed in this way: many registry malfunctions will remain untouched.
Open a command prompt as an administrator, type scanreg /fix and press Enter.
 Enter the scanreg /fix command to check the registry through the built-in Windows 10 utility
 Via CCleaner
CCleaner is the most popular and reliable computer cleaning program. It is designed to clean debris from hard-to-reach places that the system itself cannot reach. However, CCleaner deserved its popularity precisely for its registry cleaning function, which allows you to quickly find and overwrite registry errors without affecting anything important.

Via Glary Utilities
Glary Utilities- very functional program, which will run in the tray and keep your computer clean and tidy. Cleaning the registry is just one of the available features to improve your computer. Glary Utilities may seem intrusive to many, but for inexperienced users, it will be a very useful assistant.

Via Wise Registry Cleaner
Wise Registry Cleaner is a program designed not only to treat the registry, but to completely clean it from stale and unclaimed parameters. Cleaning the registry with Wise Registry Cleaner is quite serious and can affect important files that the program seems superfluous. The first time you run Wise Registry Cleaner, you will be prompted to do backup registry, which is better to agree. If important files are affected, you can always roll back.
Wise Registry Cleaner is available only on the English version of the official website: when you change the page language to Russian, you will be offered another Wise Care 365 program.

Even if you don't see any errors on your computer, it's best to scan it periodically. This will keep your system running smoothly and help resolve most issues before they become noticeable.
As the operating system functions, errors accumulate, especially if you frequently install and remove programs. This reduces performance and may even lead to malfunctions. In this article, we will tell you how to check Windows 7 for errors and fix them.
Check by system means
Windows itself has built-in mechanisms for finding and fixing errors. One of them is the sfc command line utility. To use it, open the Start menu and select All Programs. Open the "System Tools" section and find the "Command Prompt" link. Right-click on it and select the "Run as administrator" option. You may need to enter an administrator password to do this.
When the command prompt window opens, enter the command sfc /scannow in it and press the key. The system will start the check and will inform you about the progress of its execution. If errors are found as a result of the scan, the utility will try to fix them. You may be prompted to restart your computer. To make sure that all problems are resolved, after rebooting, you can run the scan again.
There is also a function in Windows to check the hard disk for errors. To use it, open the Start menu and select Computer. In the window that opens, right-click on the drive you want to check and select "Properties". In the dialog box that appears, go to the "Tools" tab and click the "Perform Check" button in the "Check Disk" section. In the window that appears, select "Automatically fix system errors”, and to ensure a particularly thorough check, there is also the item “Check and repair bad sectors”.
Checking with third-party programs
In addition to the built-in utilities, there are third-party programs that allow you to check Windows for errors. The most popular and reliable of them is CCleaner for checking the registry (which Windows itself cannot check). Free version programs can be downloaded from the official website.
To check the registry for errors, run CCleaner and select "Registry". Click the Search for Issues button. After a short scan, the program will display a list of errors found in the registry. Click the "Fix" button. This will prompt you to back up the registry in case something goes wrong. Do it. Then a small window will appear with a description of the errors and how to fix them. You can fix errors one at a time, or click the "Fix Marked" button to fix all at once.
The hard disk drive (HDD) is the most important element of the computer, which stores all the necessary information, programs and user files. Like any other component, over time, the hard drive wears out, its normal operation is disrupted, and failures begin to occur. Along with physical wear and tear, leading to the appearance of so-called bad sectors (bad blocks), there are often logical errors associated with file system, indexes, and the main file table.
For the time being, you may not observe problems in work hard disk, but this does not guarantee that one day the hard drive will not die. Therefore, it is important to periodically (once or twice a year) check the hard drive for errors and bad sectors that need to be fixed. Regular monitoring will allow you to track the state of the carrier and respond in time to changes in its state. Of course, you should not neglect such a proven method of protecting information as backup. The most valuable data must necessarily be duplicated on a spare custodian.
Symptoms of a failing hard drive
In most cases, HDDs operate smoothly for several years without requiring special attention. However, in case of improper operation (physical impact, lack of proper cooling), the resource of the information carrier is significantly reduced. In rare situations, there is a factory defect or a sudden failure.
Hard disk failures can be indicated by an operating system that takes too long to load, files and folders disappear for no reason, or applications launch slowly. Obvious symptoms of a loss of performance by a hard drive are program slowdowns and long file copying. If the computer constantly “hangs”, and nothing but restarting helps, then in the process of identifying the causes, checking the hard drive should be the first item.
Using standard Windows 7/10 tools
You can test the media standard means Windows. The easiest way is to select the desired hard drive in Explorer, right-click on it and go to the "Service" tab.
Next, click the "Perform verification" button and set the verification parameters in the window that opens. If both checkboxes are checked, then Windows will automatically fix all system errors and restore bad sectors during diagnostics.
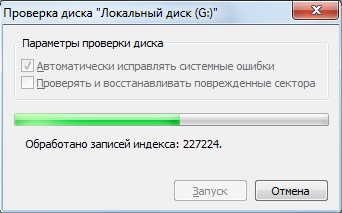
The results of the audit can be found in the report.

Command line
You can also audit the hard drive using the utility chkdsk called from the command line. In fact, such a check will not differ much from the above option.
So, we launch the command line by selecting the necessary item on the Start menu. Then in the window enter the command: chkdsk G: /f /r
- G - the name of the tested hard disk (select the disk that you want to check);
- f - checking and correcting errors;
- r - detection and recovery of bad sectors.

All information about found errors and bad sectors will be displayed as diagnostics are carried out.

Third Party Hard Drive Checker
There are many programs and utilities for finding bad sectors and fixing HDD errors. We present only the most famous.
Victoria
Perhaps the most popular verification tool hard drives. The program can be run both in the Windows environment and in DOS mode from a bootable flash drive.
The interface provides five tabs: Standard, SMART, Tests, Advanced, and Setup. First of all, go to the section standard, where in the list of devices we select the hard drive we are interested in. The Drive passport area will display basic information about the HDD.

Next, select the tab SMART and press the "Get SMART" button. SMART (Self-Monitoring, Analisys and Reporting Technology) is a hard drive self-monitoring technology. Those. the hard drive monitors its work during operation, recording information on a set of parameters that allow assessing the state of the media. It is this service information that we are trying to obtain.
After pressing “Get SMART”, either the inscription GOOD on a green background or the inscription BAD! will appear to the right of the button. on red. The second option will indicate that the media is in poor condition and will most likely have to be changed. For a more detailed study of SMART statistics, let's pay attention to the list of parameters on the left. Here we are primarily interested in the attribute 5 Reallocated sector count A indicating the number of remapped sectors. If there are too many of them, then the disk began to “crumble”, that is, its surface quickly degrades and it is urgent to make a copy of all data. In this case, there is no point in restoring the hard drive.

Chapter Tests makes it possible to check the hard drive for bad sectors, as well as try to "cure" or reassign unreadable blocks. For simple testing of the hard drive, set the switch to Ignore and start the test with the Start button. The assessment of the state of the sectors is made by measuring the response time. The smaller it is, the better. Each range of response time values has its own color designation. The "slowest" blocks are marked with green, orange and red colors. Sectors that could not be read at all are marked blue. If there are a large number of "slow" and unreadable blocks, the hard drive should be replaced.

The Victoria program allows you to restore bad sectors, but we will not consider all the nuances of the procedure. Moreover, "treatment" often contributes only to a slight extension of the service life of the information carrier. To reassign bad blocks, check with the mode enabled Remap. If the recovery was successful, do not rush to rejoice. Re-diagnose the disk after a certain period of operation. The appearance of new bad blocks will indicate that the degradation of the hard drive is irreversible, and it is time for him to find a replacement.
HDDScan
This is another handy program for identifying problems with hard drives. After launching the application, select Select list Drive drive that needs to be checked.
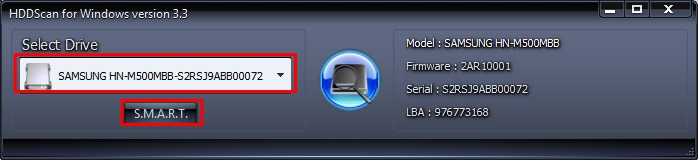
At the bottom, click on the button "S.M.A.R.T." and get acquainted with the submitted report.

Now we will diagnose the surface of the disk. Click on the round button to the right of the drop-down list of media and select Surface Tests from the menu that opens.

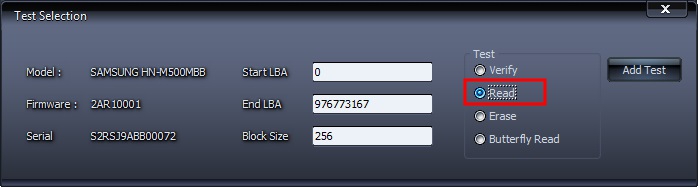
Click on the Add Test button, thereby adding a test to the list and starting its execution.

You can get information about the progress of testing in the graph (Graph), map (Map) and report (Report) mode. All blocks are also, depending on the access time, divided into groups with the corresponding color marking.


At the end, a final report is generated.

Perhaps this is all that we wanted to talk about methods for checking the hard drive of a computer for operability. We hope that the information provided will be useful to you and help you save important data.
