Windows 7 desktop views. How to change desktop wallpaper in Windows. Changing the desktop theme
Hello!
Each computer user (especially the female half :)), tries to give originality to his Windows, to customize it for himself. It's no secret that not everyone likes the basic settings, and besides, they can even slow down your PC if it is not very powerful. (By the way, the same Aero can be attributed to such effects).
Other users want to disable various graphic bells and whistles, because. they are simply not used to (after all, earlier in Windows 2000, XP, this was not all. For example, I am generally quite ascetic in this, but other users have to help ...).
So, let's try to change the look of the seven a little ...
How to change the theme?
Where can I find many new themes? At the office Microsoft website their sea: https://support.microsoft.com/ru-ru/help/13768/windows-desktop-themes
Theme - In Windows 7, a theme is everything you see. For example, desktop picture, window color, font size, mouse cursor, sounds, etc. In general, all display and sound is associated with the chosen theme. A lot depends on it, which is why we will start setting up our OS with it.
In order to change the theme in Windows 7 you need to go to personalization settings. To do this, it is not necessary to go to the control panel, you can simply right-click anywhere on the desktop and select the menu item " personalization"(See Fig. 1).
There are a lot of other topics on the Internet, a little higher, under the heading of this subsection of the article, I gave a link to the office. Microsoft site.
By the way, an important point! Some topics can even slow down your computer. For example, themes without the Aero effect (I talked about it here:) work faster (as a rule) and require lower computer performance.
How to change the background, wallpaper on the desktop?
Large selection of pre-made wallpapers: https://support.microsoft.com/en-us/help/17780/featured-wallpapers
The background (or wallpaper) is what you see on your desktop, i.e. background picture. It is this picture that influences the design very much. For example, even the taskbar strip changes its shade depending on which picture was chosen for the wallpaper.
To change the standard background, go to personalization (note: right click on the desktop, see above), then at the very bottom there will be a link "" - click it (see Fig. 3)!
By the way, the background on the desktop may be displayed differently, for example, there may be black bars around the edges. This happens because your screen has a resolution (more on this here -). Those. Roughly speaking, a certain size in pixels. When it does not match, then these black stripes are formed.
But Windows 7 may try to stretch the picture to fit your screen (see Figure 4 - bottommost red arrow: "Fill"). True, in this case, the picture may lose its entertainment ...
How to change the size of icons on the desktop?
Change icon size- very simple! To do this, right-click anywhere on the desktop, then select the “view“ menu, then select from the list: large, medium, small (see Fig. 5).
How to change the sound design?
To do this, you need to open control panels tab personalization, and then select the item sounds.
Here you can change the usual soundtrack to various others: landscape, festival, heritage, or turn it off altogether.
How to change the splash screen?
We also go to the personalization tab (note: right-click anywhere on the desktop), at the bottom select the splash screen item.
How to change screen resolution?
Option number 1
Sometimes you need to change screen resolutions, for example, if the game slows down and you need to start it with lower settings; or check the operation of some program, etc. To do this, right-click on the desktop, and then select the screen resolution item from the pop-up menu.
Option number 2
Another way to change the screen resolution is to set it in video drivers (AMD, Nvidia, IntelHD - all manufacturers support this option). A little lower, I will show how this is done in ItelHD drivers.
First you need to right-click on the desktop and select "Graphical characteristics" in the pop-up menu (see Fig. 12). You can also find the video driver icon and go to its settings in the tray, next to the clock.
Rice. 12. Graphic characteristics
Rice. 13. Resolution, display section
How to change and customize the start menu?
To customize the START menu and taskbar, right-click on the START button in the lower left corner of the screen, then select the properties tab. You will be taken to the settings: in the first tab - you can customize the taskbar, in the second - START.
It probably doesn't make much sense to describe each checkmark in the settings. It's best to customize it experimentally: if you don't know what the checkbox means, turn it on and see the result (then change again - look, by typing you will find what you need :))..
Configuring the display of hidden files and folders
Here, it is best to enable the display of hidden files and folders in the explorer (many beginners get lost and don't know how to do it), as well as showing file extensions of any file types (this will help avoid some types of viruses that masquerade as other types of files).
It will also allow you to know for sure what kind of file you want to open, as well as save time when searching for some folders (some of which are hidden).
To enable display, go to Control Panel, then to the tab decoration and personalization. Next, look for the link " Show hidden files and folders» (in the explorer settings section) - open it (Fig. 17).
- uncheck the box next to " hide extensions for registered file types«;
- move the slider to "show hidden files, folders and drives" (see Fig. 18).
Desktop Gadgets
Gadgets are small information windows on the desktop. They can notify you about the weather, incoming mail messages, show the time / date, exchange rates, various puzzles, slides, CPU usage indicators, etc.
You can use the gadgets installed in the system: go to Control Panel, type “gadgets” into the search, then you just have to choose the one you like.
By the way, if the presented gadgets are not enough, then you can additionally download them on the Internet - there is even a special link for this under the list of gadgets (see Fig. 19).
Important note! A large number of active gadgets in the system can cause a decrease in computer performance, slowdowns and other delights. Remember that everything is good in moderation and do not clutter up your desktop with unnecessary and unnecessary gadgets.
That's all for me. Good luck everyone and bye!
Windows 10 makes it easy to customize the look and feel of your desktop. To access personalization settings, right-click anywhere on the desktop, and select Personalization from the context menu. The personalization settings screen will open.
The elements of the personalization screen are labeled below, and their descriptions immediately below the image.

1. Background
Here you can select and customize your desktop background.
2. Colors
Here you can change the color of places such as the taskbar and the Start menu. By default, Windows 10 will use a color based on the background image. However, you can disable this feature if you prefer to use a different color.

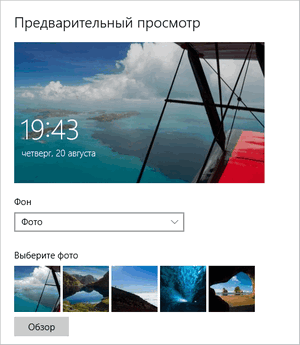
3. Lock screen
Here you can customize the look of your lock screen. Just like the desktop background, you can use the default images or set your own image.
4. Themes
If you have used themes on earlier versions of Windows, you can view and select them here. However, Microsoft currently has no plans to release new themes for Windows 10.
5. Start
Here you can configure some settings for the start menu.

6. Overview
Click Browse to select a background image from your computer for your desktop.
To change the font size:
If you have trouble seeing text on the screen, you can increase the font size. Increasing the font size will also increase the size of icons and other elements on the desktop.

To configure ClearType settings:
ClearType technology allows you to customize the display of text on the screen, which will help improve readability.
It talks about working in the Windows operating system (using the XP and 7 versions as an example), the Word 2010 text editor and other applications necessary for each user: archivers, antiviruses and programs for watching videos and listening to music (Winamp, QuickTime Pro). Much attention is paid to the work on the Internet. It tells about programs for browsing Web pages, about e-mail, as well as about various useful applications for working on the network - file download managers, ICQ, Windows Live Messenger, MSN and many others. The second edition covers the new OS - Windows 7, as well as the latest versions of applications for users.
For novice PC users.

Here you can customize the color scheme of the windows on your system. To select a color, click on it with the mouse. With the slider below, you can adjust the brightness of the color. Also you can mix colors: open the option Show color customization and use the sliders at the bottom to adjust those colors. To open the classic color settings window (Fig. 2.101), click on the option Open Classic Appearance Properties to select other options. Here you can also select one of the design options in the list. In the window above, you can see how the windows and titles will be displayed.
If you don't have a very powerful machine, I advise you to turn off the Aero effect or switch to Windows Classic View altogether - this way Vista will use significantly less system resources.

? Desktop Background- here you can set your desktop wallpaper. Compared to Windows XP, the settings for choosing a desktop background have been greatly simplified. In the window that opens (Fig. 2.102), click on the picture you like, and it will be used as a background on the desktop. For convenience, all drawings are divided into several categories, and you can choose the image to your liking. The category of images is selected from the drop-down list at the top. At the bottom you can choose how the images are displayed. To add a new image to the collection, click the button Overview and select an image in the window that opens.

? Screen saver- selecting this item opens a window for setting the screensaver (Fig. 2.103), which appears when you do not work at the computer for a long time. You can select a screensaver from the drop-down list. To view the screensaver, click the button View, button press Parameters brings up the screen saver settings window. Here you can also set the start time for the screen saver. Clicking a link Change power options brings up the computer's power settings window, where you can set power options.

? Sounds- Adjustment of sound effects. This window is also called from the control panel. For more information about this setting, see sec. 2.6.7.
? Mouse pointers- in this window, you can configure the mouse pointer and other mouse parameters. For more information about setting up the mouse, see sec. 2.6.7.
? Topic- when this option is selected, a window opens Theme Options(Fig. 2.104). Here you can set the display of the interface in Vista - it can be classic or Windows Vista (the latter, however, is installed by default).

? Display options- when this option is selected, a window of the same name opens (Fig. 2.105), where you can set the monitor settings, screen resolution and color reproduction.

To change the screen resolution, drag the slider Permission, the resolution will be displayed just below. Button press Additionally opens a window with more detailed settings for the monitor and video card (Fig. 2.106). Here you can reinstall drivers (if necessary) and find out information about the hardware.

On the tab Monitor(Fig. 2.107) it is possible to set the refresh rate of the screen.

Also in the window Personalization(Fig. 2.92) there are two more options that you should pay attention to - and Change font size. Let's consider them in more detail.
? Change desktop icons- Selecting this option opens a window Desktop icon options(Fig. 2.108).

At the top of the window, you can specify which icons will be displayed on the desktop. If you want to remove any icon from the desktop, uncheck the box next to its name and click the button Apply for the changes to take effect. You can also change the icons for Computer, Recycle Bin, Network Neighborhood, Browser, and Document Folders. To do this, select the icon you want to change and click the button change icon. In the window that opens (Fig. 2.109), select any icon you like.

? Change font size- this option brings up a window Scaling(Fig. 2.110), in which you can change the font size.

If you think the font is too small, you can increase it. To do this, check the box Large scale (120 dpi). Button press special scale brings up a dialog box Scale selection(Fig. 2.111). Here you can adjust the font size yourself. The increase is shown as a percentage. An indicator of 200% increases the text twice, 150% - one and a half.

Desktop customization in Windows 7
In Windows 7, desktop customization is divided into three items - Screen resolution, Gadgets And Personalization. To bring up the settings menu, right-click anywhere on the desktop. We are interested in the last three items in the menu - they are responsible for the settings.
When choosing an option Screen resolution, the resolution settings window opens (Fig. 2.112).

Here, in the drop-down menu, you can adjust the screen resolution. If you have two monitors or a monitor and a TV connected to your computer, you can choose which screen to adjust the resolution for.
If you are satisfied with the screen resolution, but the test and icons are too small or, conversely, large, then you can also adjust this here. Click on the link Make text and other elements larger or smaller. In the window that opens, you can change the size of text and other elements on the screen. If you have good eyesight, then leave the option - 100%. If you are having problems reading text and the icons seem too small, you can choose options Average 125% or Large 150%.

To install the gadget, download it, and then double-click the installation. After installing the gadget, you will see it in the settings window. To make the gadget appear on the desktop, right-click on it and select Add. You can also double-click on the desired gadget in the properties window to display the gadget on the desktop.
To remove a gadget, move the mouse pointer over it and click on the cross that appears above the gadget. Pay attention to two more options that are under the close icon. The second option is to open the gadget settings window. The settings can be very different: if this is a news gadget, then from which sites it receives information, if it is a calendar, then in what form it is displayed, etc. Under the settings option there is a special field with which you can drag the gadget - click on the field , and then hold down the mouse and drag the gadget to the desired part of the desktop.
The third item of desktop settings - Personalization. When this item is selected, a window of the same name will open (Fig. 2.93). Here you can customize the desktop themes, turn the screensaver on and off, change the icons and Windows theme.
Most of the window is occupied by a list of themes that you can set as screensavers for your desktop. Most themes periodically change the picture on the desktop. If you do not want to admire flowers or landscapes, you can install the Windows 7 theme or the blue desktop. However, it's up to you.
The most popular operating systems are Windows 7 and Windows 10. The desktop background, or as it is also called desktop wallpaper, is an integral part of the operating system interface that determines its appearance and is customizable by the user in accordance with his preferences.
Initially, Windows 7 already has a small set of background images, among which you can choose the one you need and set it as wallpaper on your desktop. If regular images do not suit you, then the background can be easily changed to any other picture taken from the Internet or to your own photo. So, we change the wallpaper on the Windows 7 desktop.
The easiest way to change the wallpaper on your desktop is to open the folder in Windows Explorer where images and photos are stored, right-click on the desired picture to call the context menu, in which you need to select the "" item.
Another way involves going into the personalization settings of Windows 7.

When selecting multiple images for the desktop background, they will change at a frequency set by the user.

In Windows 10, changing the wallpaper is also not difficult. Here it is also possible to set the background by right-clicking on the image, with the selection in the context menu of the item " ».
To change the wallpaper through personalization settings, you need to right-click on any free space on the desktop and select the desired context menu item (as described above for Windows 7) and select the " Background»

The design of Windows 10 contains elements of both 7 and 8 versions of the operating system. For example, the Start menu returned again, but in a slightly modified form. On the left side, there are recently opened programs, and on the right side, instead of a list of applications, live tiles appeared.
Despite the fact that the developers listened to users and made the design more familiar - they changed the start screen, returned the Start menu, and so on, not everyone is satisfied with the existing design of the system. Therefore, there are several ways to make Windows 10 look like Windows 7.
Appearance
At the first login on the desktop, the user will see nothing but the trash. In version 7 of the system, in addition to it, there were shortcuts to the desktop, network environment and user folders on the screen.
The new version of the system has changed themes and icons. This setting is the easiest to change. The Internet is full of themes, among which there is Aero 7 - the standard design of the seven. It changes in the same place as the shortcuts - in the "Personalization" section.
Taskbar settings
In Windows 10, the taskbar contains some elements that were not in version 7 - the search bar and the task view. These functions are more convenient for tablets than for the desktop version, and therefore they can be hidden.
The search bar occupies a significant place on the panel. To save space, and to make the Windows 10 desktop look more like a seven, you can do two things: either completely remove the search bar, or make it a small icon that will be pinned to the taskbar.
For the first option, you need to right-click on the panel, click on "Search" and check the box next to "Hidden". If necessary, it can be called up with the Win button. To leave the search in the panel as an icon, instead of Hidden, select Show Search Icon.
The task view button shows all open processes and allows you to create a virtual desktop. You can remove it by right-clicking on the taskbar and unchecking the box next to "Show task view button". You can see open programs and windows using the standard Alt+Win command.
The Return of the Standard Start Menu
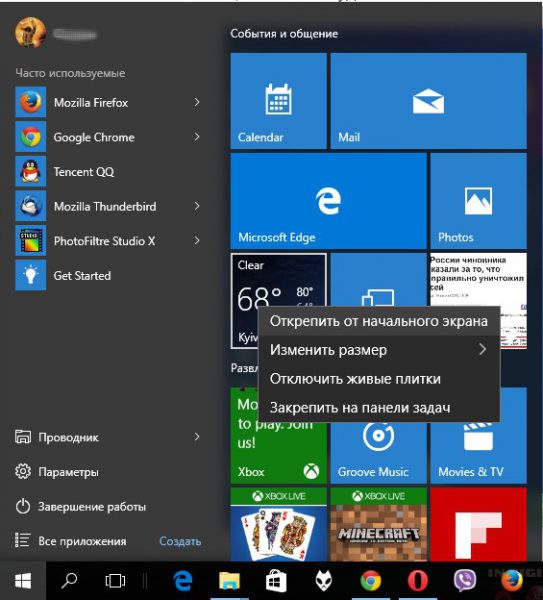
You can make the Start menu like Windows 7 either using the system tools or using third-party programs. You can return the Start menu using the system tools or using additional utilities. In the first case, you just need to remove all unnecessary tiles from the right side of the Start.
Open Start and right-click on the icons in sequence, selecting "Unpin from Start Screen". The tiles will disappear and the menu will become more similar to version 7 of the operating system. You can also resize the menu so that empty space from tiles doesn't take up much space.
For quick access to programs, you can pin them to the left side. Right-click on any empty space in the menu and select "Properties". In the window that appears, go to the "Start Menu" and select "Settings". Next, another window will appear with a list of applications that can be placed in the menu. It can be Control Panel, Documents, and so on.
If this method is not suitable and you want the standard Start menu, then only special programs will help here. For example, you can use Classic Shell - this is the most popular utility.
Download any of the above programs, run the installation file and follow the instructions of the program. Many of them have flexible Start settings. 
Windows 10 provides more options to return to the familiar look than Windows 8. Some innovations may appeal to users and they decide to leave everything as it is, some go to completely redo the look.
Video
