SuperSU: competent management of root rights on a smartphone. How to update a binary SU file on Android - restoring root access for the SuperSu application What is the Super Su application for?
There are many so-called “one-click” programs for obtaining ROOT rights to Android. These exploits are easy to use: just install the utility on your PC or the application on your smartphone, if necessary, make a couple of clicks and you're done! But their main problem is that they cannot root 100% of devices. In this instruction we will talk about a method that is suitable for all smartphones and tablets on which you can install custom recovery: CWM, TWRP.
What are root rights and what are they for?
Although Android is the most customizable mobile OS, any device out of the box does not have access to the root directory and editing system files - they are mounted in read-only mode. Having root (Superuser account), writing to the system partition becomes available. The user can customize the system as much as possible: bypass Google Play restrictions, and much more.
During the rooting process, the root rights administrator application SuperSU is installed on a smartphone or tablet, a binary file SU, which is written along the path /system/xbin/ and a set of console utilities BusyBox.
How to root Android via CWM
1. After downloading the SuperSU archive from the official website and saving it in a convenient place on your memory card.

2. – how this is done can be found in the instructions at the link.
3. In CWM, select “install zip” (selected using the power button) or “install zip from sdcard” (for older CWM versions below 6.X.X).

4. Then “choose zip from /sdcard” if the archive to be flashed is on the SD card.

5. Go to the folder where you saved “SuperSU- version.zip" and confirm with the power key.

6. Agree to the installation, select “Yes – Install SuperSU- version.zip".

7. The process of rooting the mobile device will begin.

8. At the end you will see the message “Install from sd card complete”, which in our case means obtaining root rights.

9. Return to the main CWM menu.

10. Click "reboot system now" to reboot into Android.

How to install SuperSU via TWRP Recovery
Now similar instructions for . First of all, follow the first two points from the above FAQ on flashing the SuperSU archive firmware from CWM.
1. Then select “Install” from the TWRP main menu.

2. Find the ZIP archive downloaded to SD from SuperSU.

3. Swipe, thereby agreeing to the firmware.
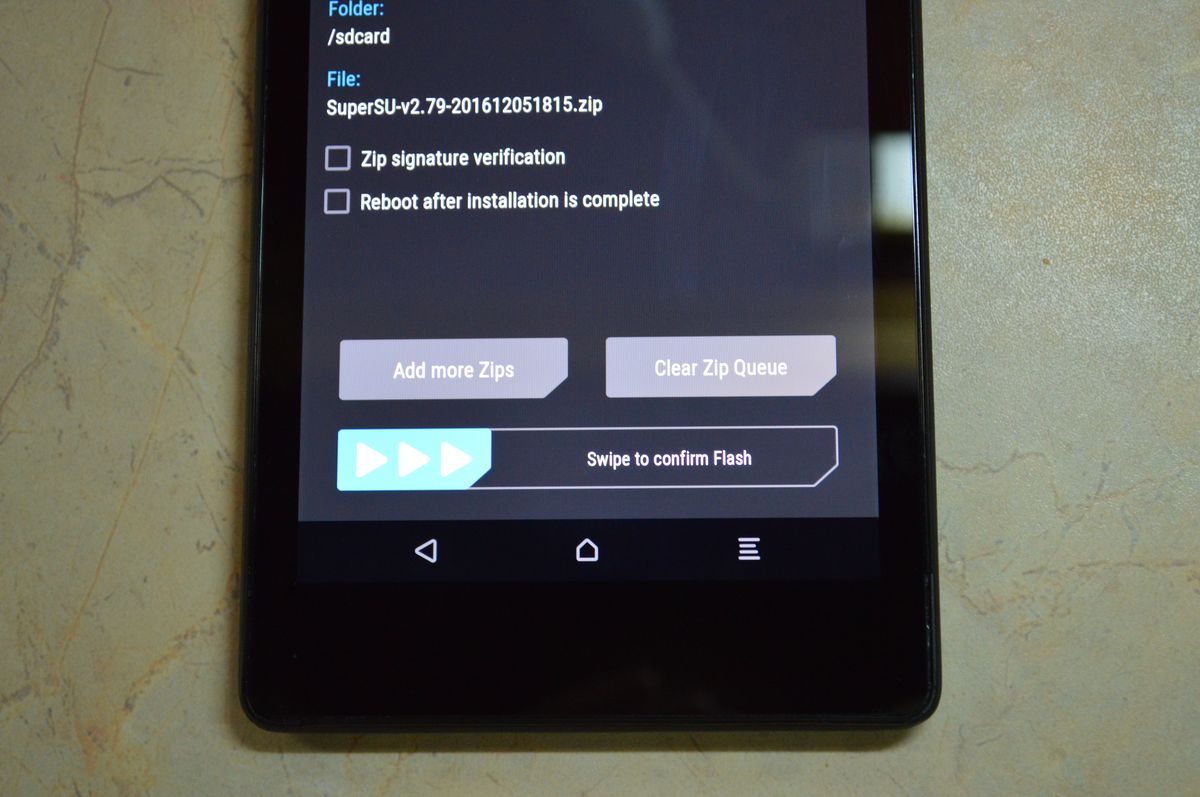
4. Successful! Root rights have been obtained, select “Reboot System” to boot the system.

How to check for SuperUser in Android
Now the Superuser rights manager - the SuperSU application - should appear in the menu. You can check whether you have root rights using a simple Root Checker program.
Obtaining root rights is only half the battle; it is important to properly manage those same rights. Because uncontrolled applications will take advantage of all the privileges without the owner's consent. Therefore, to control and manage root rights, you should use the SuperSU program.
Purpose of SuperSU
The program is designed to control applications that use root rights, for which the utility has a “Logs” tab, which displays statistics on the use of root access granted to programs. SuperSU also allows you to grant root or deny it, both permanently and temporarily.

Additional protection is also built into the SuperSU application. The utility automatically rejects program requests to grant root rights when the system starts. Also, the dialog box asking you to grant superuser rights will not appear if another application is running on top, intercepting the request. Moreover, both functions work provided they are activated in the settings by the device owner.

How does SuperSU work?
After installing SuperSU on a smartphone, tablet or other device running Android OS, the application analyzes and intercepts requests for granting superuser rights by other programs. At the time of the request, a corresponding dialog box appears, where the user is informed about the need to grant root rights. In the absence of a program, root rights are given automatically, but with SuperSU, the user personally decides: to allow or deny, and also only this time or on an ongoing basis.
After switching to SuperSU, a window with root rights is displayed on the APPS tab. By default, there is a 15 second delay. Usually this time is enough to agree or refuse to provide root rights. If you select the “only this time” option, then the application will receive root for one time, and upon further launch, this privilege will become unavailable.
For permanent access to root, you should select the appropriate option. Then, every time you start, the request to grant root will not appear. The action can be canceled at any time, for which you will need to select a program and deny permanent root access.

How to install SuperSU
There are two options for installation:
- Install like a regular application.
- Flash in recovery.
In the first case, you will need to download the program to your device and then install it according to the instructions “”. Or download from the Google Play app store.
In the second option, you will need to reboot into recovery mode, and then flash it via TWRP or CWM.
The first option is simpler, which is suitable for beginners or inexperienced users. In the second case, better integration into the system is ensured. Because the installation program will automatically detect the OS version and the preferred folder.

Where to download SuperSU
Google Play contains the SuperSU application with version 2.82, owned by an unknown company Coding Code Mobile Technology LLC, which bought the rights to use SuperSU, presumably in 2017. And although the company is registered under an American address, the origin of Coding Code is Chinese. The location of the company, owners and goals are not known. And since the source code of SuperSU is not known to the public, experienced users are in no hurry to install the program, starting with version 2.80. In addition, Google Play has a paid application,


SuperSU Pro ( utility for managing ROOT access of applications ) - This program for Android will become an indispensable assistant after you get ROOT on your mobile device. After all, the essence of this system application is to control and distribute superuser rights or administrator rights to various programs. That is, when you install some application on your device and it requires superuser rights, SuperSu will tell you about it and you will decide for yourself whether to give these treasured rights to the program or not. For ease of control, the application provides a PIN code that can be set in the program settings and which will need to be entered every time you need to grant rights to an application.
This is a very convenient function if you are more than one owner of the device, and for example, children or someone else also uses it, so so that they don’t do anything bad, it’s worth putting this pin. Another great feature in SuperSU on Android is the ability to completely remove root rights, this is necessary, for example, to update the firmware over the air, one click and you have a “clean” smartphone or tablet. From the links below you can download two versions of the program, one is installed as a regular .apk application, and the second is for flashing the firmware via custom recovery (Recovery) CWM\TWRP recovery.
Peculiarities:
- request access to superuser rights
- log access to superuser rights
- notification about access to superuser rights
- notification configuration
- temporarily disabling root rights on the device
- deep detection process
- works in the field of restoration
- works when Android doesn't load correctly
- works with non-standard shell locations
- always works in ghost mode
- wake on request
- program conversion
- perfect understanding of root rights
- backup copy in order to still exist after the daily publication of CM
- the icon can be selected from five models or you can hide the icon
- The theme can be chosen from four models
- can download by dialing:*#*#1234#*#* or *#*#7873778#*#* (*#*#SUPERSU#*#*)
Notes: Not all smartphones can work with these two passwords. In some smartphones, you need to replace the password “*#*#” with the password “*#”.
The Pro version additionally offers:
- OTA "survival mode" (no guarantees)
- full logging with highlighting (input/output/error)
- setting up a log log
- override setting
- allow or disable the application within a set period of time
- PIN protection
- PIN saving of each application program
- adjust automatically reject countdown
A method for those who were unable to install SuperSU PRO
- 1) Go to SuperSU and select “Reinstallation”.
- 2) Reboot the device.
- 3) Go to the Play Store and download regular SuperSU.
- 4) Download and install the PRO key (link below).
- 5) Reboot the device.
- 6) Done.
Solving the problem with the SU binary file:
- 1. Install Superuser and launch it.
- 2. Install SuperSU, launch it and give it root rights.
- 3. Update SuperSU and remove Superuser.
- 4. We rejoice.
Supersu download on Android
Download SuperSU Pro for Android you can follow the link below.
Rooting a mobile device is a unique opportunity to get almost unlimited possibilities for configuring, customizing and optimizing your gadget. Deep scanning of a smartphone for viruses, followed by identification, analysis and isolation of a malicious applet; installation and customization of a wireless network, even if the possibility of using it was not provided for by the developer in the application; detailed customization of the appearance of the device - all these goodies can be accessed through the rooting procedure (in other words, Android jailbreak). You can read in more detail about what “root access” is in an article recently published on our portal.
Returning to the topic of the article. How to install root rights? To do this, you can use one of the system applications: Framaroot, ROM Toolbox Pro, iRoot, Kingo Android Root, etc.
Once root access is obtained, we will need a universal, powerful and flexible software tool that will allow us to control processes and applications that use root in their work. Such a tool is one of the best utilities in its class, namely - SuperSU.
What can SuperSU do?
If you work with a large amount of software, often install and uninstall various mobile programs, and prefer to delve into and understand in detail the settings of the Android operating system, keep track of the rights and access to environment variables of this entire huge pile of applications on the phone (no matter how useful they may be) It won't be easy at all. By installing SuperSU on your tablet or smartphone, you will always know which program needs root to continue working, and what system process it starts. Based on personal priorities and personal preferences, you are free to allow or deny root access for each specific applet, thereby controlling the activity of the installed software and ensuring a secure environment.
What programs require root access to work?
The range of applications that require root for stable and efficient operation is very wide. These include file managers, task managers, and full-featured tools for optimizing smartphone resources. Root is especially necessary when using third-party projects to manage Wi-Fi networks and multimedia recording of what is happening on the smartphone display into an external video file with settings for the codec used, resolution, shooting mode, etc. Having received root rights , the user has access to hidden resources and functions of the mobile gadget, without which all the described applications simply cannot do without.
Where can I download SuperSU?
You can download the utility from the official Google Play store (see link below). To get the full set of functions, we recommend downloading the full version of SuperSU Pro on the 4pda portal. On the page dedicated to this project you can find both a Pro version with unlimited functionality in one package, and a separate key to a freely distributed build that is installed on top of the free version.
How to work with SuperSU?
From the moment the program is installed on the gadget, SuperSU begins to monitor and manage processes that request root. As soon as the corresponding program accesses a particular process, a form appears in front of you where you can allow or deny root access.
By default, the confirmation timeout is 10 seconds, but this parameter can be easily changed in the utility settings.
So let's say you give confirmation. What happens next? All requests that occur from the moment SuperSU is installed on the device are recorded in the log. This approach allows you to thoroughly study the history of system requests without resorting to the use of external software, which is quite convenient.
In the log, each item can be marked with a different color of the hash icon: green indicates programs whose calls were successful and they gained access to root rights; Those processes that have not been given root access are highlighted in red. To repeat a failed request process, you need to reinstall the corresponding applet, and explicitly indicate permission in the request form presented above.
On the first tab in SuperSU called “Applications” you can see a list of programs with allowed access, which can, in turn, be configured in detail.
By tapping on the line with the selected application, a form with settings will appear.
In the “Access” field, for example, you can set the access level for each individual software product. The default value is “Provide”. As an alternative, you can set the value to “Request” (that is, a form with a request will appear every time you start), “Allow + Time” (that is, give access for a certain specified time), “Deny”, “Deny + Time” " or "PIN code" (namely, you will need to enter a PIN code to provide root).
What can you configure in SuperSU?
The last tab contains all the program parameters. Present:
- activating the re-authentication mode, in which you will have to confirm access to root rights every time you update or reinstall the applet
- default access, valid for all programs
- waiting time for a user response to a request, after which an auto-rejection will occur
- setting up logging (what data will be recorded in the log, how long the logs will be stored in the device’s memory, etc.)
- customization of the visual part (launch icon, choice of graphic skin and language).
A fairly extensive range of specific parameters is available, namely:
- activating survival mode
- protection against tap interception
- using SuperSU as a system application.
Summary. As the developers themselves state on the project’s official page on Google Play, SuperSU is a tool of the future, and, in fact, this is not an exaggeration. All other analogues of the program (Superuser, Kingo SuperUser) are far behind the presented utility in terms of functionality, and this situation has persisted for quite a long time. The program is extremely popular not only in the Russian-speaking segment of the network, but also abroad, which has a direct bearing on the excellent localization and the stable annual release of updates. SuperSU works great on Android gadgets of any age, and this is undoubtedly another plus for developers.
Today we will talk about the most common error that occurs when launching the SuperSu program. The problem itself appears in the form of a notification with the following content: “There is no SU and SuperSu binary file.” How to update a binary su file on Android? You will learn about this from our material.
SuperSU is a special administration application that allows advanced management of all installed applications. In other words, with SuperSU you get complete control over your Android device. More details about the program:
So, when I launched SuperSU, the following message appeared on the screen:

It needs to be clarified here that the Su file is a fundamental component of the “Superuser” rights, so by deleting it you lose root rights. And even if you have an old version of SuperSU, which does not exclude the possibility of working on it, then problems associated with performing any operations will definitely arise. Therefore, you will have to update, or rather, correctly install the Su binary file in any case.
To do this, we will need to download and install the Baidu Root program. This application is not available on Google Play, so you can open any browser and find this utility, or click on the link provided and download it directly from this page. After which the downloading of the ark file will begin, the process of which will be visible on the display:

Now we need to open the file and click the “Install” button. When asked for permission to install, click the “OK” button:

Then a window will open with information about the data to which the application will gain access, and a warning about the responsibility of the user himself. We agree with everything, and now, the installation of Baidu Root is completed:

After installation, two buttons will appear at the bottom of the display on the right and left, click on the right one, after which a blue monitor will appear in the center of the screen, where your Android model will be indicated, and a blue button in the center (get root), click on it, after which a reboot will occur apparatus. Now we try to launch the SuperSU application. A request for Root access (Superuser rights) will appear from Baidu Root, we provide it. Next, a request will appear to update the SU binary file, click the “Continue” button:

Then the program will offer a way to install the SU file, select “Normal”. The installation process will begin, which the system will inform us about, and all our efforts are crowned again by a message from the system that the installation was completed successfully, click “OK”:

That’s it, the procedure is completed, and we can fully use the SuperSu program and use all the tools available in the program’s arsenal, including carrying out the so-called. temporary 'unroot' on your device.
How to install the Su binary file on Android using custom Recovery
Did the method described above not solve the problem? Well, this is possible, especially for HTC models. In this case, you will have to use custom (alternative) recovery. And if you don’t have it installed yet, but you still have the desire to become an advanced user of the Android OS, then you will have to install it sooner or later. Because this tool will allow you to perform many necessary operations: create backups, install system updates or flash your Android with a different version of the operating system (ROM), etc.
We will not tell you now how to install custom Recovery, because this is a topic for a separate conversation, and if you are interested in it, write, and we will tell you in detail how to perform this operation.
Now we will assume that you are on topic and return to our question. That is, if you have a custom recovery (or you know how to install it), then look at the last screenshot, and instead of the button “ Fine", click " CWM/TWRP" After completing the procedure, we reboot the smartphone, after which, along with the system update, the Su binary file will also be updated.
How to install SU file via command line
If both methods did not help install (update) the SU file, then the situation becomes more complicated, although not fatally. The next method that we will talk about is aimed at fairly advanced users who have experience working with the command line and are familiar with the file structure of Android OS.
So, our actions:
Download the Terminal Emulator for Android and Root Browser applications. Then, download the updatesu.zip archive, unzip it and move the folder updaters to the SD card or internal memory of your Android device.
Now let's launch Root Browser, go to the folder updaters and copy the following files: ( .has_su_daemon) (.installed_su_daemon) (install-recovery.sh) to a folder /system/etc

After this, we need to set the correct permissions for these files:

Then we need to go to the next folder, namely /system/bin and create a folder .ext and set permissions for it:

The next step is to copy the su file located in the folder /system/xbin to the newly created folder ( /system/bin/.ext), rename the su file, putting a dot (.su) in front of the name and set the rights for it: 
All we have to do is launch the Terminal Emulator for Android application and enter the following commands:

Now we reboot and again try to update the su binary file using the “Normal” button in the SuperSu program (see above).
