Instructions for Android (Android) - description of the user interface. Instructions for Android (Android) - description of the user interface How to write SMS messages
Most of us feel insecure when we have to get acquainted with a new operating system. And despite the fact that Android can be found on the vast majority of electronic devices today, there are still many users who are not familiar with it.
Users never use many system features
If you are one of these people, we will provide you with the most important information on how to understand the system, introduce you to it. In general, here is a kind of instruction called “Android for Dummies”, which contains all the current tips on working with the platform.
Turn on the device, log into your account and establish a connection to the Internet
Following the instructions, we turn on our smartphone or tablet, after which the system desktop will appear in front of you, or, if the device is turned on for the first time, the initial setup wizard will start. For example, on a smartphone the wizard suggests doing the following:


What is the system interface?
After setting up your smartphone or device, even if you did not go through the wizard, you will see the desktop of your gadget.

What is he? You will be offered the following symbols and icons:


It is worth noting that on Android tablets, a quick menu opens at the bottom line, where you can turn on Wi-Fi, find out about the battery charge and other important information - to open it, just move from bottom to top in the clock area. In smartphones running this system, to open the notification menu, you need to swipe your finger across the entire screen from top to bottom.

We've looked at what the desktop looks like, now let's move on to the main Android menu.
It is made in the form of a general list with icons and program names, or in the form of several desktops with the same lists of applications - there is nothing difficult in viewing them. In the general menu you will find all the elements of your device; there are also settings for your smartphone or tablet.
Using the Internet on Android
If you have already established an Internet connection, it's time to learn how to use the browser. If Wi-Fi is turned off, you can activate it in the mentioned notification menu or through the settings that you will find in the menu. After you open the section, activate Wi-Fi, then the device will automatically search for networks. The only thing left to do is select a network from the list, enter a password if necessary and click “Connect”.
How to access the Internet on Android?
To do this, follow these instructions:
- Select the browser installed on your smartphone or tablet and open it.
- Then you can use the browser in the same way as on a computer - you will have a line for entering an address, the ability to add tabs, and additional icons hide menus for adding bookmarks, viewing page history, etc.

In general, there is nothing difficult about working with a browser on a tablet or smartphone - if you don’t know some functions or icons, just try them.
We missed only one point - to enter the site address, you need a keyboard.
How to use the keyboard?
The keyboard will automatically open whenever you click on the line where you enter this or that text or message. Therefore, launching it is a simple matter, and if you need to remove the input tool, just click “Back”.
Here's what you need to know about using the keyboard:


How to add other languages to the keyboard?
This is done in the settings, where there is a menu dedicated to input means - in it you can add languages, turn on or off dictionaries, and perform other keyboard settings.

On tablets, input means settings are available on the bottom line, next to the clock - the corresponding symbol in the form of dots appears every time you turn on the keyboard, so you don’t even have to go into the menu and search for the desired section in the settings.
How to use Google Play Market?
This service is an application where you will find thousands of various programs for your Android device. As a rule, the Play Market is by default in the menu of your tablet or smartphone; to use it you need a Google account - if you have not previously logged in, you will do so the first time you launch the store.
So, how to use this miracle? Everything is very simple - choose the application you like or find it through the search bar, click “Install”, and then the equipment will handle everything on its own.

If you need to delete a program or transfer it to a memory card, the latter is necessary when there is little space on the device itself, and you can do this in the settings. A separate section contains all the applications installed on your gadget.
File manager and how to watch movies and listen to music on Android
To view media files, there is a separate application called Gallery or Media Storage, which you will find in the main menu. There is nothing complicated in using it; photos and videos located in the device’s memory or on the card are distributed into the created folders.
If you need audio files, books and a general list of files on the device, there is a file manager for this, which on the Android system is called Explorer.

By the way, when viewing photos, you can immediately install them on your desktop, or as an image of a contact from the phone book. In general, customizing the background, widgets and other aesthetic components is a large and separate topic.
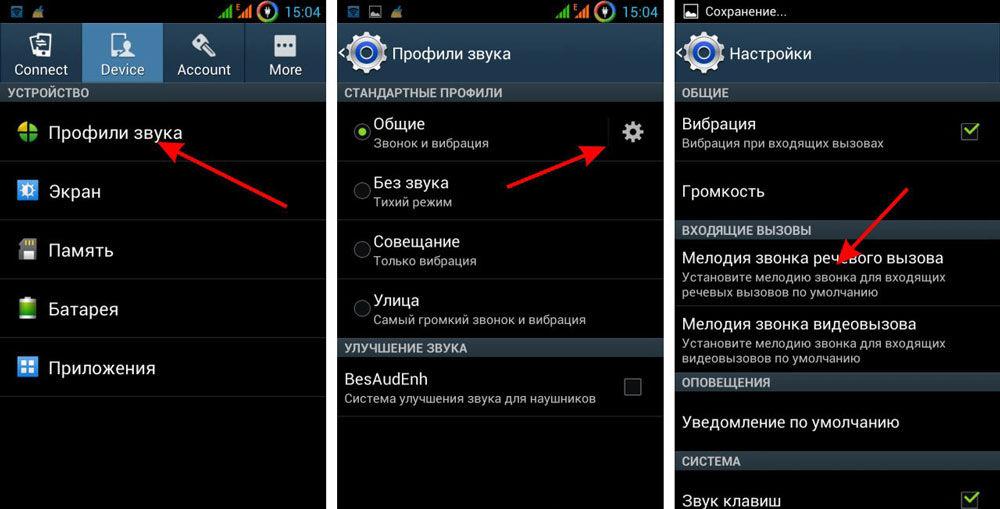
How to set a ringtone?
If you use an Android smartphone, you probably want to hear your favorite ringtone. This is done through the settings - go to the Sound menu, click on the Ringtone line, where you can select the required file. As you can see, in this menu you can completely edit your call settings. You can also set the melody you like in the player while listening to music - you will find the corresponding function in the menu.
Thanks to this brief instruction on Android, you have learned the minimum set of the most important sections and system settings that will allow you to start confidently using your smartphone or tablet. The main thing is don’t be afraid to try and find out what you haven’t seen before. In general, using this platform will probably be simple and understandable for you, because everything in it is thought out logically and consistently.
Transcript
1 User Manual Tablet with Android 4.1 1
2 Introduction.3 Important information 3 Keys and functions 4 I. Getting started Turning on/off Turning on Turning off Locking/unlocking the screen (sleep mode) Connecting to a computer..5 II. Your desktop Changing the desktop wallpaper Adding/removing applications to the desktop Adding widgets to the desktop..7 III. Connecting Wi-Fi Networks Turning Wi-Fi On Turning Wi-Fi Off Adding Wi-Fi Networks 8 IV. Internet browsing Internet browsing.9 V. Installing and managing applications Installing applications Managing applications 10 VI. Multimedia functions Music Video Gallery Camera E-books.14 VII. Settings 15 Ⅷ. Guide 16 Ⅸ. Battery 17 Troubleshooting..18 2
3 Introduction Thank you for purchasing this tablet. It will bring you a lot of convenience for your business (supports Word, Excel, sending and receiving email.) and entertainment (supports 3D games, chats, playing movies, books...). Powered by Android 4.1, with 1.6GHz processor and highly sensitive capacitive touch screen, it will bring you a wonderful experience as a user. Before starting, please read these instructions carefully. Important information. 3
4 A new battery will be in better condition to work after being fully charged and discharged 2-3 times. When using headphones, if the volume is excessively high it may damage the sound. Therefore, please adjust the player's volume to a moderate level and balance while using it. Do not abruptly turn off the tablet when formatting or downloading and deleting programs, this may lead to errors. Do not disassemble the tablet yourself, and do not use alcohol, thinner or benzine to clean its surface. Do not use your tablet while driving or walking. Tablets are not moisture or water resistant. Please do not use it in wet environment. Do not drop it or hit it on a hard surface as the screen may be damaged. Do not update the firmware yourself. This will damage your tablet. Keys and functions 4
5 1. TFT screen 8"" TFT capacitive touch screen 2. Front camera 2M front camera 3. Volume+ /Volume- Volume up or down 4. Menu key Press the key to view the menu. When you press it from an application, you will see a submenu for applications. 5. ESC Key Press to return to the previous screen/page. 6. USB host USB OTG, support mouse, keyboard, USB flash disk, etc. 7. TF Card Slot To insert a TF card 8. Mini-USB Slot Connect to your computer using a USB cable to transfer data (such as music, videos, photos and other files). 9. Headphone jack For connecting headphones 10. Power jack (dc input) Connects to the 5V adapter included in the accessories 11. HDMI port For connecting to a TV using an HDMI cable 12. Reset hole Press to reset the tablet if it is Freezes or behaves abnormally. (Use a paperclip or other sharp object to press this reset hole, and then press the power button to turn it on.) 13. Power and Lock key While holding down, press the button to 5
6 turn the device on or off. Briefly press the button to turn the screen on or off. 14. Microphone Microphone 15. Loudspeaker Loudspeaker 16. Rear camera 2M rear camera I.Getting started 1.1. Enable/Disable Enable. To start the tablet, press and hold the key on the right side of the tablet for a while. Click on the lock and drag it out of the circle to unlock it. Click and drag the lock out of the circle to unlock. Drag the lock to the right: You will be taken to the desktop. Drag the lock to the left: You will go directly to the Camera Shutdown. 6
7 To turn off your tablet, press and hold the power button until the “Do you want to turn off?” dialog box appears. and press "OK" to turn off Screen Lock/Unlock (Sleep Mode). To save battery power, you should put the tablet into sleep mode by turning off the LCD display. To do this, briefly press the power button. Press it again to wake up the screen. Connect to a computer. You can connect your tablet to your computer using the included USB cable, so you can transfer media files. 7
8 If your computer supports XP system, you need to install Windows Media Player 11 for your computer before transferring media files, because Android 4.0 system needs to support Windows Media Player 11. II. Your desktop a b c d e f g h i j a. Google Search Engine Click on the tab to enter the Google Search Engine b. Voice Search Tap to open Voice Search c. All applications, launcher Click to show all installed applications. d. ESC key Press to return to the previous screen/page. 8
9 e. Desktop Click to return to desktop f. Recent transactions Click to view your recent transactions g. Camera take pictures h. Volume+/- When connected to a PC, this icon will be shown here. Click to select connection as media or camera i. System Time Shows the current system time j. Wi-Fi The Wi-Fi signal here shows whether there is a connection to Wi-Fi k. Battery Status Shows the battery status. Change desktop wallpaper. Tap and hold your finger on any empty space on your desktop and you will see a sub-menu, you can choose wallpaper from gallery, live wallpaper or other wallpaper. 2.2 Add/Remove Apps to Desktop: There are several apps on your desktop, you can also add frequently used app shortcuts to your desktop and remove some less used ones. App Launcher tab in the top right corner, to get to the all apps panel, tap and drag the app you want on the home screen. To remove an application from the home screen, touch and hold it, and drag them to the delete icon Add widgets to your home screen: 9
10 Click on the all applications launcher click WIDGETS. It has an analog clock, bookmarks, calendar, email, and many other widgets. Drag the widget you want onto your desktop. Tips: About your desktop, you can access the other four panels by sliding your finger left or right on the home screen. You can also customize these panels. III. Wi-Fi network connection Wi-Fi can only be used when connected to a home Wi-Fi access point (AP) or free Wi-Fi hotspot. Under "Wireless Networks", click "Wi-Fi" to turn it on. After a moment, a list of your network's Wi-Fi should appear. If you need to rescan for available networks, click "Scan" Turn on Wi-Fi In the panel application, click "Settings" then "Wireless & Networks" and "Wi-Fi" to turn on Wi-Fi. The tablet lists the networks it has found within range. Select the network to connect to. If necessary, enter the networks SSID, security and wireless password and click Connect. When your tablet is connected to a network, the wireless network indicator appears in the notification bar. Waves indicate connection strength Turn off Wi-Fi 10
11 Please turn off Wi-Fi when you are not using it to save battery power. To turn off Wi-Fi, click on it again Add Wi-Fi network Users can also add Wi-Fi networks in the "Wi-Fi settings" section. In "Wi-Fi settings", click "Add network". Enter the SSID (name) of the network. If necessary, enter security or other network configuration information. Click Save. Note: The network icons turn green if you have a Google account added to your tablet and the tablet is connected to Google services for syncing Gmail, calendar events, contacts, backing up settings, and so on. IV.Internet browsing 11
12 4.1. Internet browsing Before using your browser, make sure you are connected to Wi-Fi or the Internet. In your application drawer, click on the browser to open it. Click on the address bar, Android keyboard will appear to enter keywords or URL. New tab bookmark this page Open bookmarks Click on the tab in the upper right corner of the browser page to open a submenu. 12
13 V. Installing and managing applications 5.1. Installing the application Go to the "Apk Installer" section to install and manage applications. To install the application, follow the steps below: 1. Click to open "APKInstaller" "Install" then click on "Internal Memory" or "tf Card". Available Apk files will appear on the right side. Click on what you were looking for to install Note: Make sure that the APK file is workable on Android 4.0, and that there is an APK suffix... for example "Angrybirds.apk". In some cases, there may not be a shortcut in the application drawer after the APK file is installed. Possible reasons may be that this application is not compatible with your OS or the APK file is corrupt, so you may need to download the full version.
14 5.2. Manage Applications Click to open "Apk Installer" "Manage". Click the application and then you can launch it, transfer it, delete it. You can also go to "apps" in Settings to manage apps. VI. Multimedia functions 6.1. Music After downloading music to your tablet, click on the music shortcut to open the music player. You can select songs by artist, album, songs or playlists. Click to select. Media player allows 14
15 shuffle, skip or pause the current selection and even displays album art when available. Click on the tab on the bottom line to open a submenu on the page of the currently playing music. 15
16 6.2. Videos You can play videos saved in tablets or TF cards. To play a video, click the Video shortcut to launch the video player: Click the video you would like to play. Touch the screen to display the video toolbar. Here you can play the video, fast forward it, press pause. Here you can also bookmark your video, adjust the brightness, or set the screen format. Here's the toolbar: With Wi-Fi turned on, you can also watch videos online. 16
17 6.3. Gallery You can view and edit your digital photos on the tablet's full-color, high-resolution display. After downloading media files, click the Gallery shortcut to view photos: Click on the picture you want to view and swipe right or left to view other pictures. Click on the menu tab, you can edit, rotate, crop, or set them as wallpaper. 17
18 6.4. Camera Click on the shortcut to open the camera. The tablet has a 0.3M front camera. You can take photos or videos. Note: After turning on the tablet, you can enter the camera directly by dragging the Lock to the left of the E-book. The tablet supports many e-book formats, such as PDF, Text, E-Pub, FB2... Click the "e-book" shortcut to open the set e-books. Click the e-book to open the book and read. 18
19 You can turn pages up or down by moving your finger left or right. Press or menu button to view submenus. You can adjust the font size, move forward a page, view your bookmarks, set the auto-rotate time, etc. VII. Settings Click the Settings shortcut to go to Settings. You can check and set wireless network, sound, display, memory, battery, accounts and sync, security, language, date and time, tablet information, etc. 19
20 Wi-Fi: Tap Settings Wireless & Networks to connect to Wi-Fi. It will show a list of Wi-Fi networks in range. Choose a strong Wi-Fi network to connect to. (You may need to enter a password.) Display: Here you can set brightness, wallpaper, sleep timeout, font size. Memory: Built-in memory is located here. If you insert a Micro SD card, USB or disk, you can check the overall memory size and free space of the Micro SD card or USB disk. Please disable it to safely remove it. Battery: You can check the battery status here. Display: Settings tab Display to set brightness, screen timeout, etc. Language & Input: Set the language and keyboard input. Backup and reset: Select the submenu "Backup data" and "Reset data". If you choose to reset data, all data in the tablet's internal memory will be deleted. Choose this option carefully. About Tablet: Here you can check the tablet information such as model number, Android version, etc. 20
21 Ⅷ.Explorer In Explorer, you can manage all your files. You can copy, delete, paste, or rename your files to microSD cards, internal memory and USB drive. For example, to copy files from the "internal memory" to the micro "SD card": 1. Open "File Explorer" you will see the interface above 2. "Internal memory" tab to see the files in the tablet 3. Click the "Multi" icon and then select the files you need to edit 4. "Editor" icon, you will see a pop-up menu, select "copy" 21
22 5. Click the "Home" tab in the upper left corner to return to the main interface, select "SD Cards", in the "Editor" tab, you will see a pop-up menu, select "Insert". The files will be copied from the tablet to the micro SD card. Ⅸ. Battery Battery very low Battery fully charged Battery charging indicates the battery is fully charged. If the battery level gets too low, you will be prompted to charge your tablet. While charging, you can check the charging status in the lock screen: 22
23 Charging takes approximately 5 hours to fully charge the tablet. Please only use the 5v/2A adapter that is included in the gift box to charge your tablet. Troubleshooting 1. I can't turn on the tablet. Please check the tablet's charge level, please charge it before using it. In case your tablet still cannot be turned on, you can try pressing reset. 2. There is no sound from the headphones. Check the volume. Or the headphones may be faulty, please change them to others. 3. Loud noise Check if there is dust in the headphones or speaker. Check if the file may be damaged. 4. Ignores any operation Please use the pin to press the reset button and reboot the tablet. 5. The screen responds slowly or does not respond at all. To fix this, you can a) Select Settings Accessibility Touchpad Calibration to perform the calibration, b) In case the calibration cannot be completed, you can press and hold the Power button for about 15 seconds to shut down the tablet. Calibration will be performed automatically once the tablet is started. c) Use a USB mouse to perform the calibration operation on the tablet PC. 6. Applications not working Possible reasons could be that this application is not compatible with your OS or due to loading. apk file is corrupted, so you may need to download the full version. 7. How to delete your Google account? If an account is added, the account is shown in Accounts & Sync in Settings, where you can also add a new account. To remove unwanted entries, go to section 23
24 "Settings" "Privacy settings" "Reset data". Tablet internal memory, downloaded applications, etc. will also be deleted except for the information in your flash memory. Be careful before performing this operation. 24
S1 User Manual Android Tablet 4.1 1 Introduction.3 Important Information 3 Keys and Functions 4 I. Getting Started.. 5 1.1. Switching on/off....5 1.1.1 Switching on....5 1.1.2 Switching off...5
Operating instructions for Pipo tablets running Android 4.2 1 Thank you for purchasing the tablet. The tablet runs on the Android 4.2.2 OS operating system with a RockChip RK3166 processor (4 cores with a clock speed
All original accessories for your equipment on one page User manual for the PiPO Max-M6 tablet on Android 4.2 1 Introduction.3 Important information 3 Description of the buttons 4 I. Basic operations..
Operating instructions for the PIPO M3 tablet on Android 4.1 1 Welcome..3 Rules for safe use 3 Description of the buttons.4 I. Basic operations....5 1.1.Turn on/off the device 5 1.1.1.Turn on
Contents Basic information about Tesla.............. 2 General view.................... 2 Power adapter...... 5 Basics Techniques for working with Tesla......... 7 Turning on Tesla.................... 7 Turning off Tesla.................. ....
TAB A93.2 Operating Instructions Visit our website WWW.GOCLEVER.COM To see more TAB, NAVIO, DVR, DVB-T products Read this manual before operating the device Contents Introduction
Operating instructions for the PIPO U3 3G tablet on Android 4.1 1 Welcome!..3 Rules for safe use...3 Description of the buttons..4 I. Basic operations....5 1.1.Turning on/off the device
Tablet PC Attention: Appearance and Buttons: This document contains information about important safety precautions and proper use of the product. In order to avoid accidents and breakdowns, please
Contents Basic information about the tablet................... 2 General view.................................... 2 Power adapter.... 5 Basic tablet operation......... 6 Turning on the tablet......................
Android TFT book TOUCH SCREEN TFT 7.0 EBOOK Supported formats: PDF / EPUB / FB2 / TXT / MOBI / HTM / PDB / RTF / LRC audio AUDIO Supported formats: MP3 / WMA / FLAC / AAC / OGG
Contents Tesla Basics......2 General View...................2 Power Adapter...5 Basic Techniques working with Tesla....... 6 Turning on Tesla.................. 6 Turning off Tesla.................. ...
Contents Tablet basics 2 Tablet overview 2 Tablet basics 7 Turn on your tablet 7 Turn off your tablet 7 Home screen 8 Status bar 9 Use the touch screen
Contents 1. Note 2. Components 3. Appearance of the device 4. Start and shutdown 5. Desktop 6. Buttons 7. System settings 8. HDMI 9. Installing, uninstalling and launching applications
Contents Basic information about the tablet................... 2 General view.................................... 2 Power adapter.... 5 Basic tablet operation......... 7 Turning on the tablet......................
Contents Basic information about the tablet................... 2 General view.................................... 2 Power adapter.... 5 Basic tablet operation......... 6 Turning on the tablet......................
User Manual Smart TV Stick II Android 4.1 Jelly Bean www.tvstar.eu Instructions for handling the device This manual contains all the information on safe and correct handling
Contents Precautions. 2-3 Basic information about the tablet. 4-7 Basic Operations. 8-11 Switching on and off. Standby mode. 8 Connection to PC and TV. 8-10 Installing a memory card. 10
User Manual 8 tablet based on Android 4.1 1 UsersManual-Russian.indd 1 Welcome 2 Important information 3 Keys and functions 4 I. Getting started 6 1.1 Turning your
EZCAST M2 User manual in Russian Compatible devices Getting started 1. Turn on the power using a USB cable with a W-Fi antenna. 2. Connect EZCAST M2 to the appropriate port on your TV.
Contents How to create a Google account. 1 Basic principles of working with a Tesla smartphone or tablet computer. 1 Charging the device. 2 Touch screen. 2 Memory and storage. 2 Wireless networks. 3
User Guide 2013 Hewlett-Packard Development Company, L.P. Bluetooth is a trademark of its respective owner, used under license by Hewlett-Packard Company. Google is a trademark
Contents 1. Note 2. Components 3. Device Settings 4. Starting and Shutting Down 5. Desktop 6. Buttons 7. System Settings 8. HDMI 9. Installing, Uninstalling and Launching Applications
User Guide 2014 Hewlett-Packard Development Company, L.P. Bluetooth is a trademark of its respective owner and is used under license by Hewlett-Packard Company. The SD logo is
1 2013 All rights reserved Acer Liquid S2 Quick Start Guide Model: S520 This revision: 09/2013 Product information For detailed product information, visit www.acer.com. To find out information
Teta User Manual 1 Contents Contents...2 Preface...3 Basic functions (characteristics)...4 Basic operations...5 Attention!...7 General view and buttons...8 Interface...9 Video player ... eleven
Contents Package Contents... 114 Getting Started... 115 Device Description... 116 Setup Wizard... 117 Connecting to a Wi-Fi Network... 118 A interface Android TM... 120 ARCHOS Fusion Storage... 124
ARCHOS tablets: ARCHOS 70 Neon Plus ARCHOS 70 Platinum ARCHOS 101c Platinum ARCHOS 101 Magnus ARCHOS 101 Magnus Plus ARCHOS 70c Xenon ARCHOS 80c Xenon ARCHOS 101b Xenon ARCHOS 70b Helium User Manual
MD1 Tablet Operating Instructions Tablet Features Internet Connection Enjoy your favorite websites Email Stay in touch with your friends and family Watch videos on
Getting Started 1. Package Contents 1. Ebook Reader 4. Quick Start Guide 2. USB Cable 5. Warranty Card 3. Network Adapter 2. Device Overview
MOBILE INTERNET DEVICE idx9 3G 3G BRIEF USER GUIDE Thank you for choosing Digma products. Before using this device, please read the manual carefully
Contents Basic information about the tablet................... 2 General view.................................... 2 Power adapter.... 5 Basic tablet operation......... 6 Turning on the tablet......................
MultiReader 5664 PER5664BC Prestigio MultiReader Version 1.0 www.prestigio.com Information on the user manual This user manual describes the main functions and characteristics of this device.
G1342 2QM02-00004-200S Telephone In this section you will become familiar with the hardware elements of the device. 5 6 3 1 12 4 2 10 7 8 9 11 Item Description 1 Jack for Use a headset for hands-free communication
Contents Precautions. 2-3 Basic information about the tablet. 4-6 Basic Operations. 7 Switching on and off. Standby mode. 7 Connect to PC. 7 Installing a memory card. 8 Possible problems
1 CONTENTS: Contents 4 Appearance and technical characteristics of the device 4 Tablet computer connector diagram 5 Power management 6 Selecting and loading the operating system 6 Sleep mode 7
GS202 Telephone In this section you will become familiar with the hardware elements of the device. 4 5 6 1 2 7 3 8 9 10 11 Item Description 1 Headphone jack 2 Power button 3 Micro-USB port 4 Front lens Use
Package Contents Safety Instructions Quick Start Guide OTG Cable AC Adapter USB Cable Warranty Card Product Overview 6 1 2 3 4 5 8 Micro SD 7 1 Power 2 Headphone Jack
Lenovo K900 Quick Start Guide version 1.0 For Android 4.2 software. Please read this manual carefully before using your phone. General view 1 2 9 6 8 3 10 11 4 12 5 6 7 1 Front camera
Tablet PC PRESTIGIO MULTIREADER PER5474BC 1 Contents What's included... 3 Buttons and ports... 3 Charging the battery... 4 Inserting a memory card... 4 Transferring files... 4 On/Off. food...
UPDATE THE ARCHOS FIRMWARE ENGLISH ÄÄ ÄÄ directly on your ARCHOS at: www.archos.com/firmware The ARCHOS operating system (the system that allows the ARCHOS device to function) at all times
GOCLEVER TAB R974 Operating Instructions Visit our website WWW.GOCLEVER.COM To see more TAB, NAVIO, DVR, DVB-T products Before operation, read the instructions Introduction Thank you
User Guide for the PiPO Max-M6 tablet on Android 4.2 1 Introduction.3 Important information 3 Description of the buttons 4 I. Basic operations.. 5 1.1. Turning on/off the device....5 1.1.1 Turning on......
Instruction Manual Bluetooth Remote with Handset Function BRH10 Contents Introduction...3 Function Overview...3 Hardware Overview...3 Basic Information...5 Charging the Bluetooth Remote...5 Turning On
Contents Contents... 1 General information for users... 2 Warning... 2 Contents of the kit... 2 1.0 Basic information... 3 1.1 Buttons and connectors... 3 1.2 Switching on and off... 3 2.0 Introduction
U8 User Manual 1 Contents Welcome!...3 Rules for safe use...3 Description of buttons...4 I. Basic operations.....5 1.1.Turn on/off the device. 5 1.1.1.Switching on....5
Ww w REGISTER YOUR DEVICE ONLINE at http://arnovatech.com/register Thank you for choosing this ARNOVA product brand device. We hope that for many years it will give you
TF201 FAQ File management...2 R7211 How to access data stored on an SD card, MicroSD and USB... device?...2 How to move a selected file to another folder?...2 How to copy a selected one
Contents Precautions. 2-3 Basic information about the tablet. 4-7 Basic Operations. 7-11 Turning on and off. Standby mode. 8 Connection to PC and TV. 8-10 Installing a memory card. 10
UA Zen Style Media player with touch screen Quick start instructions 2 Thank you Thank you for purchasing the ERGO Zen Style media player. These instructions will help you quickly and easily get started with your
Dear buyer! Thank you for purchasing the RoverPad tablet computer. Before using the device, please read this manual carefully. Additional User Guide
Contents Safety precautions... 2 Delivery kit... 3 Characteristics... 3 Buttons and functions... 4 Basic operating techniques... 6 Main Menu... 7 Installing a new software version... 15 Converting video files. ..
User Manual ENJOY 71 Everything is in your hands Contents Tablet computer Quick start guide USB to OTG cable Micro-usb cable Detachable plug Power adapter Device overview 1)
OPTIMA 7.0 3G USER MANUAL Thank you for choosing Digma products! Before using this device, please read the manual carefully to ensure proper operation.
TABLET COMPUTER MODEL AP-702 Thank you for purchasing the ASSISTANT AP-702 Tablet Computer. We appreciate your business and hope you enjoy our new multimedia device. This manual
GOCLEVER TAB A104.2 Operating Instructions www.goclever.com 1. Note Declaration of Conformity GOCLEVER Technology declares that the product complies with the essential requirements and other provisions
Script Electronic book Quick user guide Contents Precautions.. 3 Appearance of the device.. 6 Basic techniques for working with an electronic book.. 9 Possible problems and methods for their
Ritmix RBK-610 Operating instructions Dear Customer! Please read the instructions carefully for proper and safe use of the device. General information Thank you for
Tablet computer EKE E-925 User Manual Hello, dear customers! First of all, I would like to thank you for choosing our products! Before using the product, please
Tablet computer IRBIS TX07 Operating instructions Tablet computer IRBIS TX07 Operating instructions Dear user! Congratulations on your purchase and thank you for choosing our products.
Nowadays, few people can imagine their life without a phone, especially since modern smartphones are not only a means of communication, but also a multifunctional device for accessing the Internet, a camera, an e-reader and much more. This article will help you understand any gadget on Android.
Turning on your smartphone
Before using a smartphone on Android, a beginner needs to turn it on. The button is usually located on the top or side of the device, depending on the device model.
When you boot for the first time, you need to define the basic operating system settings. After selecting your language, you will be asked to create a Google account to which the device will be linked, or log into an existing profile. This can be postponed, however, it is better to do it right away, since a Google account is required to download applications, synchronize, use email and other functions.
Creating a Google profile takes just a few minutes: you need to come up with an email name, a strong password and fill out basic information about yourself. After this, you can proceed to further configuration of the smartphone.
How to call
Modern phones have an intuitive interface. Having turned on and unlocked the device, you will immediately see the bottom panel of icons, where the most necessary functions are located.
For example, even if you don’t know how to use the Lenovo A328 smartphone, a beginner will still understand that to make a call you need to touch the green icon with the image of a handset. In the menu that opens, you can view the latest calls made, dial a number on the keyboard, and also view contacts stored in the phone and SIM card memory. For experienced users, these operations take a couple of seconds, while for a beginner it is unusual to use a smartphone at first, largely due to the different keyboard. At first, it may be more convenient for you to simply scroll through the list of contacts, but if there are a lot of numbers in the smartphone’s memory, then it is better to resort to a search.
How to write SMS messages
Let's figure out how to use an lg smartphone. A beginner needs to learn how to write SMS messages. To do this, just click on the envelope icon, and then on the symbol of a new message (usually this is an image of a pen and paper). The first step is to select a recipient from your contacts list or enter a new number in the To field. Then type the message itself using the keyboard or voice input. If necessary, you can insert an emoticon through the additional functions menu. Click “send” and your message will be sent to the recipient.
How to take photos and videos
Almost all modern gadgets can take high-quality photos and videos. How can a beginner use a smartphone with a built-in camera? Here are some simple tips.
Always keep the outside of the lens clean. Otherwise, the pictures may turn out unclear and blurry.
Try not to shake your hands. This rule applies to any camera, but modern smartphones use fairly long shutter speeds, so this is especially true.
Set the quality settings to maximum. Photo and video files will take up more space, but this problem can always be solved by installing an additional memory card.
Take multiple pictures. All professional photographers use this technique, and you should take note of it too. Even if one shot is blurry or the focus doesn’t work, there’s a chance that others will turn out great.
Explore the settings available on your smartphone. Various scene programs, color effects and white balance will allow you to take decent quality pictures even in poor lighting.
How to use the Internet
Before using an Alcatel smartphone, a beginner needs to know that it and other gadgets have data transfer enabled by default. Therefore, if your tariff plan does not provide unlimited traffic, then it is better to disable this option through the settings (the “Wireless Networks” item) or deactivate the “Data” icon on the quick access panel, which is lowered by smoothly moving your finger across the screen from top to bottom.
When you need to go online, turn on this feature and find the built-in browser in the menu. If desired, you can install any browser adapted for the Android platform, as well as additional applications for social networks and instant messengers.
In addition, Android smartphones usually have a Google search bar right on the home screen and support voice queries. Just say “Hey Google,” wait for the characteristic sound signal and clearly speak your request.
How to set up personalization
Having become familiar with how to use the Fly smartphone, a beginner will probably want to customize the device to his liking. Modern devices support customization based on many parameters. Once you enter the gallery, you can always set any image or photo as your desktop background. To do this, call the context menu and select “Set as – Desktop Background”.
The “Settings – Sound” menu allows you to adjust the volume and ringtone for calls and incoming messages, as well as the mode and intensity of vibration of the device. You can use both basic ringtones and download them from the Internet.
In addition, you can move frequently used applications to your desktop for ease of access. Just hold down the desired icon and drag it to the main screen. Many users like to group icons into folders based on their functionality. For example, you can collect all clients for social networks in one folder, games in another, third-party photo processing programs, etc.
Another popular feature for Android smartphones is widgets, which are also placed on the desktop. The widget can display news feeds from websites or your accounts on social networks, show the weather forecast, track fluctuations in currency rates, stock indices, etc.
Important apps for your smartphone
Now that you have figured out how to use a smartphone as a beginner, we will tell you a few applications that you need to install on your device.
Antivirus. “Android” is the same as a computer, and it can be affected by a virus. Therefore, it is important to take care of anti-virus protection and not install applications from dubious sources.
Battery saving application. Such a program will promptly terminate unused applications, tell you where exactly the battery power is being spent, calculate how long the battery will last, etc.
Application for cleaning "garbage". With such a program, your smartphone will not slow down or freeze. It will help you clear your device's cache, remove unnecessary residual files, and also see where your smartphone's memory is being used.
By following these simple rules, you will easily learn how to use your smartphone. The names of the functions listed above may vary depending on the phone model, but since even the most sophisticated device has an intuitive interface, you will not have any difficulties.
Most of us feel insecure when we have to get acquainted with a new operating system. And despite the fact that Android can be found on the vast majority of electronic devices today, there are still many users who are not familiar with it.
If you are one of these people, we will provide you with the most important information on how to understand the system and introduce its main functions. In general, here is a kind of instruction called “Android for Dummies”, which contains all the current tips on working with the platform.
Start using the Android system
Turn on the device, log into your account and establish a connection to the Internet
Following the instructions, we turn on our smartphone or tablet, after which the system desktop will appear in front of you, or, if the device is turned on for the first time, the initial setup wizard will start. For example, on a smartphone the wizard suggests doing the following:
- Select interface language.
- Connect to the Internet via Wi-Fi - if you don't have a network nearby, you can skip this step. Why does this menu appear the first time you turn it on? Due to the fact that most programs are designed to be used with a working Internet connection. This does not mean at all that a phone or tablet is useless without the Internet; this step was created rather for convenience - they say, connect to it immediately, so as not to worry about it later.
- Next, the system wizard will prompt you to log into your Google account or create one if you have not yet acquired an account. We highly recommend that you create an account for yourself, because the Android system itself is strongly tied to Google services. Without it, you won't be able to access the app store and won't be able to use email. In addition, creating an account is not difficult, but it will always be with you on all devices where you want, which is quite convenient.
- In the next menu you need to confirm the time and date, which are almost always determined automatically, or enter them manually.
- In the last window you will see items related to determining your location - it is better not to turn them off so that all services work correctly and the smartphone correctly determines the time and date.
What is the system interface?
After setting up your smartphone or turning on the device normally, even if you did not go through the wizard, you will see the desktop of your gadget.
What is he? You will be offered the following symbols and icons:
- Time and date - You may have a separate clock or calendar displayed, or this data will be located in the lower right corner, as is most often the case on tablets.
- In most cases, there are three signs at the bottom - the back button, the main menu and the context menu, where running applications are displayed.
- The desktop typically houses the most important and most used programs. They can be deleted - just press and hold your finger on the program, after a couple of seconds the icon will become movable and you can drag it onto the cross.
- There can be several desktops - they move when you perform swipe movements across the screen, if desired, they can also be added or removed - the widget can be removed in the same way as a separate program. To add another desktop, touch the screen with 2 fingers and bring them together, after which a plus sign will appear - you should click on it.
- You can add programs to desktops from the general menu list. Where can I find it? Press the main key on your tablet or smartphone, or the middle button at the bottom of the screen - we have already mentioned it. When the list opens in front of you, you can select one of the elements, hold your finger on the part of the screen where it is located, after which you can move it to any place on the desktop.
It is worth noting that on Android tablets, a quick menu opens at the bottom line, where you can turn on Wi-Fi, find out about the battery charge and other important information - to open it, just move from bottom to top in the clock area. In smartphones running this system, to open the notification menu, you need to swipe your finger across the entire screen from top to bottom.
We've looked at what the desktop looks like, now let's move on to the main Android menu.
It is made in the form of a general list with icons and program names, or in the form of several desktops with the same lists of applications - there is nothing difficult in viewing them. In the general menu you will find all the elements of your device; there are also settings for your smartphone or tablet.
Using the Internet on Android
If you have already established an Internet connection, it's time to learn how to use the browser. If Wi-Fi is turned off, you can activate it in the mentioned notification menu or through the settings that you will find in the menu. After you open the wireless connection section, activate Wi-Fi, then the device will automatically search for networks. The only thing left to do is select a network from the list, enter a password if necessary and click “Connect”.
How to access the Internet on Android?
To do this, follow these instructions:
- Select the browser installed on your smartphone or tablet and open it.
- Then you can use the browser in the same way as on a computer - you will have a line for entering an address, the ability to add tabs, and additional icons hide menus for adding bookmarks, viewing page history, etc.
In general, there is nothing difficult about working with a browser on a tablet or smartphone - if you don’t know some functions or icons, just try them.
We missed only one point - to enter the site address, you need a keyboard.
How to use the keyboard?
The keyboard will automatically open whenever you click on the line where you enter this or that text or message. Therefore, launching it is a simple matter, and if you need to remove the input tool, just click “Back”.
Here's what you need to know about using the keyboard:
- The layout of the keys here is the same as on a computer keyboard.
- The globe icon is used to change the input language.
- The transparent arrow changes the keys to capital ones; if you press them twice in a row, the Caps Lock mode will turn on.
- The arrow with a cross erases characters, the large button on the right serves to move the cursor down - like a computer Enter key.
- To move the cursor, touch the desired area on the screen.
- Some keys have multiple characters - to select an additional character rather than the main one, just hold your finger on it a little.
- As a rule, under the letters on the keyboard there are buttons to switch it to a numeric layout or a list of symbols - just click on it to open the desired set of characters.
- If you need to select text and copy, cut or move it, long press on the line where the piece you want begins, and two arrows will appear. By stretching them, you can select the required number of characters, and in the top menu select an operation for the selected text.
How to add other languages to the keyboard?
This is done in the settings, where there is a menu dedicated to input means - in it you can add languages, turn on or off dictionaries, and perform other keyboard settings.
On tablets, input means settings are available on the bottom line, next to the clock - the corresponding symbol in the form of dots appears every time you turn on the keyboard, so you don’t even have to go into the menu and search for the desired section in the settings.
How to use Google Play Market?
This service is an application where you will find thousands of various programs for your Android device. As a rule, the Play Market is by default in the menu of your tablet or smartphone; to use it you need a Google account - if you have not previously logged in, you will do so the first time you launch the store.
So, how to use this miracle? Everything is very simple - choose the application you like or find it through the search bar, click “Install”, and then the equipment will handle everything on its own.
If you need to delete a program or transfer it to a memory card, the latter is necessary when there is little space on the device itself, and you can do this in the settings. A separate section contains all the applications installed on your gadget.
File manager and how to watch movies and listen to music on Android
To view media files, there is a separate application called Gallery or Media Storage, which you will find in the main menu. There is nothing complicated in using it; photos and videos located in the device’s memory or on the card are distributed into the created folders.
If you need audio files, books and a general list of files on the device, there is a file manager for this, which on the Android system is called Explorer.
By the way, when viewing photos and pictures in the gallery, you can immediately install them on your desktop, or as an image of a contact from the phone book. In general, customizing the background, widgets and other aesthetic components is a large and separate topic.
How to set a ringtone?
If you use an Android smartphone, you probably want to hear your favorite ringtone. This is done through the settings - go to the Sound menu, click on the Ringtone line, where you can select the required file. As you can see, in this menu you can completely edit your call settings. You can also set the melody you like in the player while listening to music - you will find the corresponding function in the menu.
Thanks to this brief instruction on Android, you have learned the minimum set of the most important sections and system settings that will allow you to start confidently using your smartphone or tablet. The main thing is don’t be afraid to try and find out what you haven’t seen before. In general, using this platform will probably be simple and understandable for you, because everything in it is thought out logically and consistently.
Click "Like" and read the best posts on Facebook
After purchasing a new phone, a completely logical question arises about how to use a smartphone for a beginner.
This is relevant for cases when a person has never used such devices before and knows little about them. Of course, there are very few of them left, but they still exist.
Therefore, it makes sense to figure out what those who have just purchased a smartphone need to know so that their new device works as long as possible.
- A few simple tips
- Save battery charge
- What to install
And we'll start from the very beginning.
Here are some tips that you, as a beginner, should remember throughout the life of using your smartphone:
- Read the instructions for your device. Surely, this will shed light on many questions that may arise during use. For example, in the instructions you can often find information on how to enter the system menu, how to bypass the lock, and much more. Moreover, all this will be interesting and useful.
- Immediately after switching on, be sure to get the settings from the operator. They relate to the Internet, MMS and other functions that the SIM card provides. Otherwise, you can, for example, start using the Internet and spend a lot of money on it. Once the settings are set, you will be able to use all the functions of your smartphone with complete peace of mind.
- It is best to immediately connect to Wi-Fi in order to download all the necessary applications and not use mobile Internet, which, as we said above, can cost a lot of money.
- Try to test your new device right away. Try to take a picture of something with it, shoot a video, run games, several at the same time, and so on. All this will allow you to understand how efficient your new phone is. If there is something wrong with it, it is better to immediately take it to the store. By law, this can be done within 14 days after purchase without any reason (due to the fact that you simply did not like it).
- Close all applications when you are not using them. This means that you don’t just need to press the “Back” button, but open the list of open applications and click on the “Close all” button. For example, on Samsung it looks like shown in Figure 1.
Rice. No. 1. List of open applications in Samsung phone
2. Save battery charge
There are many ways to maximize battery life.
Here are the most effective of them:
- Do not use wallpapers with 3D effects or in HD. This is especially true if the resolution of your smartphone is not very high. Then a completely standard picture, not in HD, will do. At least don't do this when first using a new smartphone.
- If you don't need it at the moment, turn off geolocation, Wi-Fi and Bluetooth. Also, if you do not need to constantly use Viber, Skype, other instant messengers and other programs that require constant Internet, turn off the mobile network, that is, the Internet from the SIM card.
- Do not use maximum brightness. Again, at least you shouldn't do this at first. Of course, any smartphone looks very impressive in a store, because they set the screen to maximum brightness. But, unfortunately, you won’t be able to use it in the same way in everyday life. This is worth remembering.
In our article you can learn more about how to save battery power on Android. The same tips apply to other operating systems.
Rice. No. 2. Battery charge on Android
Now let's talk about what applications you need to install on your new phone.
3. What to install
Of course, in the list below we present only those applications that are most popular in the Android and iOS app stores.
It will also contain programs that users themselves most often mention on forums. But all this is just a collection of subjective opinions, which may not correspond to your idea of a “gentleman’s set” of applications for a smartphone.
So, here are the applications that you need to install on your brand new smartphone:
- Messengers. This is the same Viber, Skype and much more. Most of them are really very convenient and even if you have never used instant messengers, we advise you to start doing so. For example, if we talk about Viber, this application allows you to make free calls, even with video, and also stay in touch constantly. This is definitely very convenient!
Rice. No. 3. Viber on Android OS
- Applications related to trading platforms. In particular, we are talking about the OLX application. Again, if you have never used the services of this site, it is best to start doing so. Selling and buying using the OLX app is really very convenient. The AliExpress branded application is also very popular.
- One "cleaner". Here we mean programs that allow you to remove temporary files from the device, clean all kinds of garbage and remove everything that can slow down the device. This could be Clean Master, CCleaner and much more. But such a program must be on your phone.
- File manager. In most cases, smartphones already have some kind of programs that allow you to view files on the internal memory and microSD card. But the problem is that often they do not allow you to view everything that is on the phone. Therefore, it is better to install ES Explorer, Explorer from Maple Media or something similar.
Rice. No. 4. ES Explorer for Android
- Player for music and video. Again, initially smartphones already have standard players. But often a variety of problems arise with them. For example, sound may disappear in a video, audio may not play at all, and so on. In general, it is better to download additional players. In this blog you can see which 3 players are best for Android users to play music.
You can easily access VK or Odnoklassniki through the most common browser. There is absolutely no need to install unnecessary applications.
You can read more about which 10 applications are currently the most popular among Android users in this article.
Besides, you will, of course, want to play something. In this review you can see which games are now the most popular on Google Play.
Introduction
The Android operating system today is hardly inferior to Windows in terms of prevalence. It is used in more than 90% percent of smartphones and tablets. A distinctive feature of its user (graphical) interface is that it is designed for use without a keyboard and mouse - only with a screen that responds to finger touches (touchscreen).
In general, managing Android is not difficult.
These instructions in some details may not correspond to the Android interface on a particular device. The fact is that some device manufacturers change the standard Android interface. Samsung is making especially big changes.
However, the general principles of interface organization remain the same.
Unlocking the screen and the Android desktop
The first thing you will see when you turn on your device is the unlock screen:
You need to touch the image of the lock with your finger and, without releasing your finger, drag it to the right, to the border of the circle and release it there:

Note. On some devices, there may be another image instead of a lock. But the principle remains the same - you need to swipe your finger across the screen.
After unlocking the screen, the desktop will open on which all controls are concentrated:

At the very bottom of the screen there is a status bar and a system tray - they are black. The status line contains the main control buttons, from left to right:
- Back button. Return to the previous window of the active program. If the program has one window, this button closes the program.
- Home button. Return to desktop. Minimizes the active program and opens the desktop.
- "Swap" button. Opens a preview of all running programs. Thanks to this, you can conveniently switch between running programs.
- Window button. Active program menu. Opens a menu with commands for the program that is currently active.
- Adjusting the speaker volume.
- Take a screenshot of the screen.
Note. On some devices, the status bar may not have volume and screenshot buttons.
At the right end of the status line is the system tray. It displays program messages and program icons. If you touch the tray, a menu with quick settings will open:

Note. Not on all devices, when you touch the tray, the quick settings menu opens. Some manufacturers may not have such a menu. Or it may open in a different way, such as by swiping your finger from the top edge of the screen.
Just above the status bar there is a launcher with shortcuts to your favorite programs.
Touchscreen Android
All control of programs and Android itself is carried out by touching the screen. Android divides touches (also called gestures) according to their nature:
- Quick touch (touch and immediately remove your finger) - similar to a computer double-clicking a mouse or pressing enter. Performs a default operation, such as starting a program or opening a file.
- Long touch (touch and hold with your finger) - similar to a computer right-click - offers additional operations. Or selects text, file, element.
- “Zooming” is touching with two fingers at the same time and then moving them towards each other or vice versa. Increases or decreases the font in a document or the size of a picture.
- "Scrolling" is a sliding movement of a finger across or along the screen. Displays elements that are hidden beyond the borders of the screen. For example, a list of files, the next picture in the gallery, the next page of the document.
Working with files in Android
Opening, copying and deleting files in Android is done the same way as in any other OS - through a special file manager program. There are many such programs for Android. The file manager that comes with Android is easy to use:

In the top panel there are buttons that show the folder you are currently in. And buttons for available operations. Tapping a folder quickly opens that folder. Tapping a file quickly opens that file.
If you need to select files (folders) for copying or deleting, you need to make a long touch on one file and when it is highlighted, select the rest:

Selected files can be deleted, copied, cut, or sent via Bluetooth or WiFi. If you need to copy or transfer files, then after selecting and copying (cutting) them, you need to go to another folder and click the "Paste" button there.
If you need to select all the files in a folder, this is done as follows:

First, select the first file (with a long tap), Then touch the “Selected” button. An additional “Select All” button will open.
Programs can be launched through shortcuts in the launcher or on the desktop, as well as through the main Android menu.
If you touch the program menu icon in the launcher, the program menu will open:

One screen may not fit all installed programs. To scroll through the menu, you need to make a sliding movement with your finger from right to left.
If you briefly touch the program's shortcut, it will be launched. If you touch and hold your finger, after a while the desktop will become visible and you can move the shortcut to the desktop with a swipe of your finger.
Switching between programs in Android
If you touch the button to switch between programs - .
A screen will open showing previews of all running programs:

On this screen you need to tap the desired program.
If you quickly move the program window down, the program will be closed.
How to close a program on Android
First way. Press the "Back" button in the Android taskbar. But if this is a program with several windows, such as a browser, using this button is inconvenient. In addition, the program does not actually close, it becomes invisible, but it continues to remain in RAM.
Second way. Click the "Window" button.
If the program has a main menu, it may have an exit or close command:

Or this program menu:

Third way. Click the "Swap" button in the Android taskbar. Then find the window preview and move it down:
Fourth way. Open system settings, go to the applications tab, then open the "Running" programs tab and tap the desired program:

and in the new screen click the "Stop" button

Note
Programs on Android do not actually close in the first three ways! That is, they continue to hang in the background and can work in the background. Eating up the battery and even Internet traffic.
Moreover, even after closing the program, in the fourth way, it can start again after some time. When a certain event occurs. For example, when connecting to the Internet.
Therefore, you need to periodically review the list of running programs and stop unnecessary ones.
Installing programs on Android
Internet connection on Android
On most Android devices, you can connect to the Internet through cellular networks or WiFi. Both of these methods are available through the device settings - Wireless networks section.
If you need to switch from WiFi to 3G or vice versa, you must first turn off the current Internet source and only then turn on another one.

The Android keyboard appears on the screen automatically when you touch the data entry field:

The keyboard that comes with Android is not very convenient. On it, the number keys and special character keys have been moved to another set that you need to switch to. In addition, there are no arrow keys for moving the cursor and no Alt, Ctrl keys. Second set of characters:

And the third set of characters:

As you can see, if you need curly braces, you will have to change two sets of keys in order to get to them.
However, in Android the keyboard is a program and this means that it can be replaced with another. For example on Hacker's Keyboard:

It's almost like a real keyboard. The most important thing is that it has arrow keys to move the cursor. This is very convenient because moving the cursor several characters using your finger or the graphic slider is hell. But since there are more keys on it, their size is smaller and you need to work with it more carefully.
To switch languages on Hacker's Keyboard, you need to slide your finger over the space bar.
Switching between keyboards is done in the Android settings:

Selecting and copying text in Android
When actively working with texts on a computer device, sooner or later there will be a need to copy the text and transfer it to another program (document). In ordinary operating systems this is done easily - the context menu or Ctrl + C. In Android it is more difficult. First, you need to quickly touch the screen twice on some word from the fragment that you want to copy. The word will be highlighted and two sliders will appear:

By holding the slider with your finger, you can move it and thus select as much text as you need. After this, you need to touch the selected text and do not release your finger until the menu appears:

In which you need to select "Copy". This menu may look different in different programs. For example, instead of text there may be icons.
Then go to the program (document) where you need to insert the text and touch the screen in the right place and hold your finger until a similar menu appears, but in it select “Insert”.
Of course, copying text in Android is inconvenient. But in the absence of fish there is fish.
Summary
Of course, a device running Android cannot fully replace a full-fledged computer, however, at the very least, common types of work can be performed on it. Up to editing simple MS Word and Excel files.
If your Android device supports USB-Host (OTG) mode, then you can connect a USB mouse and keyboard to it and it will be much easier to work with text.
If you found this article useful or simply liked it, then do not hesitate to financially support the author. This is easy to do by throwing money at Yandex Wallet No. 410011416229354. Or on the phone +7 918-16-26-331 .
Even a small amount can help write new articles :)
Details Konstantin Abgaryan News September 16, 2017 Views: 971Xiaomi wearable fitness trackers are extremely popular. The original Mi Band became a real hit, and the second generation only strengthened the position of the Chinese manufacturer. This year, many were waiting for the release of Mi Band 3, but for some reason the company decided not to present this device. Whether it’s worth waiting for is unknown, but meanwhile in India Xiaomi presented an improved version of Mi Band 2, developed in partnership with HRX by Hrithik Roshan. Xiaomi Mi Band HRX Edition looks almost no different from the original Mi Band 2. The new product uses an improved physical activity tracking algorithm, which allows you to obtain more accurate data on physical activity. In addition, the manufacturer promises up to 23 days of battery life. For comparison, the stated operating time of the regular Mi Band 2 is 20 days. True, the HRX Edition does not have a heart rate sensor, which may discourage many from purchasing it. Xiaomi Mi Band HRX Limited Edition will go on sale on September 18 at a price of $20.
