Data sharing mechanism 1s. Data Separation, Mechanism. Editing a Form Dialog
General details in 1C 8.3 is a platform metadata object that allows you to use one attribute for many configuration objects (directories, documents, charts of accounts, etc.). The object was created mainly to make the developer's work easier and to separate data.
General details were initially implemented in version 1C 7.7, but the developers did not immediately include it in the platform version 8. The mechanism of general details was introduced by 1C developers only in release 8.2.14.
It is very convenient to add general details so as not to change standard objects in the configuration; I often use them along with .
After adding a general attribute, it can be used in queries and displayed on the object form - Outwardly, it is no different from ordinary props.
The only limitation of general details is the inability to use them in .
Let's look at the basic settings and properties of general details that differ from other configuration objects:

Compound— a list of objects to which the general details will be used; the setting is reminiscent of setting up an exchange plan.

Get 267 video lessons on 1C for free:
Auto use— the setting determines whether general props will be used for those objects that have the “Automatic” usage mode specified.
Data separation— we will consider this setting separately.
Separation of data in 1C using common details
Data separation- a mechanism similar to the mechanism. However, the performance of this mechanism is more efficient and it is easier to configure.
The mechanism allows you to configure the display of only elements that the user can see. For example, you can distinguish between all objects (documents, directories, etc.) where a certain organization is installed.
Setting up data separation using general 1C details
To configure the general details, you need to specify the data separation - Divide. Immediately after clicking, the system will offer to create default accounting parameters:

In this case, it will be necessary to specify the session parameters when starting the system; how to do this was described with an example in the article.
This completes the setup - the user will only have access to the information that is specified in the selected session parameters.
Example of using common props
Let's look at setting up general props in 1C 8.3 using the example of a frame configuration and props Organization:
The system has 3 documents where it is necessary to indicate the details of the Organization: these are the Receipt Invoice, the Expenditure Invoice, and the Payroll.
The setup is simple:
- We create a new General attribute, specify the type - DirectoryLink.Organization.
- In the composition we arrange for our documents - Use.
That's it, the setup is complete!
Let's see the result:

The system displays general details “as if they were your own”: in requests, in form details, and in other places. This is such magic! 🙂
General requisites 1C 8.3 are not added
What will you learn from this article?
- The article discusses the purpose of the totals separation mode
- The behavior of the 1C:Enterprise 8 system during parallel operation of a large number of users is analyzed.
- Shows the disadvantages of the split totals mode
- Recommendations are given on the correct use of division of register totals
The 1C:Enterprise 8 platform contains capabilities and mechanisms, the operation of which not everyone has a complete understanding of, as well as how to use them effectively. This is the totals separation mode.
The totals separation mechanism performs a very important and useful function: its use makes it possible to carry out parallel entries in accounting registers and accumulation registers.
Let us demonstrate the effectiveness of this mode using an example. To do this, consider the situation before and after turning on the totals separation mode.
Before enabling split totals mode
We have two identical documents with numbers 001 and 002:
Both documents move through the accumulation register. There is no control over residues. Accumulation register structure:

Two users, working in their documents, begin to conduct simultaneous work. A situation arises in which two documents of the same type try to make movements at the same time.
In this case, the following picture appears at the DBMS level:

Here's what happens in the system:
- Documents are trying to make an entry in the accumulation register
- At the DBMS level, the accumulation register is represented by two tables: a table of movements and a table of balances (totals table).
- In the movement table, documents can record their data in parallel. This is ensured by different values of the “Registrar” field, and, accordingly, work is done with different rows of the table.
- But in the table of balances there is no “Registrator” field; the data in this table is stored in the context of dimensions of the register itself.
- Here we observe a situation in which two documents need to change one record, but one record cannot be changed at the same time.
- In order not to lose the recorded data, one of the documents must wait its turn to record until the other document records its movements. And, after the first of the documents makes its movements, the second will be able to make its own.

As a result, we observe a loss of time - the second user is forced to wait for the first user to finish processing the document. On the one hand, everything is correct and logical, on the other hand, the parallelism of user work in the system suffers.
To resolve the problem that arose, a mechanism for dividing the results was created.
Its use is intended only for accumulation registers and accounting registers.
Enabling split totals mode
Enabling this mode is quite simple:

Note that the totals separation mode is enabled by default for all created accumulation and accounting registers. In addition to the Configurator in user mode, we can see for which registers the mode is enabled:

What happens after you turn on the split totals mode?
A new column “Separator” appears in the accumulation/accounting register totals table. In the DBMS itself it is called “Splitter”.

In this case, the table of movements remains unchanged; the separator in it is “Recorder”. We see the change in the summary table.
This field is only populated when two (or more) transactions attempt to change the same row in the totals table. When this happens, the Separator field stores a different value for each transaction.
This implementation of the totals separation mode makes it possible to perform parallel recording of all transactions.
In our example with two documents, when the mode is turned on, the following is observed:

Both of our documents recorded their data in parallel thanks to the new Delimiter field. As a result, there are no waits for locks and increased user concurrency.
Disadvantages of the split totals mode
When this mode is enabled, the size of the register totals table increases due to the fact that a new field has been added, and several rows appear for a set of dimensions instead of one.
When receiving register balances, there is a need to collate the data, which leads to a waste of time, albeit insignificant.
In our case, with two documents to obtain the balance of the “Table” product for the “Main” warehouse, it becomes necessary to add two lines to obtain the final value “7”. When the separator is turned off, row grouping (addition) is not required.
When should you use split total mode?
To do this, you must meet the following conditions:
- There is no control of balances by register - there is no reading of data in the transaction. As a rule, there is no control over balances in accounting registers. But if residual control is present, then we will not get any performance gain. In addition, when monitoring balances, you need to use the “LockForChange” record set property, since there is a possibility of deadlock.
- Parallel work by users is performed with the register, and active work at that.
When working sequentially with a register or working with a small number of users, there is no point in enabling the split totals mode: the absence of competing transactions does not lead to waits on locks, and, accordingly, there is no effect from using the split totals mode.
Burmistrov Andrey
The form editor is used to create and edit forms of application solution objects. Object shapes are used by the system to visually display object data as the user works.
Any form represents a combination of three components:
- form dialog - a window that will be displayed on the screen;
- form module - a program in a built-in language responsible for working with form controls and processing events;
- form details - a set of objects belonging to the form, the data of which it uses in its work.
The form editor itself provides editing of the form dialog, its details and calls the text and module editor to edit the form module.

The form editor window contains three tabs that allow editing of all three components of the form.
Editing a Form Dialog
The form editor allows the developer to take full advantage of a wide range of dialog capabilities. Let's list the main ones:
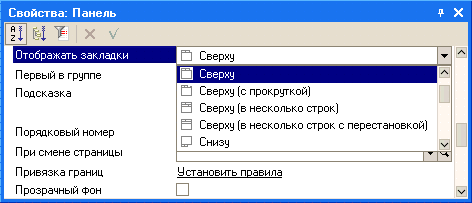
Panels, pages, bookmarks
The dialog editor allows the developer to place special controls on the form that help give the form its own recognizable style, make access to data simple and clear, and also fit a large amount of information into a limited area.
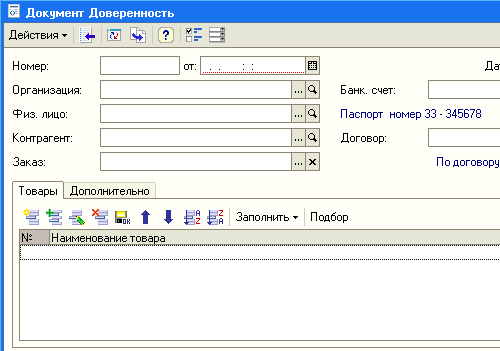
The editor allows you to place several panels on a form, each of which can contain several pages. For example, a document form may contain a panel with two pages: Products and Additional:
The developer has the ability to set a mode in which pages will scroll within the panel, or use bookmarks to switch between pages. The editor allows you to define a large number of different options for the location and display of bookmarks:
For example, bookmarks can be placed horizontally on top:
Or you can arrange the bookmarks on the left vertically:
Controls
The editor allows you to place a large number of different controls on the form. You can place controls by dragging or using a special dialog for inserting controls, which allows you to simultaneously set the desired properties of the selected control:
In the case where the form contains a large number of controls, the developer can use the mode of displaying controls in a list, which allows you to quickly navigate to the desired control:
The editor provides the ability to specify the order in which the user will bypass the form controls when entering and editing data. It is possible to set an automatic traversal order or manually set the traversal order in a special list of controls, or by clicking the mouse directly on the form:
Grid, alignment
The Form Editor has great capabilities for controlling the placement of elements on the form. In particular, it supports grid layout, where the borders and sizes of controls are aligned to the layout grid located on the form. The developer has the opportunity to change the pitch of the marking grid and thereby achieve a more precise location of the controls:
The editor also supports the use of alignment lines, which serve to facilitate the alignment and relative position of form controls. For example, in the following illustration, alignment lines are used to position controls on the More page:
The developer has the ability to place the required number of horizontal or vertical alignment lines on the page, as well as use invisible alignment lines. The editor creates invisible alignment lines automatically after two or more controls are aligned along any of the boundaries. For example, if two fields of the same size were left aligned, an invisible alignment line will be created along the right aligned borders of those fields.
Alignment of controls can also be done using special markers indicating the desired direction of movement of the controls. Markers appear when two controls are in close proximity to each other.
Blue alignment handles indicate the desired direction of movement of the control to align it with one of the borders of the adjacent control:
The red alignment handles indicate the desired direction to move the control when it overlaps another control:
It should also be said that the editor supports alignment, resizing and ordering operations for a group of controls:
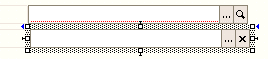
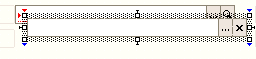
Bindings
The form editor allows you to customize the behavior of controls located in the form, so that when changing the size of the form, a natural perception of information is ensured: one part of the elements remains in place, the other part moves along with the boundaries of the form, and the third part changes its size in accordance with changing the size of the form.
To specify this behavior of form elements, the developer can describe bindings - the dependence of the position of the borders of the controls on the position of the borders of the form. The border of a control can be snapped to the border or center of a form, or to the border or center of another control.
The editor supports a wide variety of different types of bindings and can display them graphically:
Separators
Separators are special controls that allow you to redistribute the space of a form without changing its size. In 1C:Enterprise mode, the separator has the ability to be “grabbed” by the mouse and moved within the form within its limits, taking into account the possibility of the location of other controls and the orientation of the separator:
When you move a separator, all controls bound to the separator will resize or move according to the set anchors:
ActiveX
The editor allows you to place ActiveX controls on a form, which the developer can configure and subsequently manage using the built-in language:


Editing a form module
To edit the form module, the configurator calls the text and module editor. This editor provides the developer with a wide variety of options for creating and modifying module text.
Editing form details
Editing form details is performed in the list, which allows you to create new details, change existing details and delete unnecessary details:

If a form has a main attribute that determines the behavior of the form that differs from the standard one, it is highlighted in bold. The developer can place the cursor on the desired attribute and, using the menu command, immediately go to the form dialog, to the control element that corresponds to the selected attribute.
Additional Information
You can become familiar with using the form editor in real time. To do this, you can download the demo video "Example of developing a trading mini-system", which shows the process of developing a trading mini-system using this editor to create document forms "Receipt invoice", "Expense invoice" and report forms "Sales analysis" and " Sales analysis by period."
1.Preamble.
There was a need to organize accounting for two organizations in one information security system. The situation is not unique, but it so happened that our very unusual 250 gigabyte USB drive worked quite slowly, so instead of RLS we decided to try data separation. What it is is described, for example, or. In short, if RLS adds conditions to SQL queries, then the data separator is an additional column in tables at the DBMS level, due to which the separator mechanism should work faster than RLS.
So, to the database where records were kept for LLC No. 1, it is necessary to transfer information from the separate database of LLC No. 2 and organize joint work. Just like in the picture:
Mere mortals work only with their own LLC, and the chief accountant sometimes looks at data for two legal entities. In the access mode to both LLCs, you can only read the data, so the chief accountant should be able to interactively switch between the “read all”/“write only one organization” modes and select the LLC (i.e., set the value of the common details) to carry out, for example, cost calculation.
2. Implementation
Platform 8.2.19.90, without compatibility mode. DBMS - MSSQL Server 2008 R2 Standard.
We created the general attribute OrganizationSeparator of type "number", agreed with the proposal to create session parameters, filled out the composition of the details (included several directories, all documents, accumulation, accounting and calculation registers). Data separation - "Independent and joint". The value of the session parameter is set from the standard user settings in the SettingSessionParameters procedure in the session module:
Organization = UserManagement.GetDefaultValue(chCurrentUser,"PrimaryOrganization");
SessionParameters.OrganizationSeparatorValue = Organization.SeparatorValue;
In the chief accountant’s interface, they made a form with the ability to switch between organizations and turn on/off the separation mode:

When separation is disabled, when SessionParameters.OrganizationSeparatorUsage = False, the platform refuses to write documents, crashing with errors like “SDBL error: expression expected (pos=12)”, so you cannot allow the user to write documents in this option. For reliability, we created subscriptions to the “Before recording” event for objects that are part of the general attribute:
IfSessionParameters.OrganizationSeparatorUsage = False Then
#If Client Then
Warning("Cannot write because data sharing is disabled!");
#EndIf
Refuse = True;
endIf;
Our action plan was as follows: prepare the receiver configuration of IS No. 1, set the values of the general attribute = 1, load data from IS No. 2, after loading, for all objects with an empty (equal to 0) separator value, set OrganizationSeparator = 2.
The configuration has been prepared, the question arose: how to set the value of the general details for documents and their movements in closed periods, quickly and without the risk that the numbers in the balance sheet will fly? It is impossible to write a separator separately from the object through the 1C object model, so I had to violate the license agreement to get out and write a query for MS SQL. Since there are many objects in the general attribute, and there are even more tables in the table for these objects, we wrote a processing that generates a query for SQL (for each metadata object included in the separator, we wrote "update" + DB_Name + ".dbo._" + TableName + "set _" + FieldGeneralAttributes + "= 1";)
We entered the value, transferred some of the data from IS No. 2, and began testing.
The result was disappointing. Firstly, problems with the accounting register. When separation is enabled, the analyst is not visible:

This is due to the fact that the accounting register at the DBMS level is stored as several tables, and not all tables had the value of the general attribute entered (processing was used to view the structure).

Okay, let’s enter the separator value using MS SQL, and we’ll see the analytics. Reports no longer work. It turns out that there are problems with queries to the virtual tables of the accounting register “Turnover” and “TurnoverDtKt”:

(Fld27033 is just a general attribute in the accounting register table)
The separator is installed in all tables, this is visible at the DBMS level, it is not clear what the error may be. We deploy a standard empty SCP, make the configuration changes described above, enter a couple of documents (in this option, the platform itself enters the separator value in all accounting register tables), but the errors are reproduced. It’s bad, but we exclude accounting registers from the general details and continue testing.
Further, it turns out that the displacement mechanism of the calculation registers has stopped working. We did not separate the plans for calculation types; we are trying to look for the problem in the tables of the calculation register and in recalculations. We check, enter the value of the main details, do T&I - to no avail.
Along the way, we diagnose the problem when writing information from the list form to independent registers. In this case, the data is recorded and can be seen after a restart. The problem is also reproduced on the test base:

It was not possible to “fix” the information registers by manipulating with SQL (the separator value in all tables is set), so we simply excluded them from the general attributes. After several days of experimentation, attempts to restore the functionality of preemption also turn out to be unsuccessful.
At this point, we decide to turn off data separation and use RLS. When setting the partition to “do not use,” we encounter the errors “Microsoft OLE DB Provider forSQL Server: CREATE UNIQUE INDEX terminated because a duplicate keywas found for index...”. That is, it is not so easy to return to the state before the division. Problem with indexes of conversion tables, settings for storing totals and others. The fact is that the tables store identical rows, differing only in the value of the general attribute. When you delete a common attribute, non-unique records appear. You will have to delete unnecessary records directly in MS SQL, something like this (for the conversion table):
Use base;
ALTER TABLE_CRgRecalc1399
ADD id INT IDENTITY(1,1);
GO
DELETE FROM_CRgRecalc1399
WHERE id< (SELECT MAX(id)
FROM _CRgRecalc1399 AS T1
WHERE _CRgRecalc1399._RecorderTRef = T1._RecorderTRef and
_CRgRecalc1399.[_RecorderRRef] = T1.[_RecorderRRef] and
_CRgRecalc1399.[_CalcKindRRef] = T1.[_CalcKindRRef] and
_CRgRecalc1399.[_Fld1400RRef] = T1.[_Fld1400RRef] and
_CRgRecalc1399.[_Fld1401RRef] = T1.[_Fld1401RRef] and
_CRgRecalc1399.[_Fld1402RRef] = T1.[_Fld1402RRef]
);
GO
ALTER TABLE_CRgRecalc1399
DROP COLUMN id;
And only after cleaning several dozen tables is it possible to turn off data separation. After turning off the separation there are no problems.
3. Conclusions.
There was a glimmer of hope that the problems were solved in 8.3. We weren’t too lazy, we checked it on 8.3.4.482 (with compatibility mode disabled). We looked at an almost standard control unit, with changes in the configuration only for general details. On this test base, separation was enabled before information was entered, i.e. the platform had to correctly write the separator value into all tables; they did not write anything directly into MS SQL themselves.
Result:
The problem with queries to the virtual tables "Turnover" and "TurnoverDtKt" is reproduced.
The problem with repression is reproduced.
The problem with writing to independent information registers is reproduced.
The problem with turning off the separation is that you can’t get rid of it with one click of a button!
Thus, we were unable to replace RLS with a new mechanism. This mechanism was apparently conceived for cloud services, and in the case of using shared data “independently”, maybe the division will work, but we need a common master data. We just have to wait for 1C to correct the errors, or even better, to implement a standard mechanism for separating by organization in standard configurations.
The 1C separator element is needed in order to redistribute the areas of the form as it is convenient for the user at the moment. Almost every Windows user has the ability to use delimiters. Let's say you've created a simple form with two controls.
Traditionally, items from any list can be located on the left side. On the right side, accordingly, there is detailed detailing of these very points. If the left list consists of short titles, it is logical to reduce this column to a minimum. Accordingly, in this case the readability of the right side will increase. Conversely, if there are long names on the left side, the column should be expanded. Dividers allow the user to customize the shape freely by simply dragging the border with the mouse.

This control method is used when editing tables in Word and Excel. When creating a form, you can create both a vertical and horizontal form element, a separator. In general, it is most preferable to create forms that visually fit within the screen.
Separator 8.2, 8.3 (managed forms)
You cannot add a separator in managed form 1c; it is added automatically by the program before/after the table field
