Programs for system administrators, programs for the network. Local networks
Free program for changing network settings. The program is intended for non-commercial use and in the free version allows you to create up to six profiles containing different network configurations.
Changing created profiles in NetSetMan (short for Network Settings Manager) is very easy - just select the tab with the desired settings and click the "Apply" button.
You make the necessary settings in separate profiles in advance, and then simply switch to the desired one when you change the connection method!
Key Features
NetSetMan allows you to change:
IP- computer address on the Internet.DNS- a system that associates domains with IP addresses.
Hosts- a text file with instructions for redirection.
- IP addresses;
- DNS, WINS and SMTP servers;
- computer name and workgroup;
- Wi-Fi settings;
- network printers;
- entries in the Hosts file;
- some system properties (monitor operating mode, sound devices and power configuration).
In addition, NetSetMan can execute any BAT, JS or VB scripts, allowing you to change almost any settings available from the command line and/or third-party programs!
Comparison with analogue
NetSetMan has a paid PRO version, but the differences between them are minimal. In fact, by paying €18, you will receive:
Proxy- an intermediate server between the computer and the Internet.- the right to use NetSetMan on a work PC;
- activate an unlimited number of settings profiles;
- functions of changing the proxy server, network domain and browser start page.
Therefore, it seems to me that it would be more successful to compare NetSetMan with a third-party application called WinAgents HyperConf:
In fact, the WinAgents HyperConf program is a kind of analogue of NetSetMan for system administrators, since it is designed not only for automatically changing network settings, but also for maintaining these settings in working order.
And the license for it is sold for at least 10 cars. Therefore, for the average user, working with NetSetMan will be preferable.
Program installation
NetSetMan is installed like all programs: you download the archive, open it and run the installer, and then follow the wizard’s prompts.
During the first stages of installation, you will need to select the application language and accept the terms of the license agreement, after which you will be faced with the following choice:
There are three possible installation options here:
- The standard installation is the way NetSetMan will be installed on the system, like all regular applications. That is, in the Program Files folder (by default), a directory with the program will be created, which will contain all the files necessary for work. In this case, the utility settings will be saved in the system registry.
- Update - allows you to install a newer copy of the program on top of the one you already have installed. This method will only be available if you have already used NetSetMan before.
- Extract files. This method allows you to simply unpack all program files into the directory you specify. In this case, nothing is written to the registry, and you can use NetSetMan as a portable application.
We'll probably finish installing the program in the standard way, although if you are a fan of portable software, you can complete the installation in a third way :).
Creating your first profile
After the installation of the program is completed, its working window will appear in front of us:
![]()
It consists of a menu bar (at the top), a row of buttons (to the right of the program name) and six tabs, which, in fact, contain all possible settings.
In order to create the first settings profile, you need to call the context menu of the required tab (for example, Set 1):
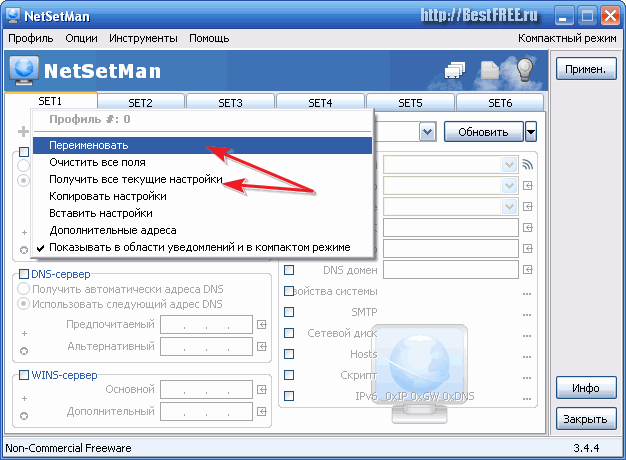
First of all, let's rename our tab to something convenient and understandable. To do this, click “Rename” and in the window that opens, enter a suitable name, for example, call the tab “Home” :).
After this, we will need to go to the context menu of the tab again and activate the “Get all current settings” item there.
This action will automatically fill in all fields with the settings that you currently use to connect to the Internet:

In addition, you can automatically fill in the required fields by clicking the arrow button located to the right of the required field (see screenshot above).
Working with the program
So, we have our first profile ready - it’s time to create another one so that you can switch between them.
I have a connection at home from a city local network, so as an example I will give the settings that I have to use if I want to connect to the Internet at my parents:
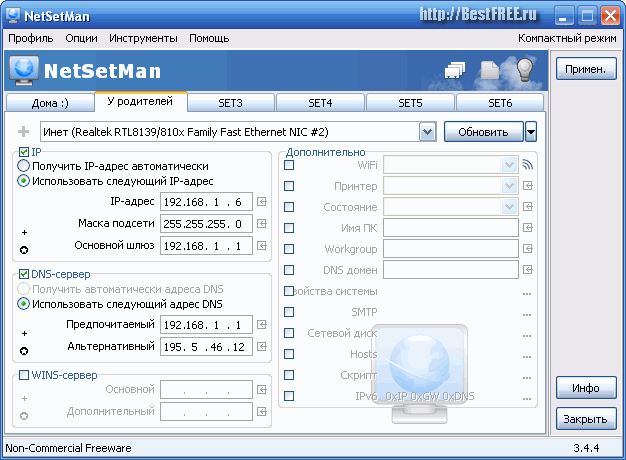
As you can see, for the Internet to work, we usually only need to know our IP address and the IP of our DNS server (which in this case is the modem). However, there are also more complex cases that NetSetMan will help us deal with.
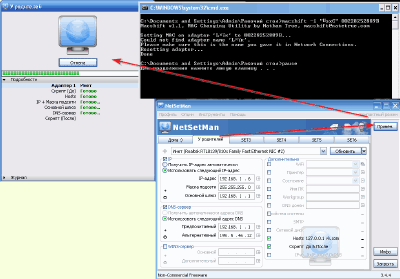
MAC address(English) Media Access Control) - unique device number on the network.The first such case is the problem of changing the MAC address of the network card.
Usually this need does not arise, however, if you have to work in several local networks, where traffic is distributed to the physical addresses of network devices, then you will not be able to do anything without this function.
Officially, NetSetMan does not yet have such a feature (although the author announced its implementation in the next beta version), but it is possible to execute almost any script, which significantly increases the functionality of the program!
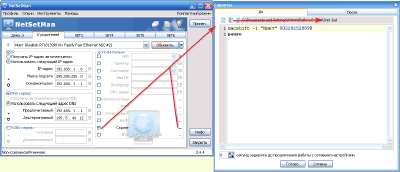
The script can be created in advance (and then simply opened), or you can write it directly in the window of a special built-in editor, to access which you need to activate the “Script” item in the desired program tab and click on the button to the right of the item name:
Let's look at working with scripts using a specific example. By default, the Command Line does not have a function for changing the MAC address, but it can be implemented using a third-party console program - macshift.
You will find this utility in the archive with the NetSetMan program. All you need to do is unpack the files "validmacs.h" And "macshift.exe"(third file is optional) to the root of the disk C:\ or to a folder C:\Windows.
Console(English) console) - window for entering text commands.Thus, you have the opportunity to change the MAC address of the network card through the console. Now the small matter is small - you need to write scripts.
The syntax of the macshift commands is very simple: macshift -i "Connection name" 2889-82-002B (required address).
We enter the line (changed to the MAC address you need) into any editor such as Notepad and save it as a BAT file.
Now all that remains is to open the created file in the NetSetMan script editor (see screenshot above). Moreover, the execution time of the script can be set both “Before” changing the settings and “After”.
Hosts file management
Next to the “Script” item there is the “Hosts” item. Activating it allows us to make changes to the system file of the same name, which is responsible for resolving and redirecting the addresses specified in it.
One of the options for using the function of editing this file may be to restrict access to certain sites from your PC.
For example, I suggest “banning” the site vk.com :).
This can be achieved by assigning the local host address to the site (by default 127.0.0.1 ). We activate the “Hosts” item in NetSetMan and using the button on the right (with the ellipsis) we open the window for editing the system host file:
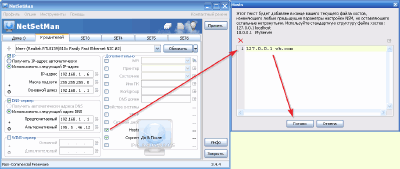
Now, following the syntax, on each new line we first write the local host address, and then, separated by a space, the address of the site to which we want to block access.
After generating the list, click the “Finish” button.
The most important thing is that NetSetMan does not touch the standard host file entries, but can both add and remove site addresses added through the program.
Thus, you can create a profile, for example, for your children, in which you can limit their ability to access certain sites!
Managing system properties
The last function that I would like to draw your attention to is “System Properties”. By activating this item in the NetSetMan window, you will be able, using a profile, to change not only network settings, but also some monitor, sound and power settings:

We've figured out the capabilities of NetSetMan, so it's time to try using the profiles we created. To do this, just go to the desired tab (profile) and click the “Apply” button. in the upper right part of the program window:
This will open a window in which all actions performed by the program will be displayed.
Above the list of actions is a progress bar for applying new settings, and above it is a “Cancel” button, which will change to a “Finish” button when the network configuration is complete.
Click the last one and you will have a completely reconfigured Internet connection at your disposal!
Additional tools and program settings
So, above we have already figured out the operating principle of the NetSetMan program and examined in detail some of its capabilities. Now it's time to get acquainted with some non-essential, but sometimes necessary functions. We'll talk about the buttons on the toolbar. There are only three of them:
- Profiles. This button opens the profile management window. Unfortunately, in the free version we cannot delete any of the six profiles, but we can rename them.
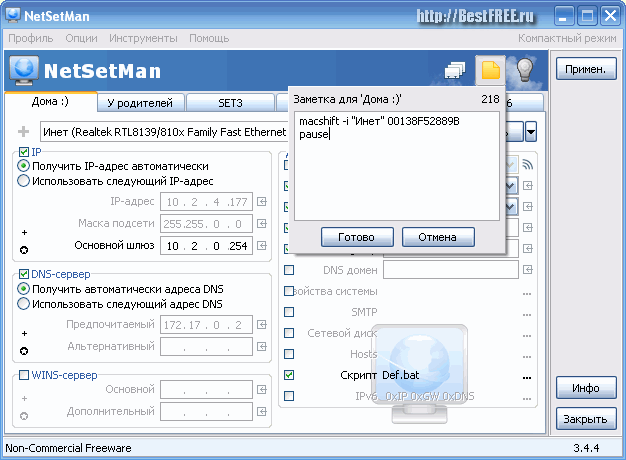
- The note. This button allows you to leave short entries (up to 256 characters) with comments on the active profile. Here you can, for example, insert the text of the script so that you can restore it if the file is lost (see screenshot above).
- Auto switch. This button opens a window in which we can configure automatic switching to a Wi-Fi profile when a signal from an open network is detected.
Without proper attention, we are left with only the menu bar.
The first item - “Profile” - activates a menu similar to the context menu described at the beginning of the section about creating the first profile. Therefore, there is no point in describing it separately, and we move on to the second point - “Options”:

Here we have three sub-items:
- import;
- profile export;
- and the “Settings” itself.
For example, if you forgot to set the interface language to Russian or want to disable NetSetMan autostart, then you can do it here.
Also pay attention to the “Administration” tab. With its help, you can activate encryption of all data stored in the program!
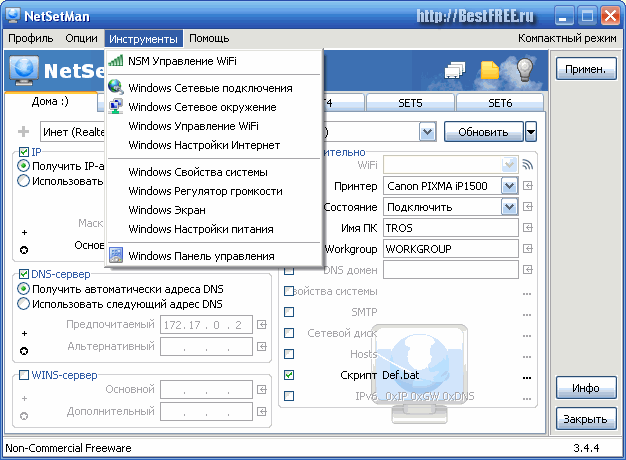
The third menu item - “Tools” - contains some standard links to built-in system network connection management tools and more:
The last thing I want to talk about is the ability to work with NetSetMan in “Compact Mode”:

To switch to this mode, just click on the corresponding inscription in the upper right corner. It is worth noting that you cannot edit profile settings in this mode, but switching the network configuration is much more convenient (at least in my opinion) :).
Advantages and disadvantages of the program
- simplicity of the interface;
- convenient system for changing profiles;
- expanding the functionality of the program by executing scripts;
- the ability to quickly automatically obtain current settings;
- Access the most popular built-in Windows features.
Flaws:
- there is no built-in function for changing the MAC address of the network card;
- There is no built-in task scheduler.
conclusions
If you are a modern laptop owner and often use it when traveling to access the Internet, then NetSetMan is an indispensable tool for you that will allow you to forever forget about the inconveniences associated with changing network settings.
If you yourself are not very good at configuring network settings, then you can always ask your friends or colleagues (for example, an office system administrator :)) to do this just once, and then always enjoy uninterrupted access to the Internet!
Afterword
In the modern world, there are probably practically no people left who do not use computer technology in one way or another. Most people today have more than one PC at home... Moreover, the second computer is most often a laptop.
Of course, with modern capabilities for almost universal access to the Internet, laptops are still the most successful solutions for replacing a full-fledged office (and even multimedia) PC.
However, all the variety of options for connecting to the Internet has one (and sometimes very significant) disadvantage - the need to change the connection settings every time.
Let's say you use a laptop as a work machine at home, in the office and with friends. At the same time, at home you “sit” on an ADSL connection, at work on a “local” connection, and with friends on a “dedicated” connection. Your laptop also has Wi-Fi, which can be used to surf open networks...
And for each case, you have to go into Network Connections every time and tinker with the settings! Scary? Of course :) But today we learned how to rid ourselves of this nightmare once and for all with the help of a fairly simple, but practically irreplaceable utility, NetSetMan.
P.S. Permission is granted to freely copy and quote this article, provided that an open active link to the source is indicated and the authorship of Ruslan Tertyshny is preserved.
There are many reasons why you need to connect 2 computers over a local network. For transferring files, for games, creating an access point and much more. In this article we will look at how to connect two computers without programs. And let's look at programs for creating a local network via the Internet.
For all these operations we need two or more computers, the Internet, and if you want to connect without programs, then you need a network card that supports Wi-Fi technology.
How to connect two computers without programs?
To do this we need:
- Go to the Network and Sharing Center and click "Set up a new connection or network."
- Select "Set up a wireless computer-to-computer network" and click next.

- Select a name, network type (preferably WPA2, since it will eliminate the high probability of your connection being hacked), write a password and click on the checkbox: “Save changes for this network.”

- After setting, click next and close the window.
Go to the second computer, where you just need to connect to our network.
This method is suitable if 2 computers are nearby, but if they are far away, then, unfortunately, the signal will not be received.
But what if you need to communicate with a friend over a long distance?
To do this, you need to download one of the programs presented below.
Programs for creating a virtual local network
If you don't have a game license, or you just don't want to go through the hassle of constantly copying and pasting an IP address, you can simply download and install a LAN simulator - a program for connecting multiple computers. With the help of such programs, you can easily play pirated or even licensed games online, and sometimes find friends there.
There are actually enough such programs and everyone can find the right one. It also happens that one of the programs may not work or not support the desired game, as often happens with Hamachi or other programs, so you can look for a solution to the problem on the Internet or use another program.
Hamachi
This program for creating a local network is presented to Windows users and was the most popular on this list until recently, when significant competitors appeared. This is where trouble can happen. “Tunnel through a repeater” is a very common problem that many users of this program encounter. The best solution would be to simply change it or configure it correctly, which is not always easy and is not guaranteed to work.
Tunngle

Quite a popular program for creating a local network via Wi-Fi and the Internet. With its help, you can connect to each other in the same way as with Hamachi. The principle of operation of this program is slightly different from others, because here you do not need to create a room for a separate server. These rooms are already created for each game, each room can accommodate 255 people. Quite convenient. This program contains almost all the games that you can play with friends.
GameRanger

Probably the most popular program for creating and playing with friends. It supports all popular games, but there are also those that are not within its reach. There are a lot of people sitting in this program for days on end, and you definitely won’t be bored if your friends have gone to bed. The server has a ping, you can see how good or bad the user's connection is. When you first register, the program will automatically scan your computer for games. Next, all rooms currently created will be shown on the main screen, as well as the nickname of the person who created the room. Some rooms may be password protected. This means that the user wants to play only with his friends and no one else.
Evolve
The program is a good analogue of Tunngle, but it is less popular among the audience. But in this program there are no advertisements and pop-ups that irritate gamers so much. Here you don’t have to mess with the settings, because everything is done automatically. But with all its advantages, there are also disadvantages. Evolve lacks the room search feature found in Tunngle. Instead, there is something like smart search. You just need to go into the game, and the program itself will find all existing rooms to which you can connect.
Conclusion
Of course, there are many programs for creating a local network, but there is also a way to create a local network without using third-party programs. If you do not trust the Internet and only Microsoft programs are installed on your computer, then there is also a way for you to create a local network. Everything is completely simple and does not require unnecessary installation of software, however, there are some disadvantages, and it is difficult not to note them, namely: the connection can only occur via a Wi-Fi network, respectively, if you have a PC without an appropriate network card that does not support If you use this technology, you will not be able to connect to the local network without programs.
Greetings to all readers.
Most computer games (even those that came out 10 years ago) support multiplayer play: either over the Internet or over a local network. This, of course, is good, if not for one “but” - in many cases it will not be possible to connect to each other without using third-party programs.
There are many reasons for this:
For example, the game does not support playing over the Internet, but there is support for local mode. In this case, you must first organize such a network between two (or more) computers on the Internet, and then start the game;
Lack of a “white” IP address. It's more about organizing Internet access by your provider. Often in this case it is impossible to do without using software at all;
The inconvenience of constantly changing the IP address. Many users have a dynamic IP address that is constantly changing. So, in many games you need to specify the IP address of the server, and if the IP changes, you have to constantly enter new numbers. To avoid this, special tools will come in handy. programs…
In fact, we’ll talk about such programs in this article.
GameRanger
Supports all popular versions of Windows: XP, Vista, 7, 8 (32/64 bits)
GameRanger is one of the most popular programs for playing games on the Internet. Supports all the most popular games, among them there are all the hits that I simply could not help but mention in this review:
Age of Empires (The Rise of Rome, II, The Conquerors, Age of Kings, III), Age of Mythology, Call of Duty 4, Command & Conquer Generals, Diablo II, FIFA, Heroes 3, Starcraft, Stronghold, Warcraft III.
In addition, there is simply a huge community of players from all over the World: more than 20,000 - 30,0000 users online (even in the morning/night hours); about 1000 created games (rooms).
During installation of the program, you will need to register by indicating your work email (this is mandatory, you will need to confirm your registration, and if you forget your password, you will not be able to recover your account).
After the first launch, GameRanger will automatically find all installed games on your PC and you will be able to see games created by other users.
By the way, it is very convenient to look at the server ping (marked with green bars:): the more green bars, the better the quality of the game will be (less lags and errors).
In the free version of the program, you can add 50 friends to your bookmarks - then you will always know who is online and when.
Works in: Windows XP, 7, 8 (32+64 bits)
A rapidly gaining popularity program for organizing online games. The principle of operation is somewhat different from GameRanger: if you go into a created room there, and then the server starts the game; then here each game already has its own rooms for 256 players - each player can launch their own copy of the game, and the rest can connect to it as if they were on the same local network. Comfortable!
By the way, the program contains all the most popular (and not popular) games, for example, here’s a screenshot of the strategies:
Thanks to such room lists, you can easily find friends for many games. By the way, the program remembers “your rooms” that you entered. In addition, each room has a good chat that allows you to negotiate with all the players on the network.
Result: a good alternative to GameRanger (and perhaps GameRanger will soon be an alternative to Tungle, because Tungle is already used by more than 7 million players around the world!).
Of. website: http://www.langamepp.com/langame/
Full support for Windows XP, 7
This program was once unique in its kind: nothing simpler and faster to set up could simply be found. LanGame allows people from different networks to play games where such an option is not provided. And for this you don’t need an Internet connection!
Well, for example, you and your friends are connected to the Internet through the same provider, but in online game mode, you cannot see each other. What to do?
Install LanGame on all computers, then add each other’s IP addresses to the program (don’t forget to turn off the Windows firewall) - then all you have to do is start the game and try to turn on the online game mode again. Oddly enough - the game will start multiplayer mode - i.e. you will see each other!
Although, with the development of high-speed Internet, this program is losing its relevance (because even with players from other cities you can play with a very low ping, despite the lack of a local connection) - and yet, in narrow circles it can still be popular for a long time.
Hamachi
Works in Windows XP, 7, 8 (32+64 bits)
Hamachi was once a very popular program for organizing a local network over the Internet, used in many games for multiplayer mode. Moreover, there were very few worthy competitors.
Today, Hamachi is more needed as an “insurance” program: not all games are supported by GameRanger or Tungle. Sometimes, some games are so “capricious” due to the lack of a “white” IP address or the presence of NAT devices - that there are simply no alternatives to playing through Hamachi!
Overall, a simple and reliable program that will be relevant for a long time. Recommended for all fans of rare games and those connected to the Internet through “problematic” providers.
Alternative programs for playing online
Yes, of course, my list of 4 programs above did not include many popular programs. However, I was based, firstly, on those programs with which I had experience working, and, secondly, in many of them the online players are too small to consider them seriously.
For example, Game Arcade- a popular program, however, in my opinion, its popularity has been falling for a long time. There is simply no one to play with in many games; the rooms stand empty. Although, for hits and popular games the picture is somewhat different.
Garena- also a fairly popular program for playing on the Internet. True, the number of supported games is not so large (at least in my repeated tests - many games could not be launched. It is possible that now the situation has changed for the better). As for hit games, the program has gathered a fairly large community (Warcraft 3, Call of Duty, Counter Strike, etc.).
That's all, I will be grateful for interesting additions...
Size: 56.57 Mb, Eng, Cracked
DameWare NT Utilities - remote management of corporate systems on the Windows NT/2000/XP/2003/Vista platform, allowing administrators to bypass the limitations of Microsoft Management Console (MMC). DNTU includes a large number of Microsoft Windows NT administration tools, combined under one common centralized interface, and allows you to remotely manage Windows servers and workstations. Almost all of the standard utilities included with DNTU are accessible through an Explorer-style interface, and most have been enhanced to provide superior performance, added functionality, and ease of use.
TeamViewer 7.0.14563 Final RePack by elchupakabra |
Size: 5.55 Mb, Rus, Free
TeamViewer (teamviewer) is a software package for remote control of computers, file exchange between control and managed machines, video communications and web conferencing. TeamViewer runs on Windows, Mac OS X, Linux, iOS and Android operating systems. In addition to a direct connection, access is possible through a firewall and NAT proxy, and it is possible to gain access to a remote machine using a web browser. TeamViewer GmbH was founded in 2005 in Germany. According to company press releases, TeamViewer is used on more than 15 million computers operating in 50 countries around the world.
Updated version from 10/13/2012!
Hamachi 2.1.0.215 |
Size: 3.7 Mb, Rus, Free
Hamachi is software designed to build a VPN. Hamachi allows you to create your own secure network of computers connected via the Internet, as if they were connected by one physical local network. Hamachi allows you to create a local area network (LAN) on top of the Internet. Most often, Hamachi networks are used to connect servers with gray IP and client computers. By the way, this method significantly complicates the decryption of client traffic. Any applications that run over a local network can run over Hamachi networks, while the transmitted data will be protected and the exchange between them will be carried out in a peer-to-peer style.
10-Strike LANState Pro 6.11 |
Size: 13.34 Mb, Rus, Cracked
LANState Pro is a program for administering and monitoring servers, computers, and other network devices. The program can be useful for administrators and ordinary users of Microsoft Windows networks. Using LANState, you can monitor the current state of the network in graphical form, changing in real time, manage servers and workstations, and monitor remote devices by periodically polling computers. The monitoring mechanism with alarms allows you to receive timely alerts about various events - network problems, lack of space on servers, service failures, and so on.
MyLanViewer 4.9.3 + Rus |
Size: 4.68 Mb, Rus/Eng, Cracked
MyLanViewer 4.9.3 - A program for scanning and monitoring computers on a network, with the ability to search for publicly available files in their shared resources. It shows computers in an easy to view view that contains the computer name, IP address, MAC address, shares and other details for each computer. Using it, you can monitor computers on the network and receive an alert when the state of one of them changes. You can also see and manage your shared resources, deny them and close sessions to them. The program is easy to install and use, has a friendly and beautiful interface. After replacing the file, enter any registration data.
NetSetMan 3.0.2 |
Size: 2.82 Mb, Rus, Free
NetSetMan 3.0.2 - A new version of NetSetMan has been released, a free program that allows you to quickly switch between six different network configurations. The program will be especially useful for those who often switch from one network to another, because every time you need to connect to one specific network, you have to set the settings it needs. NetSetMan allows you to set parameters such as IP address, subnet mask, gateway, DNS server, computer name, workgroup, running scripts (BAT, VS, JS, ...), default printer, etc. in each configuration ., and then switch between them in one click.
Radmin 3.4 RePack |
Size: 15.23 Mb, Rus, Free
Raadmin 3.4 (Remote Administrator 3.4) - A program for remote computer management, allows you to work on a remote computer as if it were your own: its desktop will appear on your monitor screen (in a window or full screen), and your mouse and keyboard will replace the mouse and keyboard controlled computer. The Radmin program works so quickly that it allows you to control a remote computer even through a modem - the update rate even in this case can reach 5-10 frames per second; if the work is carried out via a local network, then it is possible to achieve real update time (about 100 - 500 frames per second). Russian and English versions of Radmin Server 3.4, which do not require
Radmin 3.4 RePack + Network Utilities |
Size: 23.94 Mb, Rus, Free
Radmin 3.4 (Remote Administrator 3.4) - This is a remote access system that allows you to work on a remote computer. You see the remote computer's screen in your own window or on its full screen. Your mouse or keyboard movements are transmitted to the remote computer. The Radmin program works so quickly that it allows you to control a remote computer even through a modem - the update rate even in this case can reach 5-10 frames per second; if the work is carried out via a local network, then it is possible to achieve real update time (about 100 - 500 frames per second). Russian registered version!
Lizard Systems Network Scanner 3.0.1 Build 135 |
Size: 2.06 Mb, Rus, Free
Network Scanner 3.0.1 - Allows you to scan your network and create a list of all machines currently connected to the network, with their IP addresses and host names. The program can scan each device for NetBios resources and\or HTTP and FTP server services and allows you to connect to context menu resources. Other features include multi-stream scanning for quick results display and export to html, txt and xml formats. Previously, the program was released under the name LanScope. The program remains free for home users, although free registration is now required.
Size: 14.8 Mb, Rus/Eng, Cracked
MyLanViewer 4.7.2 - A program for scanning and monitoring computers on a network, with the ability to search for publicly available files in their shared resources. It shows computers in an easy to view view that contains the computer name, IP address, MAC address, shares and other details for each computer. With it, you can monitor computers on your network and receive an alert when the status of one of them changes. You can also see and manage your shared resources, deny them and close sessions to them. The program is easy to install and use, has a friendly and beautiful interface.
Size: 3.94 Mb, Rus/Eng, Cracked
MyLanViewer 4.5.8 - A program for scanning and monitoring computers on a network, with the ability to search for publicly available files in their shared resources. It shows computers in an easy to view view that contains the computer name, IP address, MAC address, shares and other details for each computer. With it, you can monitor computers on your network and receive an alert when the status of one of them changes. You can also see and manage your shared resources, deny them and close sessions to them. The program is easy to install and use, has a friendly and beautiful interface.
MyLanViewer 4.5.2 + Rus |
Size: 3.72 Mb, Rus, Free
MyLanViewer 4.5.2 - A program for scanning and monitoring computers on a network, with the ability to search for publicly available files in their shared resources. It shows computers in an easy to view view that contains the computer name, IP address, MAC address, shares and other details for each computer. With it, you can monitor computers on your network and receive an alert when the status of one of them changes. You can also see and manage your shared resources, deny them and close sessions to them. The program is easy to install and use, has a friendly and beautiful interface.
MyLanViewer 4.5.0 + Rus |
Size: 3.92 Mb, Rus, Cracked
MyLanViewer 4.5.0 - A program for scanning and monitoring computers on a network, with the ability to search for publicly available files in their shared resources. It shows computers in an easy to view view that contains the computer name, IP address, MAC address, shares and other details for each computer. With it, you can monitor computers on your network and receive an alert when the status of one of them changes. You can also see and manage your shared resources, deny them and close sessions to them. The program is easy to install and use, has a friendly and beautiful interface.
Size: 4.09 Mb, Rus, Free
MyLanViewer 4.3.0 - A program for scanning and monitoring computers on a network, with the ability to search for publicly available files in their shared resources. It shows computers in an easy to view view that contains the computer name, IP address, MAC address, shares and other details for each computer. With it, you can monitor computers on your network and receive an alert when the status of one of them changes. You can also see and manage your shared resources, deny them and close sessions to them. The program is easy to install and use, has a friendly and beautiful interface.
Radmin 3.4 + Network Utilities
Size: 6.82 Mb, Rus, Cracked
Radmin 3.4 (Remote Administrator 3.4) - Remote administration programs for the Windows platform, which allows you to fully work on several remote computers at once using a conventional graphical interface. Along with support for the NT security model and localization into any languages, it is possible to work in file exchange and Telnet modes, which allows Radmin to be considered as an integrated solution for remote management of an organization of any size.
UserGate Proxy & Firewall 5.2.711 |
Size: 18.09 Mb, Rus, Cracked
UserGate - A program for connecting local users to the Internet via one external IP address. The proxy server keeps accurate traffic records (NAT), has a built-in firewall, Port mapping, Internet statistics system and Kaspersky Anti-Virus. The built-in firewall prevents unauthorized access to server data and local network by prohibiting connections on certain ports. The firewall functionality controls access to the necessary ports, for example, to publish a company's web server on the Internet.
The principle of creating a local network in any version of Windows (XP, 7, 8, 10) is practically nothing is not different. Exceptions are complex multi-level corporate networks, where several subnets, proxy servers and VPNs are used.
But in this article we will look at how to create home network without resorting to purchasing expensive equipment, but using a regular switch or router with Wi-Fi support.
What is needed to create a network
First of all, to create a local network of a certain number of computers, we need equipment:
note: if a direct connection is used (i.e. we insert a twisted pair cable into both devices without using a router), then you will need not a standard cable, but cross— over, except when modern network cards with MDI-X support are installed. In this case, you can use the standard crimping method.
How to create a local network
Now let's proceed directly to creation. First we need to prepare:
- Install all equipment in its place - computers, routers, etc.
- We crimp cable, if necessary.
- Let's do wiring, i.e. we extend the twisted pair to the equipment.
- Connecting twisted pair equipment.
Costs note, that when the connection is made and all devices are started, the connection connectors on the computers should shine. The same applies to routers with routers, only they have light bulbs located on front panel. If any light is not lit, then the connection has been made. wrong.
When the connection is made, you need to configure the network in the operating system.
To start checking working group, for which we go to properties " My computer" You don’t have to open the properties, but use the combination Win+
R and enter in the window sysdm.
cpl.
On all devices working group must be is the same, otherwise the computers will not see each other.
To change the group, just click on the button change and enter the group name. Name must be entered Latin alphabet, and match on all devices. 
Then we look for network icon in the notification area and with its help we get to Network and Sharing Center.
Here we are interested in the link change additional parameters, it's third from the left and will allow you to edit sharing settings. In each profile we select: Enable network discovery, auto-tuning And general access to files and printers. 
Scrolling page and below turn off shared access with password protection. All other settings can be left. Click Save changes and exit.
This completes the setup. The network should work, but only if your router distributes dynamic addresses.
If you used a router, or the devices were connected directly with a cable, then you need to make a few more settings.
Network settings
When direct connection or using a router, we need change IP addresses of computers. For this necessary:

We will not describe what each setting is responsible for, because... This is quite a large topic. It is enough to enter the addresses described above on all computers.
After making all the above settings, the network should work. However, do not forget that a firewall or antivirus software can completely block the network. Therefore, if nothing works, check their settings or temporarily disable them altogether.
Local network via WiFi router
Setting up a network through a router is absolutely nothing is not different from what we described above.
If the device is configured to distribute dynamic addresses, then there is no need to change the addresses. Well, what if IP users static, then you will have to use the previous section.
Also, there will be no difference between whether the device is connected by cable or via Wi-Fi; in most routers, the settings for distributing addresses are configured simultaneously and wireless and on wired connection.
How to make shared folders
After everything is configured, you need to create shared folders for information exchange.

However, this is not yet enough. Now on the folder properties window you need to find the bookmark safety. And then press successively Change – Add.
