Reinstalling ios on macbook air. Installing Mac OS on MacBook. Installing operating systems on different hard drives
In some cases, to restore your computer's functionality, Apple may need to perform a clean installation of the system. In the article below we will tell you about the features of this procedure.
The operation of installing an OS completely includes the steps of creating a backup copy of files, burning an installation flash drive, wiping the hard drive and directly installing a new version of the system. Let's start in order.
Step 1: Backup Files
A clean installation of the system involves completely deleting user information from the internal storage, so it is best to copy all important files (documents, photos, videos, program installers) to an external device or to cloud storage.
Attention! A Time Machine backup will not help, since it also saves settings that must be completely reset during installation!
It would be a good idea to check if your computer is linked to an Apple ID. To do this, go to "System Settings" from the Dock or through the Apple menu. 
Next click on "iCloud".
Check option status "Find Mac". If this feature is enabled, after a clean installation of the system you will be required to enter your Apple ID information to authorize and continue to use your computer. 
Make sure you remember these credentials.
Step 2: Create a bootable USB flash drive
The easiest way to reinstall the OS from scratch is using a bootable USB flash drive. To create it, you will need to download an image of the required operating system (for example, the latest macOS Mojave) from the Mac App Store and write it to a suitable flash drive. We have already covered this procedure in detail, so please refer to the relevant section of the material at the link below. 
Step 3: Clean up the main drive
The operation in question requires a complete formatting of the Mac's internal storage (HDD or SSD), which can be done in recovery mode.

Step 4: OS Installation
The actual procedure for installing MacOS is not difficult and is typical - follow the link below for a step-by-step description of this operation. 
The only note is that when the option is enabled "Find Mac" You cannot skip the step of entering your Apple ID.
What to do if the installation was incorrect and the computer does not work
If something went wrong during the installation process (for example, you accidentally turned off or rebooted the device, or there was a power outage), you can restore the device’s functionality through the same recovery mode: install a previously installed OS using a Time Machine backup or reinstall the system from factory settings.
Conclusion
As you can see, the procedure for a clean installation of macOS is quite standard, and the sequence of actions does not differ from those for other operating systems.
MAC OS, like Windows, sometimes requires reinstallation. This may be due to your MAC device being slow or due to it being sold (I don't think you'll be happy with a MAC being sold with your personal information on it). Or, on the contrary, buying a MACBOOK (PRO, AIR) or iMAC with a bunch of incomprehensible files or unnecessary programs. In general, there can be many reasons to reinstall MAC OS. In this article I will describe in detail how to reinstall MAC OS and get a “clean” operating system.
So, before you start, you need to transfer all the necessary information to external media, since after reinstalling MAC OS, it will be almost impossible to restore anything.
In order to reinstall MAC OS you will need:
1 MACBOOK (PRO, AIR) or iMAC connected to a power source;
2 Internet access from MACBOOK (PRO, AIR) or iMAC;
3 This article and about an hour of time.
To reinstall MAC OS using the method described below, you must be using OS 10.7 or higher (10.8, 10.9). In order to check what version of the operating system you have installed, click on the apple in the upper left corner and select "About this MAC". The window that opens will contain information about the installed version of MAC OS.
If you are using a version older than 10.7, you need to update it.

You should load "OS X Utilities", if this does not happen, repeat the procedure by rebooting and pressing the "COMMAND" + "R" key combinations.
Select Disk Utility.

IMPORTANT!!! The following steps will delete all data on your drive, so you need to be sure that the necessary files are not on the MAC.
Then select the disk with the system, open the “Erase” tab on the right and click the “Erase” button.

Confirm deletion by clicking the "Erase" button.

After that, close the Disk Utility window and select Reinstall MAC OS.

After this, confirm the installation, click the "Continue" button. With the release of the new OS X 10.10, OS X Yosemite will be installed.

In the next information window, click “Continue”.

The next step is to read the license agreement and accept it.


Then select the installation drive. In this case, the choice is obvious. Click the "Install" button.

After this, the MAC OS download process will begin.

After this, the MAC will automatically reboot and MAC OS installation will begin.

After the installation is complete, you will receive a “clean” MAC OS operating system; all that remains is to set some settings.
The next step is to select the country where you plan to use MACBOOK (PRO, AIR) or iMAC.

Select your keyboard layout.

You can connect to a Wi-Fi network (you can skip this step if you wish).

If you want to restore data made earlier using Time Machine or from a Windows computer, select the appropriate option; if you do not plan to restore anything, select “Do not transfer any information” and click “Continue.” The data that you transferred to external storage can be transferred later.

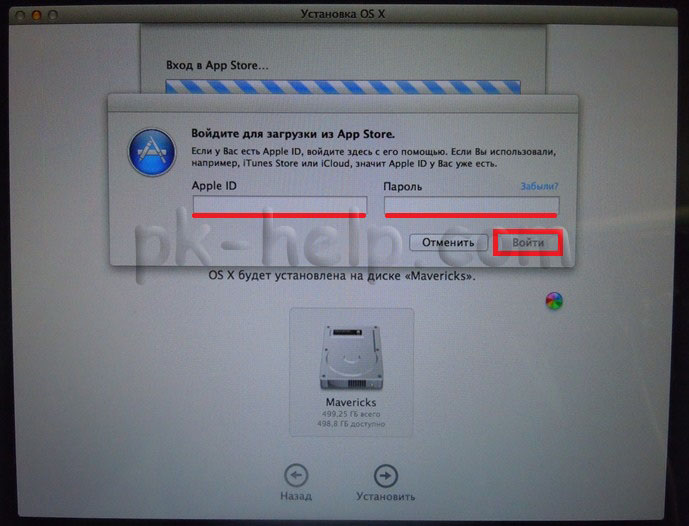
The next step is to sign in with your Apple ID. In this example I won't do that.

Then read the license agreement and accept it.

After this, provide your credentials (username and password) and click “Continue.”

The last step is to register your MAC (this step is optional).

And in the end you will get a "clean" MAC OS.
Video of reinstalling the MAC OS operating system on iMAC/MACBOOK PRO/AIR.
In my opinion, installing MAC OS is incredibly simplified, you don’t even need disks with the operating system - pressing a few keys + an hour of time and you have a “clean” MAC OS.
If you are lucky enough to pick up a used Mac from a friend or you are going to sell a Mac mini, iMac, Macbook, then it is advisable to reinstall the system so that there is no personal data left on the computer. But what if you don't know or have forgotten your account password?
In this article, we'll show you how to bypass this problem and restore your Mac to factory settings, even if you don't have the password.
To improve your device's performance, check out our tips for speeding up your Mac.
Restore password
Before you panic about a forgotten account password on your Mac, you should know that resetting it is not that difficult. Every Mac has a built-in recovery mode that will allow you to change your system password if you've forgotten it.
Check out our instructions for recovering your forgotten Mac login password.
Erase the contents of your Mac
Since you'll be completely deleting all content on your Mac, you'll need a USB drive with macOS ready or internet access that can download several GB worth of content, as this will be used to install macOS.
For more information on this, you can read our guide on how to reinstall macOS using USB or our guide on how to reinstall macOS in recovery mode.
Now you are ready to start. First you need to turn off your Mac. Then press the power button and immediately press and hold the keys Control and R until you see the Apple icon or spinning globe icon.
Release the keys and soon after you will see the macOS Utilities window.

There are four options in this window: Restore from backup Time Machine, reinstalling macOS, receiving help online And disk utility. Click on the last one, then select "Continue".
You'll then see a list of all the HD drives that are currently connected to your Mac. The left columns show the names, and the main panel shows the details of the selected drive.
Look at the section "Interior" for your main drive. It is often called Macintosh HD and appears at the top of the list. Click on it so it's highlighted, then click the button "Erase" from the options on the main panel.

A pop-up window will appear with several fields that you will need to fill out. The first is the name, in which you must enter the name of the disk, usually Macintosh HD.
Below are two drop-down menus. The first is the format in which to choose MacOS Extended (Journaled), and the second field is called Scheme, and here you need to select GUID Partition Map.
Finally, click "Erase", and the disk will be cleared of all users, applications and content.
Of course, to use the Mac after this, you will need to reinstall the operating system. To do this, return to the menu macOS utilities, select "Reinstall macOS" and follow the onscreen instructions.
Are you looking at buying an iMac or MacBook, but have you been getting used to the specifics and functionality of the Windows operating system for many years? Worried about how quickly you can get used to the Mac OS environment? Or perhaps you just want to explore Apple's operating system? For these purposes, it is not necessary to plunge into the dense jungle of the specifics of installing a Hackintosh PC if you are familiar with at least the basics of how VMware Workstation works. This hypervisor is the easiest way to run Mac OS on Windows. For this, there are ready-made virtual machines (VMs) on the network with the Apple system installed and configured. How to test Mac OS Sierra or High Sierra on VMware?
1. Ready-made Mac VMs for hypervisors
Ready-made VMs save us from a lot of hassle that we have to face when installing Macintosh on regular PCs and laptops. There is no need to install the Clover or Chameleon bootloader, search for kexts and special files like FakeSMC, or configure component emulation. There will be no need to wait for the system to install. All these efforts were taken on by the VM assemblers. We receive a ready-made virtual computer with already integrated guest OS add-ons and a user profile, which we can rename or delete if desired, creating another one.
Since Mac is officially prohibited from being installed on regular PCs and laptops, naturally, test builds of the operating system in the format of working hypervisor files will not be found on Apple’s official resources. But we can find them on Internet torrent trackers.
A VM with a Mac installed is essentially the same Hackintosh device. Lawyers and armchair experts on the topic can debate as much as they like about the existence of an offense under the conditions of using Macintosh on hypervisors, but this has nothing to do with the technical side of the issue. When working with a hypervisor, we, alas, will have to face both the problems of functioning of virtual OSs and problems of Hackintosh devices, such as lack of smoothness of interface effects, periodic brakes, certain functions or specific equipment not working due to the lack of drivers, etc. For a VM with a Mac, there are the same processor restrictions as for a Hackintosh - you need an Intel-based computer, preferably with support for SSE4.2.
Ready-made VMs exist for both VirtualBox and VMware. The latter benefit from greater convenience of working with a virtual Mac: guest OS add-ons work stably in VMware products, and we can configure shared folders with the main Windows, as well as the screen resolution we need.
2. Sierra or High Sierra
At the time of writing, there are ready-made VMs with the current Mac OS online:
Sierra (10.12) - version dated September 20, 2016;
High Sierra (10.13) – version dated September 25, 2017.
And perhaps there is already a VM with the latest version of Mojave (10.14). But it is Sierra that is considered the most stable version, suitable for experiments on a PC. It is the Mac OS Sierra VM that we will download and configure to work with VMware. And then we’ll capture it in a snapshot and update it to High Sierra through the App Store.
3. Downloading the VM
To download Mac OS Sierra VM files for VMware, go to RuTracker:
https://rutracker.org/forum/viewtopic.php?t=5287454
We add a distribution to the torrent client, and while it downloads the archive from the VM, we will perform some operation directly with the VMware hypervisor. In the description of the distribution, in the “Tablet” column, follow the link “VMware version 11 and higher.” If, of course, you have the current version of the hypervisor higher than 11 installed. Today the last one is the 14th.

4. VMware Unlocker for Mac Support
By following the link in the description of the torrent distribution, we download a certain archive called “unlocker210”. This is a VMware unlocker for Mac OS support. The fact is that VMware products do not natively support Macintosh as a guest OS. Actually, this unlocker210 is needed to solve this issue. Unpack the downloaded archive, find the win-install.cmd file in the folder and run it (important) as administrator.

Now VMware, among those supporting guest OSes, will be able to offer us Mac OS - any, up to the latest version 10.14.

5. Unpacking and setting up the VM
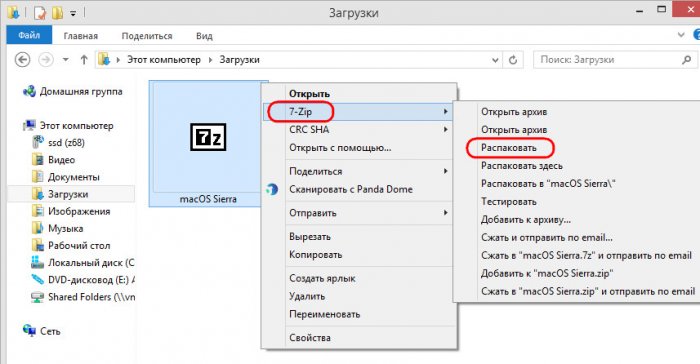
We unpack the archive downloaded by torrent using Total Commander or the 7-Zip archiver.
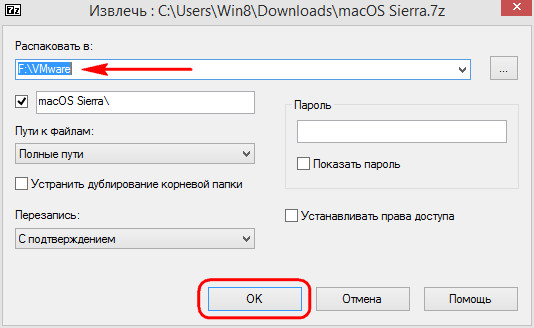
We indicate the unpacking path, which is also the path for storing VM files.

If you are using the latest version of VMware products, update the VM.


Click “Edit this virtual machine”, then “Finish”.

Now let's go to the VM settings.

We need the "Equipment" section. In the “Memory” tab, the builder set the amount of RAM to 2 GB. If the computer allows you to select more, select it.

Mac OS X Yosemite is a system introduced by Apple in 2014. This is the most current and advanced Mac OS among the systems offered by the manufacturer of Apple technology. We invite you to find out how it is done installation from scratch. We will also look at the issue of reinstalling the Yosemite system itself to restore factory settings.
What is the best way to install the system?
Mac OS X Yosemite is available in the Appstore. There are two options for installing it:
- On top of the old system;
- Clean installation from scratch.
You have the option to install Mac OS X Yosemite directly on top of the old OS X Mavericks. This is advisable if you value the current state of the file system, installed programs and their settings. All data will remain in the same place, changes will only affect the operating system. But the performance of many programs may be impaired. Compatibility and update issues can cause a lot of inconvenience.
Installing from scratch eliminates many system problems. Factory settings will be completely restored. This will help get rid of unnecessary installed applications, unnecessary data, etc. Let's look at this process in more detail.
Installing Mac OS X Yosemite from scratch
A clean installation places the system on a formatted hard drive partition. Another option is to use a new drive. The key step is to back up your critical data from your hard drive. You are invited instructions for installing the system from scratch.
System boot
Download OS X Yosemite from the AppStore. We don’t launch anything or try to install anything. We need a system image. Installation is carried out using a bootable USB flash drive.
Creating a USB flash drive

After downloading the update from the Appstore, proceed as follows:
- Launch Disk Utility;
- In the left panel, select the drive, on the right, go to the “Disk Partition” tab;
- In the "Partition Scheme" menu, select "Section 1". The disk name is "Yosemite", the format must be "Mac OS Extended (Journaled)".
- Go to "Options", select the GUID partition scheme. Click "Apply".
- Disk Utility begins formatting the flash drive.
- From the "Utilities" folder, launch "Terminal".
- To create a flash drive, run the following command:
- Enter the administrator password.
- It will take 10-15 minutes to create a bootable USB flash drive.
- After the procedure is successfully completed, reboot the Mac. When loading, hold down Alt.
- You are ready to install Mac OS X Yosemite.
Installing Yosemite
After creating a flash drive and rebooting the Mac, follow the instructions:
- Go to the "Downloads" menu and select "Mac OS X Installer".
- You need to open Disk Utility and select the disk with the system to format. Go to the "Erase" tab.
- In the "Format" menu, "Mac OS Extended (Journaled)" must be selected, and the name of the disk is written.
- Click "Erase", thereby starting the disk formatting process.
- Close Disk Utility and open the Install Mac OS X section.
- We specify the Yosemite boot disk and start the installation process.
Starting the installation process involves following the installer's instructions. Select the necessary parameters, the system will soon be ready for use. After installing Mac OS Yosemite, you can start using the system from scratch or transfer files from Time Machine.
Reinstalling Mac OS X Yosemite
If OS X Yosemite is already installed, you may need to reinstall it in the following cases:
- System failures;
- Errors when installing updates;
- Disk cleaning;
- The need to restore factory settings.
So, let's answer the question, how to reinstall Mac OS X Yosemite. To do this, you need to erase your Mac data and reinstall the system. Don't forget to back up your valuable files. To restore factory settings, you need to use the built-in recovery disk. To reinstall the system, an Internet connection is required, as well as a connected power adapter.
