Computer monitoring and remote control program. We connect remote access to a computer via the Internet. Using the Internet ID feature in Windows
Surely not every PC user (especially a beginner) knows that a computer can be safely controlled from a distance, and fully! Those. as if you are sitting and working at your own computer, but being at a distance, and doing it, for example, from a tablet or another computer. This is very convenient and, for example, I use this opportunity regularly. Why do I need it? I work a lot on the Internet, but I can’t always sit at my computer. Sometimes you need to go somewhere or to someone, but some urgent business appears and I need my computer to open some program, run something, look. Carrying a computer with you always and everywhere is very problematic. It weighs about 4 kg, which feels good when carried :) But on the other hand, I always have a tablet or smartphone with me, from which I can connect to my computer at any time and from anywhere, which I leave at home turned on. And in this way, I can work on it as if I were at home. Another reason for remote access is the ability to ask some friend or colleague to help you deal with any problems in the settings, programs on your computer through remote access. Also, you yourself can help someone solve some problem on a computer by connecting remotely to this person. And last but not least… It happens that desired computer located in a hard-to-reach place or you need to go to it. In this case, it is also easiest to connect to it remotely and you're done!
This article of mine will just talk about how to remotely control a computer from any device, and with the help of this guide you will learn how to do it easily even as a complete beginner! We will consider the most, in my opinion, the most convenient program for this business - TeamViewer, and today I will talk about its main most necessary and useful functions. Yes, it is also free for non-commercial use! There are only 2 conditions for remote control of devices: the presence of an Internet connection on both devices, and the presence of the TeamViewer program on both devices.
To date, the TeamViewer program is supported, one might say, by all devices:
Smartphones based on Android operating systems, Windows phone 8;
Tablets on the same Android systems, Windows Phone 8;
iPad of all modifications;
Computers based on the operating system Mac, Linux, Windows.
For all these devices, you can download the TeamViewer application for free.
It is also interesting that you can manage and vice versa - smartphones and tablets from a desktop computer.
So, let's start step by step to deal with the program, starting with the process of its installation.
Installing TeawViewer
First you need to download the program itself. It is best to download from the official website, as the latest version will always be posted there. We go to the official TeamViewer website at the link:
teamviewer
At the top of the page that opens, you can’t help but notice the large “Free full version” button. Here we press it:
After downloading the file, find it on your computer and run it. The file will have the name: "TeamViewer_Setup_ru":
In the next window of the program, you will be prompted to select the option to use TeamViewer. These settings can be changed at any time after installation. If you want to control this computer (on which you are installing the program) remotely, then immediately select the appropriate item. Otherwise, just choose "Install".
Below it is necessary to select the item “Personal non-commercial use”, since the program is distributed free of charge only for such a use case.
At the end, check the box "Show advanced settings" and click the "Accept - next" button:
Windows User Account Control may ask you for confirmation to continue with the installation. Just click "Yes":
In the next window, check the path where the program will be installed, and change it if desired. But I recommend leaving the default path. The options below can be omitted. All of them, if necessary, can be set after installation. Press the "Finish" button:
A quick process of installing the program will begin, which will take from a few seconds to a minute.
This completes the installation of TeamViewer! Let's move on to its settings and application.
Setting up TeamViewer
Setting up uncontrolled access to the computer:

Now we can freely control this computer from any other device, wherever we are in the Internet access zone :) But for this we will deal with the information that we (or anyone else) need to know so that we can connect to this computer remotely.
Data required for remote control of any device:
Perhaps the most important thing is to know the data by which you can connect remotely to the current computer.
To connect to this computer from another computer / device with TeamViewer installed, you only need to know:
ID of this computer;
The password to access this computer through TeamViewer (not to be confused with the Windows login password!).
All this data is located in the main window of the program:
According to my example (see the image above), in order to remotely access this computer at the moment, I need to point to remote device ID: 900 288 832 and password: 6sx71k.
The ID in TeamViewer for each specific computer does not change. Those. the one that is indicated in the window you and will always indicate when connecting remotely. And there are 2 types of passwords in TeamViewer: temporary (random) and personal (permanent). Now more about this:

I hope you understand the difference in passwords :)
Now let's go through the main most important settings of the program.
Basic program settings:
To go to all the program settings, open the "Additional" menu at the top and select the "Options" item:
We will immediately go to the "Basic" tab. Here you can enable or disable the automatic launch of the TeamViewer program when Windows boots. If you are going to control this computer remotely, then I strongly recommend leaving this item enabled. Then you do not have to start TeamViewer manually, and even more so if you are far away and TeamViewer is not running on this computer, you will not be able to connect to it.
Below you can see a message that you are linked to the previously created account. If you click the "Delete" button, you can break this link.
On this tab, there are no more important settings that are not set by default. Go to the next tab "Security".
On the "Security" tab, we can change the "Personal" password by entering a new one and repeating it at the very top. Below you can set up a "random" password by giving it the number of characters. By default, such a password will always be issued from 6 characters.
In the last section, “Rules for connecting to this computer,” you can allow or deny remote login using Windows password. It is safest to leave this parameter at the default, i.e. - "Is not allowed". The easiest way to connect is through the TeamViewer password and it will be safer that way.
Tab "Remote control". There are important settings here. All these settings are global - i.e. for any connection. But if you created for yourself account(as mentioned), then for each computer added to your personal list, you can set your own connection settings, but more on that later.
Here's what the settings on this tab look like:
At the very top, you can adjust the image quality when connecting to a remote computer. It is better to leave either "Automatic quality selection" or "Optimize speed". I always set speed optimization to connect to a remote machine and work with almost no delays even through Mobile Internet. There is only one minus - the image quality (how we see the remote computer) will not be the best, but sometimes this is not even noticeable.
Below, as you can see, the option "Hide wallpaper on a remote machine" is enabled. This means that when you connect to a remote computer, the desktop background there will simply turn black. I always leave this option enabled so as not to waste resources on loading a sometimes large background image.
Even lower are additional settings that are configured for everyone according to their preferences. For example, if the "Play computer sounds and music" function is enabled, you will accordingly hear all the sounds of the remote computer.
It can be useful to enable the "Transmit keyboard shortcut" option. If this option is enabled, then by connecting to a remote computer, you will be able to use your usual keyboard shortcuts. For example, a quick opening of the task manager is “Ctrl + Shift + Esc”.
In general, here you set it up as you need.
Let's go to the "Computers and Contacts" tab.
On the "Computers and Contacts" tab, your account settings will be displayed, in which all the remote computers and users you have added will then be visible. On this tab, you can change account information, as well as computer display settings.
On this we have analyzed the basic settings. Now let's move on to the main thing - remote computer control.
The principle of remote computer control
We can control a computer or any other device (TeamViewer must also be installed and configured on them!) We can, as I said, from anywhere where there is access to the Internet and it is enough for us to know the ID of the controlled device and its password (random or permanent ). Knowing these 2 parameters, we can control the computer.
Let's try to connect to the computer remotely:
Specify the password if you know the "personal" password of the remote computer. Otherwise, leave the field blank.
Specify the network name of the remote computer (for your own convenience). It will be displayed in the list of your computers.
Optionally, you can specify a description of the added remote computer for convenience, if you have a large list of them.
In the "Window" list, I selected "Full Screen". This means that when connected to a remote computer, TeamViewer will display the remote computer in full screen. It will look like you are fully working on that computer. You can also select another option, such as "Windowed Mode", and then the remote computer will be displayed in the window.
In the "Quality" list, I always select "Optimize speed" so as not to sacrifice performance, especially when connecting with slow internet.
"Identification Mode" is best to always set to "TeamViewer Identification". Then it will be enough for you to know the password set for this or that computer in the TeamViewer program to connect to it.
In the main TeamViewer window, where the "Manage computer" section is located, specify the ID of the computer that we will manage in the "Partner ID" field.
If you created an account, then we can immediately add the computer to our Favorites list by clicking the star button:
We will see a window for accessing the computer that we add to the list:
In the image above, I have marked those fields and lists where it is best to make changes:
The remaining settings can be left with the value "Inherited", because, as a rule, there is no need for them and, in extreme cases, you can configure them at any time.
When the settings are set, click the "OK" button.
The computers that you will add to your list will be visible in a separate window, as in my example in the image below:
In the example, I added a computer named "Test TeamViewer".
Now that the computer is on the list, to connect to it, simply double-click on its name with the left mouse button. If you immediately specified the password, then it will not be requested and the connection will immediately occur (within a couple of seconds).
Another way to quickly connect to a computer, if for some reason you did not create an account and do not add computers to your favorites list, is to simply enter the ID in the appropriate field and click "Connect to partner":
By default, the "Remote control" mode is just what we need. And we can turn on the “File Transfer” mode at any time already during a remote session.
Now a window will be displayed where you need to enter a password to connect to a remote computer:
Enter the password and click the "Login" button.
The connection usually takes a couple of seconds, but it depends, respectively, on the speed of the Internet on both sides. After connecting to a remote computer, the window will look like this:
As you can see, the screen of the remote computer is black. As you probably remember, in the settings we left the option "Hide wallpaper on a remote machine" enabled. As a result, the wallpaper on the remote machine turned black, which will reduce resource consumption, and immediately after disconnecting from the remote computer, its desktop wallpaper will return to its previous appearance.
It's so simple and easy to connect to a remote computer :)
You will be able to fully control the computer at any distance, and at the same time it will look exactly like you are sitting at that computer.
Let me remind you once again that the same can be done from almost any device. If you, for example, have an iPad, then download TeamViewer to it (it's always free!), enter the ID and password of the remote computer, and that's it! You will connect and be able to control it directly from the tablet, and it is also very convenient!
Now let's look at some of the functions available to us during a remote session.
Functions available during a remote work session on a computer using TeamViewer:
So, we are connected to a remote computer. Above we see a panel with a set of functions. Let's go through the most important of them:
The button numbered "1" allows you to immediately break the connection with the remote computer.
After any end of the TeamViewer session on both devices, a window will appear stating that the free session has ended. Just always click "OK":
You can also instantly disconnect the connection while at that remote computer. For example, someone remotely assists you in setting up the system or fixes some kind of problem. If suddenly that person began to do some actions on your computer that, in your opinion, he absolutely does not need to do, then you can break the connection with just one button in the form of a cross (see image below):
The button numbered "2" allows you to hide this panel of remote session functions.
The button numbered "3" allows you to instantly switch to full screen mode, which I use in 99% of cases.
A very useful feature is file transfer with local computer to remote and back. You can do this with a simple drag and drop. desired files from your computer window to the remote computer window.
Another way is to use a special manager - "File Transfer". It opens from the same panel, which is pinned at the top. Select "File Transfer" and then "File Transfer" again:
A special manager will open. There is also nothing complicated here. We indicate from which folder of the local computer the file will be transferred, then we specify the folder where exactly the file will be transferred to the remote computer. Then we select the file itself on the local computer, which we will transfer and click the "Submit" button:
The file will be transferred to the remote computer. In my example, I transferred an image file called "" from the Downloads folder to the desktop of a remote computer:
After transferring the necessary data, the file transfer manager can be closed, and a window will appear with statistics on the transfer of your files, where you need to click "Close" again:
Or you can hide this window.
There are 3 more very useful features that are available during a remote session. This is the possibility of voice communication, video broadcasting and chat support.
All these 3 functions can be activated by selecting the Audio/Video menu:
Here you can change the scaling, for example, enable full screen mode. Here, in the “Quality” submenu, you can select the quality you need to display content on a remote computer, for example, by turning on “Optimize speed”. Also here you can change the resolution of the remote computer (for example, if the resolution of your local computer is very different) and show / hide the wallpaper on the remote machine. Everything else is not so essential and necessary ...
Well, here, perhaps, is all the most useful thing you need to know about how to remotely control a computer using TeamViewer :) Cool program, isn't it? :)
Most importantly, it is extremely simple, convenient, even a beginner can handle it. And, of course, it's free! In general, to be honest, I have not seen a better worthy replacement for the TeamViewer program.
And now I think that in a couple of weeks I will already draw up an article, and you will be able to get acquainted with the next testing of the new autoclicker!
Well, now I say goodbye to you for a week ... Good luck to you and always in a good mood! ;)
There are many programs on the network for remote control of a computer. And all of them are somehow paid with various restrictions for the free version.
However, the Windows operating system has built-in functions that allow you to remotely control your desktop and this tool is called "Windows 7 Remote Assistance" and if you use it as described in the manual, then this is an extremely inconvenient tool. Since for each communication session it is required to create an invitation file and send it to the person who will connect.
And it's still okay if you're doing a one-time Internet connection to solve a problem. And if you need to constantly connect to the computer, then every time you ask the user to create and send an invitation file, it's overhead. Therefore, let's consider a mode that is designed to manage client machines in local network without sending an invitation.
The standard algorithm of the program is as follows. First you need to allow control (My computer \ RMB \ Properties \ Advanced system settings \ Allow connections to this PC \ Advanced \ Allow control \ Set the time limit during which the invitation will remain open)
Now you need to create an invitation file through which you can connect to the desktop via the Internet (Start \ All Programs \ Services \ Windows Remote Assistance \ Invite someone you trust to help \ Save invitation as a file). We save the file on a public resource or send it via the Internet along with a password!
Next, launch Remote Assistance on the computer from which we will connect ( Start\All Programs\Services\Windows 7 Remote Assistance, in Windows 10 and 8, access to the assistant was removed from the menu, so you will need to run it through Run (Win + R) \ msra \ Help the one who invited you \ Use the invitation file \ Enter the password \ Next, the client must allow you to view your desktop \ Request control, to be able to control the mouse and keyboard )
How do you see, this process quite long and not comfortable. Therefore, let's set up remote assistance without the need to send an invitation file. But, this method will only work on a local network, in which you can directly connect to a computer via an IP address. If you need to connect via the Internet, you will have to generate an invitation file!
To configure remote access on all computers, I will use the domain group policy. As you already understood, I demonstrate the work of remote assistance in the virtual network that we created as a result of completing the free video course "Installation and configuration Windows Server 2008R2. Although this method is designed to work in a domain network, it is also suitable for working in a workgroup or peer-to-peer network.
Let's go to the Group Policy settings (Start \ Administrative Tools \ Group Policy Management \ Domains \ office.local \ Default Domain Policy \ Settings \ PCM \ Edit \ Computer Configuration \ Policy \ Administrative Templates \ System \ Remote Assistance).
Here you need to configure 2 parameters:
Help Request \ Enable \ Helpers can control the computer;
Offer Help \ Enable \ Helpers \ Show \ Value (enter the name of the user account that will have access to connect to the computer, specifying the domain): office\sysadmin.
Now we need to apply the policy to the computers, we can either restart the workstations or force the policy update via Run \cmd\gpupdate.
Let's try to connect to the workstation, for this you need to start the "Remote Assistance" in the mode of offering help. To do this, add the /offerra key to the program name, resulting in msra.exe /offerra. It's best to create a shortcut with the msra.exe /offerra command!
We enter the IP address or domain name of the computer to which we want to connect, we allow access to the connection, and then to management! You can also launch the "Conversation" chat to chat with the user.
As you can see, with this method, no user manipulation is required, except for permission to connect and manage, and it's completely free! If you are interested in the implementation of this method in the working group, then write in the comments, if the topic is popular, I will make a video for working group.
As you understand, in order to connect to a computer, you need to know its IP address or DNS name. If the user is weak, it will be difficult for him to explain where to look at the IP address of the machine. In this case, I use the BGinfo program which adds various parameters to the desktop wallpaper. I already did it too.
I would add the following here, in the video for this program I made a black background so that the characteristics could be seen on the wallpaper of any color. But, you can simply duplicate the address in white and black. Thus, the user will in any case see the required settings.
PC remote control programs are well known to any system administrator or technical support employee, since in their daily activities they are constantly faced with the task of administering servers and PCs of local network users. The most common utility for remote PC control is, of course, Remote Desktop Connection, which is included with the Windows operating system. This fact is explained not so much by its functionality, but by the fact that it is an integral part of the OS, and therefore it is not necessary to purchase it separately. As for the functionality of this utility, in practice it is usually not enough, so specialized third-party software packages are often used. In this article, we will consider specialized software packages designed for remote control of computers.
If you try to classify remote control programs, then they can be conditionally divided into two types: utilities that provide access to the desktop of a remote PC, and utilities that provide access to the command line of a remote PC. The first of these provide users with the ability to work with a remote PC in the same way as with a local one. Utilities of the second type allow you to automate network operation by running the same or different applications on several selected network computers, as well as, for example, creating a schedule for launching programs on remote PCs. It is completely pointless to try to compare these two types of utilities, as they are used in different situations and for different purposes.
Note that most remote control programs operate on the "client-server" principle, that is, they imply the presence of the server and client parts of the program, which are respectively installed on the managed computer and on the PC from which the control is performed. To gain control over a remote PC, it is necessary that the appropriate program module (server part) be launched on it. Some remote management utilities allow you to remotely install the server part (if you have the appropriate administrative rights), and sometimes this procedure is completely transparent to the local PC user (as a rule, in this case, the server part is installed as a service on a remote PC). But some utilities require a "manual" installation of the server part of the program.
In this article, we will present to your attention remote control programs focused on use with Windows platforms. It should be noted that in the process of preparing the publication, we looked at several dozen utilities for remote control of a PC (fortunately, finding them on the Internet is not difficult). However, as it turned out, not all utilities are efficient and generally deserve mention. Therefore, we will focus only on those that really work and have been tested by us in a real local network.
Anyplace Control 3.3 (www.anyplace-control.com )
Anyplace Control 3.3 is a client-server application.
The Host module is installed on the managed PC, and the Admin module of the program is installed on the PC from which control is performed. Of course, it is possible to simultaneously install both modules on any PC in the local network. But the most interesting thing is that the Anyplace Control 3.3 program provides the ability to remotely install the Host module on any computer on the local network. And all that is needed for this is to select a computer on the local network and start the procedure for remote installation of the Host module. Naturally, for this you need to have administrator rights.
Note that the Anyplace Control 3.3 program supports the Russian-language interface.
Anyplace Control 3.3 allows you to work in two modes: view and control. In the first mode, it is possible to display the desktop of a remote PC on the screen and observe the user's actions, and in the control mode, it is possible to completely intercept control of the remote PC. An interesting feature of the remote control mode is that the work of the remote PC user himself is not blocked. However, in both modes, the user of the remote PC receives a notification in the form of an icon in the system tray that his computer is "under the hood".
To connect to a remote PC, you must first select it from the list. The built-in scanner allows you to display all computers on the local network (domain or workgroup), and you can configure the filter to display only PCs that already have the client part of the program installed, that is, those that you can connect to.
After selecting the computers to which you want to connect, they are added to the list and become available for remote management (Fig. 1).
Rice. 1. The main window of the Anyplace program
Control 3.3 with a displayed list of computers,
The undoubted advantage of this utility is that it allows you to remotely control several PCs at the same time. In this case, it is possible to simultaneously execute commands such as shutdown, reboot and end the user session on managed PCs.
To prevent unauthorized access to the PC during the installation of Anyplace Control 3.3, you can set a password to access the managed computer. Other interesting features of the program include setting up traffic encryption for remote PC control and the use of a shared clipboard between the managed computer and the PC from which the control is performed. True, it will not work to transfer pictures through this buffer, but text fragments are transferred without problems.
In conclusion, we note that the demo version of Anyplace Control 3.3 is valid for 30 days after installation. Price full version program depends on the number of PCs on which it is installed, at the rate of $17.5 per PC.
Access Remote PC 4.12.2 (www.access-remote-pc.com )
The Access Remote PC 4.12.2 utility also belongs to the category of client-server applications and allows you to intercept the desktop and get full access to any PC where the server part of this program is installed from any other computer (Fig. 2). Note that the server part of the program is installed on the managed PC, and the client part is installed on the computer from which the control is performed. When installing the server part of the application on computers subject to remote control, the user name for which remote control is authorized and the access password are specified.

Rice. 2. Transfer files between computers
in the Access Remote PC 4.12.2 utility
The Access Remote PC 4.12.2 program provides the ability to control computers both over a local network and over the Internet, and even through modem connections. With remote control of the computer, the work of the local user is not blocked, and the local user can find out that the computer is controlled from the outside, as well as who exactly controls the computer, by the icon in the system tray. In addition, the server part of the program allows, if necessary, to disconnect all remote users from the PC, change passwords, and view statistics for each remote control session.
Access Remote PC 4.12.2 provides two modes of operation: full control mode of the remote PC and monitoring mode.
The disadvantages of this utility include the impossibility of remote simultaneous control of multiple PCs using a single interface. However, you can run multiple connection sessions at the same time (each in its own window), and then you can manage multiple remote computers. Another disadvantage of the program is the impossibility of remote installation of its server part.
The advantages of Access Remote PC include the fact that it can work with firewalls, supports dynamic IP addresses and, importantly, practically does not slow down even on slow network connections, including modem ones. In addition, this utility allows you to easily transfer files between computers, for which a special Transfer Files mode is provided (Fig. 2), and also supports working with the clipboard, that is, it allows you to synchronize clipboards on a local and remote PC, which simplifies the transfer of text fragments between PC. Another advantage of the program is the support for encryption when transmitting data using the RC4 algorithm with a 160-bit key.
The free version of the program is fully functional, but the number of launches is limited - only 30 times.
LanHelper 1.61 (www.hainsoft.com)
LanHelper 1.61 (Fig. 3) is a small utility that allows you to automate the process of managing a local network.
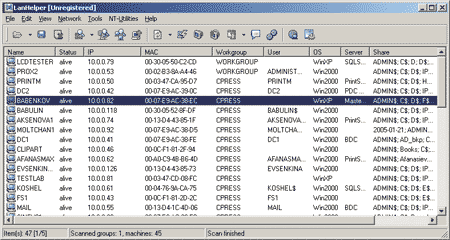
Rice. 3. Main window of LanHelper 1.61 utility
With its help, you can remotely shutdown or restart several computers on the network at the same time. Applications can be launched on remote PCs (if they support launching from command line), in addition, the simultaneous launch of the same applications on a group of managed PCs is supported.
The LanHelper utility has a built-in set of commands that can be executed on remote PCs (Figure 4). At the same time, it is possible to specify the time when the application is launched, and the time interval according to which applications are launched on the PC (minimum interval 1 minute). You can also schedule applications to run on remote PCs. The most important advantage of the program is that it does not require installation of the client part on remote PCs to implement all its features.

Rice. 4. Remote command execution
simultaneously on multiple computers
using the LanHelper 1.61 utility
In addition to remote command execution, the LanHelper 1.61 utility allows you to view, start and stop various services on remote PCs (Fig. 5), as well as send messages to users (to implement this feature, you must activate the Messenger service on all PCs).

Rice. 5. Working with services on a remote PC
using LanHelper 1.61 utility
To implement the ability to run applications and execute commands on remote PCs, you must have administrator rights.
The demo version of LanHelper LanHelper 1.61 has a limited validity period of 30 days and a license price of $49.95.
DameWare NT Utilities 5.5.0.2 (www.dameware.com)
DameWare NT Utilities 5.5.0.2 is a powerful remote LAN administration system. It is based on a set of utilities Microsoft Windows NT administration utilities, united by a very convenient single interface. Most of the utilities included in the Microsoft Windows NT administration utilities set have advanced features, and in addition, it contains a number of unique utilities. In particular, the package includes the DameWare Mini Remote Control utility, which allows you to fully control the desktop of a remote PC, as well as a utility for implementing command line mode on a remote PC.
When DameWare NT Utilities 5.5.0.2 is launched, the entire network is automatically scanned and the main program window displays all available domains and workgroups, as well as computers in the selected domain/workgroup (Fig. 6).

Rice. 6. Main window of DameWare NT Utilities 5.5.0.2
Let's briefly list the features of the DameWare NT Utilities 5.5.0.2 package: with its help, you can view information about hard drives on remote PCs, get acquainted with the contents of the Event Log, view information about connected printers, about running processes and services, about installed apps, collect detailed information about PC configuration, receive service information about PCs activated by users, and much more. There are also additional features: you can quickly edit the registry on a remote PC, send messages to users via the Messenger service, remotely shut down or restart computers, and, as already mentioned, take full control of a remote PC through the command line or desktop.
The undoubted advantage of this software package is that for the implementation of remote control it is not required to manually install the client part of the program on a remote PC. When you try to control a remote PC through the desktop or command line, DameWare NT Utilities 5.5.0.2 automatically prompts you to install and start the required service on the remote PC. In this case, the user of this remote PC will find out about the control interception in a pop-up window that displays information about which PC the remote control is being performed from.
The advantages of DameWare NT Utilities 5.5.0.2 include the ability to simultaneously connect to multiple computers to manage them, as well as the fact that the remote control does not block the work of a local user.
All in all, this software package is a powerful and convenient network management tool.
The demo version of the program is fully functional, but with a limited validity period of 30 days. The price per license is $289. Alternatively, you can purchase the DameWare Mini Remote Control package separately for remote control of computers via the desktop, one license will cost $89.95.
Omniquad Instant Remote Control 2.2.9 (www.omniquad.com )
The current version of the Omniquad Instant Remote Control utility - 2.2.9 - is far from new, but still remains one of the best in its class.
The Omniquad Instant Remote Control 2.2.9 utility allows you to get full control over a remote PC through the desktop. A distinctive feature of this utility is that it does not require installation of the client part on the managed PC. When accessing a remote PC, the corresponding service is initially launched on it in hidden mode, and the user of the PC controlled using this program does not receive any notification and has no way of knowing that control of his computer has been intercepted. This allows you to use this utility for covert monitoring of user actions. Note that not all remote control utilities have the ability to control a PC without prior notice to the user.
When the program starts, the network is automatically scanned, and the computers in the network environment are displayed in the main program window (Fig. 7). After selecting any computer by pressing the Remote Control button, control of the remote PC is intercepted. The work of the local user is not blocked. In addition, it is possible to launch this utility in the mode of monitoring the desktop of a remote PC.

Rice. 7. The main window of the Omniquad Instant Remote Control 2.2.9 utility
Note that for remote control, you must have the appropriate rights to access the PC. If you use a firewall (Firewall) on a remote PC, you must open port 6003, which is used by this utility by default. In addition, you can assign any other port to Omniquad Instant Remote Control (and open ports can be scanned).
The disadvantage of the program is that it does not support simultaneous connection with several remote computers.
The demo version of the utility has a limited validity period of 30 days, the license price is $39.
EMCO Remote Desktop Professional 4.0 (www.emco.is )
In terms of functionality, this product (Fig. 8) is somewhat similar to DameWare NT Utilities 5.5.0.2. The EMCO Remote Desktop Professional software package is a set of functional tools for implementing remote control of a local network and monitoring its status.

Rice. 8. Main window of EMCO Remote Desktop Professional utility
When you start the program, you can activate a network scanner that allows you to collect detailed information about all computers on the local network, about applications installed on them, running processes, versions of the operating system, installed equipment, etc. In addition to automatically collecting information about network computers (this process takes a long time), PCs can also be added to the list manually.
The package allows you to remotely start and stop services, restart and shut down computers. The most interesting feature of this program is the ability to gain full control over a remote computer - to do this, just select the desired computer in the list and go to the Viewer tab. If you are managing a computer for the first time, then you need to install the NetServer service on the remote PC. This procedure is carried out remotely and is completely invisible to the local user. Once the NetServer service is running on a remote PC, you can connect to it, take full control of the management, and then work with the remote PC in the same way as with the local one. When managing a computer remotely, the work of a local user is not blocked; however, if you use the mouse at the same time, it is unlikely that anything will work.
Because the local user is not notified that the computer is being controlled from outside, EMCO Remote Desktop Professional can be effectively used to covertly monitor user activity.
Another important advantage of the program is that it allows you to remotely control multiple PCs at the same time. In this case, a special window is assigned for each connection session with a remote PC.
Among the shortcomings of this program, we note the complexity of its configuration when using Windows XP SP2 on a managed PC. Moreover, as practice shows, the need for configuration depends on which patches are installed. Of course, the program comes with step-by-step instruction those changes that will have to be made in this case (more precisely, the program downloads the appropriate instructions from the site), but all this is rather inconvenient and impractical.
The demo version of the program is designed for 30 days and supports only 25 computers on the local network. The package price depends on the number of computers in the network: 50 computers (minimum quantity) - $135; 1000 computers - $1295
Radmin 3.0 Remote Control (www.radmin.com)
Of all the products we reviewed, Famatech's Radmin 3.0 Remote Control utility is the "freshest" - its a new version came out in early 2007.
This utility is designed to monitor and gain full control over a remote PC within a local network.
Radmin 3.0 Remote Control is equipped with only the most necessary tools for managing a remote PC and is very easy to configure (Fig. 9). Thanks to this, it is easy to master it. The utility works on the principle of a client-server application and includes two parts: the first (server) part is installed on the managed PC, and the second one is installed on the PC from which it is controlled.

Rice. 9. Main window of the Radmin 3.0 Remote Control utility
The disadvantages of the program include the lack of built-in tools for remote installation of the server part (Radmin Server) on a managed PC, so if you need to gain control over any PC on the network, you will first have to install the appropriate module on it locally.
A serious, in our opinion, disadvantage of this utility is the lack of a built-in network scanner, which does not allow you to get a list of PCs that you can connect to.
Well, the last drawback that was discovered during testing of this program is that for the utility to work correctly, you need to configure or simply disable the Firewall on the managed PC if it uses Windows XP SP2.
The utility works in several modes: file transfer, full control, view only, Telnet, shutdown and command line mode. There is a built-in file manager, with which files are transferred from one PC to another. The program keeps statistics of the traffic used and can encrypt data.
With the help of Radmin 3.0 Remote Control, you can manage both one remote computer and several at once, while each one has its own password. To provide an increased level of security, you can take additional precautions: enable password protection and create a list of banned IP addresses.
The latest version of the program has a lot of interesting innovations:
- support for Windows Vista;
- text and voice chat with the possibility of conferences and private messaging and password protection;
- enhanced security that provides protection against attacks and protection of active data on the network;
- different access rights for each user;
- IP filters to restrict access to specific IP addresses and subnets.
In general, it should be noted that this utility loses in its functionality to similar remote control utilities. The lack of a built-in network scanner, the need to install the Radmin Server module locally - all this significantly limits its functionality.
In conclusion, we note that the cost of a license for Radmin 3.0 Remote Control is $49 per PC.
Atelier Web Remote Commander 5.59 (www.atelierweb.com)
Atelier Web Remote Commander 5.59 (fig. 10) is a small utility that, by design, should provide complete control of a remote PC. It consists of two parts and works on the "client/server" principle. In addition, it provides the ability to remotely collect information about the hardware configuration of a PC, etc. However, it hardly makes sense to list all the features of the utility in this case, since it is so crude that it is unlikely to be used.

Rice. 10. Information window of the utility
Atelier Web Remote Commander 5.59
Of the obvious shortcomings, one can single out the lack of reference. In addition, the program does not have a built-in network scanner, which makes it necessary to explicitly enter the name or IP address of the computer to which you want to connect, which is extremely inconvenient. But the main drawback is that in order to connect to a remote PC, you first need to install the appropriate program module on it (there are no built-in tools for remote installation) and somehow configure it.
Unfortunately, no matter how we set up the program, we did not succeed in making a remote connection (the connection was made via a local network between two computers with operating system Windows XP SP2). Although the program is paid (the demo version has a limited validity period), it is absolutely useless and inoperable. Our verdict - "into the furnace" such programs.
Remote Desktop Control 1.7 (www.remote-desktop-control.com )
The Remote Desktop Control 1.7 program belongs to the category of client-server applications, that is, the Host module of the program is installed on the managed PC, and the Admin module is installed on the PC from which control is performed.
According to its interface (Fig. 11) and functionality The Remote Desktop Control 1.7 package is very similar to Anyplace Control 3.3, but it also has some important differences (and for the worse), for example, it lacks the ability to remotely install the Host module on any computer on the local network. In addition, for the Remote Desktop Control 1.7 package to work, it is necessary to configure the Firewall on the managed computer (to add the program to the list of allowed ones), while the Anyplace Control 3.3 program does this automatically.

Rice. 11. Main program window
Remote Desktop Control 1.7 with a displayed list of computers,
to which you can connect remotely
In terms of functionality, Remote Desktop Control 1.7 is similar to Anyplace Control 3.3: it allows you to work in two modes: view and control; in view mode, you can display the desktop of a remote PC on the screen and observe user actions, and in control mode, you can completely intercept control of a remote PC.
Utilities allow you to remotely control multiple PCs at the same time. This provides for the simultaneous execution on managed PCs of such commands as shutdown, reboot and end the user session.
In conclusion, we note that the demo version of Remote Desktop Control 1.7 is valid for 30 days after installation. The price of the full version of the program depends on the number of PCs on which it is installed - $15 per PC.
TightVNC for Windows 1.3.8 (www.tightvnc.com)
TightVNC for Windows 1.3.8 - absolutely free utility for remote control of a computer, which works on the principle of "client-server" and has two modules: TightVNC Viewer and TightVNC Server. The TightVNC Server module is installed on the managed PC, and the TightVNC Viewer is installed on the managed PC. There are no tools to remotely install the TightVNC Server module. In addition, before starting work, you must configure the TightVNC Server module by specifying a connection password. To connect to a remote PC, just specify its DNS name or IP address and select the connection type (Fig. 12).

Rice. 12. Connecting to a remote PC using the utility
TightVNC for Windows 1.3.8
The only function of TightVNC for Windows 1.3.8 is to get full access to the desktop of a remote computer and control it using the mouse and keyboard. Given that the utility is absolutely free, it can be recommended to home users.
UltraVNC 1.0.2 (www.uvnc.com)
The UltraVNC 1.0.2 utility is another absolutely free, but nevertheless very effective utility for remote control of a PC, working according to the "client-server" scheme. The UltraVNC Server module is installed on the managed computer, and the UltraVNC Viewer module is installed on the computer from which the management is performed. There are no tools for remote installation of the UltraVNC Server module in the program, so you need to install the modules locally.
The UltraVNC Server module has a lot of settings (Fig. 13) and allows you to set a password for the connection, select the ports used, etc.

Rice. 13. Configuring the UltraVNC Server module
When accessing the desktop of a remote PC in full control mode, the work of the local user is not blocked. In addition, the UltraVNC 1.0.2 utility offers a number of additional features. For example, there is a built-in chat with which you can exchange messages with a remote PC. It also provides the ability to transfer files. In addition, the UltraVNC 1.0.2 utility provides encryption of transmitted data, for which key exchange between computers is provided.
In general, it can be noted that the UltraVNC 1.0.2 utility is a highly efficient tool for remote PC control and can be recommended for both home users and corporate use (especially considering that the utility is free).
RealVNC (www.realvnc.com)
There are three versions of the RealVNC program: Free Edition, Personal Edition and Enterprise Edition, which differ from each other in functionality and cost.
RealVNC Free Edition has minimal functionality and is absolutely free. Actually, in this case we are talking only about the possibility of gaining access to the desktop of a remote PC.
RealVNC Personal Edition offers a number of additional features. First of all, this is traffic encryption using the AES algorithm with a key length of 128 bits (Fig. 14), and automatic generation of the encryption key is supported. In addition, it is possible to use user authentication, as well as transfer files between computers, and much more.

Rice. 14. Setting up traffic encryption
and user authentication
in RealVNC Personal Edition
A distinctive feature of the RealVNC Enterprise Edition variant is its multiplatform nature. I.e this program, having all the functionality of RealVNC Personal Edition, can be used to remotely control computers running Linux, Solaris, HP-UX and MAC, as well as Windows 95/98/Me/NT 4/2000/XP/2003/ Vista.
The cost of the RealVNC program depends on the number of licenses (number of managed computers) and on the delivery option. For example, the Personal Edition costs $30 per license, while the Enterprise Edition costs $50 per license.
Hidden Administrator 1.5
The Hidden Administrator 1.5 program (Fig. 15) is another free program for remote control of computers, and, as the name suggests, it allows covert monitoring of computers.

Rice. 15. Main window of the Hidden Administrator 1.5 utility
The program works on the principle of "client-server". The server part is installed on a managed computer, and there are no tools for remote installation.
In addition to the function of gaining access to the desktop of a remote computer in full control mode, Hidden Administrator 1.5 offers a number of additional features: get information about the configuration of a remote PC, exchange files with a remote PC, send messages to a remote PC, turn off or restart a remote computer, work with registry of a remote PC, receive and send the clipboard, run programs on a remote PC, and much more (Fig. 16). Listing everything that this program is capable of would take a lot of time. Note that the only thing she can't do is encrypt traffic. Naturally, it provides for setting a password for connecting to a remote PC and even setting up an IP filter on computers from which remote control is possible.

Rice. 16. Select action with remote PC
in Hidden Administrator 1.5
This utility is the best in its class and can be recommended to home users.
Hi all! Imagine you are leaving. It doesn't matter: to the office on the next street for a few hours, on a business trip or on vacation. But you know for sure: you may need the data that is stored on your home computer. For some reason, you can't take them with you: for example, you don't know exactly which books from your huge library you'll need or which samples you'll want to put into a song you're writing in the islands. But you will need access to your home computer.
Good news for you: humanity has long figured out how to remotely connect to a computer via the Internet. True, you need to prepare for this event in advance. In the article below, we'll show you how.
There will be 2 methods involved. The first is using standard Windows applications, and the second with the help of third-party programs.

Remote access to a computer via the Internet using Windows
Remember the lines from the old Nokia instructions included in the joke? Well, yes, “to use this function, the phone must be turned on”? You will laugh, but we will also play Captain Obvious: in order for you to remotely connect to your computer, it must remain turned on and connected to the Internet.
But this is an obvious consideration. There are also not so clear: for example, the interaction between two computers - your home and the one through which you will connect - is based on the “client-server” scheme, and your home computer will act as the server, and the one you have with yourself. Before you connect to another computer via the Internet, you need to prepare both.
Let's start with home computer. Let's assume it's on it. I must say that the Home version is not suitable for this function to work: you must have at least Windows 10 Pro.
The first step is to allow remote connection to your computer. This is done using the system tools: go to Control Panel / System / System Protection / Remote Access, find the line “Allow remote connection” there and check the box there.

The second thing you need is a static IP address. In the same Control Panel, go to the “Network and Internet / Network Connections” section, find the adapter that is currently being used, and right-click its menu.


Click on "Properties", select the line "IP version 4" and click on "Properties" in the same tab. Here you need, available locally, but not used by the router (the occupied range can be found in the menu of the router itself). In the line "Subnet mask" is usually entered "255.255.255.0.", And in the line "Default gateway" - the IP of your router. It can also be entered as a DNS server, but options are possible here. So, for example, Google's public DNS addresses are also valid: 8.8.4.4 and 8.8.8.8.
For example it could be like this:


On the router, you will also need to configure port 3389 (how to do this - read the instructions for the router or in thematic discussions).
However, all the manipulations from this point can be avoided if, when leaving, you turn off the router altogether and leave the computer connected directly to the provider's network. Then you only need to know yours and make sure with the provider that it will remain unchanged.
How to prepare a terminal using Windows
By "terminal" we mean the computer from which you will connect to your remote. All you need for this is an application called "Remote Desktop". Perhaps in your Windows versions it already exists. And if not, you can download it from the Microsoft App Store.

The application is made in Modern-style, with the expectation of touch displays, but it is also convenient to work with it in the traditional way. To add your home computer, you need to click the plus button in the upper right corner of the window. In the drop-down menu, select Desktop (Computer) and enter the access data - a local IP address if the computer is on the same network as you, or an external one if you connect via the Internet.
To access your computer, you will need account information. If you're using a Microsoft account, enter your details. If local, enter the username and password. Click "Save" to avoid entering data every time you connect. Of course, if you're using the Remote Desktop app on someone else's computer, you don't need to save your login information on it.
With the right settings, after connecting, you can see the desktop of your computer in the program window and run any programs or open files from it.
We only considered the option when Windows 10 Pro is installed on the remote computer. Other versions of Windows do not have this functionality or need more fine-grained settings. However, remote control of a computer via the Internet is also possible through universal solutions, which we will discuss below.
Third Party Remote Access Tools
Although Windows has its own organization of remote access, there are third-party programs that do it better. Let's take a look at some of the most famous of them.
teamviewer
One of the first programs that more or less dedicated people thought of when they saw the title was TeamViewer. Naturally, we will start with it.
The advantages of this program are not only well-known and popular (and as a result - commercial success, demanding users and attentive developers, plus support). TeamViewer is a fairly simple, flexible and multifunctional solution. By and large, you don't even need a second computer to connect to your home: an iPhone, iPad, or Android device is enough. Clients exist for most mobile platforms, plus Windows, OS X, and Linux.

In addition to remote desktop, the application supports voice and video calls. So, for example, if one of your relatives or colleagues still has access to your computer and needs your help, you can chat as you work right in TeamViewer without leaving your session or using other programs.
Your connection will be protected by 256-bit AES encryption, so intercepting it is almost useless.
The most valuable property of the program, which cannot be overestimated, is the ability to turn on your home computer on a signal via the Internet. If in your absence there were many hours of power outages, no UPS will help. But TeamViewer will allow your computer to turn on on demand from the outside.
And one more plus - the program is not divided into client and server parts. It is enough to install a single version on both computers. And then everything is configured in a few clicks.
The disadvantage of the program, by and large, is only one: the cost. A single copy license for a private user costs about $200. But if timely access to a computer is worth it - why not?
Radmin
The name of this product means "Remote Administrator", which immediately conveys its purpose. In terms of its functionality, it roughly corresponds to Team Viewer: you can remotely access your computer, turn it on and off with network commands, launch programs, open files, and move data between a remote PC and a terminal.

Radmin is inferior to TeamViewer only in some aspects: it does not offer applications for mobile devices, does not provide simultaneous access to a computer from several terminals, is not so common.
One of the main advantages of Radmin is the price. A single license for the program to access one computer will cost only 1250 rubles - that's just over $20: ten times cheaper than Team Viewer! At the same time, you will get all the benefits of commercial programs: ongoing support,
However, if you need a completely free solution, there is one too.
UltraVNC
Yes, it exists! A free application that works on the same principle as the above. But remote access to a computer via the Internet, it is very high quality.
Yes, UltraVNC is inferior to commercial solutions in some aspects. So, to provide 256-bit encryption, you will need to install a special plugin. The desktop client is only for Windows, while the mobile clients are only for Android and iOS. There is no built-in voice communication, so remote support will have to be done using Skype or a regular phone, or the built-in text chat.
But, on the other hand, a remote access tool for free is not such a frequent pleasure. Therefore, we recommend that you first use UltraVNC, and then, if some important functions are sorely lacking, turn to commercial products.
Good afternoon!
In today's article, I would like to focus on remote control of a computer under Windows 7, 8, 8.1. In general, such a task can arise in a variety of circumstances: for example, to help relatives or friends set up a computer if they are poorly versed in it; organize remote assistance at a company (enterprise, department) so that you can quickly solve user problems or simply monitor them (so that they don’t play and go to “contacts” during working hours), etc.
You can remotely control a computer with dozens of programs (or maybe hundreds, such programs appear like “mushrooms after the rain”). In this article, we will focus on some of the best. So, let's begin…
Team Viewer
This is one of the best programs for remote PC control. Moreover, it has a number of advantages in relation to similar programs:
It is free for non-commercial use;
Allows you to share files;
Has a high degree of protection;
The computer will be controlled as if you were sitting at it yourself!
When installing the program, you can specify what you will do with it: install to manage this computer, or manage and allow you to connect. It is also necessary to indicate what will be the use of the program: commercial / non-commercial.
After installing and running Team Viewer, you can get started.
To connect to another computer necessary:
Install and run utilities on both computers;
Enter the ID of the computer to which you want to connect (usually 9 digits);
Then enter the access password (4 digits).
If the data is entered correctly, you will see the "desktop" of the remote computer. Now you can work with it as if it were your "desktop".
The Team Viewer window is the desktop of the remote PC.
Radmin
One of the best programs for administering computers on a local network and for providing assistance and support to users of this network. The program is paid, but there is a test period of 30 days. At this time, by the way, the program works without restrictions in any functions.
The principle of work in it is similar to Team Viewer. The Radmin program consists of two modules:
Radmin Viewer - a free module with which you can manage computers on which the server version of the module is installed (see below);
Radmin Server is a paid module that is installed on the PC that will be managed.
A mmyy Admin
A relatively new program (but about 40,000 people around the world have already met and started using it) for remote control of computers.
Main advantages:
Free for non-commercial use;
Easy setup and use even for novice users;
High degree of security of transmitted data;
Compatible with all popular OS Windows XP, 7, 8;
Works with installed Firewall, through proxy.
Remote computer connection window. Ammyy Admin
R MS - remote access
A good and free program (for non-commercial use) for remote administration of a computer. Even novice PC users can use it.
Main advantages:
Firewalls, NAT, firewalls will no longer prevent you from connecting to a PC;
High speed of the program;
There is a version for Android (now you can control your computer from any phone).
A eroAdmin
 Website.
