What is dom html. Working with the DOM model. How the DOM tree of a document is built
In this tutorial we will look at the basics of working with events, attributes and getElementById in JavaScript.
In previous lessons, we studied the basic capabilities of the JavaScript language. Starting with this lesson, we will do what JavaScript is actually designed for - we will modify HTML page elements and respond to user actions. Our scripts will become more spectacular and useful.
We'll start by teaching our code to respond to site user actions. For example, the user will click somewhere with the mouse, and our code in response will have to process this click and display some information on the screen.
User actions that we can track through JavaScript are called events. Events may be as follows: cry mouse on a page element, guidance mouse to a page element or vice versa - care mouse cursor from an element and so on. In addition, there are events that do not depend on user actions, for example, the event when an HTML page is loaded into the browser.
There are several ways to work with events in JavaScript. We will start with the simplest of them.
Event BasicsThe easiest way to set an element's response to a specific event is to specify it using an attribute for a specific tag. For example, an event "mouse click" corresponds to the onclick attribute, event "mouse over"- the onmouseover attribute, and the event "cursor leaves element"- onmouseout attribute.
The value of the attribute with the event is JavaScript code. In the following example by clicking a button with the mouse the alert function will be executed:
And now by click the func function will be executed on the element:
function func() ( alert("!"); )
You can perform not just one function, but several:
function func1() ( alert("1"); ) function func2() ( alert("2"); )
Please note that if you need double quotes inside an attribute (for example, for a string) and the outer quotes of the attribute are also double quotes - onclick="alert("!")"- this code will not work.
There are several ways to combat this: you can change the outer quotes to single quotes onclick="alert("!")", you can also escape inner quotes with a backslash onclick="alert(\"!\)" or simply move the JavaScript code from the attribute to the function, and leave only the function name in the attribute onclick="func()".
The same thing will happen if you put the outer quotes of the attribute in single quotes and also use single quotes for the string: onclick="alert("!")"- here, too, everything is solved in similar ways.
Attribute table for events Working with getElementByIdNow we will learn how to receive HTML page elements and carry out various manipulations with them (we will be able to change, for example, their text and color and many other useful things).
Let's say we have a tag on the page with the id attribute set to test . Let's write the link to this tag into the elem variable. To do this, we must use the getElementById method, which gets the element by its id.
This entry will occur when the button to which we have assigned the onclick attribute is clicked. By clicking on this button, the function func will work, which will find an element on the HTML page with id equal to test and write link to it to the elem variable:
Now in the elem variable we have a link to an element with the id attribute in the test value. The variable elem itself is object.
This object and the HTML page tag are connected to each other - we can change any properties of the elem object and at the same time we will see changes on the HTML page that will happen to the element we received.
Let's see how this happens in practice.
Basics of working with HTML attributes via JavaScriptNow we will read and change tag attributes. Let us again have an input with an id equal to test and a button, upon clicking which the func function will be launched:
Inside the func function we will receive our input by his id and write a link to it in the elem variable:
function func() ( var elem = document.getElementById("test"); )
Let's now display the contents of our input attributes. To access, for example, the value attribute, you should write the following: elem.value , where elem is the variable in which we wrote a link to our element using getElementById, and value is the attribute of the tag that interests us.
We can display the contents of the attribute via alert in this way - alert(elem.value) - or write it to some variable. Let's do this:
function func() ( var elem = document.getElementById("test"); alert(elem.value); //will display "!" )
We can read the values of other attributes in the same way, for example, elem.id - we read the value of the id attribute, and elem.type - the value of the type attribute. See example:
function func() ( var elem = document.getElementById("test"); alert(elem.value); //will display "!" alert(elem.id); //will display "test" alert(elem.type); //will display "text" )
You can not only read attribute values, but also change them. To, for example, change the value of the value attribute, you just need to assign it to the elem.value construct:
function func() ( var elem = document.getElementById("test"); elem.value = "www"; //присвоим новое значение атрибуту value } !}
The HTML code will look like this (the value attribute will become www):
Well, now the most difficult thing - you can not enter the elem variable, but build a chain of points in this way:
function func() ( alert(document.getElementById("test").value); //will display "!" )
In the same way (chain) you can rewrite attributes:
function func() ( document.getElementById("test").value = "www"; }!}
However, in most cases, introducing a variable is more convenient. Compare two examples - now I have introduced the elem variable and can read any number of attributes, while getElementById is called just one time:
function func() ( var elem = document.getElementById("test"); elem.value = "www"; elem.type = "submit"; }!}
Now I don't introduce a new variable and so I have to call getElementById twice:
function func() ( document.getElementById("test").value = "www"; document.getElementById("test").type = "submit"; }!}
In my opinion, this code has become more complicated, although it takes one less line. In addition, if I want to change the id value from test to, for example, www, I will have to do it in many places, which is not very convenient.
to the browser. Finding elements on a page, which the getElementById method does, is a rather slow operation ( and in general any work with page elements is a slow operation- remember this).In our case, if we use getElementById each time, then the browser will process the HTML page each time and look for an element with a given id several times (it doesn’t matter that the ids are the same - the browser will do all the actions several times), performing useless operations that can slow down browser operation.
If we use the elem variable, no search on the page occurs (the element has already been found and the link to it lies in the elem variable).
Exceptions: class and for attributesYou have already learned how to work with attributes through JavaScript and now it’s time to tell you that not everything is so simple - there is an exception when working with attributes - this is the class attribute.
This word is special in JavaScript and therefore we cannot simply write elem.class to read the value of the class attribute. Instead you should write elem.className.
The following example displays the value of the class attribute:
function func() ( var elem = document.getElementById("test"); alert(elem.className); )
By the way, there are other attributes that are called differently than properties. For example, the for() attribute has a property called htmlFor.
Working with thisNow we will work with a special this object, which points to the current element (the element in which the event occurred). Moreover, it indicates as if this element had already been obtained by the getElementById method.
Let's see how to work with this and what is the convenience of this approach.
Let us have a task of clicking on an input to display the contents of its value.
For now you can only make this decision:
function func() ( var elem = document.getElementById("test"); alert(elem.value); )
In principle, this solution is good, but now imagine that we have many inputs and when we click on each one, we need to display its value.
In this case, we will end up with something like this:
function func1() ( var elem = document.getElementById("test1"); alert(elem.value); ) function func2() ( var elem = document.getElementById("test2"); alert(elem.value); ) function func3() ( var elem = document.getElementById("test3"); alert(elem.value); )
Now the drawback of our approach is clearly visible - for each input we have to create our own click processing function, and these functions do almost the same thing.
If we have 10 inputs, we will have to make 10 functions, which is not convenient.
Let's simplify our task: we will pass the id of the current element as a parameter to the function. And instead of a large number of functions, everything will be reduced to one function:
function func(id) ( var elem = document.getElementById(id); alert(elem.value); )
However, this solution still has a drawback - each element will have to enter a different id, which is also somewhat inconvenient.
So, let's finally look at the option of solving the problem using this .
Let's make it so that each input will display its content when clicked. To do this, we pass the this object as a parameter to the function, like this: func(this) .
Our this is passed as a function parameter and ends up in the elem variable. This elem behaves as if it were obtained this way: var elem = document.getElementById(...), but you don’t need to receive it this way, everything is already ready there and you can use it. For example, elem.value points to the value of our input and so on.
So, here is the simplest solution to our problem:
function func(elem) ( alert(elem.value); )
CSS BasicsIn JavaScript, working with CSS properties occurs by changing the value of the style attribute for an element. For example, to change the color you need to build the following chain - elem.style.color- and assign it the desired color value:
function func() ( var elem = document.getElementById("test"); elem.style.color = "red"; )
You can also not enter the elem variable, but build a very long chain.
The main tool for working and dynamic changes on the page is the DOM (Document Object Model) - an object model used for XML/HTML documents.
According to the DOM model, a document is a hierarchy.
Each HTML tag forms a separate node element, each piece of text forms a text element, etc.
Simply put, the DOM is a representation of a document as a tree of tags. This tree is formed by a nested structure of tags plus text fragments of the page, each of which forms a separate node.
The simplest DOMLet's first build the DOM tree for the next document.
Title: Excellent Document
The outermost tag is , so the tree starts growing from there.
There are two nodes inside: and - they become child nodes of .
Tags form element nodes(element node). Text presented text nodes(text node). Both are equal nodes in the DOM tree.
More complicated exampleLet's now look at a more vital page:
About moose The truth about moose.
The root element of the hierarchy is html. He has two descendants. The first one is head , the second one is body . And so on, each nested tag is a child of the tag above:

In this figure, blue indicates node elements, black indicates text elements.
The tree is formed by blue node elements - HTML tags.
And this is what a tree looks like if you depict it directly on an HTML page:

By the way, the tree in this figure does not take into account text consisting of only whitespace characters. For example, such a text node should come immediately after . A DOM that does not contain such "empty" nodes is called "normalized".
Let's look at a slightly more complex document.
Document Data
- Carefully
- Information
The top tag is html, it has children head and body, and so on. This results in a tag tree:

Attributes
In this example, the nodes have the following attributes: style , class , id . Generally speaking, attributes are also considered nodes in the DOM whose parent is the DOM element on which they are specified.
However, in web programming they usually don’t delve into this jungle, and consider attributes to be simply properties of a DOM node, which, as we will see later, can be set and changed at the request of the programmer.
This is actually a secret, but DOCTYPE is also a DOM node, and is located in the DOM tree to the left of the HTML (this fact is hidden in the picture).
P.S. It’s a joke about the secret, of course, but not everyone really knows about it. It's hard to think of where such knowledge could be useful...
Normalization in different browsersWhen parsing HTML, Internet Explorer immediately creates normalized DOM in which nodes are not created from empty text.
Firefox has a different opinion, it creates a DOM element from each text fragment.
Therefore, in Firefox the tree of this document looks like this:

In the figure, for brevity, text nodes are simply indicated by a hash. body has 7 children instead of 3.
Opera also has something to brag about. She can add an extra empty element “just from herself”.
To see this, open the document. It returns the number of child nodes of document.body , including text nodes.
I get 3 for IE, 7 for Firefox and 8 (!?) for Opera.
In practice, this incompatibility does not create big problems, but you need to be aware of it. For example, the difference may manifest itself in the case of enumerating tree nodes.
The possibilities that the DOM givesWhy, besides beautiful drawings, do we need a hierarchical DOM?
Very simple:
Each DOM element is an object and provides properties for manipulating its contents, for accessing parents and children.
The document object is used for DOM manipulation.
Using document , you can get the desired tree element and change its content.
For example, this code takes the first element with the ol tag, removes two list elements sequentially, and then adds them in reverse order:
Var ol = document.getElementsByTagName("ol") var hiter = ol.removeChild(ol.firstChild) var kovaren = ol.removeChild(ol.firstChild) ol.appendChild(kovaren) ol.appendChild(hiter)
For an example of how such a script works, click on the text on the moose page
In old tutorials and scripts, you can see modifying the HTML code of a page directly by calling document.write .
In modern scripts, this method is almost never used; the cases of its correct use can be counted on one hand.
Avoid document.write.. Except when you really know what you're doing (why are you reading a tutorial then - you're already a guru)
Let's take a closer look at access methods and properties of DOM elements.
Accessing elementsAll DOM accesses and modifications originate from the document object.
Let's start at the top of the tree.
document.documentElementThe top tag. In the case of a correct HTML page, this will be .
document.bodyTag, if present in the document (must be).
The following example, when a button is clicked, will produce a text representation of the document.documentElement and document.body objects. The string itself depends on the browser, although the objects are the same everywhere.
function go() ( alert(document.documentElement) alert(document.body) )
Types of DOM elementsEvery element in the DOM has a type. Its number is stored in the elem.nodeType attribute
In total, there are 12 types of elements in the DOM.
Usually only one is used: Node.ELEMENT_NODE, whose number is 1. Elements of this type correspond to HTML tags.
Sometimes the Node.TEXT_NODE type is also useful, which is equal to 3. These are text elements.
Other types are not used in javascript programming.
The following example, when clicked on a button, will print the types of document.documentElement and then the type of the last child of the document.body node. This is a text node.
function go() ( alert(document.documentElement.nodeType) alert(document.body.lastChild.nodeType) ) Text
ExampleFor example, this is what the document from the example above would look like in a browser if each visible element was surrounded by a frame with a nodeType number in the upper right corner.
...Data
- Carefully
- Information
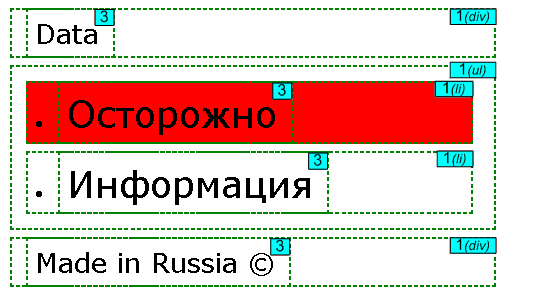
Only the elements inside the body are shown here, as they are the only ones that are displayed on the page. For elements of type 1 (tags), the corresponding tag is indicated in brackets; for text elements (type 3), there is simply a number.
Child elementsThe following example loops through all the children of document.body .
For(var i=0; i BODY
styleThis property controls the style. This is similar to setting a style in CSS.
For example, you can set element.style.width:
Source code for this button:
There is a general replacement rule - if a CSS attribute has hyphens, then to set the style you need to replace them with uppercase letters.
For example, to set the z-index property to 1000, you need to set:
Element.style.zIndex = 1000
innerHTMLAt one time this property was only supported in IE. Now all modern browsers support it.
It contains all the HTML code inside the node and can be changed.
The innerHTML property is mainly used to dynamically change the content of a page, for example:
Document.getElementById("footer").innerHTML = "Bye!"
Perhaps innerHTML is one of the most commonly used DOM element properties.
classNameThis property specifies the class of the element. It is completely similar to the "class" html attribute.
Elem.className = "newclass"
onclick, onkeypress, onfocus...And other properties starting with “on...” store handler functions for the corresponding events. For example, you can assign an onclick event handler.
For more information about these properties and event handlers, see
This publication precedes a series of articles about alternative ways to work with XML. “Alternative” because, as a rule, working with XML in 1C is limited to parsing xml using sequential reading - line-by-line parsing of text content. But there are other ways.
For example, using the XML query language xPath or XSL transformation templates. These options will be discussed in future articles. But they all rely on a basic DOM representation of XML documents. What DOM (document object model) is will be discussed in the publication.
DOM is based on the representation of a document of any structure in the form of a tree of nodes, each node (node) of which represents an element, an attribute of an element, a text value of an element, etc. The connection between nodes is built on the principle of “parent - subordinates”. The document root (DOM tree) has no parent. A dead-end element has no child (such elements are abstractly called leaves of the tree). Thus, the DOM can be created not only for XML, but for virtually any structured document (HTML, XHTML). So, for example, the user's browser, receiving the HTML code of a web page from the Internet, builds the DOM tree of this page in the RAM of the user's computer.
The DOM opens up wide possibilities for manipulating document data. You can create new nodes, insert them at different tree levels, copy nodes, delete nodes, search for nodes using different parameters, and much more.
The DOM model of an XML document is visualized in the figure below.
Any modern programming language includes tools (parsers) for working with such a tree. Receiving string content as input, the XML parser builds a tree of nodes in RAM and performs manipulations with the tree data. The advantage of this approach over line-by-line parsing is obvious: with one query to the tree you can select the necessary data without going through the entire document line by line, because the RAM contains a complete representation of the elements with all the relationships.
In the 1C platform, the DOM model is represented by a special object DocumentDOM, which in turn is built using the BuilderDOM object and its Read method. The input to this method is usually either an XML Reader or an HTML Reader object, which directly reads XML or HTML text content from files or loads it from a string. Well, then there are a number of constructions that allow you to extract data from the object model of the read document.

Of all the options, the most interesting from my point of view is option No. 1 using the CalculateXPathExpression method. The next article will be devoted to him.
Advantages of line-by-line parsing: the need for resources is less. Disadvantages: it takes a long time to get data, you need to read the entire file line by line, the complexity of the program code when parsing XML documents with a complex structure.
The advantage of sampling through the DOM: speed of data sampling, simplicity of the program code. Disadvantages: demanding on resources; building and queries to the DOM consumes RAM and processing power.
The Document Object Model, or "DOM", is a programming interface for accessing elements of web pages. Essentially, it is a page API that allows you to read and manipulate the content, structure, and styles of a page. Let's figure out how it works and how it works.
How is a web page built?The process of transforming the original HTML document into a renderable, styled and interactive page is called the “Critical Rendering Path”. While this process can be broken down into several steps, as I described in Understanding the Rendering Critical Path, these steps can be roughly grouped into two steps. In the first, the browser parses the document to determine what will ultimately be displayed on the page, and in the second, the browser performs the rendering.
The result of the first stage is what is called a “render tree”. A rendering tree is a representation of the HTML elements that will be rendered on a page and their associated styles. To build this tree, the browser needs two things:
DOM is an object representation of the original HTML document. It has some differences, as we'll see below, but essentially it is an attempt to convert the structure and content of an HTML document into an object model that can be used by various programs.
The structure of DOM objects is represented by what is called a "node tree". It is so called because it can be thought of as a tree with one parent that branches into several child branches, each of which can have leaves. In this case, the parent "element" is the root element, the child "branches" are the nested elements, and the "leaves" are the contents within the elements.
Let's take this HTML document as an example:
My first web page Hello, world!
How are you?
This document can be represented as the following tree of nodes:
- html
- head
- title
- My first web page
- title
- body
- h1
- Hello, world!
- p
- How are you?
- h1
- head
In the example above, it appears that the DOM is a 1:1 mapping of the original HTML document. However, as I said before, there are differences. To fully understand what the DOM is, we need to look at what it is not.
DOM is not a copy of the original HTMLAlthough the DOM is created from an HTML document, it is not always exactly the same. There are two cases in which the DOM can differ from the source HTML.
1. When HTML contains markup errorsThe DOM is the interface for accessing the actual (that is, already rendered) elements of an HTML document. During the process of creating the DOM, the browser itself can correct some errors in the HTML code.
Consider this HTML document as an example:
Hello, world!
The document lacks the elements and , which is a requirement for HTML. But if we look at the resulting DOM tree, we can see that this has been fixed:
- html
- head
- body
- Hello, world!
In addition to being the interface for viewing the contents of an HTML document, the DOM itself can also be modified.
We can, for example, create additional nodes for the DOM using Javascript.
Var newParagraph = document.createElement("p"); var paragraphContent = document.createTextNode("I"m new!"); newParagraph.appendChild(paragraphContent); document.body.appendChild(newParagraph);
This code will change the DOM, but the changes will not appear in the HTML document.
The DOM is not what you see in the browser (i.e. the rendering tree)In the browser viewport you see the rendering tree, which as I said is a combination of DOM and CSSOM. What's different about the DOM and the render tree is that the latter consists only of what will eventually be rendered on the screen.
Because the render tree only relates to what is rendered, it excludes elements that are visually hidden. For example, elements that have styles with display: none .
Hello, world!
The DOM will include the element
- html
- head
- body
- h1
- Hello, world!
- p
- How are you?
- h1
However, the render tree, and therefore what is visible in the viewport, will not be included in this element.
- html
- body
- h1
- Hello, world!
- h1
- body
This difference is slightly smaller because the DevTools Element Inspector provides the closest approximation to the DOM that we have in the browser. However, the DevTools inspector contains additional information that is not in the DOM.
The best example of this is CSS pseudo-elements. Pseudo elements created using the ::before and ::after selectors are part of the CSSOM and rendering tree, but are not technically part of the DOM. This is because the DOM is created only from the original HTML document, not including the styles applied to the element.
Even though pseudo-elements are not part of the DOM, they are present in our devtools element inspector.
 Summary
 DOM is the interface to the HTML document. It is used by browsers as a first step in determining what to render in the viewport, and by Javascript code to change the content, structure, or style of a page.
The reference contains descriptions of all the properties and methods of standard built-in JavaScript objects.
Document object modelThe Document Object Model (DOM) is an Application Programming Interface (API) for XML that has been extended to also work with HTML.
In the DOM, all page content (elements and text) is represented as a hierarchy of nodes. Consider the following code:
Simple page
Hello World!
This code can be represented using the DOM as a hierarchy of nodes:
By representing a document as a tree of nodes, the DOM API gives developers full control over the content and structure of a web page.
When describing the tree structure of the DOM, terminology is used that was borrowed from family trees.
Thus, the node located directly above a given node is called the parent of this node. Nodes located one level below a given node are called children of this node. Nodes that are at the same level and have the same parent are called siblings. Nodes located any number of levels below a given node are called its children. Parent, grandparent, and any other nodes located any number of levels above a given node are called its ancestors.
The DOM reference contains descriptions of the Document, Element, Event, and NodeList objects, including descriptions of their methods and properties:
BOM DirectoryBOM (Browser Object Model translated from English - Browser Object Model) provides access to the browser window and allows you to manipulate it and its elements.
BOMs provide access to browser functionality independent of the content of the web page. The topic of BOM is both interesting and complex because, due to the long absence of a specification, browser vendors have been free to extend BOM as they see fit. Many elements that are similar across browsers have become de facto standards that are still followed today for reasons of mutual compatibility. To standardize these fundamental aspects of JavaScript, the W3C defined core BOM elements in the HTML5 specification.
