How to change the application icon in Windows 10. Changing the appearance of icons in Windows. ICO, PNG and similar files
Even if Microsoft wanted to radically transform Windows icons by presenting them to users, say, in some flashy style with a red or purple color scheme, it would never do this. The reason is the narrow scope of the concept. The design concept of any product provides for its recognition by the masses, and its external transformation should not go beyond certain limits.
That is why we can observe some visual transformation of icons from version to version of Windows, but these changes can hardly be called cardinal. From XP To Vista, from Vista To "Seven", from "Sevens" To "Eight" we will see almost the same design of Windows icons with a predominance of yellow shades. Even in the new version of Windows 10, where the icons are most different from those found in all other versions of the operating system, they only acquired a flatter outline and a changed drawing. But they still remained in the yellow color scheme and with the same individual elements of the pictures.
Fortunately, in the Windows system, changing a boring picture is the work of the users themselves. Below we will look at how to change Windows icons.
What are icon files?
Windows icon files have the extension ".ico" and are a small picture, usually no more 48x48 pixels. The most common icon image sizes are 16x16, 32x32 And 48x48 pixels. There may be larger sizes - for example, 64x64 or 128x128 pixels, but these, in most cases, are third-party icons, specially created to replace the standard ones. In older versions of the system, large icon sizes may not be displayed correctly, which is why we rarely see icon files with large image sizes among program installation files. In addition to files with the extension ".ico", other types of files can be used as icons in Windows - for example, startup files ".exe" or library files ".dll". However, they don't look particularly good when the labels are enlarged.
Icons, specially created by professional designers, can contain several images of different sizes.
When you zoom out the shortcuts, the pictures of such icons will not lose sharpness, and when you zoom in, they will not lose detail. If there are several images in the icon, the computer automatically selects the required size for display, and such shortcuts always look attractive - be it a system explorer, be it a startup Metro screen with tiles, be it the dock or launcher inside a third-party file manager.
Where can I get icons for Windows?
If not to replace shortcuts for launching some programs with icons of completely different ones, in order to bring chaos to the work of the victims of such pranks, but to harmlessly change the design of Windows, naturally, there should be third-party icons on the computer.

Their collections can be downloaded on the Internet by entering a key query like "Download icons" or "Icons Pack download" . The archive file with a collection of icons must be unpacked and placed somewhere in a secluded place. It is advisable not to move or rename folders with icons in the future, because then the placement path configured for shortcuts will be lost, and everything will need to be configured again.
You can create icons yourself from your own images. Any of the graphic editors (even with the same standard Paint) the desired picture can be cropped and reduced in size, for example, to 48x48 pixels. Then save in format BMP. After this extension ".bmp" in Windows Explorer or a third-party file manager is renamed to ".ico" . And that’s it – the icon is ready.
Almost any image format can be converted to ICO using software or online converters. To create icons, there are special small programs like a minimalist graphic editor - for example, Easy Picture2Icon, M-Icon Editor, IconUtils, ArtIcons and others.
How to change a folder icon
For each individual folder in Windows, you can customize its own unique icon. To do this, you need to select this very folder and use the context menu to open its properties.

In the folder properties window, click the button change icon .

We will see a selection of icons existing in the system, but they are not what we need, and they are already boring. Click the browse button, select the folder with the saved icons in Explorer and open the file you like.

Returning to the properties window, click the button "Apply". And we can see how the folder has changed.

How to change the shortcut icon
As with a folder, you can assign a different icon for each individual shortcut to launch a program, regular service, saved web page or other object. Call up the context menu on the shortcut and click .

In the tab, click the button change icon.
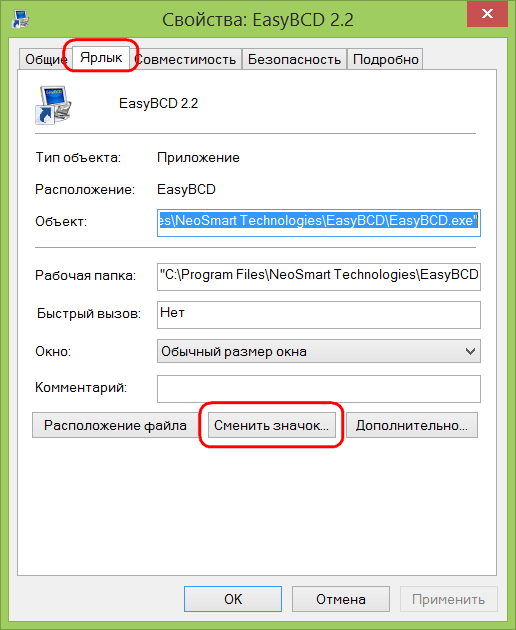

Click "OK" in the icon change window.

Returning to the shortcut properties window, click at the bottom "Apply" and confirm the decision in the window asking for administrator rights. After which we can observe this shortcut with an already changed icon.

How to change desktop icons
You can configure your own icons for some desktop elements - computer contents, user profile, network, recycle bin, etc. - in the section personalization. On an empty space on the desktop, call up the context menu and select, in fact, the item.


For each element separately, click the button.
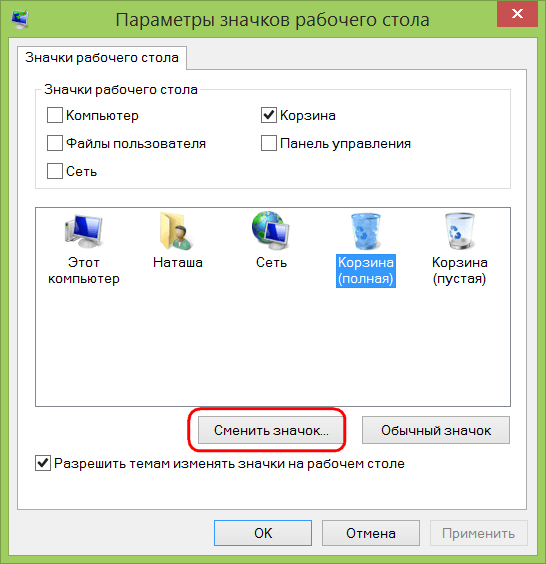
Then, by clicking the browse button, select the icon in Explorer.

After applying the changes, the selected desktop element will be transformed.

Windows does not provide the ability to change icons for individual files. Documentation, video-, audio recordings, drawings and other files will have the appearance of an application, which plays them by default. However, you can give a unique look to individual frequently launched files by creating shortcuts for them on the desktop and customizing the icons of these shortcuts in the manner described above.

How to change the file type icon
Windows does not provide for setting up custom icons for individual file types. But this is possible using a free third party program Default Programs Editor. It is designed to edit the Windows context menu and change file association settings.
After starting the program, click , then - "Icon".


In the next window, click .

Then press another review button (already system) to indicate the path to the desired icon.

Confirm your choice.

Save the icon for the selected file type by pressing the button "Save Icon".

We can see what has changed: While other file types will display their application icons, the file type you just configured will have its own icon.

Automatic icon change using patches
Above we looked at ways to manually configure icons for individual elements. But standard Windows icons can be automatically replaced with others - created in the same collection style. Thematic icons, introduced into Windows using patches, replace standard icons for folders, devices and drives, network elements, desktop, control panel and other system objects. Using a patch to change system icons is a much easier way to refresh the appearance of the system than manually setting folder icons and shortcuts, however, this is far from the safest action.
When implementing patches to change icons, themes, cursors, using system tweaks and similar operations that interfere with Windows settings can sometimes end unsuccessfully - from slight slowdowns in Explorer during further work to the blue screen of death. Therefore, when downloading patches for changing icons on the Internet, it is advisable to read user reviews - either thanking the site owner for posting such excellent programs, or cursing him for distributing system killers.
Well, what about without basic safety rules? Before any transformation operations using patches, you must create restore point or backup.
Patches for using third-party icons can be found in the form of universal utilities that can work with several icon packs.

And the icon packs themselves, working in conjunction with such a patch, are selected separately to suit everyone’s taste and color.

Another type of patch - individual collections, implemented into the system using its own installer.

Windows patching is carried out during the installation of such programs.

And without any extra fuss, we get a ready-made result – a modified icon design.
Icons on the Windows 10 desktop, as well as in Explorer and the taskbar, are of a “standard” size, which may not suit all users. Of course, you can use the scaling options, but this is not always the optimal way to resize labels and other icons.
In order to change the size of icons in Windows 10 Explorer, all the same methods are available that were described for desktop icons. Additionally, in the “View” menu of the explorer there is an item “Huge icons” and options for displaying in the form of a list, table or tile (there are no such items on the desktop).
![]()
When you increase or decrease the size of icons in Explorer, there is one peculiarity: only those in the current folder are resized. If you want to apply the same dimensions to all other folders, use the following method:

After this, icons in all folders will be displayed in the same form as in the folder you configured (Note: this works for simple folders on the disk, system folders such as “Downloads”, “Documents”, “Images” and other settings will have to be used separately).
How to change taskbar icon sizes
Unfortunately, there are not many options for changing the size of icons on the Windows 10 taskbar, but it is still possible.
If you need to make icons smaller, just right-click on any empty space on the taskbar and open the “Taskbar Options” context menu item. In the taskbar options window that opens, enable the “Use small taskbar buttons” option.
![]()
In this case, enlarging icons is more difficult: the only way to do this using Windows 10 system tools is to use the scaling parameters (in this case, the scale of other interface elements will also be changed):
After changing the scale, you will need to log out and log back in for the changes to take effect, the result may look something like the screenshot below.
![]()
Additional Information
When you change the size of icons on the desktop and in Windows Explorer 10 using the described methods, the labels for them remain the same size, and the horizontal and vertical spacing are set by the system. But this can be changed if desired.
The easiest way to do this is to use the free Winaero Tweaker utility, in which in the Advanced Appearance Setup section there is an Icons item that allows you to configure:
In the new operating system, Microsoft has redesigned each interface element and allowed the user to personalize the appearance of each of them. Desktop icons have also undergone changes. There are few people who want to get used to the new look of desktop icons when switching from Windows 7, so the developers took care of the function of replacing their icons. In this regard, let's look at how to change desktop icons in Windows 10 to your own or those present in the system.
Changing the appearance of the main desktop icons
The main icons are those that are displayed on the desktop immediately after installing the operating system. In order to replace one of them, we perform the chain of actions below.
1. Call the “Options” menu using the keyboard shortcut Win→I.
2. Go to the personalization section.
3. Activate the “Themes” tab.

The above steps can be replaced by clicking on the “Personalization” item in the desktop context menu.
5. In the window of the same name, select the element whose icon should be changed and click “Change icon”.

6. Select the icon you like from those available in the system or specify your icon file in ico or dll format.
To do the latter, unpack the archive with icons, click on the “Browse” button and specify the location of the icon library.

7. Having replaced all the icons, click “Accept” and confirm the action.

Free icon packs can be downloaded from sourceforge.net/projects/openiconlibrary.
Can all shortcut icons be changed?
The icon of any desktop element, be it a system directory or a link to an application/directory, can be replaced with your own. The exception is files located in the “Desktop” directory, which belongs to the current account.
Let's look at the process of changing the appearance of an application shortcut (using the example of the popular Internet browser from Google).
1. Open the shortcut context menu and click on the last item “Properties”.
The window can also be opened using the Alt+Enter key combination.
2. Activate the “Shortcut” tab.
3. Click on the “Change icon...” button located in the last row.

4. Indicate the icon you like from those proposed.

5. Click “OK” and save the new settings.
If you click “Browse”, you will be able to select any file with icons located on your PC and specify one of the pixel images packed in it in ico format as the application icon.
Replacing the directory icon
There are virtually no differences from specifying a new look for a shortcut and a folder.
1. Open the “Properties” window of the directory (applicable to any folder except system folders).
2. Activate the “Settings” tab.

3. In the “Folder Icons” form, click “Change icon...”.
4. Specify your or your favorite icon and save the changes.

How to create an icon yourself?
If you want to be original and not use other people's ideas, spend a few tens of minutes working on your own icons for the icons located on the desktop. The powerful IcoFX utility is best suited for this. You can download it from the official resource pixabay.com. The same site contains thousands of freely available images that can be converted to ico files.
1. Launch the installed utility and open the raster image, which will be the basis of the future icon.
![]()
Select the second item “Create an icon from the image”.
![]()
As a result, a pixelated version of the image with several sizes will open.

Unnecessary icon sizes can be removed; for example, 16×16 and 256×256 are unlikely to be needed by the average user.
2. Save the finished icon in ico format through the “File” menu.
Using the editor, you can easily create your own icon from virtually any digital image. It also allows you to apply additional effects and change the appearance of the original icon.
Resizing icons
You can reduce or increase the size of desktop icons in Windows 10 in the same way as in previous versions of the operating system.
You can enlarge or reduce icons on the Windows 10 desktop using the mouse wheel while holding down the Ctrl key. Each rotation of the wheel in one direction or another changes the size of the icons by several pixels in the corresponding direction.
The second option for changing the icon size is as follows:
- call the desktop context menu;
- in the drop-down menu select “View”;
- Click on the appropriate item to specify the size of the icons.

This way you can change the scale of icons in three positions: small, large and medium images. The function is necessary for selecting the optimal icon size for various working conditions and monitor sizes.
If you are tired of the standard icon design in Windows 10 and 7, you can change it. Who needs monotonous folders that are no different from each other? After all, they can choose individual icons. For books - a volume in a beautiful binding, for documents - a stack of papers with a paper clip, for music - sheet music, for games - a joystick. If you do the same with shortcuts and system directories, you get a unique design theme. Find out how to change icons in Windows 7 and other versions. You can decide for yourself how your desktop elements will look.
There are several requirements for the image. She must be:
- Square.
- In .ICO format.
- Suitable size (16x16, 32x32, 48x48 or 256x256).
- Go to Start - Run.
- In the window that opens, enter “regedit” without quotes and click OK. The Registry Editor will appear.

- Click File - Export.
- Come up with a name for the backup and indicate where to save it. If something goes wrong, you can restore them all.
Now start changing icons.
- In the registry, open the folder “HKEY_LOCAL_MACHINE”
- Go to "SOFTWARE".
- Then in Microsoft\Windows\CurrentVersion\Explorer.
- Right-click on Explorer.
- Item “Create - Section”.
- Name it "Shell Icons". If such a directory is already in the list, open it.
- In the right part of the window, call the context menu and select “Create - Stock parameter”.
- Write type 3 (three).
- Right-click on the newly created parameter “3” (“Three”).
- “Change” item.
- In the “Values” section, enter the path to the icon along with the file name and extension.
- If you have a 64-bit system, open the HKEY_LOCAL_MACHINE\SOFTWARE folder again.
- But this time go to Wow6432Node\Microsoft\Windows\CurrentVersion\explorer
- And repeat all the steps described above.
- Restart your computer and enjoy the new look of the icons.
Edit the registry only if you are well versed in this matter. Get one parameter mixed up and errors will occur.
If you don't like the way folders and shortcuts look, you can change their icons. You only need pictures of a certain format. This way you will make a beautiful desktop.
Most of the system icons in the new Windows 10 OS were originally introduced with Windows Vista. If you've been actively using Windows 7 or Windows 8 before upgrading to Windows 10, you're probably familiar with most of these icons. Unlike Windows 7, there is a limited amount of free software available to customize the Windows 10 operating system. What can we say, some customization tools have been released almost within the last six months to customize the latest version of the Windows operating system.
CustomizerGod for Windows 10
About a year ago we first talked about a free tool called CustomizerGod for changing Windows operating system icons. The developer recently released an updated program to support Windows 10 and it is already available for download.
CustomizerGod is basically a program to change hundreds of default Windows 10 icons. With CustomizerGod, you can change the original icon system with ease, without having to change the file system.
The current version of CustomizerGod for Windows 10 supports changes to the start button on the taskbar, and can also change other taskbar icons such as task view, Cortana, touch keyboard, volume icon, battery icon, and action center.
![]()
This tool can also be used to change the default folder icons in Windows 10. In addition to this, you can change hundreds of other icons with ease.
As you can see in the image below, CustomizerGod will also allow you to change the branding windows and the branding system itself.

To help users safely change system icons, the program will automatically back up the original before changing anything on the system. This way, you can restore the original icons later, when necessary, by simply selecting the icon and clicking the restore button.
The program package also includes a tool to clear and reset the icon cache. For the initiated, if you are seeing vintage icons even after replacing them with custom icons, you need to clear your icon cache. You can clear the icon cache by clicking the button next to the restore button, and then clicking either quick clear or completely clear the icon cache partition.
![]()
If you are not happy with some of the default icons that come with Windows 10, then you should try this tool. The tool is completely free and does not contain any unwanted programs. CustomizerGod is a standalone program and works without installation. Download and extract the zip file and run it. The program must be run with administrator rights. CustomizerGod is compatible with both 32-bit and 64-bit types of Windows 10 operating system.
