How to open BIOS using the command line. All ways to enter the BIOS on a desktop computer or laptop. What to do if a password is required to enter the BIOS
All the best. During W7 installation, how do I enter the BIOS to change settings? Is it possible via the command line? and got the best answer
Answer from Alexandr kovalev[guru]
Not okay. The BIOS initializes the hardware. and the fact that he launched it is how the programs will work. The BIOS is configured BEFORE loading programs.
Answer from 2 answers[guru]
Hello! Here is a selection of topics with answers to your question: Good luck to everyone. During W7 installation, how do I enter the BIOS to change settings? Is it possible via the command line?
Answer from Sanek Molostov[newbie]
add, are you moving from Windows 8 to 7, if so, then change its structure gi bi ti to m b r
Answer from Loony[guru]
In principle, you can change the values of registers in the BIOS without going into it. But, not from the installation program - for this they boot in MS DOS mode (or start another axis) and use special programs to change the contents of the ROM cells - only you need to clearly understand what you are doing, otherwise you may end up with a non-working computer and have to go to the service center for flashing.
Answer from Anton Yoshin[guru]
First, check how the screw boot mode is set, if AHCI, then install IDE) If it doesn’t help, here it is
reply from the forum:
On the command line type
bcdedit /set (globalsettings) advancedoptions true
After the reboot you should get a menu with the ability to work with the bootloader.
Disabling this mode
bcdedit /deletevalue (globalsettings) advancedoptions
Team
bcdedit /set (default) bootmenupolicy legacy
will give you a standard Win7 bootloader
cancel this
bcdedit /set (default) bootmenupolicy standard
Look what and how.
But most likely this will not help.
The reason for you is most likely that you cannot enter normally
BIOS. You still need to enter the BIOS, read how to do this in
instructions for your laptop.
The laptop's UEFI BIOS is probably activated
"UEFI-boot" item (you also need to pay attention to the "Secure boot" item
or items with similar names). Activating "UEFI-boot" allows
create a service UEFI partition on the target drive with GPT (GUID
Partiton Table) table of contents. Windows 7, unlike Windows 8, does not
supports installation on drives with GPT contents. That's why
the above item UEFI-boot (and/or Secure-boot) in the motherboard BIOS
The laptop boards need to be deactivated (select "Disabled").
Further,
pre-installed Windows 8 are most often installed on drives with
GPT table of contents, and to install Windows 7, the drive must be
converted to a traditional MBR (Master Boot)
Record). You can convert GPT to MBR during installation
Windows 7, namely:
at the moment when the installation wizard
prompts you to select a drive/partition for installing the operating system,
you need to press the keys Shift + F10, which will open the command line
line.
On the command line:
diskpart
At the diskpart command prompt, determine which disks are there
list disk
Write down the number of the disk that you will convert to an MBR disk.
Next, select the disk to work with
select disk (where is the disk number)
Disk Cleanup and Delete All Partitions
clean
Disk conversion
convert mbr
Exit
exit
In the window for selecting a drive to install Windows 7, you must click
"Refresh" key. After this, you can continue installing Windows.
ASUS laptops have problems
First you need to go into the BIOS, in the "Security" section disable "Secure
boot", then in the "Boot" section enable "Launch CSM" - translate from
"Disabled" to "Enabled" (Launch CSM - activating compatibility mode)).
After that, save the settings and exit the BIOS. Then you need to log in again
in the BIOS and in the "Boot" section, change the boot priority - select in
as "First boot device"
optical drive.
In BIOS, select option 1.CSM OS or 3.CSM and UEFI OS
(the last option will be needed if you are making two axes on the laptop).
And then start installing Windows 7.
Some users in their lives are faced with the need to restore the Windows system. In this article we will look at what system recovery is, how to do it and all the additional points on this issue.
Content:
What is it for? System Restore can help if your computer stops working properly. This condition is caused by the installation of virus software that makes changes to the PC registry or by inept/harmful actions of the user himself.
When might a system restore be necessary?
- The computer is hopelessly glitchy, slows down, and won’t boot.
- After installing a program, windows began to pop up reporting errors at the RAM level.
- The computer boots up to the Windows welcome window, after which the computer reboots.
Windows System Restore- This is the restoration of the state of the OS, files and programs on the computer to the moment when the malfunctions began. Sometimes the user misunderstands the meaning of system restore and means by it returning a previous version of Windows. For example, from windows 8 to windows 7. In fact, when restoring the system, its version does not change.
There are many ways to “breathe life” into your operating system, but we will look at 2 of the simplest Windows system rollbacks:
- Restoring the system using BIOS,
- Restore using the command line.

It is worth noting initially that Windows 7 system recovery can only be performed if the recovery function (service) was launched earlier, before problems occurred. If it was not enabled, then you can only rollback using the Windows boot disk.
To activate the Windows Recovery service, you need to go to the “Control Panel”, this can be done from the “Start” menu. Next, look for an icon called “System Restore”. Next, click on the tab called “Start recovery”, the system will give us a message - the recovery service is disabled and will offer to activate it.
Typically, the first time you start Windows, a restore point is saved, even if the restore feature has been disabled. To view a list of your recovery points, you need to click the “View other recovery points” button.
If this function has already been launched previously, then we can immediately begin launching the system recovery procedure. Click “start system restore”, select a restore point, click “next” and “finish”. The recovery process has started, as soon as it is finished, the computer will restart, after which you can start working.
What to do if system restore doesn't work?
The most common problem is that the recovery service is not enabled. How to activate it is written above.
Of course, the possibility of its complete inoperability cannot be ruled out. Very often this can be found if a non-licensed version of Windows is installed.
Is it possible to restore a system without a restore point?
Most likely, you have already gone to the system recovery center, activated the recovery service and discovered that there is no backup point - which means you cannot choose which state to roll back the system to. Don't worry, your system can still be restored!
System recovery without a restore point can be done using the command line. It is recommended to strictly follow the instructions so as not to break anything. We will look at how to perform a system rollback using the command line below.
By the way, it is not necessary to use a disk; you can restore the system from an image by first recoding it and recording it on a flash drive.

Windows OS recovery programs
If your operating system is not completely dead, i.e. it still loads and works somehow. Or, for example, the system recovery tools built into Windows do not help - try using special Windows recovery programs, such as:
1.
- a program that will help you both restore the OS (registry, boot areas, access rights) and scan your PC for viruses and errors in files.
2.
— this software is focused mainly on backup of files, logical drives (partitions), but Acronis can also restore Windows and even Mac OSes.
How to restore the system via BIOS?
The huge advantage of this method is the successful recovery of the system even in the most difficult cases, the main thing is that the computer or laptop turns on.
Make sure you have a Windows installation disk (bootable disk) handy and insert it into the drive. Now we need to enter the BIOS. When you start the computer, press the F12 key, go to the Boot -> BootDevicePriority menu - first select the DVD drive if you are using a disk, or a USB HDD if you are using a flash drive.
We reboot the PC again, the Windows installer should now start. Often, when booting a PC, a message in English pops up, which requires you to press any key to start booting from the disk. If you do not do this, the computer will continue to boot after 10 seconds in normal mode from your HDD, and not from a bootable flash drive/disk as we need.
So, we booted from the disk and now select “System Restore” in the installation menu and click “Next”. After this, you will have to select a restore point; it is best to use the first successful launch, but the programs you need may not have been installed there yet. Those. you will lose programs (and the data in them) that you installed after creating a restore point. Click “Next” again, the system will now be restored. When the process is complete, click “Yes, ready.” We reboot the system, first removing the disk/flash drive from the drive.
System Restore via Command Line
This method is recommended if there is no system restore point. Again, we need a boot disk with the Windows operating system. Exactly the one installed on the computer.
You can view the OS version by right-clicking on the “My Computer” icon and going to the “System” tab.
If you have a system restore point, then you just need to boot into command line mode (to do this, press the F8 key when loading the OS and select “Boot in safe mode with command line support”). Then enter the command “rstrui” and follow the instructions.
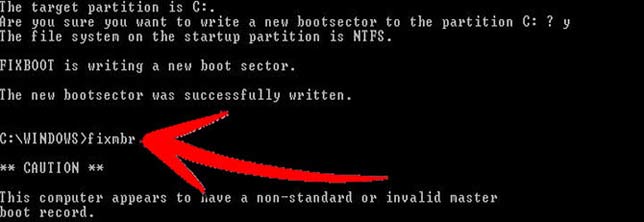
1. If the boot sector of your OS is damaged.
Enter “fixboot” in the command line, press “Enter”, then enter “fixmbr” and press “Enter”. That's it, your windows boot sector has been restored, you can restart your computer as usual.
2. If the boot.ini file is missing.
Enter “bootcfg /rebuild” in the command line and press “Enter”. We answer all possible questions of the system by entering “Y” and pressing the “Enter” button.
3. If your config in the system32 folder is damaged.
Insert the disk with your version of the operating system into the drive, enter “cd repair copy SYSTEM C:\windows\system32\config” in the command line, press “Enter”, you’re done!
4. If the “ntldr” or “ntdetect.com” files are missing and the system displays messages like: “NTLDR is missing when loading Windows.”
Enter in the command line “copy J:\i386\ntldr C:\”, press “Enter” (Where J is the letter of the important drive, and C is the letter of your system drive on which your OS is installed).
If you do not want to restart your computer, you can restore the system via the command line from Windows. We insert the disc into the DVD-ROM, and the computer must be booted. Now you need to launch the command line. To do this, in the “Start” menu, click “Run” or press the “Windows + R” hotkey combination.
Enter the following value there: “sfc /scannow”, click “Ok”. After this, all broken system distributions will be copied from the boot disk automatically. System recovery and rollback are quite quick and trouble-free.
What is the difference between system recovery on laptop brands: Asus, Acer, Lenovo, HP, Sony, Samsung, Toshiba, Bell, Dell, Vaio, etc.?
I would like to note that there are no serious differences here. There may be different versions of BIOS, but the intuitive interface and tab names are preserved. There shouldn't be any problems with this.
The second point is the BIOS entry key; they differ between these manufacturers. But this is not a problem either, you can see what you need to click in the picture that appears when loading.
- Acer - F2;
- Dell – F2 or F1;
- Toshiba – F1 or Esc;
- Sony – F1, F2 or F3.

Sometimes after a system rollback, when you first start a laptop or computer, a message appears with this error - this means that the recovery was not completed successfully and strongly recommends trying again with a different restore point.
Try restoring to a different, earlier restore date. If such an error still appears after this, then the problem is much deeper. This means that the problem is a virus in your system that has corrupted the system restore point information.
To restore a system with error 0 xc 0000022, use the command line method. In this method, these restore points do not play any role. After all the files have been restored and you have checked the system for functionality, you need to delete all existing restore points from the computer and make a new one that you can count on in the future. You can perform such manipulations through the “System Restore” menu in the control panel.
3 more useful articles:
Windows Repair is a rare type of program that can rid your personal computer of almost all…
Acronis is a pretty famous program. When developing this software, the developers placed the main emphasis on...
A program that checks the strength of system user passwords. This utility is used by network administrators to calculate users with...
Necessary for setting up hardware on the motherboard (BIOS), most often used to configure booting devices, setting the time, setting up the processor, cooling, memory, disabling and enabling some devices. The BIOS's task is to prepare and test the equipment for subsequent loading of an operating system or device that has a program for installing or loading the operating environment (such as an operating system on disk).
How to enter BIOS on a computer
The usual way to enter the BIOS is understood as: pressing a certain key or key combination on the keyboard during startup or reboot, before the Windows operating system itself starts. It should be mentioned that in new versions of operating systems (if they are installed in UEFI mode, Windows 8, 8.1, 10), it is possible to enter the BIOS after loading the operating system.
To enter the BIOS you usually need:
- View the keyboard shortcut for your motherboard. You can find an electronic manual for your motherboard on the Internet.
- Or usually, when you turn on the computer or when you reboot, prompts pop up on the screen regarding the keys to enter the BIOS. If the operating system starts loading immediately, then the article below describes how to disable fast boot or enter the BIOS from the operating system without using the keyboard and key combination when logging in.

Most often, BIOS uses keys such as Delete, less often Ctrl+Alt+Esc, F2 more often on laptops, Delete.
How to log in via Windows
As previously mentioned in new versions of the Windows operating system (Windows), it is possible to enter the BIOS from the system itself. Yes, yes, you understood everything correctly. You can enter the basic input/output system after loading the operating system without a keyboard, not when you turn on the computer, but after loading the operating system.
To do this you need:
- Windows 10, Windows 8, 8.1, Windows Server 2012, Windows Server 2012 R2 must be installed in UEFI mode (usually DEFAULT).
- Go to settings through the start menu. Or similar in other versions of Windows (Examples on Windows 10)


In the next menu “Options” of the Windows operating system. You should select the recovery tab, left side of the window. In the “Recovery” tab that opens. Find “Special boot options” and below the button “Restart now”

After these steps, Windows will shut down and the “Select Actions” window will appear. In this blue window, select “Diagnostics Restore your computer, return the computer to its original state, or use additional tools.”

We select the UEFI firmware parameters, then select reboot and after the reboot, instead of loading into Windows, the BIOS will appear. Let me remind you that the menu item “UEFI Firmware Settings” will be available if Windows is installed in UEFI mode.

Entering BIOS using the command line
If anyone had a question: “How to enter the BIOS using the command line?”, then I want to correct it a little. From the command line you can only call the blue menu, which is indicated above in the previous paragraph of our article, and then if the operating system is installed accordingly, you need to launch the command line.
To do this, you can enter “cmd” or “command line”, you can enter it incompletely.

Press Enter and a command prompt window opens.

Copy this name of the executable file in the system folders (if a specific path to the executable file is not specified) of the program or enter it manually:
shutdown.exe /r /o
If you are wondering what the /r and /o keys mean. (Keys are parameters to a program that is launched via the command line, written separated by a slash, in this case the key “r” and “o”)
If you want to find out what these keys are, enter “help shutdown”. After entering this command in the command line and pressing the Enter key on the keyboard, a hint will appear explaining how to use the shutdown command.

From which we learn, for example, that the /o parameter is to go to the additional boot options menu and restart the computer. And also that this option must be used with the /r option.
Thus, this is simply an alternative way to open the blue menu discussed in the previous paragraph. Only for this purpose we will not use the start and graphical interface of the toolbars, but the command line and the shutdown application with parameters.
What to do if you can’t enter the BIOS?
What could be the reason for the inability to enter the BIOS (UEFI - actually it should be called, but out of habit everyone uses the word “BIOS”).
1. First of all, this is a quick start of the Windows 10 operating system, which can be disabled; because of it, they do not have time to quickly press the BIOS entry key. For owners of solid-state hard drives, this function is very convenient; it allows you to quickly turn on the computer after pressing the power key, but if you need to enter the BIOS, you will have to either disable it or log in through Windows.
In the search near the start, type “Power Options”
Press Enter. Go to the “Power button actions” tab. And if the “Enable fast startup” checkbox is checked, then uncheck it. Now you have time to press the BIOS entry button.

2. Other reasons may be the wrong login button or key combination.
3. If the computer does not start due to the parameters previously set in the BIOS, then it can be reset by removing the battery for a while. This will reset the BIOS settings to factory settings and possibly give access to it.
4. If when you first turn on the monitor does not display a picture for a long time, during this time the BIOS screen may pass and Windows will begin loading.
This instruction contains 3 ways to enter the BIOS when using Windows 8 or 8.1. In fact, this is one method that can be used in many different ways. Unfortunately, I did not have the opportunity to check everything described on a regular BIOS (however, the old keys should work in it - Del for a desktop and F2 for a laptop), but only on a computer with a new motherboard and UEFI, however, most users of the latest versions of the system I'm interested in this configuration.
On a computer or laptop with Windows 8, you may have a problem entering the BIOS settings, since with new motherboards, as well as fast boot technologies implemented in the OS itself, you may simply not see any “Press F2 or Del” or don't have time to press these buttons. The developers took this point into account and there is a solution.
Here are two more ways to get to the same Windows 8 boot menu to enter the BIOS, which may also be useful; in particular, the first option may work if your desktop and system initial screen do not load.
Using the command line
You can enter in the command line
shutdown.exe /r /o
And the computer will reboot, showing you various boot options, including entering the BIOS and changing the boot drive. By the way, if you wish, you can make a shortcut for such a download.

Shift + Reboot

Another way is to click the shutdown button in the sidebar or Start screen (starting with Windows 8.1 Update 1) and then hold down the Shift key and click Restart. This will also cause special system boot options to appear.
Additional Information
Some manufacturers of laptops, as well as desktop motherboards, provide an option to enter the BIOS, including with fast boot options enabled (which is applicable for Windows 8), regardless of the installed operating system. You can try to find such information in the instructions for a specific device or on the Internet. Usually, this is holding down a key when turning it on.
Many users sooner or later face the need to change certain settings in the BIOS. For novice users, the word BIOS is usually associated with something very complex and incomprehensible.
In fact, in order to enter this menu and change individual parameters, you only need to perform simple operations, depending on your operating system and BIOS version.
As a rule, the most popular reason for changing settings is reinstalling the operating system. In this case, users need to change the read priority of the hard drive to a DVD drive or flash drive.
Some BIOS versions have a special menu for selecting which device the system will load information from first. This way, the user can avoid frequent visits to the BIOS menu. To call the boot menu, use the appropriate key (usually the “F11” or “F12” keys).
What is Bios, and what to do there?
BIOS is a basic input/output system, presented as a variety of programs. The BIOS is responsible for the interconnection and proper operation of individual computer components. This relationship is a fundamental point in the PC system, providing the possibility of joint correct operation of all personal computer equipment.
To configure these relationships, the BIOS has an engineering menu, which was created for the convenience of users, as well as a more comfortable selection of certain system parameters. The BIOS contains many settings, ranging from time and date settings to parameters responsible for powering individual computer components.
Each group of parameters is located in the corresponding section of the “engineering menu” of the computer. You can enter the BIOS only before starting the operating system itself. BIOS parameters include various CPU modes, which are highly not recommended to change unless the user has experience. The user, if necessary, can also adjust the cooling of computer components by increasing the speed of the installed coolers.
Moreover, in the BIOS the user can disable various computer components, for example, an additional audio or video card.
It is important to remember that the settings can affect the operation of the equipment itself and lead to equipment failure, so it is recommended to change only those parameters that are known to the user.
If you have changed any settings and want to set the default settings, you can try resetting the BIOS settings to return them to their original values.
Each BIOS version has a certain set of sound signals that provide the user with information about certain errors. For example, if the equipment is faulty, the system will inform the user about this using a combination of short and long sounds. A complete set of sounds and their meanings for your BIOS can be found on the manufacturer’s website.

Photo: decoding BIOS beeps
The most modern BIOS version is “UEFI” - a system from Intel, which is installed on the equipment of this company.

Call methods
There are two main ways to enter the BIOS menu:
- the first method is a classic option, and until a certain time was used to enter almost any BIOS;
- the second method appeared with the release of Windows 8, which made significant changes to the loading of the operating system.
1 way. Keyboard shortcut
To enter the menu using this method, you must press a certain key while the computer is booting until the operating system begins to load. It is recommended to press not once, but several times until the engineering menu interface is loaded. So, which button does one use to enter the BIOS? Each manufacturer of motherboards that have a built-in BIOS system sets different keyboard shortcuts for entry.
The most common solution for personal computers is the “Del” button. In some cases, the key combination “Ctrl+Alt+Esc” is used. There are also options with the “F1” and “F2” keys.
As a rule, manufacturers indicate a key combination or a separate key at the bottom of the screen when the computer boots.
If you do not have time to press any keys before loading the operating system, then you have UEFI and you should choose the second method of entering the BIOS.
Table of keys for entering the BIOS, as well as calling the boot menu
| Manufacturer/device | BIOS version | Boot menu key | Key to enter BIOS |
| Mat. MSI boards | AMI | F11 | Del |
| Mat. Gigabyte boards | Award | F12 | Del |
| Mat. Asus boards | AMI | F8 | Del |
| Mat. Intel boards | Phoenix Award | Esc | Del |
| Mat. AsRock boards | AMI | F11 | Del |
| Asus laptops | Esc | F2 | |
| Acer laptops | Inside H2O | F12 | F2 |
| Acer laptops | Phoenix | F12 | F2 |
| Dell laptops | Dell | F12 | F2 |
| HP laptops | Esc -> F9 | Esc -> F10 | |
| Lenovo laptops | AMI | F12 | F2 |
| Packard Bell laptops | Phoenix Secure Core | F12 | F2 |
| Samsung laptops | Phoenix Secure Core | Esc (once, pressing again exits the menu) | F2 |
| Sony Vaio laptops | Inside H2O | F11 | F2 |
| Toshiba laptops | Phoenix | F12 | F2 |
| Toshiba laptops | Inside H2O | F12 | F2 |
Method 2. Windows 8.1 menu
This method is a solution for entering the BIOS when the Windows operating system version 8.1 is installed. Since loading Windows 8.1 on modern computers with UEFI is almost instantaneous, it is not possible to have time to press the necessary button.
For Windows 8.1 users, to get into “UEFI” you need to click on the “Restart” button while holding down the “Shift” button. This operation can be performed via the command line, for example, if the keyboard on the laptop does not work. To do this, open a command prompt and enter “shutdown.exe /r /o” without quotes.
To open the command line:
- press the “Start” button;
- select “Run”;
- if this item is not there, then click on the free space of the start menu and select “Properties”. In the menu that appears, check the box next to “Run command.”
The operating system will load an additional menu in which you should do the following:
- select “Diagnostics” (“Troubleshoot”);
- in the submenu you need to open “Advanced Settings”;
- then select “UEFI Firmware Settings”. If this item is not present and you cannot enter the new BIOS through Windows, then your computer does not use UEFI technology. In this case, you can load the BIOS using certain keys (method 1).

How to enter Bios from a laptop
In order to enter the BIOS settings when booting the laptop, you must perform the following steps:
- reboot the laptop;
- Press the key to enter the BIOS before Windows starts. It is recommended to start pressing this key as soon as the computer starts to start;
- As a rule, this key is indicated in the corner of the screen when the computer starts.
Keys for entering BIOS from the most popular manufacturers:
- F1 – basic models from Lenovo, HP, Dell;
- F2 - Acer, Asus, Samsung laptops;
- F3 – rare Dell and Sony models;
- F10 – Toshiba;
- F12 – Lenovo;
- Ctrl+F2, Ctrl+Alt+Esc - some Acer models.
Video: How to enter BIOS on a laptop
How to save settings and exit BIOS
After making the necessary settings in the BIOS, you need to save the changes. To do this, press the “F10” button and select “Save and Exit”, after which the computer will reboot and the changes to the BIOS settings will take effect. It is impossible to log into the system without restarting the computer.
To exit the BIOS without saving parameter changes, you must press the “Esc” key.
This feature is especially useful for inexperienced users. If you doubt that you have changed any unnecessary parameters, we recommend that you exit without saving and make the necessary settings in the BIOS again.

Photo: confirmation of saving settings and exiting BIOS
Possible problems when logging in
One of the most common problems is the need to enter a password to enter the BIOS. By default, no password is set to enter the menu; if the system asks you to enter it, it means it was set by another user. In this case, the situation will be saved by an engineering password, which for different BIOSes represents a different set of letters and numbers.
Universal passwords for AMI BIOS:
| 2.50 | 2.51 | 2.51G | 2.51U | 4.5x |
| AWARD_SW | AWARD_WG | g6PJ | 1EAAH | AWARD_SW |
| j262 | j256 | j322 | condo | AWARD_PW |
| TTPTHA | BIOSTAR | ZJAAADC | biostar | 589589 |
| 01322222 | HLT | Wodj | CONDO | PASSWORD |
| KDD | ZAAADA | bios* | CONCAT | SKY_FOX |
| ZBAAACA | Syxz | biosstar | djonet | AWARD SW |
| aPAf | ?award | h6BB | efmukl | award.sw |
| lkwpeter | 256256 | HELGA-S | g6PJ | AWARD?SW |
| t0ch88 | alfarome | HEWITT RAND | j09F | award_? |
| t0ch20x | SWITCHES_SW | HLT | j64 | award_ps |
| h6BB | Sxyz | t0ch88 | zbaaaca | ZAAADA |
| j09F | SZYX | zjaaadc | ||
| TzqF | t0ch20x |
If an error occurs while working with one or another computer hardware, the BIOS can also display various messages indicating the nature of the failure. Each BIOS manufacturer has a special set of system error messages, comments for which you can find on the website of your BIOS manufacturer.
The BIOS is responsible for many different functions and settings, so every user should know how to enter the BIOS with their hardware configuration. As a rule, sooner or later, every user is faced with the need to change certain settings in the BIOS.
Despite the fact that different manufacturers set different keys to enter the BIOS, access to the engineering menu is quite simple to install. Thanks to these instructions, even novice users will be able to enter the BIOS, for example, to change the device reading priority when installing Windows.
The most important and decisive point is to determine the required key or combination to access the engineering menu. If you decide to update the BIOS, you should clearly define the reason for performing this operation. If your system is working correctly and you are satisfied with the number of BIOS functions, we recommend not updating the BIOS due to the possible occurrence of problematic situations.
