How to remove audio track from avi. Remove sound from online video. Mute all fragments
Let's say you have a video and you want to remove the sound from it, completely cut out the audio track. This can be done using various video editors, such as Sony Vegas, Movie Maker, Adobe Premier, etc. But because of this generally banal operation, is it worth installing additional software on your computer, which, by the way, is not at all free? In this case, it is much easier and more effective to use online services!
In order to remove sound from a video, we will use Cloudconvert.com. This is a cloud service with which you can convert anything into anything :) Although we are not going to convert anything, by and large, this online service is ideal for our needs. Why? Now I’ll tell you everything.
Go to Cloudconvert.com and click on the “Select files” button.
Select the desired video file on your computer’s hard drive. It is also possible to provide a link to it on the Internet or download it from:
- DropBox
- Google Drive
- OneDrive
After this, a page will open where the file name will be indicated (in my case Webinar), its format (in my case MP4), and there will be a button with an icon in the form of a wrench. We click on it.

In the window that opens, in the AUDIO section there will be an item “Audio Codec”. In the drop-down menu, select the “none (remove audio track)” option. By doing so, we indicate that we intend to remove the audio track from the video.

If you wish, you can do additional options with the video:
- Convert it to another format
- Cut/add subtitles

After this, click on the “Start Conversion” button, and after a certain time (depending on the size of the source file) you will receive a result that can be downloaded to your computer.
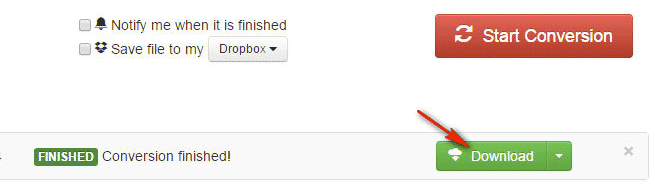
Start playing the video and make sure it is already without sound :)
You can use the Cloudconvert.com online service completely free of charge. The maximum video upload size is 1 GB. You have a daily limit of 25 conversion units.

So, for example, the conversion of one text file or image is equal to one unit. But in the case of video files, as far as I understand from the description, one conversion unit is equal to one minute of the time spent by the service on conversion. Maybe I'm wrong. If you know from experience how things really stand with this, write in the comments.
A personal computer is not just a tool for work. Perhaps this was initially the case; websites were created with the help of a personal computer, they worked with 3D graphics, and complex calculations were made, but over time, the computer increasingly began to be used for entertainment purposes.
Computer technology has gained truly wide popularity mainly thanks to video games and entertainment video content. Why wait for a movie to come out on TV when you can easily download it from the Internet and watch it with the dubbing that suits the user’s taste.
One way or another, the computers of most modern users are “filled” with multimedia content.
Movies and music make up the majority of the occupied space. This is not surprising, because a high-definition film can take up from ten to thirty gigabytes of disk space, not to mention the 4K format, which also has its fans.
Why delete audio tracks?
In fact, the most effective way to reduce the size of a video file is conversion, but this is a rather complicated procedure that is not available to all users.
Before you start converting videos, you need to understand all the intricacies because converting a file almost always leads to improved quality of the material.
In addition, for an acceptable conversion speed, the user must have a fairly powerful system, especially the processor.
However, there is a much more effective way to significantly reduce the size of your video collection. The fact is that high-quality video recording uses the same high-quality sound.
In other words, the volume of an audio track embedded in a file can take up at least 500 megabytes. Everything would be fine if films did not use several sound tracks at once. Sometimes a film has up to ten built-in tracks, the total size of which sometimes exceeds the volume of the video sequence.
Most often, a film has one or two high-quality dubs, while the rest of the dubbing is a one-voice translation or amateur dubbing over the original sound.
Working with MKVTool
To remove an unnecessary audio track, you can use a proposal such as MKVTool. This program is free.
After installing and launching the application, you need to drag the video file into it, after which a list of all available audio tracks will appear at the bottom of the program.
To define an audio track, you need to select it, after which the name will appear in the “Track name” section. Often, instead of the name, the inscriptions rus or eng are indicated.
In order to find out which track is of the highest quality, the film must be opened using any player with a function for switching audio tracks, for example PotPlayer or KMPlayer.
To remove unnecessary audio tracks, you just need to uncheck them. Video recordings and audio tracks are specified as codecs, that is, if films have an AVI container, the video recording itself can be compressed using MPEG -4.
In addition, the list may contain subtitle files, which are also deleted by unchecking them. If desired, you can delete all audio tracks.
If instead of an audio track, you delete a video sequence, separately from the video, the audio track will remain, which, if desired, can be connected to the video separately, or embedded in another video file.
At the bottom of the program, you can specify the path where the file will be saved, and then click on the “Start processing” button.
Adding a new audio track
Using the MKVTool program, the user can not only delete unnecessary tracks, but also add new ones. This is especially useful for reducing file size.
For example, a person can cut an audio track with a bitrate of 1000 kbps, then convert it to MP3 format and 192 kbps bitrate and add it back to the video.
Since this did not change the duration of the audio track, there will be no desynchronization with the video.
To add a new track, you need to drag it into the same window as the main file, after which it will automatically appear in the lower list, next to other data.
Now, a person checks the compressed audio track and unchecks them from other tracks, after which he can begin processing the file.
To summarize, it can be noted that MKVTool is currently the most functional application for working with audio tracks.
In addition, unlike other video editors, MKVTool does not convert audio or video, so file processing takes a matter of minutes, and processor power does not play any role.
However, you should remember one important detail: after processing, the film is automatically placed in the MKV container, support for which is implemented mainly on computers.
Have you recorded a panorama with an expressive landscape, but extraneous sounds spoil the whole harmony? Don’t rush to send the file to the trash – the problem can be easily fixed using a video editor. From this article you will learn how to remove sound from a video and replace it in the VideoMONTAGE program.
A couple of clicks and there is no sound
“VideoMONTAZH” is an editor designed to make video processing as easy as possible for beginners. Its functionality includes all the basic tools necessary to obtain high-quality results. In addition to comprehensive improvement of video footage, the software provides a number of functions for working with audio. To erase an audio track from a file, install the editor on your PC and follow the instructions below.
☛ №1. After launching the video editor, click the button labeled "New project" in the start window. The next step, the software will offer to set the format of the future video file, you can select one of the proposed options or leave the option "Install automatically".
You can choose one of the standard formats or enter the value manually
☛ №2. Drag the clip from which you want to remove audio to the bar at the bottom of the screen. Use the command "Import video", if you want to copy a video track from a DVD. After the desired file has been downloaded, go to the tab "Edit" and select "Sound replacement".

If you add several videos, each of them needs to be edited separately
☛ №3. To completely remove sound from a video, you need to click on the command Add Audio > Select Music from Collection. A window with a list of compositions will appear in front of you, find the track among them "Silence" and apply it. The name of the audio track speaks for itself - the sound will completely disappear from the video.

If the video lasts less than 15 minutes, trim the “Silence” track; if longer, add it to the list again
The lack of sound can cause discomfort and sometimes anxiety when viewing. Directors often use a similar technique to create so-called suspense, completely immersing the viewer in what is happening on the screen. And if in a movie such an artistic technique works like a charm, then in an ordinary video it looks as if the creator forgot to attach a sound track. If you do not intend to add tension to watching the video, we recommend adding music to the background.
In addition to “Silence” in the collection you will find several more melodies that suit different moods - calm and cheerful, quiet and louder. Select an audio recording that matches the content of the video, or upload your own by clicking "Select a file". If the video recording is long, you can connect several tracks or loop one, adding it again.

You can select any part of the audio track; it is not at all necessary to trim the melody only from the beginning or end
The program also allows you to create from several excerpts, applying a single musical background to the entire project. To do this, you need to place video fragments on the slide bar and open the tab "Music". By clicking on the plus icon, select music files, adjust their duration and sequence. To remove the original audio tracks from all videos at once, simply uncheck the command “Add music to the original sound”. If you wish, you can leave this function enabled, in which case the background melody will be overlaid on top of the original one.

You can edit the sound of background music, make it loud or, conversely, barely audible
Correct and improve your video in 5 minutes
Now you know how to remove sound from a video and forget about spoiled footage forever. However, installing the “VideoMONTAZH” program will open up many more possibilities for you in terms of processing video files! Just a couple of minutes is enough to polish and improve even an unremarkable video.
- Trim off excess
After uploading a clip, you can reduce the size of the video and cut out excess, simply by marking the boundaries of the segment that you want to leave. Move the black marks on the timeline or fill the time period manually.

The program will allow you to remove unnecessary things from the video while maintaining high quality
If an extra object ruins the composition, use cropping, so you can highlight the desired area of the image, focusing on the main thing.

The same option will help you get rid of horizontal or vertical black bars in your video.
- Adjust the speed
Manage time the way you want - speed up the clouds slowly creeping across the sky or, conversely, slow down the falling leaves from a tree. Correctly adjusted speed can greatly increase the expressiveness of a clip. To change it, just select the appropriate command from the drop-down list. So you can speed up or slow down the clip by 1.5, 2 or 3 times with just one click!

Videos sped up or slowed down in the program will also not lose quality
- Improve image quality
“Video Montage” will eliminate jitter in the frame in seconds using the option "Image stabilization", which you will find in the tab "Improvements". Check the box next to the corresponding line and evaluate how much the image has changed. In the same section, you can make the picture brighter, increase the saturation of shades, or, conversely, eliminate overexposure by darkening the frame. In the “Cropping” section you can either rotate the video 90 degrees or cut off the excess.

Using auto-enhancement tools, you can adjust the color balance in your video in just one click
- Apply effects
Go to the tab "Effects"– and you will see dozens of filters, ready to instantly make your video original and atmospheric. The presets are divided into thematic categories - vintage, romantic, children's. To apply an effect, just select it with one click.

With stylish filters from the program's collection, your video will look more professional
If you wish, you can use manual settings and develop your own unique filter from scratch. To do this, you need to select several improvements and adjust the parameters of each of them. The video editing program offers to tint the image, age it, apply film grain, color noise, spray or engraving effects, apply masks, highlights or flares.

By combining different effects, you can use completely new, unique filters in each of your projects.
The program is not limited to the described functions - replace the background, create music video cards, record with a webcam. With the VideoMONTAGE editor, nothing is impossible or inaccessible - download the software, and working with video files will become your favorite hobby!
Hello friends!
In this article I want to show you how you can separate audio from video in Sony Vegas and, if necessary, remove the audio track or do some other manipulations with it.
You've probably already noticed that when we add video to a project for later editing, it is loaded together with the audio and they are glued together. And if we try to do some manipulations with one of the tracks (with video, for example), then the same thing will happen with the other (with sound).
So, it’s clear that this can be very, very inconvenient. I want to tell you right away that when editing video in Vegas Pro, you often have to separate audio and video tracks.
To be able to work with each of these tracks separately, we must first “unstick” them, i.e. separate audio and video. In Sony Vegas this is done very simply.
Watch the video tutorial on how to separate audio and video in Sony Vegas, as well as how to remove an audio track from a Vegas Pro project:
Well, friends, well, we have learned how to separate audio and video tracks in Sony Vegas pro. We also learned how to remove the audio track from the Sony Vegas project.
That's all for me. I hope this tutorial was helpful to you.
Often, when downloading foreign films, you can find several audio tracks in them with translations into different languages, as well as with original sound. It even happens that for one film there are several versions of translation into Russian.
You will need
- - computer;
- – video editing programs.
Instructions
1. Use the MKVtoolnix program to remove sound track from a file in mkv format and without losing the quality of the video recording. Launch the application, open the video file using the menu command “File” - “Open”, then select a folder and select the desired movie. The selected video will appear in the program window.
2. Go to the Tracks, chapters and tugs window, uncheck the boxes next to the components you want to remove. After removing the audio path from the video, save the file using the Browse command in the Output filename window, then click the Start muxing button. Wait for the process to complete and exit the program.
3. Use the Avidemux program to remove sound track from a video file in avi format. Launch Virtual Dub Mod in the program, then drag the desired file into the application window, execute the command Streams – Stream list, then select with the left mouse button track that you want to delete and click the Disable button. Then click “OK”. Save the file in Direct stream copy mode. Exit the program.
4. Remove audio track from a video with support for the Mkvmerge GUI program, you can download it from the official website bunkus.org/videotools/mkvtoolnix. Load the initial file into the application, demux it into mkv format, but do not change any settings. Then follow the link smlabs.net/tsmuxer.html and download the latest version of the tsMuxer utility.
5. Run it and open the resulting mkv file in the program window. Next, leave the checkboxes next to the audio tracks. Set the switch next to the Demux command. Start demuxing. Exit the program and erase the initial file. As a result, you ended up with two or more sound files. Find out which one you need.
6. Launch the Virtual Dub program, load the initial file in *.avi format into it, execute the command Video – Direct stream copy, then Audio – Audio from other file... and specify the desired audio file obtained using the support of the previous step. Next, click the Save as Avi command in the “File” menu. As a result, all audio tracks will be replaced with the one you selected.
Not all household DVD players have the function of switching paths, and when recording a movie with several “built-in” audio paths onto a disc, there is a need to leave only one, removing all the indecent ones. Let's look at the procedure in such a situation.

You will need
- VirtualDubMod program
Instructions
1. Before everyone else, you need to stock up on tools. To do this, go to the website www.virtualdubmod.sourceforge.net and download the VirtualDubMod program to your computer, which can be used to remove indecent sound paths from a video file. The program is completely free and quite easy to use.
2. The program does not require installation, but after downloading it must be extracted from the archive; on the contrary, you will not be able to run it. Unzip the file by placing the program in a folder on your computer's hard drive, and then run it.
3. From the File menu, select the Open command and add a video file from which the obscene paths should be removed.
4. In the Vide menu, check the box next to Direct Stream Copy so as not to make metamorphoses to the video stream.
5. Open the Streams menu and select the Stream List command. Select obscene audio paths and click the Disable button. This way you will exclude these paths from the file.
6. All that remains is to write the new file with the changes made. To do this, select the Save as command from the File menu, specify the folder in which you want to save the result, and click OK.
7. Wait for the recording process to complete and you will receive a video recording with one audio path.
Video on the topic
Replacing the audio path or simply removing it can be done by any program that can edit video. For example, if several sound paths are embedded in a video file, while significantly increasing its size, without any problems you can “throw away” the indecent one with the help of only a few operations.

You will need
- Video editing program Virtual Dub, MKV Toolnix or TSMuxer.
Instructions
1. The easiest video editing program that handles most operations is Virtual Dub or Virtual Dub Mod. This is a free, small, but functional program with its own set of codecs. To begin with, you need to open the desired file through it (menu “File” - “Open”). After this, you need to go to the “Streams” item (also in the top menu), and select “Stream List” (the item responsible for editing streams). Next, use the left mouse button to select the audio tracks that need to be deleted, and press the “Disable” button. Inactive audio streams are grayed out, and you can now click the “Ok” button.
2. After this, you need to go to the “Audio” – “Direct Stream Copy” and “Video” – “Direct Stream Copy” tabs, after which you can save the file (“File” – “Save Video”). The paths have been removed.
3. If the video file is in mkv format, then Virtual Dub will not always be able to cope with it. Then the MKV Toolnix package comes to the rescue, which includes the mkvmerge GUI program. It does an amazing and quick job of removing obscene paths from the selected file. After loading the file (“File” – “Open”), the program displays a list of all video parameters. After this, you can easily uncheck unnecessary items. After selecting the directory to save the target file, you must click the “Start” button.
Video on the topic
Helpful advice
The TSMuxer program does a great job of cutting out unnecessary parameters of a video file. It has a huge number of settings and is stable in use (it opens virtually all audio formats). Moreover, if any problems arise with video playback, then by running the necessary file in TSMuxer you can find out the cause of the error and, if possible, correct it.
When creating video materials using editing programs, you need to synchronize audio and video streams. In some cases, the audio track may be replaced, for example, by other audio files. In order to superimpose sound files onto a video image, you need to use a special program.

You will need
- Software VirtualDub Mod.
Instructions
1. This program can be found in the public domain on the Internet. Use any search engine, enter “Download VirtualDub Mod” without quotes and press Enter. Among all the requests, select the line in which you can see the word “Download”. After following the selected link, click the “Download” or Download button on the page that opens.
2. After unpacking the program from the archive, run it. Open the video file where you want to add audio track, click the top menu File, in the list that opens, select Open video file.
3. You see a file selection window, after you find the video, click the “Open” button. The video you selected will be loaded into the program window. You need to add audio recording, i.e. you will not touch the video file itself. But by default, the program includes the possibility of editing both a video file and an audio file; therefore, when saving the video, the stream will be created again. Creating a new thread will take some time, so it is better to disable this option. To do this, click the top Video menu and select the Direct stream copy item in the list that opens.
4. To add any audio stream to the program window, you need to click the top menu Streams, in the list that opens, select Stream list. The Available streams window will appear in front of you, in which you can connect new streams or disable existing streams. To delete a stream, you need to select it, and then click the Disable button.
5. To add a new stream, click the Add button, find the stream in the window that opens and click the “Open” button. You can add a ton of audio streams to the Available streams window, but the one at the top of the list will play. After adding all the audio tracks, click OK. All that remains is to save the fruit of your creations: click the top File menu, then click the Save As button or press the F7 button.
To improve your knowledge of a foreign language, it is recommended to watch videos in it in the original, without translation. Using the VirtualDubMod program, you can remove the Russian path from virtually any foreign film.

Instructions
1. Download and install the application. To do this, follow the link below and download the zip archive. In order to open it you will need an archiver. Use WinRar, but if you don’t have it installed, download and install it also by following the link win-rar.ru. Once the installation is complete, unzip VirtalDubMod. This is strictly because if you run the application from the archive, this may affect the correct operation of the program.
2. Launch the program. Click on the File – Open menu, then locate the video file you need. Select it, wait for the download to finish. Next, go to the Video menu. Check the box opposite Direct Stream Copy. This is necessary in order to leave the video stream unchanged - in this case, its quality will remain the same.
3. Enter the Streams menu and click on the Stream List button. Listen to audio tracks and delete the one that contains translation. Later, you will save the resulting video. Go to the File – Save As menu and specify the folder to save. Don't close the program. Wait until the recording finishes, and then test the resulting file. If you accidentally delete the wrong audio path, undo the last action and re-record the video.
4. If there is only one audio track, then you have a choice: either remove it and insert the latest translation in its place, or remove the audio and attach subtitles to the film. Separately, subtitles and audio tracks can be downloaded online; in extreme cases, you can download the same film in the original, but of worse quality, and extract audio from it using the Adobe Audition program. Launch it, then open the video file from which you plan to extract audio. Wait for it to load, then use the “Extract audio from video” menu and save the resulting file. Later, using the VirtualDubMod program, add this file as a new audio path and save the film.
5. If you have multiple audio tracks, one of which contains actual audio, you can move between them while playing the video file. Select the video file with the right mouse button and open the file through Media Player Classic. Go to the Audio menu. Several threads will appear in front of you. Select the one that contains the original sound without translation and click on it. When viewing through other players, follow the same scheme - go to the audio settings, then select the stream that contains the original sound.
Video on the topic
