Installing and configuring hyper-v server for those who see it for the first time. Hyper-V - a virtual machine from Microsoft Launching a hyper v virtual machine
Hyper-V is a virtual machine from Microsoft, created on the basis of a hypervisor, with hardware support for virtualization for 64-bit systems. Previously, the hypervisor was used only in Microsoft server operating systems.
Microsoft Hyper-V runs only on 64-bit Windows operating systems, in Pro (Professional) and Enterprise editions, in Windows 8, Windows 8.1, Windows 10 operating systems, as well as in server operating systems (Windows Server).
The editions of these operating systems contain the Hyper-V component, which is disabled by default. The user can enable the Hyper-V virtual machine without installing third-party virtualization programs (for example, VirtualBox) on their computer.
Hyper-V hypervisor
The virtual hypervisor (Hyper-V) allows you to create a virtual machine for installing a guest operating system. Using a virtual guest operating system, you can get acquainted with working in a new operating system, test settings, experiment, install unfamiliar programs, etc. All these actions will not affect the operation and settings of the real operating system installed on the computer.
The hypervisor was originally created for server operating systems, so working in the Hyper-V virtual machine has some limitations: there is no support for sound cards and CD/DVD recording, the application has limited visual settings compared to its competitors, there is no possibility of direct copying or inserting files between real and guest systems, etc.
This is not the most important thing for testing, so the more ascetic settings of Hyper-V will be more to their liking for some users than similar settings from more advanced competitors.
Keep in mind that when the real (host) and guest operating systems are running simultaneously, the resources of one computer are consumed, so you should not try working in a virtual machine on a weak computer. While working in a virtual OS, do not use resource-intensive applications on a real computer in order not to slow down the computer.
This article will discuss installing and configuring Hyper-V in the Windows 10 operating system. In Windows 8.1 or Windows 8, settings are made in a similar way.
Installing Hyper-V
First you need to enable the Hyper-V feature. Go to “Control Panel”, then “Programs and Features”, click on “Turn Windows features on or off”.
In the Windows Components window, check the box next to Hyper-V, and then click OK.
After searching for the required files and applying the changes, you must restart your computer.
In the Start menu, in the Windows Administrative Tools folder, you will see the classic Hyper-V Manager application. Launch the program on your computer.

In the application window, click on the computer name; a column will open on the right with a list of commands that are available from the “Actions” menu.

Now you can set up your Internet connection.
Click on “Virtual Switch Manager”. In the next window, in the “Create a virtual switch” section, select the “External” switch type, and then click on the “Create virtual switch” button.

Next, in the “External network” item, come up with a name for the virtual switch, then from the list of available network adapters, select the adapter used to connect to the Internet on your computer. After selecting the settings, click on the “OK” button.

In the warning window that opens, agree to apply the changes to your computer.
Creating a Hyper-V virtual machine
To start the process of creating a virtual machine, follow the path: menu “Action”, “Create”, “Virtual machine...”. Next, the virtual machine creation wizard will open.
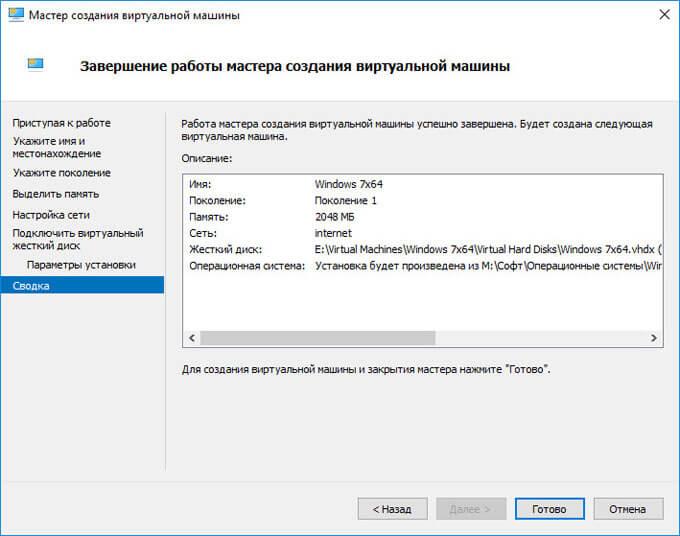
In the first “Getting Started” window, click on the “Next” button. In the next "Specify a name and location" window, give a friendly name for the virtual machine you are creating (I named it "Windows 7x64"), and select a location to save it.
By default, virtual machine files are saved on drive “C” in the “ProgramData” folder:
C:\ProgramData\Microsoft\Windows\Hyper-V\
On my computer, virtual machines are saved not on the system drive, but on another drive in a special folder (“Virtual Machines”). Therefore, if you want to save the virtual machine in a folder other than the default, check the box next to “Save the virtual machine in another location”, and then select a folder to save. Create a folder for storing virtual machine files in advance.

In the Specify Generation window, Generation 1 is selected by default, which is suitable for most cases. "Generation 2" does not boot from all images; it is essentially a virtual machine with UEFI.

In the Allocate Memory window, you must select the amount of memory to allocate for this virtual machine. I allocated 2 GB of memory from my computer out of 8 GB.

In the next Network Settings window, select the previously created network adapter (virtual switch).

The “Connect virtual hard disk” window will display information about the name of the virtual machine, its location on the hard drive, and the amount of disk space allocated for the virtual machine (127 GB was suggested by default, I chose 50 GB).

In the Installation Options window, you can choose how to install the operating system: install later or select your preferred installation option.
To install the OS, select "Install an operating system from a bootable CD or DVD." Here, select “Physical CD or DVD” to install the system from a disc placed in an optical drive, or select “Image File (.iso)” to install the operating system directly from an OS ISO image located on the computer.
Using the "Browse..." button, I selected the Windows 7 Ultimate SP1 x64 operating system image located on the external hard drive that is currently connected to my computer.

The Completing the New Virtual Machine Wizard window displays the configuration of the created virtual machine. Click on the “Finish” button to complete the creation of the VM.
After applying the settings, the created virtual machine will appear in the Hyper-V Manager window and its settings will be displayed.
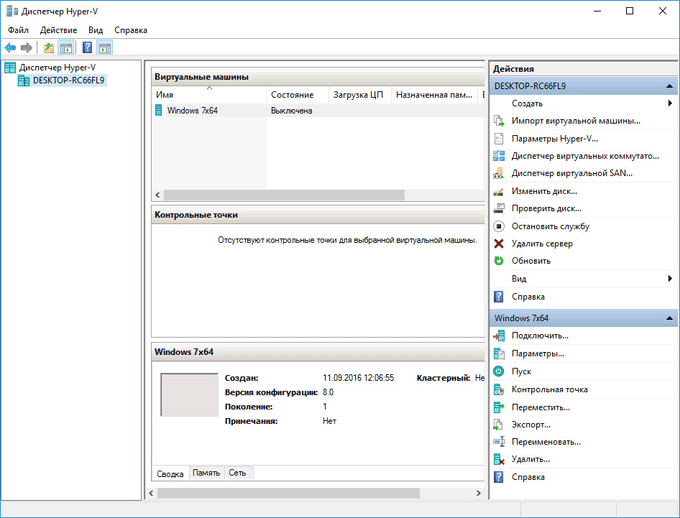
To start the installation process, select the virtual machine and select “Connect...” in the context menu.
In the window that opens, go to the “Action” menu, select the “Start” command, or simply click on the green “Start” button.

Once the operating system installation is complete, the guest OS is ready to use. In this image, you can see that my (host) computer is running Windows 10, and the window is running a Hyper-V virtual machine running Windows 7.

In a virtual machine, you can create snapshots of the virtual system (checkpoints) in order to save the state of the operating system for a certain period of time.
You can create a checkpoint from the application window. You can manage checkpoints (restore the state of the virtual machine, delete unnecessary points) from the “Checkpoints” section in Hyper-V Manager.
Sharing files in Hyper-V
In the Hyper-V virtual machine, dragging and copying files between the physical and virtual operating systems does not work the same way as it is implemented in VMware Workstation or VirtualBox. Data exchange between the guest and the systems installed on the PC can be realized using shared network folders.
Create and configure a shared folder on the real operating system so that the shared folder can be accessed from the virtual system. Then create and configure a shared folder on the virtual machine so that the shared folder can be accessed from the real system. Read how to do this.
After completing the settings, you can exchange data over the network, transferring files from the computer to a shared folder on the virtual machine, or in the reverse order, from the virtual machine to a shared folder located in the operating system on the computer.
Conclusions of the article
The Microsoft Hyper-V virtual machine is built into the Pro and Enterprise editions of the 64-bit operating systems Windows 10, Windows 8.1, Windows 8. After installing and configuring the Hyper-V hypervisor, create and install a virtual machine with a guest operating system to test the software, which does not affect the main operating system installed on the computer.
Back in Windows 8, Hyper-V virtualization technology appeared, previously available only in Microsoft server operating systems. This solution looks better than the Windows Virtual PC virtual machine included in Windows 7. Today I will tell you how to create a virtual machine in Windows using Hyper-V, and also set up the Internet, local network and file sharing in it.
In addition to Coreinfo, you can use Intel's proprietary utility (AMD has a similar one).
You can also look at the virtualization technology support table on your processor manufacturer's website: Intel | AMD.
Enable Hyper-V
Hyper-V is an operating system component that is initially disabled. Advanced users can enable it with one PowerShell command:
Enable-WindowsOptionalFeature -Online -FeatureName Microsoft-Hyper-V -All
If you prefer a GUI, press Win + R, enter OptionalFeatures and press Enter .

In the window that opens, select the Hyper-V checkbox.
One way or another, the component will become available after a system reboot. Among the problems with installation in Windows 8 RP, a cyclic reboot due to the fault of USB 3.0 controller drivers has been noticed so far, which on some systems was solved by disabling USB 3.0 in the BIOS.
Creating and configuring a virtual machine
Press Win + R, enter virtmgmt.msc and press Enter to open Hyper-V Manager. From the menu Actions select Create – Virtual machine.
The virtual machine creation wizard is extremely simple, but I will note some points for those who like detailed instructions with pictures. I will skip the network setup step now, since I will analyze this issue in more detail.
The standard location for virtual machines is a folder ProgramData, but it can be changed.

If you already have a virtual disk in VHD format, you can connect it. By the way, I did just that, using the disk I created earlier for Virtual Box.

When you specify an existing VHD, the wizard removes the step where you specify the media for installing the system.

However, you can specify the path to the ISO later by opening the virtual machine settings in the main Hyper-V Manager window.
Starting a virtual machine and installing Windows on it
Everything here is also simple, but a little unusual for those who have not previously encountered Hyper-V.
In Hyper-V Manager:
- To start the virtual machine, click “Start”
- To interact with it, click “Connect” or double-click the machine’s thumbnail
When the bootable Windows ISO image is specified in the machine settings, you will see the familiar Press any key to boot message on the screen... Then you can do it yourself, but if you need step-by-step installation instructions, they are on OSZone for Windows 7 and Windows 8.
If the operating system on the physical machine is newer than the one installed on the virtual one, it is recommended to update the integration components (thanks, Artem). To do this, connect to the virtual machine in the Hyper-V manager, press Ctrl + I and run setup.exe.
Setting up Internet access and local network
The instructions in this section are only necessary if you are unhappy with the Default Switch introduced in Windows 10 1709, which cannot be removed or renamed. When using Default Switch, if the host is connected to a VPN, the virtual machine also uses the VPN. This is one of the main differences from an external switch, the creation of which I will describe later.
On the menu Actions select Setting up virtual switches. A window will open in which you can create a switch of one of three types. To enable your virtual machine to access the Internet, create external switch.
Now you need to set the name of the switch and select the network adapter if you have more than one. I use a wireless network at home, so I chose a Wi-Fi adapter.
All that remains is to specify the created switch in the network connection parameters of the virtual machine.
Now, with Windows installed, you will have an Internet connection and a local network between the physical and virtual machines.
In the picture above you see:
- on the left is the result of adding a virtual switch to Hyper-V on a physical machine, i.e. network bridge and virtual adapter
- on the right – Internet access and connection to the local network on the virtual machine
As you can see, setting up the Internet and local network is not so much complicated as it is unusual for users of Microsoft client operating systems.
Sharing files between physical and virtual machines
As you work with a virtual machine, you regularly need to copy files from a physical one to it, or vice versa. I will describe several ways to solve this problem.
Shared network folders
This method works in all editions of Windows 10. Since we have a local network at our disposal, we can use shared folders to share files. In fact, the instructions below boil down to the basics of creating shared folders.
Access from virtual machine to physical machine
A picture is worth a thousand words, as the Americans say.

The figure shows the virtual machine explorer (VIRTUAL-PC), from where the physical machine (VADIK-PC) is accessed. Once you enter your account credentials, access to your profile will be at your disposal.
You may want to create a shared folder located on a physical machine outside of your profile. To do this, it is enough to use standard sharing tools, but I will explain this process using the example of access to an arbitrary virtual machine folder.
Access from physical machine to virtual machine
Let's say there is a folder in the root of the virtual machine disk Shared. Right click on it and select General access – Individual people(or Specific users in Windows 7).
Now you can open a shared folder over the network in Explorer, including by entering the address of the form in the address bar \\computer-name\folder-name.
Connecting to a remote desktop of a virtual work machine
In Hyper-V, files cannot be exchanged between a physical and virtual machine by copying and pasting. You can only paste text copied on a physical machine using the keyboard shortcut Ctrl + V. However, once the virtual machine is running, you can connect to it via RDP instead of opening it from Hyper-V Manager. This method works in Pro editions and higher.
Actions on a virtual machine
First, you need to enable remote desktop connections on the virtual machine in the system properties. Press Win + R and run:
RUNDLL32.EXE shell32.dll,Control_RunDLL sysdm.cpl,5
Then allow the connection as shown in the picture.

All that remains is to find out the IP address of the virtual machine with the command ipconfig

Actions on a physical machine
Press Win + R and enter mstsc and expand login options.

In the window that opens:
- Enter the IP address of the virtual machine (required).
- Enter the name of the user whose account you will be signing in to.
- Enable login credentials to be remembered.
- Save the connection settings.
You can also set the Display tab to a resolution lower than what is used on the physical machine.
Now you can exchange files between physical and virtual machines using the usual keyboard shortcuts Ctrl + C and Ctrl + V.
Finally, I would like to virtualize a few recommendations from Denis Diaghilev for working with Hyper-V.
Use RDP to connect to virtual machines.
This will not only allow you to share files between the physical and virtual machine by copying and pasting, but will also save system resources that vmconnect consumes when connecting to the virtual machine in Hyper-V Manager or from the command line.
If you plan to regularly use RDP to connect to various virtual machines, pin the program to the taskbar. Then the list of cars will be saved in the transition list.

Be careful with your photos
With Hyper-V you can create snapshots of a virtual machine using differential disk technology. However, the logic of the images is almost the opposite of what a person who has never stepped on a rake would expect from it.

Alexander Kosivchenko (MVP for virtualization) described in detail, although somewhat chaotically, the principle of operation of Hyper-V snapshots on Habré.
Use virtual machine import if necessary
Import will be more interesting to IT specialists, but I happened to use this function by accident. After creating the virtual machine, I renamed the drive letter where it was stored, and then Hyper-V Manager lost it.
Looking around in the snap, I saw the import option and instantly restored the machine.

Moreover, I didn’t even suspect that the actions I performed became possible only due to the emergence of a new feature in Hyper-V :)
Hyper-V vs. virtual box
While understanding Hyper-V, I couldn’t help but compare Microsoft’s solution for the client operating system with Oracle VirtualBox.
From the point of view of typical tasks of home users (testing the system installation, familiarization with it, checking the operation of applications), these solutions are practically no different from each other. But VirtualBox can be used in Windows 10 Home editions, while Hyper-V is not available in them.
VirtualBox does not have such strict hardware requirements, and its graphics capabilities are even greater, since it supports 3D hardware acceleration (though I have never used it).
As for the graphical interface, this is purely a matter of taste. Probably, the hypervisor that came from server operating systems looks more ascetic, but the parameters and configuration of virtual machines are generally very similar.
The presence of Hyper-V in Windows will primarily please IT professionals accustomed to this technology. For home users, this is a good opportunity to take advantage of the system’s built-in tools and expand their horizons by becoming familiar with Microsoft server technologies.
Survey
I became acquainted with virtual machines in 2004, when I started doing Windows Auto Install. Since then they have become an integral part of my daily work, including testing system settings, programs, etc.
In comments Tell us what virtualization solution you use and for what purpose!
I would like to thank Denis Diaghilev for his assistance in preparing this material. One of the benefits of the MVP program is exposure to top Microsoft technology talent. This means that you can get competent advice on any issue privately;)
Denis also kindly offered his assistance in facilitating the discussion. Therefore, if you have any technical questions regarding this article, you can count on qualified answers.
I want to specifically emphasize that
If you have Windows 10 Pro or Enterprise installed on your computer, you may not be aware that the operating system has built-in support for Hyper-V virtual machines. Those. everything you need to install Windows (and more) in a virtual machine is already on your computer. If you have a home edition of Windows, you can .
The average user may not know what a virtual machine is and why it can be useful, I will try to explain it. A “virtual machine” is a kind of software-based separate computer, or even more simply, Windows, Linux or another OS running in a window, with its own virtual hard disk, system files and so on.
How to do it:
- In Hyper-V Manager, select the second item (your computer name) from the list on the left.
- Right-click on it (or the “Action” menu item) - Virtual Switch Manager.
- In the Virtual Switch Manager, select “Create a virtual network switch, “External” (if you need Internet) and click the “Create” button.
- In the next window, in most cases, you don’t need to change anything (if you are not a specialist), except that you can set your own network name and, if you have both a Wi-Fi adapter and a network card, select that one in the “External network” item and network adapters, which is used to access the Internet.
- Click OK and wait until the virtual network adapter is created and configured. During this time, the Internet connection may be lost.

Done, you can move on to creating a virtual machine and installing Windows into it (you can also install Linux, but according to my observations, its performance in Hyper-V leaves much to be desired, I recommend Virtual Box for these purposes).
Creating a Hyper-V virtual machine
Just as in the previous step, right-click on the name of your computer in the list on the left or click the “Action” menu item, select “Create” - “Virtual Machine”.
At the first stage, you will need to specify the name of the future virtual machine (at your discretion); you can also specify your own location of the virtual machine files on your computer instead of the default one.

The next step allows you to select the generation of the virtual machine (appeared in Windows 10, this step was not present in 8.1). Please read the descriptions of the two options carefully. Generation 2 is essentially a UEFI virtual machine. If you plan to experiment a lot with booting a virtual machine from different images and installing different operating systems, I recommend leaving the 1st generation (2nd generation virtual machines do not boot from all boot images, only UEFI).

The third step is to allocate RAM for the virtual machine. Use the size required for the OS you plan to install, or better yet, even more, taking into account that this memory will not be available in your main OS while the virtual machine is running. I usually uncheck the “Use dynamic memory” checkbox (I like predictability).


The virtual hard disk is mounted or created in the next step. Specify the desired location on the disk, the name of the virtual hard disk file, and also set the size that will be sufficient for your purposes.

After clicking “Next” you can set the installation options. For example, by selecting the “Install operating system from a bootable CD or DVD” option, you can specify the physical disk in the drive or the ISO image file with the distribution. In this case, when you turn it on for the first time, the virtual machine will boot from this drive and you can immediately install the system. You can also do this later.

That's all: you will be shown a summary of the virtual machine, and when you click the “Finish” button, it will be created and appear in the list of virtual machines in the Hyper-V manager.

Starting a virtual machine
In order to start the created virtual machine, you can simply double-click on it in the Hyper-V manager list, and in the virtual machine connection window, click the “Enable” button.

If, when you created it, you specified an ISO image or disk from which to boot, this will happen the first time you launch it, and you will be able to install an OS, for example, Windows 7, in the same way as installing on a regular computer. If you did not specify an image, you can do this in the “Media” menu item for connecting to the virtual machine.
Typically, after installation, the virtual machine will automatically boot from the virtual hard disk. But, if this does not happen, you can adjust the boot order by right-clicking on the virtual machine in the Hyper-V manager list, selecting “Options” and then “BIOS” settings.

Also in the settings you can change the size of RAM, the number of virtual processors, add a new virtual hard disk and change other parameters of the virtual machine.
Finally
Of course, this instruction is only a superficial description of creating Hyper-V virtual machines in Windows 10; all the nuances cannot be covered here. Additionally, you should pay attention to the possibilities of creating checkpoints, connecting physical drives to the OS installed in a virtual machine, advanced settings, etc.
But I think it’s quite suitable as a first introduction for a novice user. You can figure out many things in Hyper-V yourself if you wish. Fortunately, everything is in Russian, explained quite well, and if necessary, can be searched on the Internet. And if you suddenly have questions during the experiments, ask them, I will be happy to answer.
Microsoft Hyper-V is a server virtualization solution for enterprise environments. Microsoft Hyper-V is part of the Windows Server operating system and allows you to run several virtual servers on one physical server, each of which will run its own operating system and various business applications. Unlike the Virtual Server or Virtual PC products, Microsoft Hyper-V provides virtualization at the hardware level, using virtualization technologies built into all modern processors. Thus, Hyper-V provides high performance, almost equal to the performance of a single operating system running on a dedicated server.
Recently, server virtualization has become an integral part of any modern information system, because has undeniable advantages compared to physical infrastructure. Previously, to build even the smallest IT infrastructure, it was necessary to purchase from 5 to 10 or more physical servers, but now, thanks to Microsoft Hyper-V server virtualization, the entire infrastructure of even a fairly large company can be built on just 2 physical servers. Moreover, such an infrastructure turns out to be more flexible, more productive and more reliable. For more than 4 years, LanKey has been building IT infrastructures of any level of complexity using only Hyper-V or VMware virtualization technologies.
An example of the simplest 2-node cluster of Microsoft Hyper-V virtual servers.
The cluster is built on 2 HP DL360 servers and 1 HP MSA P2000 G3 storage system - the approximate cost of the solution is from 1 million rubles.
Benefits of Microsoft Hyper-V Server Virtualization
- Low hardware and software costs. With Microsoft Hyper-V server virtualization technology, each physical server can run multiple virtual servers using a single Windows Server Enterprise or Datacenter license. Thus, the entire infrastructure is deployed on just two servers, and therefore there is no need to purchase a new server and operating system licenses for each new task. It only takes a couple of minutes to deploy a new virtual machine on your existing hardware.
High availability and fault tolerance (new SLA level). The Hyper-V cluster automatically restores its functionality in less than 5 minutes, even in the event of a complete failure of one of the servers. In the case of physical servers, the failure of any of the servers leads to the inevitable failure of one or more services, requiring complex procedures for manual restoration from backup copies and the purchase of new or repair of old equipment, which can paralyze the business for several days. The snapshot technology used in Hyper-V allows you to roll back the state of virtual servers to the point of failure in a matter of minutes, for example, in the event of an unsuccessful update of a business application. In the case of physical servers, it would take several hours to restore information from a backup copy.
Scalability (readiness for business growth). If the task arises of deploying a new service or application, you simply create a new virtual machine and deploy the necessary applications in a matter of minutes. But even when, as your business grows, the performance of two servers becomes insufficient, you can simply include additional physical servers in the cluster (3rd, 4th, etc. up to 32). This will not require any reinstallation of operating systems or migration of applications. Virtual machines will simply be redistributed to new servers, without interrupting work.
Reduced maintenance costs (reduced TCO). Maintaining 2 Microsoft Hyper-V virtualization servers is much cheaper than 10 - 20 physical servers, each of which requires monitoring, repair, and complete replacement every 3-5 years. In a Hyper-V cluster, moving a virtual machine from one server to another takes 1 minute without interruption. For physical servers, system administrators typically need 8 hours or more to reinstall the operating system, drivers, deploy applications, and migrate data. The Hyper-V virtual machine cluster has a flexible management system based on Microsoft System Center Virtual Machine Manager (SCVMM), which allows you to centrally manage computing resources, the availability of free resources, prepare virtual machine templates, and migrate physical servers to a virtual infrastructure.
Advantages of server virtualization services from LanKey
- The LanKey company has been offering the deployment of Microsoft Hyper-V clusters for more than 4 years, almost since the appearance of the product itself.
- LanKey is a gold partner of Microsoft and has a silver competency in virtualization - Silver Virtualization, which confirms our experience and professionalism in deploying server virtualization systems based on Microsoft Hyper-V.
- All employees taking part in projects to build virtualization systems based on Microsoft Hyper-V have MCITP: Virtualization certificates.
- LanKey has a large portfolio of successfully completed projects for the deployment of virtualization systems based on Microsoft Hyper-V, which have received positive feedback from customers.
![]()
List of services provided as part of the implementation of server virtualization systems based on Hyper-V
- Audit of existing IT infrastructure, testing the load of current equipment, planning the growth of computing power consumption, developing recommendations for the Hyper-V virtualization system.
- Development of the architecture of Hyper-V virtual server clusters.
- Selection and supply of server equipment and data storage systems for deploying clusters of Hyper-V virtual servers.
- Selection and delivery of software, development of the most optimal licensing schemes for Microsoft Windows Server, System Center Virtual Machine Manager and related software.
- Deployment of the Hyper-V virtualization system at the customer’s site, commissioning.
- Migration of existing physical servers to Hyper-V virtual infrastructure.
- Deployment of backup systems for Hyper-V virtual servers based on Veeam BackUp & Replication, Symantec BackUp Exec, Microsoft Data Protection Manager.
- Development of documentation, backup policies, disaster recovery plans (DRP) for Hyper-V virtual servers.
- IT outsourcing, support and maintenance of Hyper-V virtual server clusters.
- Providing virtual servers for rent as part of cloud services (IaaS).
Examples of some projects for implementing Microsoft Hyper-V clusters
|
Customer |
Description of the solution |
|
 |
As part of the planned modernization of the IT infrastructure, LanKey deployed a cluster of virtual machines based on the Microsoft Hyper-V hypervisor from Windows Server 2012 Datacenter. HP Blade servers and storage systems were used as the server platform. Microsoft System Center Data Protection Manager (DPM) 2012 was deployed as a data backup system. And in order to automate the management of the virtual environment, Microsoft System Center Virtual Machine Manager (SCVMM) 2012 was deployed. Based on the results of the project, feedback was received from the customer. |
|
|
|
A fault-tolerant and scalable cluster of virtual machines based on Hyper-V from Windows Server 2012 Datacenter was built. The cluster hardware platform was based on HP c7000 blade servers and NetApp FAS2240 storage systems. | |
|
|
As part of a project to create an IT infrastructure, a cluster of virtual machines based on Windows Server 2012 Hyper-V was built. IBM servers and storage systems were used to build the cluster. Symantec BackUp Exec 2012 V-Ray Edition was deployed as a backup system. Initially, the entire infrastructure was deployed based on LanKey’s IaaS cloud services, after which all virtual machines were migrated from the cloud infrastructure to the customer’s local cluster. | |
|
In connection with the transaction for the purchase of 100% of the shares of the company OJSC "SIBUR-Minudobreniya" (later renamed OJSC "SDS-Azot") Holding Company "Siberian Business Union" in December 2011, the need arose to separate the IT infrastructure of OJSC "SDS" -Azot" from the SIBUR Holding network.  |
A 5-node cluster of Hyper-V virtual machines was built on Intel servers and HP storage systems. |
|
|
A 2-node cluster based on Hyper-V has been deployed. Dell servers and SUN storage systems were used. |

Among the top three leaders in the software market for virtualization of operating systems – VMware, VirtualBox and Hyper-V – the latter hypervisor occupies a special place. This special place is due to the fact that Hyper-V is a standard component of Windows server systems and some versions of Windows for desktop PCs. While inferior to VMware Workstation and VirtualBox in functionality, cross-platform, and partly in ease of use, Hyper-V, however, is not without its advantages. And the main thing is higher performance of guest operating systems.
Below we will talk about activating Hyper-V in Windows 10 and creating a virtual machine using this hypervisor.
1. Hyper-V - standard hypervisor from Microsoft
The Windows 10 system inherited the standard Hyper-V component from versions of Windows 8 and 8.1, and in them the hypervisor migrated from Windows Server. Both Windows 8.1 and Windows 10 include optional Hyper-V in the Pro and Enterprise editions. The hypervisor can only work on 64-bit systems.
For a long time, Hyper-V did not support any guest operating systems other than Windows. However, relatively recently, Microsoft took care of hypervisor support for Linux guest OS. And today, using Hyper-V, you can test some Linux distributions, in particular the popular Ubuntu.
2. Requirements for running Hyper-V
The minimum amount of RAM on a physical computer to run Hyper-V is 4 GB.
The computer processor must support SLAT technology (Intel EPT or AMD RVI). Almost all modern processors meet this requirement.
Another requirement for the processor, also provided for by many modern models, is support for hardware virtualization technology and, accordingly, its active state in the BIOS. In the BIOS of motherboards for Intel processors, this technology (depending on the version) can be called differently - Intel-VT, Intel Virtualization Technology, Intel VT-x, Vanderpool or Virtualization Extensions. AMD's hardware virtualization technology is called AMD-V or SVM (Secure Virtual Machines). For example, in AMI BIOS version 17.9, the AMD processor hardware virtualization function can be found under the path Cell Menu – CPU Feature – SVM Support.

AMD processors usually have hardware virtualization enabled by default. Whether a specific processor model supports hardware virtualization can be found out on the websites of Intel and AMD.
3. Activation and launch of Hyper-V
Hyper-V is optional with Windows 10 Pro and Enterprise. Initially, the standard hypervisor is disabled. It is turned on in the “Programs and Features” section of the control panel. The fastest way to get there is an internal search.

Run “Turn system components on or off.”

In the small window that appears, check all the sub-items of the Hyper-V item. Click "Ok".

The system will apply the changes for a couple of seconds and ask to reboot. After the reboot, look for the shortcut to launch the Hyper-V Manager. You can immediately pin the Hyper-V Manager shortcut to the Windows 10 Start screen by finding it in the Start menu Administrative Tools.

The Hyper-V Manager shortcut can also be accessed using an in-system search.

Launch Hyper-V Manager.
4. Setting up network access
In Hyper-V Manager, the network is configured in a separate step, and first you need to create a virtual switch - the parameter that provides access to the network. Click on the name of the physical computer, and on the right side of the window select “Virtual Switch Manager...”.

The virtual switch creation wizard will launch, where the first thing you need to do is select the network type. There are three of them:
- External - This type uses the network card or Wi-Fi adapter of the physical computer and connects the virtual machine to the same network as the physical computer. Accordingly, this is a type of network that allows a virtual machine to access the Internet;
- Internal - this type provides a network between the physical computer and Hyper-V virtual machines, but does not provide their access to the Internet;
- Private - this type allows you to create a network between Hyper-V virtual machines, but there will be no physical computer on this network, nor will there be Internet access.
In our case, virtual machine access to the Internet is necessary, so we will choose the first type - an external network. Click “Create a virtual switch.”

In the properties window of the virtual switch, give it a name; it can be any name, for example, “Network card 1”. If necessary, you can add a note to the virtual switch. If a physical computer has both a network card and a Wi-Fi adapter on board, the specific device through which the virtual machine will connect to the network can be selected from the drop-down list in the “Connection type” column. After making the settings, click “Apply” at the bottom of the window.

5. Create a virtual machine
Now you can proceed directly to creating a virtual machine. On the left side of the Hyper-V window, the selection should still be on the name of the physical computer. In the top right corner, click “Create”, then click “Virtual Machine”.

In the welcome window of the launched wizard, click “Next”.

Give the virtual machine a name; You can also change its location on the disk of a physical computer by specifying the desired disk partition and the desired folder using the browse button. Click “Next”.

One of the relatively new features of Hyper-V is the choice of virtual machine generation. In our case, generation 2 was selected.

What does it mean? Generation 1 are virtual machines that support 32- and 64-bit Windows systems. Generation 1 is compatible with previous versions of Hyper-V.
Generation 2 – new format virtual machines with built-in UEFI-based software. Such virtual machines support a number of new features and can provide a small performance increase. On generation 2 virtual machines, only 64-bit versions of Windows 8.1 and 10, as well as server versions of Windows Server 2012, Server 2012 R2 and Server 2016 are installed as guest operating systems.
The UEFI platform imposes another requirement for using Generation 2 virtual machines - UEFI boot media. This point needs to be clarified by downloading an ISO image with a Windows distribution from third-party sources on the Internet. But it’s still better to download Windows distributions from official Microsoft sources. Thus, the Media Creation Tool utility, which downloads Windows 8.1 and distribution kits from the Microsoft website, creates a bootable ISO image that supports the UEFI environment.
If you install Windows 10 as a guest OS, this is the recommended method for obtaining an ISO image of the system. Windows 10 includes a lazy-input installation process. In our case, Windows 8.1 will be installed as a guest OS, and its official distribution, obtained using the Media Creation Tool utility, requires entering a product key during the installation process. The TechNet Trial Center website can help you support the UEFI environment and take advantage of the free opportunity to test Windows 8.1. On this site you can download the English edition of 64-bit Windows 8.1 Enterprise and test the system for free for 3 months. The problem with the lack of support for the Russian language after installing the system can be solved separately by installing a language pack and setting Russian as the main language of the system.

We return to the virtual machine creation wizard. In the memory allocation window, leave the preset parameters if the physical computer has no more than 4 GB of RAM. If it is more than 4 GB, you can increase the amount allocated when starting the virtual machine. For guest Windows XP, the RAM indicator can, on the contrary, be reduced to 512 MB. Click “Next”.

In the network settings window, select the previously created virtual switch from the drop-down list. Click “Next”.

In the virtual hard disk connection window, give the virtual machine a name, indicate the location on the physical computer’s disk, and indicate the size. These are the options for creating a new hard drive. The second point of this wizard step is used when the computer already has a virtual hard disk, in particular, with a guest OS installed. If you select a Generation 2 virtual machine, the virtual hard disk file must be in VHDX (not VHD) format, and the guest OS must support the UEFI boot environment. Click “Next”.

If in the previous step of the wizard you selected the option to create a new virtual hard disk, the next step will be to specify the path to the Windows distribution. Generation 2 virtual machines no longer allow booting from a physical CD/DVD drive. The only sources for downloading the guest OS distribution can be the network and ISO image. In our case, this is an ISO image. Click “Next”.

The final stage of the wizard is to click “Finish”.

6. Connecting a virtual machine
Having created the virtual machine, return to the Hyper-V Manager window. Now you need to connect it. To do this, there is the “Connect” command, among other commands in the context menu called on the virtual machine. The “Connect” command is also present on the right side of the Hyper-V Manager window. To connect, you can also double-click with the left mouse button on the preview window of the selected virtual machine.

In the connection window that opens, click the green start button.


The normal Windows 8.1 installation process will follow, just as it would on a physical computer.

As soon as the installation files begin copying, you can close the virtual machine connection window and do other things.

Closing the connection window will free up some resources of the physical computer to perform other tasks, while the virtual machine will continue to work in the background. Its performance will be displayed in Hyper-V Manager.

You can connect to the virtual machine as needed to perform actions in it.
That's it - Windows 8.1 is installed. You can turn off, pause, save a virtual machine, or reset its state using commands in the Hyper-V manager and buttons on the top panel of the connection window.

7. Boot priority
In order to avoid wasting time on the boot window from a CD/DVD when starting a virtual machine in the future, you need to open the settings window when it is turned off and remove the path to the ISO file with the distribution kit. This is done in the DVD drive tab of the virtual machine hardware settings.

An alternative option is to raise the hard drive in boot priority above the DVD drive (but not above the “bootmgfw.efi” file). This is done in the “Firmware” tab of the hardware settings.

In both cases, the changes made are saved with the “Apply” button at the bottom.
8. Bypass Hyper-V connection window restrictions
The Hyper-V hypervisor focuses on the performance of virtual machines, not functionality. Unlike its competitors - VMware and VirtualBox - Hyper-V virtual machines do not work with connected flash drives, do not play sound, and interaction with a physical computer is carried out only by inserting text copied into the main OS inside the guest OS. This is the price of performance of Hyper-V virtual machines. But this is if you work with the usual Hyper-V connection window.
Full integration of a physical computer and a virtual machine can be achieved using the standard remote desktop connection utility.

This utility allows you to flexibly configure connection parameters, in particular, to make available within the virtual machine not only USB drives connected to the physical computer, but also individual hard drive partitions.

Connecting to a virtual machine in this way will provide audio playback and two-way file transfer in the guest OS.
Have a great day!
