How to connect a webcam to a computer? Instructions for connecting a webcam. Turn a digital video camera into a web camera Use a digital camera as a web camera
Today the popularity of the Internet is difficult to overestimate. If previously the World Wide Web was used to search for information, now users from all over the world can communicate with each other via video, record videos for posting on thematic portals and conduct live broadcasts. All this is achieved using a webcam.
In recent years, video cameras for computers have become as necessary an accessory as a keyboard and mouse. It is difficult to find an Internet user who does not use Skype, watch videos or record their own.
The most popular areas of use of a computer video camera:
- communication on Skype;
- recording videos for YouTube;
- online broadcasts (streaming).
Modern PC models have compact dimensions and convenient fastenings, both for placing the accessory on the table and directly on the monitor. Initially, the web video camera was created specifically for Skype and other programs for video calls on the Internet. In recent years, the fashion for blogging on YouTube or streaming various events, for example, computer games, has led to cameras being used for slightly different purposes. However, the main task is recording and broadcasting video.
Most modern models are USB video cameras with a microphone. Such devices are very easy to configure and do not require any special characteristics from the computer. Even the simplest PC can work with this accessory. The webcam itself must have good video resolution, at least HD (that is, 1280*720 pixels) and a good microphone with noise reduction.

It is worth noting that vloggers prefer separate microphones, as their sensitivity and ability to suppress background noise is much better.
Connecting a web camera
This accessory is designed in such a way that users do not have any problems setting it up. Usually, There is no need to configure the camera on a laptop, since it is initially built into the case, and if the device has an operating system, then the webcam almost always has drivers. Just launch the program and you can use it.

On a stationary device you will have to connect the video camera to the computer, which usually does not cause any particular difficulties. The accessory must be connected via a USB connector; in most cases, drivers are installed automatically. The user can only configure the camera in Skype.
If the camera is not automatically detected on your computer, you will need to install drivers for it. This can be done from a disk that may be supplied with the device itself, or you can download the necessary software from the manufacturer’s official website.
After installing the drivers, you can use the camera, but you will need special programs for this. The most common way to make video calls around the world is Skype. But first you need to configure it for use. When you first install the program, it will automatically ask you to check your video camera and microphone. All the user needs to do is agree to the requirements of the program.

If the program was installed previously, then the setup is carried out as follows. An example is given for Skype on Windows 7, but there will be no significant differences from newer versions in the setup.
- You should log in to Skype.
- On the toolbar at the top, select “Tools” - “Settings”.
- Video settings. After activating the item, a window with a video shown by the camera automatically opens.
- In this menu, you can click the “Webcam Settings” button and get access to fine settings, however, for simple communication all these parameters are completely unnecessary.
Connection problems
Sometimes it happens that the computer does not see the video camera via USB, or the user has other problems using the device. The reasons why the device may not be visible to the computer are as follows.

Advice! If all of the above reasons are not confirmed, then you should turn off the video camera and check it on another PC to make sure that the device itself is working.
How can you replace a webcam?
Sometimes situations arise when you urgently need to shoot a video for broadcast on the Internet or conduct a stream, but there is no camera at hand. In this case, a regular or action camera will come to the rescue. It is quite possible to use your camcorder as a webcam, but you should first make sure that it supports this function. This information is usually specified in the instructions.

In general, connecting the video camera is carried out in a fairly standard way. The connection between it and the computer is carried out via USB cable. The video recording device switches to shooting mode. You will need to install drivers for it; they are usually on the disk that comes with the device. But you can also download them from the manufacturer’s website.
Advice! To start using it, for example, for a video blog, you will need to make sure that the computer sees the device as a video recording device, and not a storage medium (if it has a built-in hard drive). To do this, you need to go to “Control Panel” - “Image Processing Devices” and see if there is a connected technician there.
Next stage - installing blogging or video recording software. To broadcast online, you can use Skype, and it allows you to select the device from which the broadcast will be carried out. The selection of the appropriate option is carried out in the camera settings along the path “Tools” - “Settings” - “Webcam Settings”. Using multiple cameras, you can change the scene during the broadcast.

If a digital camera does not support web display mode, but can transmit video via cable, then it can also be configured as web using video capture devices and special programs. Video capture can be carried out by a TV tuner, a video card itself, or a special receiver. SplitCam, ManyCam and similar programs are suitable as software. In this case, the connection is made via a “Tulip” cable.

Similarly, you can make an action camera into a webcam. The principle is the same: connect the action camera, install drivers for it, and turn on the device for recording. Most modern action cameras have a built-in web mode.
Using regular and action cameras is a very convenient option for bloggers, because quite often the image quality from these devices is better. In addition, you can simultaneously connect a regular camera and an action camera, and install a web device. This will allow for alternating display from three different points.
An important point: all cameras must be connected to the electrical network so that they do not discharge during operation.
Related topics.
What are the advantages and disadvantages of using a DPC instead of a webcam?

The benefits depend on the camera used. With many cameras, for example, you can set white balance to a target, which is not available when using a webcam.
Modern digital cameras have higher sensitivity and a wider dynamic range than most webcams, allowing you to broadcast video with acceptable quality in almost any lighting conditions.
The picture shows a frame captured from a video stream. The room is lit only by the light from the monitor. The arrow points to the reflection of the monitor in the glass of the furniture, which is located on the opposite wall of the room. https://site/

The disadvantages include the relatively high power consumption of a digital camera in video broadcast mode. Additional energy will also be needed if you use constant focus mode (autofocus tracking).
All this, during prolonged operation, may require recharging the battery or connecting the camera to an external power source. The cost of a branded power supply can be comparable to the cost of a budget webcam.
Another disadvantage is the relatively low image resolution when transmitting video. In any case, it cannot exceed 720x576i pixels at 50fps for the PAL format and 720x480i at 60fps for the NTSC format. In fact, the resolution of the video stream at the output of the DSC can be two or more times lower.
Which DSC can work as a webcam.
DFCs are divided into those that have a “webcam” mode and those that do not. As for the former, there may not be any special problems with the connection, except for the usual problems that arise when connecting a webcam to Skype. You just need to connect the camera to a USB socket, and if the camera does not support the UVC protocol, then also install the driver supplied with the camera.
Next, we will talk about DPCs that do not have a “web camera” function, but transmit an analog video signal not only in slide show mode, but also in the mode of transmitting a video image received through a lens in real time.
Before you buy any video capture device, connect your camera to your TV and make sure it is capable of transmitting a video signal of the quality you are comfortable with.

All digital photo cameras have a video output that allows you to view photos or videos on your TV screen.

That is why, in addition to the USB cable, the DFC comes with a cable for connecting to a TV.

If, when connected to a TV, your camera is capable of streaming video, then it can be used as a webcam for conversations on Skype or recording video on a computer hard drive.

It’s good if the camera allows you to turn off the information board with data about shooting conditions.
Hardware video capture.
The operation of transferring streaming (live) video from a camera to a computer is called Capture Video.

You can capture video using any video capture device that has a tulip-type composite input (usually yellow). This device can be a video card or a tuner with a video input, as well as any built-in or external adapter for capturing video signals.
In the picture, pos. 1 and 2 are built-in and external TV tuners, and pos. 3 and 4 – built-in and external video capture adapters.
Video capture software.
Before installing video drivers on your computer, if possible, create an OS restore point, or better yet, a .
It's easier to recognize some software and hardware conflicts when you can roll back and start over. This, of course, applies not only to installing video drivers. It’s just that conflicts that arise when using all kinds of video software can be a little more difficult to resolve.
Any video capture device comes with a driver program that allows you to record a video signal to a hard drive, but this program does not transmit the video signal to Internet telephony programs. To transmit this video signal directly to Skype, it needs to be intercepted and redirected. For this purpose, you can use the free SplitCam program.
However, the software supplied with the video capture device must be installed, since without it, the video signal cannot be captured.
The only case where you can do without installing accompanying software is when the video device supports the UVC (USB Video Class) standard. This standard does not require installing drivers in the OS starting from Windows XP SP2. Such a device, for example, could be a webcam, which, however, does not want to “cooperate” with Skype. Similar cases occur, and we will consider them below.
Installation and use of SplitCam.

Installing the program is no different from installing other applications, except that during the installation process the installer offers to install a bunch of related software that is not related to capture. I have not installed any of the proposed software and I do not recommend it to you.
The picture shows the installation process. On pages with options not related to video capture, you can safely click the “Declines” button.
The installation process itself takes only a few seconds.
So, the Split Cam program is installed, and you can start switching the signal.
Switching the video signal when using a video capture device.

If your video capture device, such as an adapter or TV tuner, is located outside of the computer, you must first connect it to the computer.
Then, in the composite input (usually yellow), you need to connect a cable connected to the same output of the digital camera.

The digital camera has an automatic shutdown timer to save battery power. Set it to the maximum time so that the camera does not turn off at the most inopportune moment.
Using an external power source will eliminate the need to frequently recharge the battery.

Before attempting to redirect a video stream using SplitCam, make sure that your camera's image is being received by the video capture device.
To do this, run the program that came with the video capture device.

Launch the SplitCam program.
In the program menu, select the signal source: File > Video Source > Your video capture device. Do this even if there is already a bird facing your device.
This is a little counterintuitive, since usually when you select again, the bird is removed. But, let’s leave this up to the conscience of the program developer, not forgetting that the program is free.

If you select the option: Options > Advertisements > Exchange ad and video windows, then the picture with the captured video will move to a larger window.
Now that you have verified that the video signal has been successfully intercepted, you can launch Skype.

The latest versions of Skype themselves offer to check the quality of the video image. But, if this does not happen, you will have to select the signal source manually.
In the Skype main menu, select Tools > Settings > Video Settings > Select Webcam. Select from the drop-down menu SplitCam Capture.
Possible problems with video signal transmission.
The appearance of a video image in the Skype settings window is not a guarantee that you will be able to successfully transmit this video signal to your subscribers.
The first obstacle on this path is the Skype program itself.
If the video signal successfully passed Skype and went to your interlocutor, then we cannot significantly influence his further travels via the P2P (Peer To Peer) protocol. Here, a lot will depend on a number of circumstances, such as the transmission speed between individual computers on the network (of which there can be many), the magnitude of pings, the number of lost packets, etc.
But it’s even worse if, some time after establishing a connection with the subscriber, the video signal “jams” in the Skype program itself. The cause may be a software conflict due to a specific hardware configuration. This manifests itself as freezing of the picture or even freezing of the Skype program itself. In the worst case scenario, this conflict can cause the OS to freeze and require a computer restart.
Manufacturers are aware of the existing problems and are trying to solve them, but the huge variety of hardware used and its configurations makes this process difficult.
On one of the tested computers, I encountered a similar conflict, which manifested itself in video freezing and Skype freezing. I followed all the manufacturer’s recommendations, from installing the latest drivers for all computer hardware to flashing the BIOS firmware with the latest software version, but nothing changed at all.
If such a conflict occurs, then you can use another program that can also redirect the video stream - ManyCam.
Installing and using ManyCam.
The ManyCam program is a multifunctional software that allows you not only to redirect the video stream in the same way as SplitCam does, but also provides a lot of other equally interesting functions.

For example, using this program, you can show your friends a video recording located on your computer’s hard drive.
The desktop display function has been expanded compared to the similar Skype function, which allows you to adapt the image transmission to the capabilities of the existing communication channel.
Simply put, you can determine not only the size of the transmitted image, but also the resolution of the video image.
With a narrow communication channel, image legibility can be significantly increased by moving the selected area following the movement of the cursor.

Well, for lovers of various baubles, ManyCam was taught to intercept streaming video and add all sorts of effects, like those that allow you to add proprietary software that comes with regular web cameras.
What I liked most was the ability to change the background directly during the video broadcast. Moreover, the background can be not only static, but also dynamic. In the program this effect is located under the button Background.
It works like this. First, ManyCam remembers the background behind you * , and then replaces it with its own static or dynamic background. Of course, upon careful examination of the picture, you can notice artifacts characteristic of mediocre performance of Chroma key technology. But, if you try and match the real and virtual backgrounds by tone, then you can easily.
In general, if you are an active Skype user, then this program may be useful to you, even if everything is already working well for you.

Installing the ManyCam program takes 10 – 20 seconds.
When, during the installation process of the program, you are prompted to install additional software, you can safely click Declines.
-----------------------
* When you try to use the background replacement effect, a pop-up window will appear and you will be asked to capture a photo of your background without you. Clicking the button Take snapshot(Capture photo), you need to leave the field of view of the webcam within 3 seconds.
The background, in this case, must be stationary and the lighting conditions unchanged. For example, if you sit down at a table and even slightly change the flow of light falling on the background, this can cause additional Chroma key artifacts. Naturally, all settings (Focus, WB, Exposure) of the webcam should be in manual mode.
Modern people have long been accustomed to the fact that a smartphone is a multifunctional device with which you can solve a wide range of problems. But the user may not even be aware of some of the capabilities of his mobile gadget. For example, in a situation where a webcam is required for video communication, it can be replaced with an Android phone camera.
Turning your phone into a webcam is useful if you need to:
- Make an urgent video call on Skype, but you don’t have a standard camera at hand, or it’s broken;
- Install an additional webcam for Internet broadcasting;
- Create remote surveillance using your phone.
Even a phone with a broken screen can be used as a webcam. The main thing is that the front or main camera module is in working condition. For different ways to connect your phone you will need:
- USB cable;
- Wi-Fi hotspot;
- Programs for pairing your phone and computer or laptop.
Method 1. How to use your phone as a webcam via USB
You can connect your smartphone as a webcam to a PC or laptop using a regular USB cable. You will need some software to set up a video call. The most popular and convenient is the Android application DroidCam Wireless Webcam, which can be downloaded for free in the Google Play digital store. You also need to install the DroidCam program on your PC.
This software will work in conjunction: the Android application will configure the phone as a webcam, and the PC program will receive and process the signal from the mobile device.

Let's look at the step-by-step setup of the phone:
- Install the DroidCam Wireless Webcam application on your smartphone;
- Open the page http://www.dev47apps.com/ in your browser, download the distribution and install it on your computer or laptop;
- Enable developer mode on your phone. You can read about how to do this in our article “The 10 most useful hidden features of Android”;
- Launch the USB Debugging feature. To do this, in the phone settings, select the “For Developers” menu item and press the button in the corresponding item.


- Launch the DroidCam Wireless Webcam application;
- Connect your smartphone to your computer via a USB cable;
- Launch the DroidCam client on your computer;
- Click on the USB connection button;
- Click on the Start button.


An image from the phone's camera will appear on the client's screen. In the settings of the DroidCam Wireless Webcam application, you can select the front camera as the main one for connection, and also assign the phone’s microphone to capture sound.


Method 2. How to use your phone as a webcam over Wi-Fi
The DroidCam Wireless Webcam program allows you to configure your phone as a webcam via a Wi-Fi connection. To do this, follow steps 1 and 2 from the above instructions. Then go through the following steps:
- Start Wi-Fi on your phone;
- Open the DroidCam Wireless Webcam application;
- Open the DroidCam program on your PC;
- Click on the Wi-Fi connection button;
- In the Device IP line, enter the number that will be displayed on the main screen of the Android application in the WiFi IP item;
- Check the Audio and Video checkboxes;
- Click Srart.


After this, the application will capture the video signal from the phone's camera and transmit it through the client to the computer. The free version of the application only connects the phone and PC, and also contains advertising. The paid DroidCam application does not show advertising banners and allows you to customize the video: set the contrast and brightness, change the resolution, and so on.
Please note! On the Internet you can find many recommendations for applications that allow you to use your phone as a webcam. The second most popular program is the USB Webcam Android application. It should work similarly to the DroidCam utility, that is, you need to download the application to your smartphone and the PC program from the official website. The problem is that, although the application is still available on Google Play, the client developer’s website has ceased to exist, and downloading the distribution from a third-party source risks introducing a dangerous virus to your computer.
Method 3. Turn your smartphone into an IP camera for remote video surveillance
This method is suitable for those who do not want to limit themselves to the length of the USB cable or the reception area of the home Wi-Fi signal. You can turn your smartphone into a webcam, even if you’re on the other side of town, using the IP Webcam Android application, which can be downloaded for free from the Google Play store. To output a video signal from your phone to a PC or Skype, you will need a special adapter, which can be downloaded from the official website.

To set up your phone as a webcam you need:
- Install the application on your smartphone;
- Install the adapter on your computer;
- Set up a camera for video capture in the application;
- Set video resolution and quality;
- Change additional settings: video orientation, focus and flash mode, white balance, color effect, and so on;
- Select “Start broadcast” in the application.


- Via browser;
- Via VLC player;
- Via Skype.
To watch the video in a browser, enter the IP address and port of the device into the search bar. This information can be found by clicking the “How do I connect” button in the application. Indicate that you are connecting directly and select the connection method: via mobile network or Wi-Fi. In a pop-up window, the application will indicate the required number, for example, 192.168.0.39:8080. Next, on the video broadcast page, select the viewing and listening mode.

- Install the distribution;
- Open the player;
- In the top menu, select “Media”;
- Click "Open URL";
- Enter a line with the address specified in the application and add the word videofeed, for example, like this: http://192.168.0.39:8080/videofeed ;
- Click Play.


To connect to a broadcast on Skype:
- Open the adapter program;
- Enter an address similar to the one used for the VLC player;
- Specify the resolution 320x240 (if the signal does not connect, increase the resolution to the next level, for example 640x480);
- Click "Apply";
- In Skype, open Video Settings;
- In the “Select webcam” selector, select MJPEG Camera.


The IP Webcam application differs from DroidCam Wireless Webcam in its advanced functionality and simpler connection, which does not require installing additional drivers for your phone.
While studying ways in which a phone can be turned into a webcam, we used a gadget model from the Fly company.
Why Fly
Since 2003, the British company Fly has been a stable manufacturer of high-quality smartphones, in which engineers try to take into account all the requirements of modern users. The company's main focus is on creating budget smartphones that are not inferior in quality to mid-price models. Even in a gadget for 7-8 thousand rubles, the user will find a powerful 4-core processor, a capacious battery, an excellent camera, a high-quality IPS screen, and all this is framed by a stylish design.

We turned our smartphone into a webcam for a while. Since testing took quite a lot of time, we needed a gadget with a capacious battery, a large screen, a high-speed Internet module and a fast processor. And the Cirrus 9 smartphone ticked all the boxes. The large 5.5-inch IPS screen made it very convenient to manage application settings and study instructions for managing programs. A powerful 1.25 GHz quad-core processor ensured stable system operation while downloading and launching several applets simultaneously. The 4G LTE module made it possible to instantly download the largest application, and a capacious 2800 mAh battery kept the smartphone in a state of full combat readiness all this time.
It's no secret that Skype has become incredibly popular in recent years. Now this is one of the few programs that allows you to organize communication with relatives or loved ones over a long distance completely free of charge. Not only can we communicate just like on the phone, we also have the opportunity to see each other. But here many are faced with the fact that they do not know how to connect a webcam to a computer. This is what we will talk about now.
General provisions
First, you need to understand that there are several types of webcams. Some do not require additional software, while others install normally only if drivers are available. What kind of camera do you have? We'll deal with this a little later. As a rule, a disk may be included with the webcam; if there is none, then it is most likely not needed. Additionally, the connection process differs depending on the hardware and operating system used. So, it can be a laptop or computer running Windows HP or Linux OS. But since connecting a webcam to a computer is not too difficult, even a novice user can cope with this procedure without experiencing any problems. However, before you start, read the useful information that will be useful to you in practice.

What do we need to get started?
We have already said a little about the fact that webcams are different, but the installation principle is not very different. That's why in order to do everything right, we need several integral components. One of them is high-speed Internet. As practice shows, without access to the network there is no particular benefit from the web. This is due to the fact that with its help you can only take your own pictures, but the quality in this case will not be the best. In addition, we will need the camera itself. Currently, most models have a USB connector. If the webcam does not have a microphone, which is typical for older models, you will need headphones with one. If you have a new camera, then you can do without a headset, since you will hear the interlocutor through the speakers, and speak directly into the webcam. By the way, do not forget to free one USB port, because we will need it. Well, now let's see how to connect a webcam to a computer.
Stage one
If you work on a laptop or netbook, then it already has a webcam. To use it you do not need to install, update or download anything. But if you decide to install a higher-quality analogue, then this is a different matter. First, connect the camera to the appropriate port, where it is located, you will figure it out, since it is almost impossible to mix it up. Next, you need to wait a little while the driver is automatically installed from your operating system database. The same procedure applies when connecting a storage device, mobile phone or other equipment, so don’t worry. After this, you will receive a message stating that the device has been successfully installed and is ready to use; in rare cases, you will need to restart your PC. Well, now let's go further and consider a slightly different situation.

Stage two: manual installation
If the camera does not install automatically, you will need to insert a driver disc. But here you may encounter the problem that it is missing or does not work. Of course, this does not mean that you need to throw away the device, so do not despair, because you can turn on the webcam on your computer even without a driver without any problems. To do this, you will need to go to the manufacturer's website and find the appropriate software there. All you have to do is download and install. You can go the other way and install a utility called DriverPack. Its essence is that it will automatically search for a suitable driver on the network and install it. To check if it works, go to “My Computer” and find your USB video device there. If you can enter it and see the picture, then everything is in order, and now you can talk with your family and friends.

Setting up and connecting a webcam to a computer
We must not forget that this USB device has a lot of internal settings. Sometimes the factory settings are quite acceptable, so you don't need to do anything else. But in some cases, you will need to adjust a number of parameters, for example, the volume of audio recording and playback. If this indicator is at the maximum, the voice may be poorly recognized or extraneous noise will be observed. In addition, sometimes it is useful to change the image quality as well as its size. In the latter case, you can make it wider or, conversely, narrower. This is necessary in order to see the interlocutor in full or only his face. In addition, modern webcams have a number of other settings, such as saturation, sharpness, brightness, contrast, etc. If you connected the device to a PC using drivers, the settings will be set automatically, and most of them will be at 50%.

Setting up in Skype: step one
In principle, connecting a webcam to a computer is quite simple and quick. Sometimes it is much more difficult to set it up directly in Skype. Let's figure out how to do this. First, you need to log in to the program, go to the “Tools” section and select “Settings” there. After that, select “video settings”. If you see the picture, then everything is in order, but when a text message from Skype is displayed on the screen, this indicates that there is a problem. The first thing to do is check whether the device is connected to the port and whether the computer finds the webcam. Go to "my computer" and see if "usb video device" appears there. By the way, one of the most common mistakes is that “webcam” can only be used in one program. Therefore, if it is open somewhere else, Skype simply will not see it. It's easy to guess that fixing this is very simple. It is enough to close one of the utilities. You may also need to restart Skype, after which everything will fall into place.
Setting up in Skype: step two
Any webcam requires drivers; the only question is how they will be installed. This can be an archive of your operating system or a disk that comes with the package. If the camera is not displayed in Skype, and you have tried all the methods described above, then do the following. Go to the “Control Panel”, select “System” - “Hardware”, and then “device manager”. You will see a list of all devices running on this PC. Somewhere among them should be your webcam. If it is not there, then this only means that the problem is either with the port socket or with the device cable. If you do find the camera and see a yellow exclamation mark next to the icon, this indicates that there are no drivers. Next, right-click on the icon, select “properties” and “update drivers”. If there is no exclamation mark and the “webcam” is still not visible, reinstall the driver. After this everything should work.

A few important details
Many users report that the webcam does not appear in My Computer. There is nothing wrong with this, especially if you do not use the Windows HP operating system. This is due to the fact that later updates do not support this function. For example, you won’t be able to call up the webcam on a laptop running Win 7; it will only work in Skype. It is worth drawing your attention to the fact that there are a lot of manufacturers of this equipment. They all take a different approach, so the setup will be slightly different. For this simple reason, it is simply impossible to develop a single algorithm, however, debugging is not so difficult. Moreover, in approximately 70% of cases, a webcam, which is installed on a computer automatically, does not cause any inconvenience to the user.

Conclusion
So we have figured out how to install and configure the web. Everything is extremely simple: insert the cable into the port, install the drivers, update them if necessary, close all utilities that use the web - and you can enjoy communication. You also already know how to connect a webcam to a computer without an installation disk, so this shouldn’t be a problem. However, before purchasing, check whether it is necessary to install a driver for this device. They may not give you the disk, but they will tell you where you need to go to download the necessary software. That's probably all on this topic.
Greetings to blog readers!
Today I would like to consider one interesting question that subscribers and readers of the blog have already asked about several times. So, can the camera be used as a webcam?
How to use a camera as a webcam?
The question is relevant for those who do not have a webcam on their computer, but want, for example, to chat with friends on Skype. The answer is ambiguous - maybe, but there are a number of conditions for this. Firstly, many modern models are already equipped with a similar operating mode. In order to activate it, you just need to install the drivers, connect the camera with a USB cable to the computer and activate the camera mode.
But in most cases, everything is much more complicated. First of all, you need to check whether your camera has the ability to stream video. To do this, take from the kit that came with your model a cable with tulips for connecting to a TV - on one end it usually has 3 tulips, and on the other is the connector that is intended for audio-video output on the camera - this can be USB, miniJack or some other one.

As a rule, the yellow tulip is responsible for the video - we connect it to the video input on the TV and select AV input as the image source in the TV menu - the camera, of course, must be turned on. If there is no picture, then you will not be able to use this camera as a web camera, since it cannot transmit streaming video.
If a picture from the camera appears on the screen, then you can proceed to the next step and connect it to the computer.
But first you need to make sure that it has a video capture device with a tulip video input that will transfer video to the program. This could be a video card or TV tuner. If there is no tuner, and the video card is not equipped with the necessary video input, then you can purchase a separate video capture device - there are a lot of all kinds of inexpensive models in Chinese online stores.

We connect this device to the USB of the computer, and insert the tulip connector from the cable that came with the camera, which is inserted into the turned on camera.
For Canon cameras there is a separate similar special proprietary utility called PSRemote.
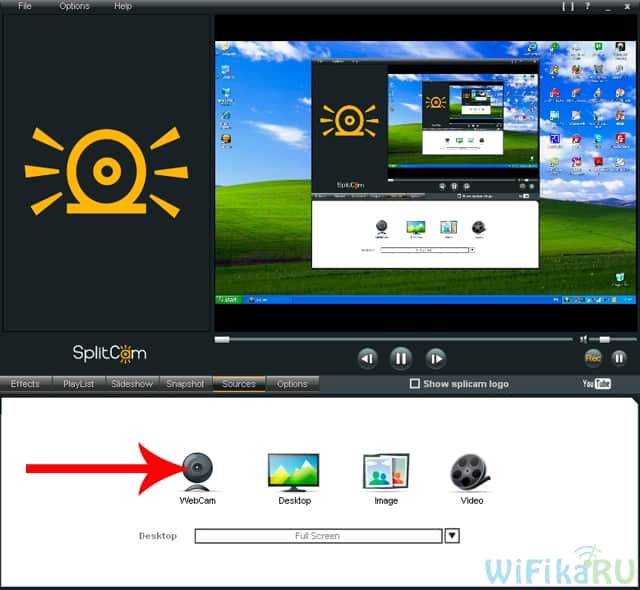
As you can see from the screenshot, you can also select a video file, picture, or broadcast your desktop for playback on the Internet. In addition, the program allows you to apply various cool effects to your video.
After that, in Skype or another video communication application, for example ooVoo, select our application as the outgoing video (“Tools > Settings > Video settings > Select webcam > SplitCam Capture”)

The MoneyCam program works similarly, in which there are even more various effects for overlaying online videos and detailed settings for displaying video images. To launch an image from the camera, go to the “Sources” tab and select our camera.
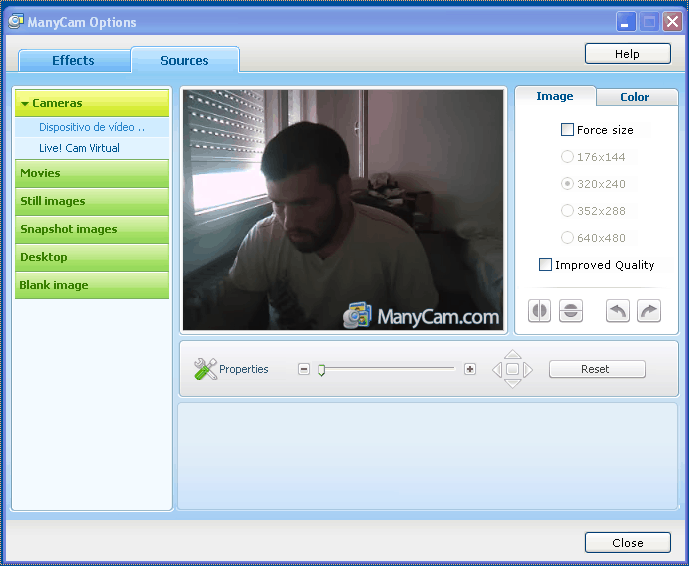
In Skype, as in the case of SplitCamer, go to the source selection section and activate the ManyCam application as its source.

Or, for example, you can use the program on Facebook:

That's all for today - I hope the question of how to use a camera as a webcam has become not so insoluble for you - go for it!
