General information about sites, workspaces, and pages. Appendix B: "Creating Web Site Templates" What is a Web Site
To speed up execution laboratory work it is possible to copy via the clipboard to create a page with frames p.2.3.1, 2.1.4 and 2.1.5 from a file with guidelines.
2.1.1 Create and design a web site containing web pages. To do this, you need to run the command File 4 Create 4 Single page Web site, select an option in the dialog box Single Page Web Site. Then switch to mode Transitions(tab at the bottom of the Front Page window ) , then double-click on the file name index.htm in the center of the screen. Then you should place the data shown in Figure 1 on the sheet: enter text according to the model, arrange pictures. To create a logo for the store name, you can use the WordArt tool.
For clearance appearance home page you need to use the command Format4Font, in which you need to select the font color and typeface. The next step is to save the page.
To create a page with frames shown in Figure 2, select the index.htm file in the navigation area and run the command File 4 Create 4 Other page templates, in the dialog that appears Page Templates select tab Frames Page, then choose a template Announcement and table of contents, and click on the button OK. After that, switch to page editing mode, then you need to click on the button Create page in every frame.
Figure 1 Home page example
To design the page of the upper frame (Figure 2), insert a table of one row and three columns. Then place the figures in the columns of the table, then move the borders of the columns according to the size of each of the figures and align them in the center. Then right-click on the table and select the command from the context menu that appears. Table properties.... In a group of elements Borders set the size of the table border to zero so that the border becomes invisible.
You should also use a table with one column and four rows to write menu items on the left side of a page with frames. Each menu item is written to a table row.
On the right side of the page with frames, enter the text, formatting it accordingly.
After that, you need to run the command File4Save, to save all new pages. Each page will be saved under its own name. The saved page will be outlined in blue. For example, the name of the top frame page would be baner.htm, the left one would be mnu.htm, the right one would be text.htm, and the name of the frame page itself would be start.htm. The result should be a page with frames, shown in Figure 2.

Figure 2 Example of creating a page with frames
After creating a page with start.htm frames, you should start creating other pages that will contain information on each of the menu items in the left frame.
Note. The data contained in the created web pages can be transferred using the commands for working with the clipboard from the electronic version of the FrontPage guidelines installed on computers.
Create a new page on which, in mode Constructor place the following information.
![]()
A Web site is a set of linked pages that are located on the same domain.
Any site on the Internet is a web site.
The home page of a site is called the home page. She connects everyone else.
The Web site is an encyclopedia book. Each article is a separate page
Web site structure
The site consists of structured files that have a hierarchical layout, with the main page at the top. Most often, they correspond to HTML files, which are given the name Default.htm or Index.htm.
Pages are divided by the degree of remoteness from the current one:
- equal - located on the same level;
- parent - are one level higher;
- child - located one level below.
Any document is structured. There is a title, title, body, etc.
Where are the websites located?
The nodes are on servers. These are machines that are connected to the internet. Disk space is allocated for each site.
Node address
Each node document has its own address. It provides access to this file on the server.
The address is divided into several parts:
- The http:// prefix is a type of data transfer protocol.
- WWW is an abbreviation for an address.
- The site name is a unique name purchased from registrar firms. It is formed from two parts - the name itself and the designation of the domain zone.
What is a web site security certificate
Determines how reliable communication with the host is.
There are two types of certificates: with DV domain verification and extended EV verification. DV certification ensures compliance with minimum reliability requirements. The user's browser marks such resources with a special icon. The EV certificate provides more detailed security requirements.
Stages of building a website
- Forming the structure of the site and determining what content will be placed on the home and other key pages.
- Creation of web pages.
- Viewing HTML files in a browser: checking if links work, content is up to date, etc.
- Publishing a web site with all its files on the server.
- View web pages stored on the service using all popular browsers, since they format pages differently.
- Run to index pages.
Partitioning principles
Logo
Almost every web site has not only a name, but also a unique logo that distinguishes the resource from the rest.
Navigation bar
It should be displayed in any document, be convenient, contain links pointing to other pages and large sections.
Must meet the following conditions: literacy, accuracy and reliability of the posted content. Additionally, there are a number of secondary conditions that the document must meet.
Graphic arts
It is desirable to have a weighted ratio of graphic content in relation to text content, based on its specifics in general.
Throughput of channels
SSI server support
Its use allows the Web server to use statistical amounts of dynamic content in the redirected HTML document.
Provider server support for CGI scripts
A function that allows a Web server to run arbitrary programs to generate HTML documents.
Page Refresh Method
Most often occurs over the FTP protocol.
Installing a Web Site on a PC
This may be required at the initial stage of site development. For example, you have made several small pages and want to check if they can be published in this form.
There are special programs - for example - that emulate the work remote server on your computer.
This section contains general information about nodes and their properties, administrator privileges, and administration of nodes with remote computers. The section contains the following subsections:
Web and FTP Sites
Multiple Web or FTP sites on a single Windows 2000 computer can be created while working on an intranet or the Internet in any of three ways:
- Adding port numbers to an IP address.
- Using multiple IP addresses, each with a corresponding fee network adapter.
- Assigning multiple domain names and IP addresses to a single NIC using host header names.
The following example illustrates an intranet scenario where an administrator has installed Windows 2000 Server with IIS on a company server, resulting in a single default Web site, http://CompanyServer. The administrator then created two additional Web site, one for each department: marketing group and human resources department.
But CompanyServer, and Marketing, and Human Resources hosted on the same computer, each will appear as a separate Web site. These departmental nodes have the same security settings as if they were hosted on separate computers because each node has its own access and administrative permissions. In addition, administrative tasks can be distributed among employees of each department. For more information about hosting multiple hosts, see Assigning Host Header Names, Addresses, and Ports to Web Sites in the About Determining Addresses by Names section.
If you create a large number of nodes, be sure to take into account the limitations imposed by the hardware and, if necessary, upgrade the hardware. For more information, see the volume IIS Resource Guide Windows package 2000 Resource Kit.
Properties and property inheritance on nodes
Properties are values that can be set on a Web site. For example, can be used to change the TCP port assigned to the default web site from 80 to a different port number. Node properties are displayed in the properties window and stored in a database called metabase.
During IIS installation, various properties are set to default values, which are displayed in the properties window. You can use the default values provided by IIS, or you can customize these settings to suit your web publishing needs. Adjusting default settings can sometimes add new functionality, improve performance, and improve security.
Properties can be set at the node level, at the directory level, or at the file level. Options set at the top level, such as node level, are automatically used, i.e. inherited at lower levels, such as the directory level. In addition, the values of these parameters can be changed individually at the lower level. If you change a property for a single node, directory, or file, then changing the setting of the main properties will not automatically override the value of the property explicitly set at the lower level. Instead, a message will be displayed prompting you to confirm whether the property of an individual node, directory, or file should be changed to match the new value of the main property.
The values of some properties are in the form of a list. For example, the default document value could be a list of documents that will be loaded if the user does not specify a file name in the URL. Other examples of properties stored in list format are special error messages, TCP/IP access control, script mappings, and MIME mappings. Although these lists typically contain multiple items, IIS treats the entire list as a single property value. If the user changes the list for a directory and then makes a global change to the node-level properties, the directory-level list is completely replaced by new list from the node level; lists are not merged. In addition, list-formatted property values are displayed only at the base property level, and at the site or directory level at which those properties were changed from their default value. Lists are not displayed if they represent inherited defaults.
The following figure shows a properties window that sets properties for all Web sites.

You can press the button Reference in the properties window for information about setting individual properties.
Website Operators
Web Site Operators are a special group of users who have limited administrative privileges for individual Web sites. Operators can administer properties that only affect the respective nodes. They do not have access to properties that affect IIS, the server computer, or the network.
For example, an ISP that hosts many sites from different companies may appoint a company representative to operate the company's website. This method of distributed server administration has the following advantages:
- Each operator can act as a site operator and can reconfigure the site as needed. For example, an operator can set access permissions for a Web site, allow login, change the default document and notes, set an expiration date for site content, and enable content rating.
- The Web Site Operator is not allowed to change the Web Site ID, configure an anonymous user's username and password, throttle bandwidth, create or change virtual directory paths, or change application sandboxing.
- Because operators have more limited privileges than site administrators, they do not have the ability to view remotely file system and therefore cannot set the properties of directories or files (unless a universal naming convention path is used).
Instructions for specifying accounts Windows users used by site operators, see Assigning site operators .
Remote node administration
Because it is not always convenient to perform administrative tasks on a computer that is running IIS, there are two options for remote administration. If you are connecting to the server over the Internet or through a proxy server, you can use the HTML version of the Internet Services Manager to change the host properties. When working in intranets you can use either the HTML version of Internet Services Manager or the one found in the Microsoft Management Console (MMC). Although the HTML version of the Internet Services Manager offers many features similar to those of the Internet Information Services snap-in, property changes that require coordination with the Internet Information Services Windows programs, cannot be made using the HTML version of the Internet Service Manager.
Note. In previous versions, the Internet Information Services snap-in was called Internet Services Manager.
The HTML version of Internet Services Manager uses a Web site that is listed as an administrative Web site to access IIS properties. After IIS is installed, a port number ranging from 2000 to 9999 is randomly selected and assigned to this Web site. This host responds to web browser queries for the names of all domains installed on the computer, provided that the port number is appended to the address. If Basic authentication is used, accessing the site will prompt for a username and password. Only members of the Windows Administrators group can use this site. Web Site Operators can remotely administer Web Sites. For instructions on using the HTML version of Internet Services Manager and the Internet Information Services snap-in, see Remote Administration .
Note. While the functionality of the HTML version of Internet Services Manager shares many of the features of the IIS snap-in, the HTML version is designed as a web page. Right click actions are not supported. Many familiar toolbar buttons or tab titles appear as links in the left frame. Because of these differences, many of the instructions in the documentation may not accurately describe the specific actions that you perform in the HTML version of Internet Service Manager.
When performing remote administration tasks, online documentation is also available. To obtain this documentation, launch a web browser and type http:// ServerName/webmast/iis/misc/default.asp, where ServerName is the name of the computer running IIS.
MIME mapping can be configured at the computer, Web site, virtual directory, directory, or file level. To configure machine-level MIME mappings, use the Internet Information Services Properties window. To configure MIME mappings at other levels, use the HTTP Headers properties window.
Note. MIME mappings configured at the computer level automatically override settings made at lower levels.
Chapter 11 Creating a Web Site Using Wizards and Templates
Templates and Wizards
We got acquainted with the main window of the program FrontPage. Before we start developing a Web site on our own, let's take a look at the templates and wizards that FrontPage offers to speed up development.
Creating a Web site is a rather time-consuming process that requires not only a lot of time, but also extensive knowledge in the field of development. FrontPage comes to the rescue of developers by providing them with tools designed to minimize the time it takes to create a project. Among them are a large number of templates and wizards for creating Web pages, frames, Web sites, and styles.
What are templates and wizards and how do they differ from each other? You have probably come across templates while working with other office products, such as when working with Microsoft Word.
Sample is a set of document parameters for its multiple use, in other words, the frame of your document. By choosing one or another template, you will later use the tools that are already included in it. For example, by selecting the One-column Body template, you get a page on which information must be placed in one column in the center. In other templates, areas are pre-allocated for placing text and graphic information, etc.
When using wizards, your development options are expanded, as master asks you questions in the process and creates a Web site or Web page based on your answers, posting headings and some of the information. Thus, when using the wizards, you get a project that is close to your main tasks.
Web site creation wizards
To run the Web Site Creation Wizard, follow these steps:
1. On the File menu, select the New command, and then in the submenu that opens, select the Page or Web option. As a result, the New Page or Web panel appears in the main FrontPage window (Figure 11.1).
Rice. 11.1. Panel Create a web page or site to work with new pages and Web sites
2. Select Web Site Templates in the panel. The Web site templates dialog box opens, in which you can select a template or wizard to create a Web site (Figure 11.2).

Rice. 11.2. Web Templates Dialog Box
The dialog box contains one Web Sites tab, which contains icons for templates and wizards offered by the system for creating Web sites. In table. 11.1 describes the purpose of the wizards offered by FrontPage.
Table 11.1. Wizards used to create Web sites
|
Master |
Purpose |
|
Enterprise Web Site Wizard(Corporate Presence Wizard) |
Creates a Web site representing the enterprise on the World Wide Web |
|
Database interface wizard(Database Interface Wizard) |
Creates a Web site that uses a database to store information in which you can view entries, add new ones, delete existing ones |
|
Web Discussion Wizard |
Creates a Web site for discussions |
|
Web Import Wizard |
Imports data from Web sites created using other programs into a Web site created in FrontPage |
Comment
In the Web Site Templates dialog box, FrontPage provides four wizards for creating a Web site. They are listed in Table. 11.1. The rest of the list are templates.
3. Select the icon of the wizard whose services you want to use. A brief description of the selected wizard appears in the Description area.
4. In the Specify the location of the new web field, enter the URL of the Web site, that is, the name of the Web server where you want to host the Web site, and the name of the Web site. Names must be separated by "/". For example, http://localhost/Corporate. In this case, the following options are possible:
- The web server is installed on your computer. In this case, the server name is automatically substituted into the URL. The server can also be given the default network name of your computer, localhost.
- You are using your ISP's Web server, which is available on the Internet. In this case, the server's real URL is entered as the server name.
- Save the Web site on your computer. In this case, the physical path to it is specified as the address.
- To establish a secure connection to the Web server using SSL, select the Secure connection required (SSL) check box in the Web Templates window.
5. Click OK. The master starts.
Advice
You can also double-click the icon of the selected wizard to launch a wizard or template.
Creating a Web site using the wizard is as follows. After starting the wizard, dialog boxes for entering the parameters of the created Web site appear on the screen one by one. You must answer all the questions provided. To navigate between screens during the wizard, use the buttons located at the bottom and have the following purpose:
|
Button |
Purpose |
|
Cancel(cancel) |
Terminates the wizard |
|
Back |
Allows you to return to previous steps in the wizard to change the information entered earlier |
|
Allows you to go to the next step of the wizard |
|
|
Ready(Finish) |
Allows you to proceed to the final stage in creating a Web site based on the information entered |
After answering all the wizard's questions, you click Finish. The wizard creates a Web site and displays it in the main program window for viewing and editing.
Comment
You can proceed to the final step from any window of the wizard using the Finish button. In this case, FrontPage will create the Web site using the default options.
Let's briefly consider the possibilities of the wizards for creating a Web site:
- Corporate Presence Wizard. Creates a Web site that represents the company on the Internet. The structure of the created Web-site may include:
Pages used by Web site visitors to view company news, products, and services
Table of contents to make it easier for visitors to navigate the Web site
Form of customer feedback on a particular issue
- Database Interface Wizard. A Web site created using this wizard may contain the following pages:
・Page for viewing information from the database
· Page designed for entering information
· A page that allows you to edit the database of a Web site from a browser
- Discussion Web Wizard. Creates a Web site, on the pages of which the user expresses his opinion about. ongoing discussion. The structure of the created Web-site may include:
Pages for discussion and a page by which the visitor determines whether his message has reached the Web site
・Web site table of contents
Form streaming responses
A search form that allows site visitors to find information of interest to them on the Web site
- Web Import Wizard (Import Web Wizard). Imports data from other Web sites into the Web site you create in FrontPage. You can import an entire Web site or individual pages. You can import from your computer, from a computer in your local network or from the Internet by specifying its URL
Company Representation Web Site Wizard
Let's take a look at the work of the Corporate Presence Wizard, which creates a Web site to represent an enterprise on the Internet. To create a Web site using this wizard, follow these steps:
1. On the File menu, select the New command, and then in the submenu that opens, select the Page or Web option.
2. In the New Web Page or Site panel that appears in the FrontPage window, select Web Site Templates (Web Site Templates).
3. In the Specify the location of the new Web site field in the Web Site Templates dialog box, enter the location and name of the Web site to create.
4. Double-click the Enterprise Web Site Wizard icon.
5. The wizard starts his work. Its first window appears on the screen, which contains a brief description of the wizard.
(Fig. 11.3). Review the information provided and click Next.

Rice. 11.3. First Information Screen of the Enterprise Web Site Wizard
6. At the next step of the wizard, you are asked to decide on the pages that will be included in the Web site (Fig. 11.4). The dialog box contains the following checkboxes:
Home (Note) - the home page of the Web site
what's new (What "s New) - Web site news page
products and services (Products / Services) - a page representing the products or services offered by the company

Rice. 11.4. Dialog Box for Selecting Web Site Pages
Table of Contents - the page containing the table of contents of the created Web site. From this page you can go to all pages of the site
feedback (Feedback Form) - a page in the form of a form on which visitors to a Web site can post their opinion about the goods and services offered
search form - a page in the form of a form for searching for words on a Web site. This form will allow the visitor to quickly find the information they need.
By default, all checkboxes are checked. Clear the check boxes next to the pages that you do not want to include in the Web site you are creating. The Home (Note) flag is unavailable for correction. This is understandable. After all, you can’t do without a home page. Once you've made your choice of pages, click the Next button to proceed to the next step.
7. The next dialog box of the wizard allows you to define the format of the home page of the created Web site (Fig. 11.5). It contains checkboxes, the selection of which leads to the reservation on the page of space for the following information:
Introduction (Introduction) - for introductory information
mission (Mission Statement) - about the goals and objectives of the company
company profile - about the company profile
Contact Information - for contact information
Uncheck the boxes next to those sections whose information you will not place on the home page, and click the button Further.

Rice. 11.5. Dialog box for defining the format of the home page
Comment
When you create a Web site using the wizard, certain dialog boxes may not appear. Their presence is determined by the pages that will be present in your development and which you specified in the second dialog box of the wizard.
8. The next window of the wizard allows you to set the parameters of the page that will contain the latest news of your Web site or tell you which page of the Web site has new information (Fig. 11.6). This window contains three checkboxes that, when checked, will place the following sections on the Web site:
|
Checkbox |
Section purpose |
|
website changes |
Web site news |
|
information messages |
Placing informational messages |
|
articles and reviews |
Posting articles and reviews |

Rice. 11.6. Dialog box for setting news page parameters
9. At the next step of the wizard, in the fields Products (Products) and Services (Services) (Fig. 11.7), you can set the parameters of the page containing information about the goods and services provided by the company. According to the entered numbers, one page will be created for each advertised product or service. Enter the required numbers in these fields and click Next.

Rice. 11.7. Dialog box that allows you to set the number of advertised goods and services
10. In the dialog box that appears in the next step, you can specify the sections under which space will be reserved on pages that advertise goods and services (Fig. 11.8). It contains two groups of checkboxes. The first group of flags defines the parameters of the page that represents the products:
Product image - reserves space on the page for placing the product image
Pricing information - reserves a place on the page for placing prices for the specified product
Information request form - results in the creation of an information request form
The second group of flags defines the parameters of the page that advertises services:
Capabilities list - reserves space on the page for more detailed description services
reference accounts - reserves space on the page for placing accounts
Information request form - indicates the need to form a request form for Web site visitors for services
Select the required checkboxes and click the Next button to proceed to the next step.

Rice. 11.8. Dialog box for setting parameters of pages containing information about goods and services
11. The next dialog box allows you to set the fields of the questionnaire form feedback with visitors to your Web site (Figure 11.9). This form is used to collect information and then submit it to the Web site. Don't put too many fields on this form so you don't scare visitors who want to register on your Web site. Check the boxes next to the information you want to receive about guests and click Next.

Rice. 11.9. The dialog box allows you to set the fields of the form-questionnaire for feedback from visitors to the Web site
12. In the next dialog box, you need to set the format of the data coming from the form-questionnaire for feedback from visitors to your Web site (Fig. 11.10). The choice of one or another format will be determined by the way they are processed. You are offered a choice of two options:
Yes - tab-delimited format (Yes, use tab-delimited format) - the data is saved as a table. This option is used if the survey results will be processed using a database or spreadsheet. Microsoft Excel
No - web page format (No, use web-page format) - data is stored in the Web page format
After setting the required option, click the Next button to proceed to the next step of the wizard.

Rice. 11.10. The dialog box allows you to set the format of the data coming from the questionnaire form
13. At the next step, the wizard offers to set the parameters of the Web site's table of contents page (Fig. 11.11). The dialog box contains three checkboxes:
Keep page list up-to-date automatically - checking the box allows you to automatically update the information in the table of contents when the pages included in the Web site change
Show pages not linked into web - the checkbox determines whether it is necessary to show pages in the table of contents that do not have direct links from other pages
markers for top-level pages (Use bullets for top-level pages) - when the checkbox is checked, the list of top-level pages is displayed as a bulleted list

Rice. 11.11. The dialog box allows you to set the parameters of the page containing the table of contents of the Web site
Warning
Checking the box to automatically update the list of pages (Keep page list up-to-date automatically) with a large number of pages in
Web site and frequent updates can increase the loading of the table of contents page.
14. Setting the checkboxes in the wizard window shown in fig. 11.12, you reserve space for information to appear at the top and bottom of all pages on the Web site. The parameters are divided into two groups. The first group of flags defines the information placed at the top of the pages. This is the company logo, page title, links to the main pages of the Web site.

Rice. 11.12. Dialog box for placing information at the top and bottom of Web site pages
The second group of flags defines the page parameters placed at the bottom of the pages, such as links to the main pages of the Web site, the address Email Webmasters, copyright information, page last modified date.
Comment
Checking the boxes in this wizard window is only used to reserve space on Web pages. After completing the wizard in the FrontPage editor, you can place the necessary information in these places.
Select the required checkboxes and click Next.
15. Further in the wizard, it is proposed to place the Under Construction icon on the pages, indicating that the creation of this page has not yet been completed (Fig. 11.13). Set one of the two suggested options and click the Next button to proceed to the next dialog box.

Rice. 11.13. You are invited to place an icon on your pages Under construction
16. In the next two dialog boxes, you must specify information about the company for which the Web site is being created. In the dialog box shown in Fig. 11.14, you must enter the full and abbreviated name of the company, as well as its address. Other information about the company - phone number, fax number, Webmaster's email address, and company's email address, enter in the box shown in fig. 11.15.

Rice. 11.14. Dialog box for entering the full and abbreviated name of the company, as well as the address

Rice. 11.15. Dialog box for entering phone number, fax number and e-mail address
17. In the next step, the wizard prompts you to choose the style of your Web site (Fig. 11.16). You can accept the default appearance and click Next. Later, you can change the design of the entire Web site or any of its pages using the Theme command on the Format menu. If you want to start styling the Web site you are creating now, then click the Choose Web Theme button located in the center of the dialog box. The Choose Theme window will open on the screen (Fig. 11.17).

Rice. 11.16. Dialog box for setting the style of the Web site

Rice. 11.17. Dialog box for selecting a theme for the design of the pages of the Web site
At the top of the Select Theme dialog box, the All pages option is set by default, indicating that the Web site theme you select will apply to all pages. Below this option is a list of themes provided by FrontPage. When you select a value from this list, in the Sample of Theme area, you can view the proposed design of text, headings, lists, navigation bars, hyperlinks. If you check the boxes below the list of topics, then:
Vivid colors - the colors used in the design will be more saturated
Active graphics - you can add active graphics to the design
Background picture (Background picture) - you can add a background image to the page design
Apply using CSS (Apply using CSS) - an external style sheet is added to the page design
After selecting the theme of your choice and checking the required checkboxes, click OK to close the Select Theme dialog box. This will return you to the wizard window. Press "Next.
18. In the next dialog box (Figure 11-18), the wizard says that it has finished collecting the information it needs and is ready to move on to building the Web site. By default, the Show Tasks View after web is uploaded check box is selected in the wizard dialog box, indicating that after the wizard completes and the created Web site loads, a list of generated tasks for finalizing the site will be displayed on the screen . Leave this checkbox checked, because immediately after the completion of the wizard, you will be able to view the list of work that you have to do and make sure that the wizard has done all the main work for you.

Rice. 11.18. The final information window of the wizard
Comment
Until you click Done, you can return to previous dialog boxes, view the information you entered, or change something. To do this, you can use the Back button. After viewing the settings, you do not have to return to the last dialog box. To start the process of creating a Web site, click the Finish button in any window.
Click the Finish button to complete the creation of the Web site.
The wizard proceeds to create the Web site. If the last dialog box was set to Show "Tasks" after loading the web site
(Show Tasks View after web is uploaded), then after the completion of the wizard, a list of tasks for finalizing the Web site will open on the screen in a tabular form (Fig. 11.19). Tasks are sorted by the priority of their execution. The Associated With column lists the name of the page that needs improvement, and the Description column gives a description of the work you need to do.

Rice. 11.19. Checklist to complete the creation of the Web site
Place the cursor on the task you want to start, press the right mouse button and select the Start Task command from the context menu that appears. The page you selected will open in edit mode. to editing the Web site created by the wizard.
First on the list of tasks is editing the Web site's home page. Therefore, when you start the first task in the list, the home page opens in edit mode (Fig. 11.20). Consider the elements located on it. They will usually be present on other pages of the Web site as well.
- The title of the page (the home page has the title Home). Is graphic object
- Web page background. Like the title, it is a graphic object

Rice. 11.20. Web site home page
- Horizontal and vertical link bars located at the top of the page above the header and in the left common area, respectively. The horizontal navigation bar contains links to Note (Home), Contact Us, Table of Contents, and Search Form. The vertical bar of the home page contains links to News, Products, Services, designed to go to pages with company news, as well as pages that advertise products and services.
- Horizontal dividing lines
- Contact telephone numbers, postal address, e-mail address, company name. This information located at the bottom of the page
Comment
Graphic images placed on Web pages can be created using software products such as Microsoft Photo Draw, Microsoft Image Composer, CorelDraw, Adobe Photoshop etc.
The elements placed on the page, as well as the page itself, are characterized by properties that can be viewed and changed using the element's properties dialog box. To open this window, you need to select the element, press the right mouse button and select the Properties command with the name of the element being modified from the context menu that appears. For example, to open the page header properties window, you need to use the Page Banner Properties command, Link Bar Properties, Horizontal Line Properties, and so on.
Let's look at the navigation structure of a Web site to represent a company on the Internet (Figure 11-21) and how its pages are related. To do this, switch to the Transitions mode by pressing the button of the same name on the Views panel.

Rice. 11.21. Web Site Navigation Structure Enterprise Web Site Wizard
As you can see from the structure of the Web site, the pages navigated to via the horizontal link bar hyperlinks are located on the same level of the hierarchy as the home page. At the next level of the hierarchical structure are the pages that are navigated to using the vertical link bar of the home page. In turn, the pages of the second level (Products, Services) contain links to go to the pages of the third level of the hierarchy.
Web site for discussions
To create a discussion group Web site:
1. On the File menu, select the New command, and then in the submenu that opens, select the Page or Web site option
(Page or Web).
2. In the Create Web Page or Site panel that appears in the FrontPage window, select Web Site Templates.
3. In the Specify the location of the new web field of the Web Templates dialog box, specify the location and name of the Web site to create, and then double-click the Discussion Web Wizard icon.
4. The wizard starts its work. Its first window appears on the screen, which contains a brief description of the wizard. Review the information provided and click Next.
5. In the second dialog box (Fig. 11.22) there are checkboxes. They allow you to specify the pages that are created on the Web site and the functions that are implemented:
Submission Form - a form for entering comments during the discussion
Table of Contents - A table of contents used to organize and view previously submitted comments on a particular topic. The table of contents is included in the Web site if it is required that visitors get acquainted with the questions of other participants and make comments on them.
search form (Search Form) - a form for searching information by a given criterion
Threaded Replies - when this checkbox is checked, comments on a general topic are combined, thereby providing the visitor with a consistent view
Confirmation Page - A confirmation page that lets the visitor know if their message has reached the Web site
By default, all checkboxes are checked. If you want to opt out of any pages or features, clear the corresponding checkbox, then click the Next button to proceed to the next step.

Rice. 11.22. A window that allows you to specify the pages of the created Web site
6. In the next dialog box of the wizard (Fig. 11.23) there are two fields. In the upper field, enter the title of the discussion, and in the lower field, the name of the folder in which the messages of the discussion group will be placed. You can leave the default folder name suggested by the wizard. When you have completed entering the information, proceed to the next step by clicking the Next button.

Rice. 11.23. Dialog box for entering title
Comment
Note that the folder name must start with an underscore "_".
At the next step of the wizard (Fig. 11.24), you must specify which fields the form should initially contain for submitting comments during the discussion. By default, it is proposed to include the subject (Subject) and notes (Comments) fields. Subsequently, in addition to the selected ones, it will be possible to add other fields to the form. After setting the desired option, click Next.

Rice. 11.24. Dialog box for setting form fields
8. In the next window of the wizard (Fig. 11.25), you must specify whether you want to limit the number of participants in the discussion group. By default, the No, anyone can post article option is set, indicating that anyone can participate in the discussion. Leave this value and click Next.

Rice. 11.25. Window that allows you to limit the number of participants in a breakout group
9. The following dialog boxes of the wizard specify how to organize the articles received on the Web site, whether to place the table of contents on the home page, set the search form fields, the theme of the Web site, whether to use a frame for page design, and if so, then its appearance . In these windows, you can accept the default options offered by the wizard. In the final window of the wizard, click the Finish button. The wizard proceeds to create the Web site. After completing the wizard, switch to the Folders mode by clicking the button of the same name on the Views mode panel.

Rice. 11.26. Viewing a sent message
10. Web site in the browser. Select the Post a new article link on the home page. A form for entering a message opens. Enter a subject, your name, and a message in the form fields, then click the Post Article button. Depending on the security mode set in the browser, a security warning may appear on the screen. Click the Yes button in this window. A confirmation of receipt appears in the bottom frame of the page
Web site of the message. On fig. Figure 11.26 shows the table of contents page with the message sent.
Web Site Import Wizard
Let's take a look at how the Import Web Wizard works. You can use this wizard if you want to copy a Web site you like on the Internet to your computer or modify a Web site. created without using FrontPage.
To import a Web site using the wizard, follow these steps:
3. In the Specify the location of the new web field of the Web Templates dialog box, specify the location and name of the Web site to create, and then double-click the Import Web Wizard icon .
Advice
You can also use the Import command from the File menu to launch the Import Web Wizard. The Web Templates dialog box will open and the Web Import Wizard icon will be selected by default.
4. The wizard starts and its first dialog box, Choose Source (Figure 11.27), appears on the screen, in which you need to specify where the Web site is imported from. The window contains two options:
- Directory on the local computer or on the local network (From a source directory of files on a local computer or network) - when this option is selected, the file will be imported from a directory on the local drive or from the network. Select the Include subfolders check box if the copied directory contains subdirectories. You can use the Browse button to specify the full path to the Web site.
Web site on the Internet (From a World Wide Web site) - this option allows you to import a Web site from a WWW server. You only need to specify the URL in the Location field
Select one of the two options provided, specify the location of the imported Web site, and click Next.

Rice. 11.27. First dialog box of the Import Web Site Wizard
5. The appearance of the next dialog box depends on the option set in the first step. If you are importing a Web site from a directory, the Edit File List window (Figure 11-28) will open, listing all the files, including the subdirectories you specified. When all files are imported, click the (Next) button. If you want to exclude individual files from import, select them and remove them from the list using the Exclude button. To restore the list is wrong remote file click the Refresh button. When the list is completed, click the button.

Rice. 11.28. Wizard dialog box when importing a Web site from a directory
6. When importing a file from the Internet, the Choose Download Amount dialog box opens (Fig. 11.29), in which you are prompted to create a number of conditions for the number of copied levels in the page hierarchy and the maximum amount of information in kilobytes. If the Limit to text and image files check box is selected, only text and image files will be imported. After setting the required parameters, click the button to proceed to the next step in the wizard.

Rice. 11.29. Wizard Dialog Box When Importing a Web Site from the Internet
7. The following dialog box is informational. Click the Finish button. The import process will begin, preserving the structure of the imported Web site.
Comment
If there is no private directory in the Web site structure, where FrontPage places confidential files, as well as an images directory for placing graphic files, they will be added to the newly created structure.
When the wizard completes, the imported Web site is displayed in the FrontPage window, and you can start working with it.
Database interface wizard
The Database Interface Wizard is a new wizard introduced in FrontPage XP. It creates a Web site that allows you to work with information contained in an Access, Oracle, or SQL Server. To use this wizard:
1. On the Create Web Page or Site panel, select the Web Site Templates command.
2. In the Specify the location of the new web field of the Web Site Templates dialog box that opens, specify the location and name of the Web site to create, and then double-click the Database Interface Wizard icon .
3. The wizard starts its work. Its first window appears on the screen (Fig. 11.30), in which it is necessary to specify the database with which the Web site will be connected. The window contains the options:
Create a new Access database within your web - this option specifies that the connection will be made to a new Access database
an existing database connection (Use an existing database connection) - when this option is selected, it becomes possible to select an existing database from the list below the option
connection to the sample database (Northwind) - connection to the test database Northwind
Let's look at how a connection to a new database is made. Leave the new Access DB connection on Web site option set to the default and click Next.

Rice. 11.30. Wizard window for selecting a database
4. The next window of the wizard contains one field for entering the name of the database. Enter a name and click Next.
5. At the next step, the wizard offers to create a list of database fields (Fig. 11.31). Information about the fields is presented in the form of a table containing three columns. The first column indicates the name of the field, the second - its type, and the third - the interface object with which information given field will be presented in the form. By default, the table contains three fields. Using the buttons in the dialog box, you can add new fields to the table, edit and delete existing ones.

Rice. 11.31. Window for generating a list of database fields
Add (Add) - opens a dialog box (Fig. 32), with the help of which a new field is entered into the database
Edit (Modify) - opens a dialog box with which you can edit information about the field selected in the table of the created database
Delete - deletes the field selected in the table from the database Use these buttons to create the table fields.
When entering a new or editing an existing field, a window similar to the one shown in fig. 11.32. It contains the following interface objects:
Column name - field name
Column type - field type. Specifies the type of information stored in the field. Can be text (Text), text field Memo, Integer, Long, Float, Double, Date, Boolean
Form field input type - specifies the interface object with which the field information will be presented in the form. The list contains the following values: Text Box, Text Area, Option Button, Drop-Down Box
Number of options - the number of options in the radio button or values in the list. This counter is available when Option Button, Drop-Down Box are selected from the Form Field Input Type list.

Rice. 11.32. Wizard window for entering and editing database field information
6. After all field information is set, click Next. The wizard proceeds to create a database based on the entered information. After the database has been created, an information window will appear, in which also click the Next button.
7. By checking the boxes in the next step of the wizard (Fig. 11.33), you specify the pages included in the Web site. The wizard offers three pages:
Result Page - page for viewing information contained in the database
Submission Form - a page designed to enter information into the database
Database Editor - A page that allows you to edit a Web site's database from a browser

Rice. 11.33. Generating a list of web site pages

Rice. 11.34 Dialog box that allows you to create a password to access the page used to edit the database
Specify the pages to include in the Web site and proceed to the next step of the wizard.
8. If the Web site includes a Database Editor page, a dialog box appears allowing you to set a username and password to access this page. To restrict access to the page, enter the name of the user who will edit the database structure in the Username field, password in the Password field, and password confirmation in the Confirm field. In the event that you want this page to be accessed without entering a password, check the box Don't project Database Editor with a username and password. parameter setting, continue to the next step by clicking Next.
9. An information box appears indicating the list of pages that the wizard will include in the Web site. Click the Finish button in this window. The wizard completes the creation of the Web site and opens it in the FrontPage window for viewing and editing (Figure 11.35).

Rice. 11.35. One of the pages of the Web site created by the wizard in edit mode
Templates for creating Web sites
In addition to wizards, templates can and should be used when developing Web sites. They help create a typical Web site structure.
To create a Web site using one of the suggested templates, follow these steps:
1. In the menu File (File) select the command New (New), and then in the submenu that opens - the option Page or Web site ( New page or Web site).
2. In the Create Web Page or Site panel that appears, select the Web Site Templates command.
3. The Web site templates dialog box that opens contains templates for creating Web sites (Table 11.2).
Table 11.2. Templates used to create Web sites
|
Sample |
Purpose |
|
Single Page Web Site |
Creates a Web site containing one page |
|
Customer Support Web Site(Customer Support Web) |
Creates a support Web site for buyers of your products, where they can post their comments and suggestions regarding the quality of goods and services |
|
Empty web site |
Creates an empty Web site |
|
Personal website |
Creates a multi-page personal Web site |
|
Project website |
Project Web site. This template can be used as a focal point and discussion center for a large project. On the pages of the Web site, you can post information about the project participants, the status of things, discuss the most important issues, and so on. |
|
Web site working group based on SharePoint(SharePoint-based Team Web Site) |
Web site for cooperation. Contains a calendar of events, a library of shared documents, a list of contacts, tasks, and so on. |
Highlight the template icon you want to use with the cursor. This displays a short description of the selected wizard in the Description area.
4. In the Specify the location of the new web field, enter the location and name of the Web site to create.
5. Click OK.
Based on the selected template, FrontPage generates the required Web site template and opens it in view and edit mode. You can start editing the created Web site prototype.
Template for creating a one-page Web site
First on the list of templates and wizards is the One Page Web template, designed to create a one-page Web site. With this template, FrontPage builds a folder-based Web site structure and adds one blank Web page to it.
To view the structure of the Web site created using the template, display the Folder List panel in the program window by selecting the command of the same name from the View menu. The page included in the created Web site structure is saved in a file named index.htm. By default, this page is meant to be used as the home page. Open this page by double-clicking on the index.htm filename. The page will open in edit mode in the FrontPage workspace (Fig. 11.36).

Rice. 11.36. Web site created using the Single Page Web Site template
Comment
The structure of a Web site created on the basis of the One-Page Web Site template can be changed later: add new folders and any necessary number of pages.
Blank Web Site Creation Template
To create an empty Web site, use the Empty Web site template. With this template, FrontPage generates a Web site structure consisting of the _private and images folders.
After the template is generated, the created Web site opens in edit mode. In the folder pane, you can view the structure of the Web site. It does not contain any pages.
Comment
The Empty Web template is useful when you intend to use a page with a more complex structure, such as one that includes a frame, to create your home page.
Template for creating a multi-page personal Web site
Using the Personal Web template, you can quickly create a personal Web site. In it you can place personal information, photos of friends, reference information, and also, using links, view the most frequently visited pages on the Internet. In addition, this Web site is a great starting point for those who are starting to explore the possibilities provided by FrontPage.
To create a personal Web site using a template, follow these steps:
1. On the File menu, select the New command, and then in the submenu that opens, select the Page or Web site option (New page or Web site).
2. In the Create Web Page or Site panel that appears, select the Web Site Templates command.
3. In the Specify the location of the new web field of the Web Site Templates dialog box that opens, enter the location and name of the Web site to create. Let's name the Web site, for example, My Pers_Web.
4. Double-click the Personal Web icon. The template creation process begins. After a while, the resulting Web site will open in the main FrontPage window for viewing and editing (Figure 11.37).
The Folder List pane contains the page files of the created Web site. Selecting the files one by one with the mouse cursor, view the pages offered to you. Using the tools of the FrontPage program, you can modify them, change the names of pages, add new pages to the Web site, insert your own text.

Rice. 11.37. Personal Web site created using a template
Modifying a personal Web site
On fig. Figure 11.37 shows the home page of a personal Web site created using a template. It contains a set of elements that you can use as they are offered by the wizard or modify them.
At the top of the home page is the heading Welcome!, which is an object called ad on the page (Page Banner). This object is used to graphically display headings on Web pages. The header type is defined in the Page Banner Properties dialog box, which is opened by double-clicking on the header or by the context menu command of the same name.
In the center of the home page (below and to the right of the dotted lines) is plain text, which can be changed. To figure out whether it's regular text on a Web page or an object, experiment. Move the cursor inside the home page and watch how the appearance of the cursor changes when you place it on certain objects.
When the cursor is over the page title, over the date below the title, the cursor changes to a hand holding the page.
Place the cursor on the text in the center of the page. The cursor does not change its appearance. You can safely delete the text and place the necessary information in its place.
To change the properties of objects over which the cursor takes the form of a hand holding a page, the corresponding dialog boxes are used. For example, to change the format of the date displayed on the page, you need to place the cursor on the date and double-click. The Date and Time dialog box (Fig. 11.38) will open, using which you can set a different date display format.

Rice. 11.38. Dialog box Date and time
On the left side of the page is link bar, also called navigation bar. To set the properties of a link bar, use the Link Bar Properties dialog box, which opens when you double-click the link bar.
The names of the buttons on the link panels correspond to the names of the pages included in the Web site, to which these links are navigated. You can check the activity of these links. To do this, follow these steps:
1. Place the cursor on the title of one of the pages on the navigation bar.
2. When the cursor changes to a hand holding the page, press the
You cannot select a label in the navigation bar and change the text placed on it. To change the names of the buttons on the link bar, you must rename the pages you navigate to using these buttons. For example, to change the name of a Hobby to a Hobby, you need to do the following:
1. Open in edit mode the page called Hobbies. To do this, do one of the following:
Double-click the file icon interes.htm in the Folder List panel
To navigate from the home page to the Hobbies page, use the link bar: by holding down the key
2. Place the cursor on the title of the page and double-click.
3. In the Page banner field of the Page Banner Properties dialog box that opens (Fig. 11.39), enter a new heading name instead of Hobbies, for example, Hobby.

Rice. 11.39. Page Ad Properties Dialog Box
4. Click OK. The Page Announcement Properties dialog box closes. The page will look like shown in Fig. 11.40.
Advice
Please note that not only the name of the page has changed, but also the name of the button on the link bar located on the left of the page. Return to the home page and take a look at the link bar placed on it. The name of the corresponding button has changed both on the home page and on all pages of the Web site. In the same way, you can change the names of other buttons, except for the Home button.
In addition to the above method of changing the name of the pages, and, accordingly, the names of the buttons of the link panels, there is another one:
1. Switch to the Navigation mode by pressing the button of the same name on the Views mode panel. The FrontPage workspace displays the navigation structure of the personal Web site, with pages represented as rectangles.
2. Position the cursor on the page whose name you want to change, press the right mouse button and select the Rename command from the context menu that appears. The page title becomes editable (Fig. 11.41).
3. Enter a new page name and press the key

Rice. 11.40. View of the web page after changing its name

Rice. 11.41. Changing Page Titles in Transitions Mode
Both of the above methods used to change the text of the links bar buttons do not allow you to change the name of the button intended to go to the home page.
To change the name of the button for going to the home page on the link bar, you must use the Navigation tab of the Web Settings dialog box (Fig. 11.42).


Rice. 11.42. Web Site Setup Dialog Box
To open this window, use the Web Settings command from the Tools menu. Then, in the Home page text box, instead of Home, enter a new name for the link, and then click OK. See how the link bars now look. Walk around the pages of the Web site.
Advice
Using the Navigation tab of the Web Site Setup dialog box, in addition to the Home button on the link bar, you can change the names of the buttons that allow you to navigate through the Web site pages of the same hierarchy level.
The fonts, color of text and hyperlinks, and the background image of the personal Web site are determined by the wizard's default theme. To change the theme of a Web site, use dialog box Themes, opened by the Theme command from the Format menu. For more information about Web site themes, see Chapter 15.
Customer Support Website Template
The Customer Support Web template allows you to create a customer support Web site for your products. On the site's pages, visitors will be able to get acquainted with the offered goods and services, ask their questions, place their comments and suggestions regarding the quality of the goods. On fig. Figure 11.43 shows the structure of a Web site created using this template.

Rice. 11.43. Structure of a Web site created with the Customer Support Web site template
- What's New (What's New) - information about the new that is offered to the visitor
- Products (Products) - a page with information about the offered goods and services
- Frequently Asked Questions (F.A.Q.) - page with answers to frequently asked questions
- Service Request - product buyer support page. Contains a form where the user can describe the problem they are experiencing and ask related questions
- Suggestions - a page where visitors can enter their suggestions using a form
- Catalogs and directories (Catalogs/Manuals) - a page that users can use to download to their computers software or documents from your Web site using the FTP protocol ( File Transfer protocol)
- Support Forum - page for participation in the forum
- Contact Us - page with contact information
- Search (Search) - a page containing a form for searching the necessary information on a Web site
Project Web Site Creation Template
The Project Web template lets you create a Web site that can be used as a focal point and discussion center for a large project. On the pages of the Web site, you can post information about the project participants, the status of things, discuss the most important issues, and so on. On fig. Figure 11.44 shows the structure of a Web site created using this template.

Rice. 11.44. Structure of a Web site created using the Project Web site template
The Web site contains a large number of pages with the following purpose:
- Members - page with information about project participants
- Schedule - page containing the project plan
- Archive (Archive) - page access to shared documents and files
- Search (Search) - a form for searching for information contained in the documents of the Web site
- Discussions - a page that contains links to the discussion groups Requirements Discussions and the Knowledge Base for interactive forums
- Contact information (Contact Inf) - page with contact information
Templates and Wizards for Creating Web Pages
To view the templates and wizards offered by FrontPage for creating Web pages, on the File menu, select the New command, then in the submenu that opens, the Page or Web option. The New Page or Web panel appears in the program window, on which select the Page Templates command. The Page Templates dialog box shown in fig. 11.45.

Rice. 11.45. The Page Templates dialog box allows you to select templates and wizards for creating a Web page
The Page Templates dialog box contains three tabs. The General tab lists the names of the main page templates. The Frames Pages tab contains the names of page templates that use frames. In this chapter, we will limit ourselves to the General tab templates. A description of the frame page tab templates will be given in Chapter 20.
The number of Web page creation templates offered by FrontPage is much greater than that of Web site templates. As you navigate through the list of templates, a brief description of the selected template appears in the Description area of the window, and an approximate view of the page created using it appears in the Preview area.
The first in the list of templates is the Normal Page, which is a blank page template. You do not need to open the Page Templates dialog box to create a page using this template. Just click the New button on the standard toolbar. The default is always to use the Regular Page template.
In table. Figure 11-3 lists the templates and page wizards provided by FrontPage.
Comment
When describing page templates, the term is used styling effects. This term refers to the use of graphic elements and text that has a different design style than the main text of the page.
Table 11.3. Web Templates and Wizards
|
Template or master |
Purpose |
|
normal page |
Empty page |
|
Bibliography |
|
|
Confirmation Form |
Form of confirmation of receipt of information |
|
Feedback form |
Form for entering comments |
|
Form Page Wizard |
Wizard for creating a customer survey form. With this wizard, you can create a list of questions that you want to get answers from customers |
|
Common Questions |
|
|
Guest book |
Guest page where Web site visitors can express their opinion |
|
Narrow left-aligned text |
The information on this page is placed in one column along its left edge; on the right you can put a graphic image |
|
Narrow right-aligned text |
Page, information on which is placed in one column on the right; on the left you can insert a graphic image |
|
Text in one column |
Information is placed in one column in the center of this page. |
|
Text in one column with a table of contents and sidebar |
Information is placed in one column in the center; on the left of the page is the table of contents, and on the right is the effects area, which can contain text and graphics |
|
Text in one column with a table of contents on the left |
A page that shows the table of contents on the left and everything else on the right |
|
Text in one column with a table of contents on the right |
A page that shows the table of contents on the right and everything else on the left |
|
One-column Body with Staggered Sidebar |
A page that has two columns with checkerboard effects on the left side and a body text column on the right side |
|
Text in one column with two frames |
The main text will be placed in the center of the page, to the left of the text - two columns with checkered design effects, and to the right - another column with design effects |
|
Text in one column with a sidebar in two columns (One-column Body with Two-column Sidebar) |
A page with a body text column on the left side and two columns with design effects on the right side |
|
Photo collection |
Page intended for placement of graphic images |
|
Search page |
Form-like page used to search for words |
|
Text in three columns |
|
|
Text in two columns |
|
|
Text in two columns with a table of contents and sidebar |
|
|
Text in two columns with a table of contents on the left |
|
|
Zigzag text in two columns |
|
|
Zigzag text in two columns with a table of contents and sidebar |
|
|
Registration form |
User registration form |
|
Wide text with headings |
Page formatted as several paragraphs with subheadings |
Photo collection template
Template Photo Gallery (Photo Gallery) creates a page designed to accommodate graphic images (Fig. 11.46). This template was not available in previous versions of FrontPage. The convenience of the Photo Collection template lies in the fact that it is easy to add new graphic images or delete existing ones to the page created using this template.
The Photo Gallery Properties dialog box (Fig. 11.47) is used to set up graphic images placed on a page created using the Photo Gallery template. To open this window, place the cursor in the graphics area and do one of the following:
- Double click
- Press the right mouse button and select the Photo Gallery Properties command from the context menu

Rice. 11.46. Page created with the Photo Collection template

Rice. 11.47. Photo Collection Properties Dialog Box
The Photo Gallery Properties dialog box contains two tabs. The Pictures tab is designed to generate a list of images placed on the page, specifying the order in which they appear. The Layout tab allows you to specify how graphics are arranged on a Web page.
The top left of the Pictures tab contains a list of graphics displayed on the Web page. To the right of the list is the viewing area of the image on which the cursor is positioned. The buttons above the list have the following functions:
- Add (Add) - adds a new graphic image to the list and, accordingly, to the Web page. When you click on this button, a menu of two commands appears. The Pictures from Files command opens the File Open dialog box, allowing you to add an image from a file. The Pictures from Scanner or Cameras command adds a graphic image from a scanner or digital camera to a Web page
- Edit (Edit) - opens the Edit Picture dialog box (Fig. 11.48), which allows you to edit a graphic image
- Remove (Remove) - removes a graphic image from the list
The Move Up and Move Down buttons below the list change the order of the images in the list and, accordingly, on the Web page.
On a Web page created with the Photo Collection template, graphics are displayed as thumbnails, the size of which is set using the Width and Height fields in the Thumbnail area.
The Pictures tab contains two checkboxes, the selection of which:
- Maintain aspect ratio - indicates the need to maintain proportions in the thumbnail
- Default Size (Set as Default Size) - indicates that the set size should be used as the default value
The Caption field allows you to enter text for the graphic image that will be displayed on the Web page. The formatting of this text (font, color, size, style) is carried out using the lists and buttons located above the field.
The Edit button on the Pictures tab opens the Edit Picture dialog box (Fig. 11.48), which allows you to edit the graphic images placed on the Web page.

Rice. 11.48. Edit Picture Dialog Box
Counters Width (Width) and Height (Height) area Picture size
(Picture Size) allow you to set the size of the graphic image in pixels. Below are the following checkboxes:
- Maintain aspect ratio - when checked, the proportions in the image are preserved
- Default size (Set as Default Size) - a checked box indicates that the specified size will be used as the default value
The buttons in the Rotate Picture area have the following functions:
|
Button |
Purpose |
|
Rotates the image counterclockwise by 90 degrees |
|
|
Rotates the image clockwise by 90 degrees |
|
|
Displays the image about the horizontal axis (creates a vertical mirror image) |
|
|
Displays the image about the vertical axis (creates a horizontal mirror image) |
The Crop button located in the Edit Picture dialog box allows you to place on the Web page not the entire image, but part of it. When this button is pressed, a frame with selection markers appears on the graphic image. Setting the cursor one by one on the markers, move the outlines of the frame, changing the size of the area bounded by the frame so that it highlights the desired area on the image. Then click the Crop button again. The cut image will replace the original image.
In addition to those named, the dialog box also contains the following buttons:
- Previous (Previous) - displays in the window the image that is in the list of the Pictures tab before the current one
- Next (Next) - displays in the window the image that is in the list of the Pictures tab after the current one
- Reset (Reset) - restores the original image
Layout tab of the Photo Collection Properties dialog box
(Photo Gallery Properties) (Fig. 11.49) allows you to set the method for arranging graphic images. The Choose a layout list contains options for arranging images and captions for them on a Web page. The Preview area lets you preview how the page will look with the selected layout. The Number of pictures per row list indicates the number of pictures in one row.

Rice. 11.49. Layout tab of the Photo Collection Properties dialog box
Working with web sites.
Let's take a closer look at the various host-level administrative tasks that you can perform in IIS. We have already briefly reviewed the Basic Properties dialog box for the WWW service, and you already know that it has ten tabs containing various settings that you can configure. Nine of these ten tabs are also used at the site level (for administration of individual Web sites); in this section, we will explore these various tabs and their settings in detail. As an example, in this chapter we will configure Default Web Site.
Web site tab.
The Web Site tab of the Site Properties window allows you to set Web site authentication, configure a limit on the maximum number of concurrent TCP connections that make HTTP sessions, enable or disable HTTP connection persistence, and enable IIS logging on your server.
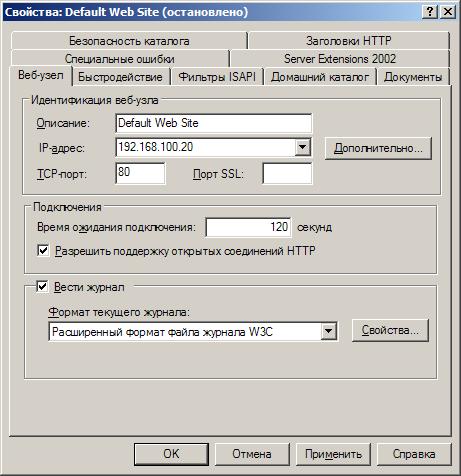
Web site identification.
Each Web site hosted on an IIS computer must have a unique identity so that browser clients can connect to it and download content from it. Web sites can be defined using three different parameters: IP address, TCP port number, and host header name.
The identification of a web site is set in the properties window page of this web site with the Web site tab. For Web sites on the same computer to have unique identities, they must differ from each other in at least one of the three identification parameters. Let's take a look at the different ways you can define a web site's identity and discuss how you can have multiple different web sites on the same server.
Configuring Multiple IP Addresses for a Single Server NIC
You can configure multiple IP addresses for a single server NIC, or you can install multiple NICs so that each card has a different IP address. Choose a different IP address for each of the web sites. Do not change the TCP port setting of these sites (80 is the standard HTTP TCP port setting) and do not configure host header names. The advantage of this method is that it is convenient for clients to connect to each site using the site's IP address in the URL they request (or using a fully qualified DNS name if a unique hostname has been configured on the DNS server for each of the computer's IP addresses). IIS).
The disadvantages of this method include that if the computer contains many web sites, then they will have to assign many IP addresses. This is not a problem for private intranets using one of the private IP address blocks such as 10.y.z.w, 172.16-31.z.z, 192.168.z.z. But on servers that are directly connected to the Internet, you will have to obtain the required number of IP addresses from your ISP. Nonetheless, this way the Web site identification task is the most common.
Configuring only one IP address for the NIC
Set a different TCP port (greater than 1023) for each of the web sites you want to connect to. The main disadvantage of this method is that clients must know the port numbers of the web sites they want to connect to. For example, if the DNS name of the server is Win2003s.test.fio.ru, and the web site on this server is assigned port number 8023, then the client will have to use the URL http://Win2003s.test.fio.ru to access this site: 8023.
Configuring a single IP address while maintaining the standard TCP port
This method configures only one IP address for the server NIC and leaves the TCP port at the default value (80) for all sites. Configure a unique host header name for each site using the Advanced button. Host header names are possible in HTTP 1.1. The host header name associated with each host is the typical fully qualified DNS name assigned to the host in an available DNS server database (or local hosts file on clients).

When you open the properties window for Default Web Site and Tab Page Web site, then the IP address is set to All Unassigned. This means that the web site will respond to any IP address not specifically assigned to other web sites on the published computer. That is why this site is the default and the only Web site on an IIS computer that can be set to an IP address in this way.
When the client requests a URL like http://vio.fio.ru, the client passes the host header name vio.fio.ru in the HTTP request headers passed to the server. The server parses the host header name, identifies the web site to which the client should connect, and returns the files that match the request. The disadvantage of this method is that the client must also support host header names, meaning it must be able to pass the site's DNS in its HTTP request headers. Host header names supported by Microsoft Internet browsers Explorer versions starting from 3 and up. Another disadvantage of using host header names is that this method does not work in combination with SSL connections, because in this case HTTP sessions are encrypted.
If you are working with older browsers that do not support host header names, you can implement a cookie-based mechanism that allows browsers to distinguish between web sites that have the same IP address and TCP port number. More information about this can be found in the online documentation.
Changing the port number for a Web site does not require a server restart for the change to take effect.
Connections.
The Web tab page allows you to configure HTTP sessions to limit the maximum number of concurrent TCP connections to the server. You can also enable or disable the HTTP Keep-Alives setting and set connection timeout values. The HTTP Keep-Alives setting is an HTTP 1.1 feature that allows a client to keep an open TCP connection to a server after downloading a file, in case other files need to be downloaded from that server. If clients begin to suffer due to server slowdown or receive frequent "busy" error messages
HTTP 500: Busy errors
then try lowering the value in the Connection Timeout field so that unused TCP connections end faster.
The timeout set on the Web tab applies to active TCP sessions. TCP has its own settings for terminating half-open TCP connections, such as those created during Denial of Service (DoS) attacks, when attackers try to crash a web server by flooding its network connection with TCP SYN packets .
Journaling.
The Web Site tab allows you to enable (or disable) logging for your server. By default, this setting is enabled and allows administrators to monitor client browser access to the site. Registered information can be stored in various formats:
- General NCSA log file format. Creates a space-delimited ASCII file with a predefined set of fields.
- ODBC logging. Fixed logging format in the database.
- W3C Extended Log File Format. This custom log format is used by default; a space-delimited ASCII file is created, with the set of fields defined by the administrator.
- Microsoft IIS log file format. An ASCII fixed format file is created.

New IIS log files can be created hourly, daily, weekly, or monthly, or when an existing log file grows to some predetermined size. By default, log files are stored in the \%systemroot%\System32\LogFiles folder, but you can change this setting using the Browse button.
Enabling IIS logging on a Web Site tab page does not mean that visits to all parts of your site will be logged. You can use the Logging check box on the Home Directory tab of the Web site's dialog box to enable or disable access logging for content located in the site's home directory. You can track visits to other directories and even individual files using other tabs.

tab Additionally allows you to configure advanced log options.
Performance tab.
Performance tuning for individual Web sites is performed on the Performance tab page of the Site Properties window.

On this page, you can configure the following settings:
- Bandwidth limitation. You can enable and set the bandwidth limit for this site in the Bandwidth Throttling section. This will allow you to prioritize access to certain sites located on the same server.
- The number of connections to websites. You can limit the total number of simultaneous connections to a website. To do this, set the switch to no more than and set the value corresponding to the number of connections.
ISAPI Filters tab.
Internet Server Application Programming Interface (ISAPI) filters are additional DLLs that perform specific actions when IIS processes HTTP client requests. On this tab, you can set the set of ISAPI filters and the order in which they are processed by IIS. Filters set at the site level apply only to the selected Web site. Filters set at the server level apply to all web sites on the server.

ISAPI filters perform their actions before the server actually responds to the HTTP request itself. You can, for example, develop ISAPI filters that perform custom authentication, data encryption, writing traffic information to a custom log file, or other tasks.
Home directory tab.
On the Home Directory tab page, you can specify the location of the content that maps to the Web site's home directory to set access permissions and other settings for the directory and web applications implemented in that directory.

home directory.
The site's home directory specifies the location of content that is accessed using a URL of the form
http://site_name/file_name
where SiteName is the NetBIOS name, IP address, or DNS name of the site, and FileName is the name of any HTML pages, or a picture file, or a script, or some other file from the site's home directory.
The site home directory can be set using the Content Source switch when connecting to a resource in one of the following ways:
- As the name of a directory located on the computer's local disk (position Directory of this computer).
- As a UNC path to a network share on a file server (location Shared folder on another computer).
- As a redirect to a URL that prompts a client wishing to access the content mapped to the home directory to connect to another web server, not necessarily an IIS server (location Permanent URL). The redirect can be either temporary or permanent.
Access redirection.
The ability to redirect access for the home directory (or any virtual directory) to a URL is useful when a web site is in the process of being built or when it is down due to maintenance or an upgrade. IIS allows you to redirect a request to any of the files in your home directory to the same URL (for example, to a page with the announcement "Maintenance in progress. Site will be available in 15 minutes") or to the same file in a network directory (this way you can redirect clients to a temporary mirror site). You can also redirect access to a subdirectory of your current home directory if the maintenance announcement page or mirror content is on the same server.

Set a permanent redirect only when you really plan to move the content of the site to another server, because. some browsers getting "Permanent redirect" message
HTTP 301 Permanent Redirect
Permissions.
If you specify the home directory location as a local directory or as a network share, the Home Directory tab page allows you to set access permissions and other settings for that directory.
If you set the home page location to redirect URL, these settings will not be available. The following settings are possible:
- Access to script text. When checked, users can access script source code (for example, ASP files). Please note that if you do not enable the Read or Write setting, this setting will have no effect. (Enabling the Read setting allows users to read script source texts, and enabling the Write setting allows users to modify scripts.) The Script Text Access setting is typically enabled when designing the servers that create content. It is disabled by default.
- Reading. If you select this check box, users will be able to see the contents of a directory or file and its properties, such as creation time and file size. The setting is enabled by default.
- Recording. If you select this check box, users will be able to modify the contents of the directory or file. Only browsers that support the HTTP 1.1 PUT command (including Internet Explorer 4 and up) can write to the server. By default, the setting is disabled.
- Directory overview. If you select this check box, users will be able to see the contents of the home directory in cases where it does not have a default home page. Typically, this setting should be turned off (it is off by default) to hide the directory structure with the contents from accidental viewing by users who want to enter where you do not want them to go.
- Logging. If this check box is checked, each time the client accesses any of the files in the home directory, an entry will be added to the log file. Note that the Logging checkbox on the Web Site tab page must be checked before this setting can take effect. By default, home directory hit logging is enabled.
- Catalog indexing. When checked, the Indexing Service adds the contents of the home directory to the main index. By default, the Indexing Service is installed during installation Windows Server 2003.
Although the authority Reading and installed for Default web site but the ability to access the content of a particular web site depends on many conditions.
Setting up a web application.
If you specify a local directory or a network share as the location of the home directory, then on the Home directory tab you can set the settings for any application implemented in this directory.
An example of a web application is a set of ASPs that work together to provide algorithmic capabilities to site visitors. Settings you can set in the area Application Options:
- Entry field app name. The field specifies a unique application name.
- Source folder. An application may consist of a tree of directories and their contents. The top of this tree is the starting point of the application.
- Launch allowed. With this setting, you can set the types of applications that can be run in the home directory. You can select Nothing, Scripts only, or Scripts and executables.
- Application group. This setting allows you to select a group of applications associated with this home folder.
- Button Setting. Clicking this button opens the Application Setup dialog box, where you can configure options to map the application to script engines or programs that interpret it, to copy ISAPI applications (for performance reasons); to set session times; to set the default ASP scripting language, for debug settings.

If you set the Write access permission for a directory along with setting scripts and executables, then there is a security risk: a user you do not trust can be able to upload a malicious program to the server in an executable file and cause damage.
Documents tab.
On the Documents tab of the Web site properties window, you can set the possible filenames for standard home directory documents and how the browser accesses them.

By default, four files are specified in the following order: Default.htm, Default.asp, index.htm, and iisstart.htm. For example, if a browser tries to connect to the Default Web site on the Win2003s.test.fio.ru server using the URL http://Win2003s.test.fio.ru, the server will first check if the Default.htm file exists in the home directory. . If there is such a file, it will be returned to the client. If there is no such file, the server will look for the Default.asp file. This process will continue until either the file is found or until the list of default documents ends. You can specify additional standard documents (for example, Index.html) or remove documents already in the list. It is possible to completely cancel references to standard documents, in which case clients must know and indicate the actual name of the file they want to access on the server, for example, by setting URLs like this: http://Win2003s.test.fio.ru/NoDefault .htm
You can also use this tab to set the file name of the footer (written in HTML format); A footer must be added to the bottom of each file delivered from the site to the client. Headers and footers allow you to add a copyright statement or disclaimer to the bottom of each page. If FrontPage is used to create the content, then you can create complex footers to display information such as the date the file was last modified, the popularity count, and so on.
