Data input-output in VBA. Entering and Outputting Data into an Excel Worksheet Using the Cells Method Data Output Operators
In this article you will learn how to create an input field in VBA Excel - InputBox, into which you can enter various information for calculations.
Function InputBox prompts users to enter values. After entering values, if the user clicks the OK button or presses ENTER on the keyboard, the InputBox function returns the text to the text box. If the user clicks the Cancel button, the function will return an empty string ("").
Syntax
InputBox(prompt[,title][,default][,xpos][,ypos][,helpfile,context])
Parameter Description
- Request - required parameter. A string that appears as a message in a dialog box. The maximum invitation length is approximately 1024 characters. If a message extends over more than one line, then the lines can be separated by using a carriage return (Chr(13)) or line feed (Chr(10)) character between each line.
- Title is an optional parameter. The string expression appears in the title bar of the dialog box. If the title is left blank, the application name is placed in the title bar.
- Default is an optional parameter. The default text in the text field that the user would like to display.
- XPos is an optional parameter. The X-axis position is the approximate horizontal distance from the left side of the screen. If you leave the field blank, the input field will be positioned horizontally.
- YPos is an optional parameter. The Y-axis position is the approximate vertical distance from the left side of the screen. If left blank, the input field will be vertically centered.
- Help file is an optional parameter. A string expression that identifies a help file that will be used to provide context-sensitive help for the dialog box.
- context - Optional parameter. A numeric expression that identifies the help context number assigned to the help author to the corresponding help topic. If context is provided, the help file must also be provided.
example
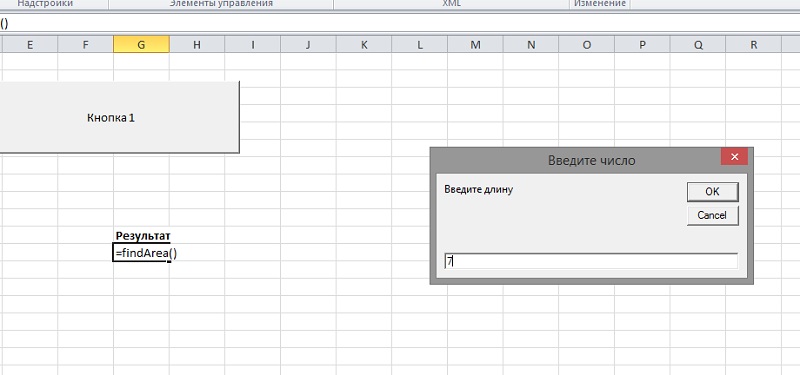
Let's calculate the area of the rectangle by getting values from the user at runtime using two input fields (one for length and one for width).
Function findArea() Dim Length As Double Dim Width As Double Length = InputBox("Enter length", "Enter number") Width = InputBox("Enter width", "Enter number") findArea = Length * Width End Function
InputBox step by step
Step 1 − To do the same, call using the function name and press Enter as shown in the following screenshot.
Step 2 - Once executed, the first input field (length) is displayed. Enter a value in the input field.
1. InputBox function
The InputBox function has the following syntax:
Variable = InputBox(Prompt[, Title] [, default] [, Xpos] [, Ypos] [, help_file, contents])
This function requires only the argument Invitation Argument value Invitation– the only required argument to this function is a text string that is displayed in the input dialog box as a message. This text must be enclosed in double quotes.
Argument Heading
Argument default specifies the value that is displayed by default in the input field until the user enters a value. If this argument is omitted, the input field appears empty.
Optional Arguments Xpos And Ypos set the position of the input window on the screen. Arguments help_file And content
The return value of the InputBox function is the value entered by the user in the input box.
2. MsgBox function
A message box is created by the MsgBox function, which has the following syntax:
Variable = MsgBox(Prompt[, Buttons][, Header[, help_file, contents])
Argument value Invitation– the only required argument to this function is a text string that is displayed as a message in the dialog box. This text must be enclosed in double quotes. Note the use of parentheses in the MsgBox syntax - they indicate that in this case MsgBox is a function that returns a value. If the parentheses are omitted, then for VBA this is a sign that this expression does not return a value. If you want to return a value, you must use code similar to the following:
Dim i As Integer
The result of running this code in VBA will be a dialog box with three buttons “Yes”, “No”, “Cancel” and an exclamation point icon in a yellow triangle.
If no argument is given Buttons, then VBA offers only one "OK" button. Argument Buttons allows you to manage the following message window parameters:
¨ The number of buttons in the window.
¨ Types of buttons and their placement in the window.
¨ Icons displayed in the window.
¨ Which button is assigned by default.
¨ Mode (modality) of the message window.
Table 1 shows possible settings for this argument. The first group of values sets the number and type of buttons. The second allows you to select the icon displayed in the window. The third assigns the default button. The fourth group sets the message window mode. To create the final argument value Buttons You can use only one value from each group, combining them with a plus sign.
| Group | Constant | Meaning | Description |
| Group 1 | vbOKOnly | Displays the OK button only (default setting) | |
| VbOKCancel | Displays OK and Cancel buttons | ||
| VbAbortRetryIgnore | Displays the Stop, Repeat and Skip buttons. | ||
| VbYesNoCancel | Displays Yes, No, and Cancel buttons | ||
| vbYesNo | Displays Yes and No buttons | ||
| VbRetryCancel | Displays the Redo and Cancel buttons | ||
| Group 2 | VbCritical | Displays a prohibition icon | |
| VbQuestion | |||
| VbExclamation | Displays a warning icon | ||
| VbInformation | Displays an information icon | ||
| Group 3 | VbDefaultButton1 | The first button is the default button | |
| VbDefaultButton2 | The second button is the default button | ||
| VbDefaultButton3 | The third button is the default button | ||
| VbDefaultButton4 | The fourth button is the default button | ||
| Group 4 | VbApplicationModal | Application mode: The user must close the message box before continuing with the current application | |
| VbSystemModal | System mode: All applications are unavailable until the user closes the message window | ||
| Additional group | vbMsgBoxHelpButton | Displays the Help button | |
| vbMsgBoxSetForeground | Makes the message window the foreground window | ||
| vbMsgBoxRight | Displays a message box aligned to the right edge of the application window | ||
| vbMsgBoxRtlReading | For Hebrew and Arabic, specifies that text should be displayed from right to left. |
Table 1. Settings for the argument Buttons MsgBox functions
To avoid mistakes when entering argument values Buttons, use the list of constants that appears after you enter the "+" sign. The "+" sign is used to combine multiple constants when specifying a complex argument Buttons.
Argument Heading used to specify the text that is placed in the title bar of the input window. If this argument is not specified, Microsoft Excel is displayed in the title bar.
Arguments help_file And content are used if you create your own help system for your application.
Table 2 provides a list of values returned by the MsgBox function . The return value depends on the button the user pressed.
| Return value | Button |
| OK | |
| Cancel | |
| Stop | |
| Repeat | |
| Skip | |
| Yes | |
| No |
Table 2. Values returned by the MsgBox function
The best return type of the MsgBox function is Integer.
Range and Cells objects
In VBA, worksheet cells are treated as Range objects. This is the most commonly used object.
The Range object uses the A1 format when working with cells.
A1 format. The link consists of a column name (designated by letters A to IV, 256 columns maximum) and a row number (from 1 to 65536). For example, A77. To refer to a range of cells, specify the addresses of the upper left and lower right cells of the range, separated by a colon. For example, B10:B20, 7:7 (all cells in the 7th row), 5:10 (all cells between the 5th and 10th rows inclusive), D:D (all cells in column D), H: J (all cells between columns H and J inclusive). An absolute reference is indicated by a dollar sign before the row or column name
The Cells object uses the R1C1 format when working with cells.
R1C1 format. In the R1C1 format, after the letter “R” the row number of the cell is indicated, after the letter “C” the column number. For example, the absolute reference R1C1 is equivalent to the absolute reference $A$1 for format A1. To set a relative reference, specify the offset relative to the active cell. Mixing is indicated in square brackets. The sign indicates the direction of displacement. For example, R[-3]C (a relative reference to a cell three rows higher in the same column). RC (relative reference to a cell located two rows below and two columns to the right). R2С2 (absolute reference to the cell located in the second row and in the second column). R[-1] (relative reference to the row above the current cell), R (absolute reference to the current row).
The full cell address may also contain the worker's name and book address. The sheet name is followed by a “!” sign, and the workbook address is enclosed in square brackets. For example: [Book1.xls]Sheet5!D$2.
The following can act as a Range object:
§ separate cell;
§ selected range of cells;
§ several selected ranges of cells (i.e. a collection of non-adjacent ranges);
§ row and column;
§ three-dimensional range (i.e. consisting of ranges located on different worksheets).
Range and Cells Object Properties
| Properties | Description and allowed values |
| Value | Returns a value from a cell or range (to a cell or range): X=Range(“A1”).Value Range(“A1”).Value=10 |
| Name | Returns the name of the range: Range(“B1:B4”).Name=”Application” |
| Address | Returns the current position of the range |
| Count | Returns the number of cells in a range |
| Offset | Returns the offset value of one range relative to another |
| Resize | Allows you to change the current range selection |
| CurrentRegion | Returns the current range that contains the specified cell and is delimited by an empty row and column. |
| WrapText | True (False) – allows (does not allow) text wrapping when entered into the range. |
| EntireColumn, EntireRow | Returns the row and column. |
| ColumnWidth, RowHeight | Returns the column width and row height of a range. |
| Font | Returns a Font object. For example: With Worksheets(“Z3”).Range(“F10”).Font .Size=22 .Bold=True .Italic=True End With |
| Formula | Formula in A1 format. For example, this is how you can enter a formula in cell C2: Range(“C2”).Formula=”=$B$2+$A$2” |
| FormulaLocal | Formula in A1 format, taking into account the user’s language (for non-English versions of Excel). For example: Range(“C1”).FormulaR1C1= “=PI ()” |
| FormulaR1C1 | Formula in R1C1 format. For example, Range(“C1”).FormulaR1C1= “=R1C1+2” |
| FormulaR1C1Local | Formula in R1C1 format taking into account the user's language (for non-English versions of Excel). |
| Horizontal Alignment | Horizontal alignment. Possible values: xlHAlignGeneral (normal), xlHAlignCenter (center), xlHAlignCenterAcrossSelection (center of selection), xlHAlignJustify (width), xlHAlignRight (right), xlHAlignLeft (left) and others. |
| Vertical Alignment | Vertical alignment. Possible values: xlVAlignBottom (at the bottom edge), xlVAlignCenter (at the center), xlVAlignTop (at the top edge) and others. |
Range and Cells object methods
| Methods | Actions |
| Address | Returns the cell address. |
| AutoFit | Automatically adjusts column width and row height. For example: Range(“B1:B3”).Columns.AutoFit Using the Columns or Rows property in this case is necessary, since the range value must be rows or columns, otherwise an error will be thrown. |
| Clear | Clears the range. For example: Range(“B1:B20”).Clear |
| Copy | Copies a range to another range or clipboard (if Destination is not specified). For example, this is how you can copy range values from one sheet (L1) to another (L2): Worksheets(“З1”).Range(“D1:D5”).Copy Destination:=Worksheets(“P2”).Range(“D5”) ") |
| Cut | Copies the range with deletion (cuts) to another range or clipboard (if the Destination parameter is not specified). For example, let’s copy a range of cells with deletion to the clipboard: Worksheets(“Sheet1”).Range(“D1:E5”).Cut |
| Delete | Deletes a range. The Shift parameter determines the direction in which cells are shifted when deleted. For example: Range(“B6:D6”).Delete Shift:=xlShiftToLeft |
| Insert | Inserts a cell or range of cells. For example, this is how you can insert a row before the sixth row in the “Sheet2” sheet: Worksheets(“Sheet2”).Rows(6).Insert |
| Select | Selects a range: Range(“A1:C7”).Select |
Range and Cells object methods that implement Excel commands
| Methods | Actions |
| DataSeries | Creates a progression. DataSeries(rowcol,date,step,stop,trend) The method is performed manually using the Edit\Fill\Progression command |
| AutoFill | Autocomplete. Automatically fills the cells of a range with elements of the sequence: Object(Range, Type). |
| AutoFilter | Autofilter. Implements a request to filter data on a worksheet: Object.AutoFilter(Field, Condition1, Operator, Condition2) Corresponds to the Data\Filter\AutoFilter command. |
| AdvancedFilter | Advanced filter. Corresponds to the Data\Filter\Advanced Filter command. |
| Consolidate | Combining data from multiple ranges into one final table. Corresponds to the Data\Consolidation command. |
| Find | Data Search. Manually called with the Edit\Find command. |
| TblGoalSeek | Selection of parameter. This is done manually using the Tools\Parameter Selection command. |
| Sort | Sorting data. Manually performed using the Data\Sort command |
| Subtotal | Adds subtotals. Manually called by the command Data\Subtotals. |
Note . It should be especially noted that in VBA (unlike Excel) the assignment operation is performed regardless of the cell status and does not change it. Those. To assign a value to a cell (or to obtain its value), it is not at all necessary that this cell be active (remember that in Excel, before entering it into a cell, it must be activated); it will not become active (if it was not so before) even after the assignment it has no meaning.
This is done using the built-in functions InputBox, MsgBox, by changing certain properties of certain objects or applying appropriate methods to them.
Data input
Variable values can be entered:
Using the functionInputBox, which displays its own window when the program runs. The value returned by the InputBox function is of type string. Therefore, to use the entered value as a numeric variable, you must additionally convert it to a numeric type using the Val function. For example, to enter the value of 5.25 into a variable, you need to write the following line of code:
a = Val(InputBox("Enter a", "Input"))
2) Using a text boxTextBox. The form must have a text window, for example, Text1, and in the event procedure, for example, for clicking a command button, program code must be written that uses the text property of the Text1 object:
Private Sub Command1_Click()
a = Val(Text1.text)
The text property of the Text1 object also has a string value, so it needs to be converted to a numeric value using the Val function.
Output of results
There are various ways to output results in VB.
The main operator for printing variable values in the VB language is the Print operator, which in terms of object-oriented programming is considered as method, acting on an object to which the values specified in the list will be output. The main objects for which there is a Print method are the Form and the graphics windowPictureBox.
If the object to which the Print method is applied is not specified, then the list of values is displayed on the active form. For example, after executing the line of code:
You can display the value of a variable using the MsgBox function, which, when executed, activates its own message box on the screen.
Private Sub Command1_Click()
The output can be formatted into a TextBox by changing its Text property
Text1.text=str(a)
It should be remembered that the Text property works with a string of characters, so the output number is converted into a string of characters using the str function.
The output can be formatted on a Label by changing its Caption property:
Label1.Caption=”Result” & str(a)
The & (+) sign means concatenation of two string variables.
Format function
When displaying results, for greater clarity, the Format function is often used, which returns a value of type Variant (String) containing an expression formatted according to the instructions specified in the format description.
Syntax
Format (Expression[, Format[, FirstDayOfWeek[, FirstWeekOfYear]]])
Expression - required argument - any valid expression to be formatted.
Format - optional argument - any valid named or user-defined format expression (format pattern).
When formatting numbers without specifying a format pattern, the Format function produces the same result as the Str function, i.e. returns a string representing a number. The difference is that when converting a positive number using the Format function, the space at the beginning of the line (in place of the number sign) is lost, but when converting using the Str function, it remains
Examples of format templates used to create custom number formats
Print Format(6.789, "00.0000") " will return 06.7890
Print Format(6.789, "##.0000") " will return 6.7890
In VBA, input and output of information (for user interaction) can be done in dialog boxes. The dialog box for entering values is implemented by the built-in function InputBox. The input window, implemented by the InputBox function, displays a variable value entry field in which the user must enter a specific value. Next, the user must click OK.
Function InputBox() has the following syntax:
VariableName = InputBox(Prompt, , , , , , )
Where the arguments are: Prompt or Message - a required argument that specifies an informational message in the dialog box. All other arguments are optional. Title specifies the title of the window. Figure 1 shows a module in which the InputBox function is used.
Rice. 1.
After completing module 2, the message window “Entering variable values” appears (Fig. 2), in which you need to enter a number and click OK. The dialog window (Fig. 2), implemented by the InputBox function (Fig. 1), displays: Window title - Entering variable values; Message - Enter a number; Buttons (default) - OK and Cancel; A field intended for entering variable values.

Rice. 2.
To display information, message dialog boxes implemented by the operator are used MsgBox or function MsgBox(). MsgBox can be used as an operator. The MsgBox statement displays information in a dialog box and sets the mode to wait for the user to press a button.
The MsgBox operator has the following syntax:
MsgBox Prompt, , , ,
Where the arguments are: Prompt or Message - a required argument that specifies the information message to be displayed in the window. All other arguments are optional. Buttons - Buttons that can be used in the message dialog box. Various buttons can be used in the message window (OK, Cancel, etc.). If you do not specify which buttons to display in the message box, the OK button is displayed by default. In addition, you can use different icons in message output dialog boxes (vbQuestion - question mark icon, vbExclamation - exclamation mark icon, etc.).
A module in which MsgBox is used as an operator is shown in Fig. 3 (operator MsgBox "3", vbOKCancel, "Output values").

Rice. 3
When module 4 is launched for execution, the “Output values” message window is displayed (Fig. 4), in which you must click the OK button. The window (Fig. 4), implemented by the MsgBox operator (Fig. 3), displays: Window title - Displaying values; Message - 3; Buttons - OK and Cancel.

Rice. 4
For example, to evaluate a function like y = 5 x 2 + 7 x + 9, you can use the InputBox function and the MsgBox operator (Fig. 5)

Rice. 5
After completing module 5, an input window is displayed

Rice. 6
After you enter a number, such as 789, and click OK, a message box appears showing the result of the function y = 5 x 2 + 7 x + 9.
Rice. 7
MsgBox can be used as a function. The MsgBox() function has the following syntax: MsgBox(Prompt, , , , ). In this case, several different buttons are used in the dialog window. When a button is clicked in a dialog box, the MsgBox() function returns an Integer value that depends on which button was clicked in the message dialog box.
In this article, you will learn how to create a message box in VBA Excel that can display various information.
Function MsgBox displays a message box and waits for the user to click a button and then the action will be performed based on the button clicked by the user.
Syntax
MsgBox(prompt[,buttons][,title][,helpfile,context])
Parameter Description
- Request is a required parameter. A string that appears as a message in a dialog box. The maximum invitation length is approximately 1024 characters. If a message extends over more than one line, then the lines can be separated by using a carriage return (Chr(13)) or line feed (Chr(10)) character between each line.
- Buttons are an optional parameter. A numeric expression that specifies the type of buttons to display, the icon style to use, the default button ID, and the message box modality. If left blank, the default value for buttons is 0.
- Title is an optional parameter. The string expression appears in the title bar of the dialog box. If the title is left blank, the application name is placed in the title bar.
- Help file is an optional parameter. A String expression that identifies a help file that will be used to provide context-sensitive help for the dialog box.
- Context is an optional parameter. A numeric expression that identifies the help context number assigned to the help author to the corresponding help topic. If context is provided, the help file must also be provided.
The Buttons parameter can take any of the following values:
- 0 vbOKOnly - displays only the OK button.
- 1 vbOKCancel - displays the OK and Cancel buttons.
- 2 vbAbortRetryIgnore - Displays the cancel, retry and ignore buttons.
- 3 vbYesNoCancel - Displays the Yes, No and Cancel buttons.
- 4 vbYesNo - displays the Yes and No buttons.
- 5 vbRetryCancel - displays retry and cancel buttons.
- 16 vbCritical - displays the critical message icon.
- 32 vbQuestion - Displays a warning icon.
- 48 vbExclamation - Displays a warning message icon.
- 64 vbInformation. Displays an information message icon.
- 0 vbDefaultButton1 - the first default button.
- 256 vbDefaultButton2 - the second default button.
- 512 vbDefaultButton3 - The third default button.
- 768 vbDefaultButton4 - The fourth default button.
- 0 vbApplicationModal Application modal - the current application will not work until the user responds to the message.
- 4096 vbSystemModal System modal - all applications will not work until the user responds to the message.
The above values are logically divided into four groups: The first group (0 to 5) indicates the buttons that will be displayed in the message box. The second group (16, 32, 48, 64) describes the style of the icon that will be displayed, the third group (0, 256, 512, 768) indicates which button should be the default, and the fourth group (0, 4096) defines the modality of the message window.
Return values
The MsgBox function can return one of the following values, which can be used to identify the button that the user clicked in the message box.
- 1 - vbOK - OK button pressed.
- 2 - vbCancel - Cancel button pressed
- 3 - vbAbort - Abort button pressed
- 4 - vbRetry - Retry button pressed
- 5 - vbIgnore - Ignore button pressed
- 6 - vbYes - the “Yes” button is pressed
- 7 - vbNo - No click
Sub MessageBox_Demo() "Simple message MsgBox ("Hello") "Message with title and buttons yes, no and cancel a = MsgBox("Do you like the color blue", 3, "Choose an answer") "Code of the pressed button MsgBox ("Value answer " & a) End Sub
MsgBox step by step
Step 1 - The above function can be performed either by clicking the Run button in the VBA window or by clicking on the button that you yourself have added to the Excel sheet.
Step 2 - A simple text box is displayed with a "Welcome" message and an "OK" button
