Save android contacts to sd card. Import contacts to android from CSV. Using third party apps
After buying a new phone, an important task appears - you need to transfer the saved contacts from the old phone to it. You need to import contacts to android from CSV, but in most older models of brands: Apple, Black Berry, HTC, LG, Samsung, Sony Ericsson, Motorola, Nokia, phone book data is saved in a CSV file (English Comma Separated Values - comma-separated amounts of data).
Most often, you need to adapt these files for Android OS in order to import contacts to android from CSV.
There are such methods for adapting CSV files for Android:
1. Google account synchronization with a mobile device.
2. Transfer from a memory card to an android device.
3. Using a standard program on HTC smartphones.
4. Import via SIM - card.
Synchronization of Google - account with a mobile device.
Contact data can be stored not only in the phone memory and SIM card, but also in a Google account.
The requirement is to have a Google account. If you use Gmail, then you already have a Google account, and do the following:
- Turn on the Internet connection and synchronization on the old mobile phone.
- Enter your Gmail mail, click on the "Contacts" link in the column on the left.
- In the address book that opens, select the "Import" tab in the upper right corner to sync with your phone.
- In the new tab that appears, select a CSV or vCard file with your contacts' details and upload it to your account's address book.
- And then, copy these files from your Google account to a new android phone.
Import contacts to android from CSV from memory card:
- We overwrite the CSV or vCard contact files from the old phone to the memory card, be sure to put it in the “Contacts” folder. Therefore, if there was none, then we create it.
- Having finished copying the files, open the standard application on the android phone, called "Contacts", and go through the tabs: "Menu", "Import / Export".
- Check the box "Import from SD card" in the window that opens. After that, you will be prompted to choose whether to import with or without synchronization from a mobile device.
By choosing the option "With synchronization", in this way, you will create a backup copy of phone contacts in your Google account.
Using a standard program on HTC smartphones.
The new HTC brand phones have the "Transfer" program, which allows you to rewrite from the previous phone: phone numbers, SMS messages, calendar events. It is convenient and easy to work with her.
- After opening this application, go to the "Select your old phone" tab. Choose a model from the proposed list.
- Next, you need to turn on the Bluetooth connection on the old phone.
- In the open application, go further through the tabs to the list of found devices, mark your phone as detected, and click "Next".
- On the old phone, confirm the request to connect to the HTC phone, click "Yes".
- In an open program, choose where you want to transfer data from - from contacts or a calendar.
- The connection request will be displayed again on the old phone. Allow, and the import of contacts from CSV to HTC phone will be successful.
Import contacts to android from CSV via SIM card:
- From the memory of the donor phone we rewrite to the SIM card.
- We take out this card and install it on the phone - the recipient.
- To from a SIM card to the memory of an android phone, go to its menu by items: “Menu”, “Export / Import”, and select “Import from SIM card”.
When buying a new Android phone, the first thing that comes to mind is, "How do I save phone numbers?" It turns out that this is not such a big problem, since it is possible to move phone numbers from one gadget to another in several ways.
How to transfer contacts from Android to Android?
There are quite a few ways to transfer the phone book directly from an Android phone to another. All of them are simple and will take no more than 5 minutes.
By Bluetooth
The first thing that comes to mind is to transfer contacts from Android to Android using Bluetooth. This method has long been known to everyone, since it was very popular on push-button phones. However, with the advent of Android, almost nothing has changed in it.
The first step is to enable Bluetooth on both devices. Next, you need to enable the device discovery system. On some, it is always disabled to protect the user from transferring obscure files. Go to Settings/Bluetooth. We put a tick in front of "Visible to others" on both gadgets, after which we search for devices on one of them.
We find the right one (most likely, it will be the first in the list, but just in case we look at its name), and then click on it to connect. You may need to come up with a password for a more secure connection and enter it on another phone. Having connected, we start sending data.
We go into the phone book. In the settings, click “Mark several” or “Mark all”, after which we click on “Send”, “By Bluetooth” in the same place. We accept on another gadget.

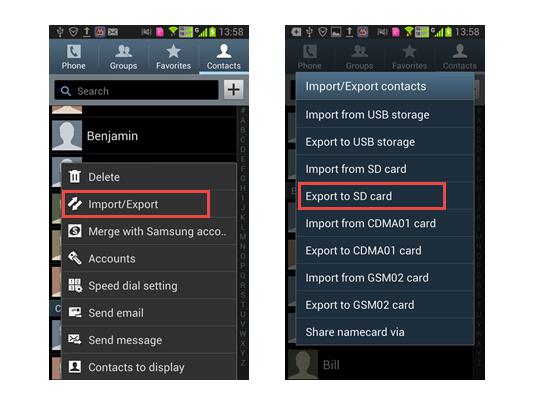
Save to SD card
Few people know, but contacts can be saved to internal memory or micro SD. To do this, go to the phone book, enter the options and click "Import / Export". Select "Export to SD card" from the list. It is important to remember the save path that will be specified (most likely, the file will be saved to the system folder). from the save directory can be via Bluetooth, e-mail, sending to the cloud. Having received a list of numbers on another gadget, go to contacts, open “Import / Export”, where we select “Import from SD card”.
On the SIM card
This method can be used in a situation where other methods are physically impossible, for example, to transfer numbers from
This method requires that all phone numbers are on the SIM card. We insert a SIM card with a phone book into a smartphone and transfer data in any convenient way.
Transfer via computer
You can also transfer contacts from via PC. To do this, you need to install a special program for this on your PC, for example MOBILedit! Download, install.

Immediately after installation, the utility will prompt you to download the driver database. To save time, we ship them only for devices of the brands we need. Before transferring contacts to Android, you need to prepare the gadget. Go to "Settings / Features for Developers" and mark the item Connect to PC via USB cable, run the program.
After launch, you will need to select the type and purpose of the connection. In our case, select Phone\Cable connection. Click "Next", after which the automatic connection scanning will begin. When the gadget is found, select it and click Finish. Next, in the left panel, click on the Phonebook section and click on Export in the toolbar at the top. Select the save location, name it and in the "File Type" column select CSV.
We connect the second smartphone to the computer via cable, Wi-Fi or Bluetooth, before the connection procedure is exactly the same. Then click on the AImport button in the top toolbar and load the previously exported file. Next, go to the contacts of the phone, click "Import" and load the address book.
Via Google
Another way to transfer contacts from Android to Android is via Google+. First you also need to save the phone book as a single file and transfer it in any convenient way (USB cable, Wi-Fi, Bluetooth, cloud, email). Now let's go to Gmail. Each Android user should have it, because without it you can’t download any application from the market. We go to google.com and enter our account, after which we go to the profile. In the upper right corner, click on the nine squares and select "Mail" from the list. The easiest way to get here is at gmail.com or mail.google.com. Next, you need to click on the “Gmail” button and select “Contacts / Contacts” from the drop-down list.

In the page that opens, click on "More" - "Import".

Loading the phone book saved in or vCard.
To transfer data from Google to Android, you need to export it in the same CSV format to your hard drive, dump it on your phone and import it into the number database. Why then such a cumbersome method? Its advantages are that data is stored in Google, they can be edited and new ones added.
In addition, in the future it will be possible to simply synchronize with the Gmail mailbox, after which all contacts will be available on the phone after synchronization. If you synchronize with other applications (Facebook, VKontakte, Skype), you can see contacts from them in the list of phone numbers.

Thanks to a special application from Google, you can copy selected contacts to other devices via email. This method is most suitable for transferring contacts between devices that you do not want to link to a shared account.
Contacts in the form of a single VCF file will be attached to the letter. The recipient can save this document on a computer or smartphone. To add the entries stored in the file to the phone book of another Android device, just open the received VCF document using the Contacts application.
Method 1: using a computer

The web version of Google's Contacts app lets you save your selected contacts on your computer as a single file, with which you can copy them to any iOS or Android device. It is not necessary to link devices with a shared account. But this method will be convenient only if you have a computer at hand.
- Launch a browser on your computer and open Contacts.
- Log in to the account to which the desired contacts are linked.
- In the menu on the left, click "More" → "Export", and then - "TO OLD VERSION".
- Mark the desired contacts, then click on the "More" button and select "Export".
- End the process using system prompts.
As a result, a document with contacts will be downloaded to the computer in the form of a VCF file.
- Contacts ".
- Contacts » on the iCloud site using the Apple ID you want to copy entries to.
Method 2: Using a Google Account


By connecting a new Android smartphone or iPhone to your Google account, you can copy all the contacts linked to this account on the old device to your gadget at once. Unlike the previous method, you cannot choose which contacts will be copied. But this does not require a computer.
First, open the settings on the source smartphone, find the connected Google account and make sure that contact synchronization is activated.
If you are copying contacts to an Android smartphone:
- Go to the settings of the target device and open the section dedicated to accounts.
- Go back to the accounts section in settings and select Google.
- Open the added account and sync its contacts with the device.
If you are copying contacts to iPhone:
- Go to your iPhone settings and tap "Contacts" → "Accounts" → "Add Account" → Google.
- Add a Google account to which the necessary contacts are linked.
- Open the added account and sync its contacts with iPhone.

The Contacts web app lets you save your selected contacts to your macOS or Windows computer as a single file that you can copy to any iOS or Android device. You do not need to link smartphones with a shared account. But this method will be convenient only if you have a computer at hand.
- Launch a browser on your computer and sign in to Contacts on the iCloud website using the Apple ID you want to copy entries from.
- Highlight the desired contacts in the list.
- Click on the gear in the lower left corner and select "Export vCard".
The selected contacts will be saved on your computer as a VCF file.
If you are copying contacts to iPhone:
- Launch a browser on your computer and sign in to Contacts on the iCloud website using the Apple ID you want to copy your contacts to.
- Click on the gear in the lower left corner and select "Import vCard".
- Specify the path to the file with contacts and confirm the import.
- Open the Contacts mobile app on the target iPhone and refresh the contact list with a swipe from top to bottom.
If you are copying contacts on Android:
- Send the file to the target device, for example via email.
- Open the received document using the Contacts application.
How to copy contacts from iPhone to another iPhone
Method 1: using the mobile application "Contacts"


The Contacts application allows you to share selected contacts via instant messengers, SMS and other services. This method is most suitable for copying single contacts to devices that you do not want to associate with a common Apple ID with the source device. You don't need a computer for this.


By connecting a new iPhone to your Apple ID, you can copy all the contacts associated with this Apple ID on the old iPhone to your gadget. Unlike the previous method, you cannot choose which data will be transferred. But this method copies the entire phone book at once.
- Make sure the same Apple ID is connected to both devices.
- Enter the settings on the source device and click on the profile name at the very top.
- Select iCloud and make sure that the switch next to "Contacts" is green.
- Scroll down and click iCloud Backup → Back Up Now.
- Make sure that in iCloud settings on the target iPhone, the switch next to "Contacts" is also green.
- Launch the Contacts app on the target iPhone and swipe down to update the data.
- Wait a few minutes for the sync to complete.
How to copy contacts from Android smartphone to SIM card or vice versa
You will most likely find options for importing from a SIM card and exporting to it in the contacts application preinstalled on your device. If not, then install the Contacts program from Google. Select "Export" or "Import" in its settings depending on your purpose and follow the prompts on the screen.
If for some reason you are unable to copy contacts using the pre-installed program and application from Google, look for alternatives on Google Play. For example, try the SIM cards and contacts app. Broadcast".
How to copy contacts from SIM card to iPhone
- Insert a SIM card into iPhone.
- Go to settings and click "Contacts" → "Import SIM Contacts".
- Wait for the import to complete.
Unfortunately, you cannot copy contacts from iPhone to SIM card without iOS jailbreak.
Articles and Lifehacks
How to copy contacts from phone to SIM card and why you need to do it, read below.
But whoever faced the problem of a complete breakdown of the phone, or a situation where it was necessary to reflash the memory, knows what a surprise you can get in the end.
You pick up the device from the service center, you are about to make another call, and you realize that the contents of the phone, accumulated for months, and sometimes for years, have passed into a state of virgin purity.
The guys from the service center did not take care of saving the data and simply completed their direct task.
To prevent such a situation from becoming yours, you need to take care of saving contacts in time. The most banal way is to store their copies on a SIM card.
Lifehack on transferring contacts to SIM
To copy contacts from the phone book to a SIM card, just:
Note. Sometimes you can see "Export to SD card" instead of the "Export to SIM card" tab. We boldly press this tab, and already inside it we select "SIM".
Now you know how to copy contacts from phone to SIM card correctly. It should be borne in mind that on a SIM card, familiar contacts will look different than on a phone.
Points to consider
When copying contacts to a SIM card, you should be aware of some surprises:- The subscriber's name, written in Cyrillic, will be shortened to 6 characters during transfer, including spaces, which can make it almost unrecognizable.
Important! If you get an error when copying, and the contact is not transferred to the SIM card, then you need to shorten its name yourself to 6 characters. Because in some devices it decreases automatically when copying, somewhere you need to do it manually.
- If several phone numbers are attached to the subscriber, then each of them will be saved in a separate line, i.e. instead of one contact there will be two or more with the same name.
- Additional information (date of birth, subscriber's e-mail, etc.) will not be transferred and saved.
- On most phones, the "Contacts" tab has a "View" sub-tab, be sure to check all the checkboxes here if you decide to delete something completely.
If you often change your phone, and there is no time to transfer numbers using synchronization or other methods, then it is rational to store a copy of contacts on the SIM card. How to make a copy of contacts, you will learn from this article.
Why keep a copy of contacts on the SIM card
It is rational to keep contacts on a SIM card in the following cases:
- When using multiple phones or smartphones in turn.
- To prevent adding new numbers.
- When you need to do a complete data cleanup, but there is no Internet to restore contacts.
- When contacting a service center.
- If you want to use a regular phone that does not support transferring contacts over a wireless network or the Internet.
- When replacing a SIM card.
Instructions on how to transfer contacts to a SIM card
- Open the Directory or Phonebook application where phone numbers are stored.
- Find and click on the button with a drop-down list of options.
- Select Import/Export. If the item is missing, click on "Settings".
- Next - "Export to SIM card".
- In the new window, mark the contacts that should be transferred. Please note that SIM card memory is limited and often does not allow you to accommodate more than 250 numbers.
- After selecting the numbers, click on the "Export" button. The phone will inform you that some of the information - music, photo, additional notes - will not be saved. Confirm the action and wait for the procedure to finish.

So, by following these simple 6 steps according to the instructions, you will completely copy contacts from your phone to a SIM card.
Write!
If you still have questions or something did not work out, then ask questions in the comments to the article and we will try to answer you. If you know other ways to quickly move contacts from phone to SIM card, then write your method in the comments to this article, maybe it will work for other users.
Was the article helpful to you?
Rate - support the project!
