How to customize navigation menu style in wordpress. Horizontal Dropdown Menu Super WordPress Plugin Vertical Mega Menu wordpress
It is widely known that WordPress 3.0 added support for custom menus (custom menus). The thing, in my opinion, is extremely convenient and useful. Actually, that's where this article comes from.
The convenience lies in the fact that now you can create and configure menus directly from the admin panel, adding links by clicking on checkboxes and changing the order of links by simply dragging and dropping. You can add links to pages, categories, and individual posts to the menu. You can create multi-level menus, you can also add your own arbitrary links to the menu, which WordPress does not know about. In general, complete freedom of action.
However, in order for such "freedom" to be available, let's say, with a slight movement of the mouse, you need to set up the output of an arbitrary menu in the template.
Using such menus will be extremely convenient if you use the WordPress multisite feature, because you can set up different menus for different sites, and use one template for them.
Note: the menu works through the (nav_menu) WordPress taxonomy, and arbitrary (external) links are written to the main posts database table. This approach is more flexible and dynamic, but requires the constant generation of such menus.
Register_nav_menus(array("top" => "Top menu", //Name of the menu location in the template "bottom" => "Bottom menu" //Name of another menu location in the template));
We have now registered 2 menus with IDs "top" and "bottom" with their respective names. Identifiers are needed to use them in the theme, to indicate the place where, through the output function wp_nav_menu() , the menu created in the admin panel will be displayed. We will see the names of the registered locations in the admin panel when we go to the Appearance -> Menu section.
After the menus are registered, go to the admin panel and create our own menus (in this example, 2 menus):
- We choose where the menu will be located, since we have registered 2 menus, we will have 2 options: "Top Menu" and "Lower Menu".
Set the name of the menu (the menu in the template can be displayed by the specified name using the wp_nav_menu () function
Creating menu items We use the left block: link pages, headings

Support for custom menus in WordPress is enabled for each theme separately, with this line in the functions.php file add_theme_support("menus"); However, this line is not necessary if we are registering the menu. In this case support will be enabled automatically.
Display custom menus via the wp_nav_menu function
The menus are registered and created, it remains to add them to the template. This is done by the wp_nav_menu() function, which can take the following parameters:
Wp_nav_menu(array("menu" => "", // (string) The name of the displayed menu (specified in the admin panel when creating the menu, takes precedence // over the specified location theme_location - if specified, the theme_location parameter is ignored) "container" => " div", // (string) Menu container. ul wrapper. Container tag is specified (default to div tag) "container_class" => "", // (string) container class (div tag) "container_id" => "" , // (string) id of the container (div tag) "menu_class" => "menu", // (string) class of the menu itself (ul tag) "menu_id" => "", // (string) id of the menu itself ( ul tag) "echo" => true, // (boolean) Display or return for processing "fallback_cb" => "wp_page_menu", // (string) Function to use (fallback) if menu does not exist (failed to get ) "before" => "", // (string) Text before each link "after" => "", // (string) Text after each link "link_before" => "", // (string) Text before the anchor (text) of the link "link_after" => "", // (string) Text after the anchor (text) of the link "depth" => 0, / / (integer) Nesting depth (0 - unlimited, 2 - two-level menu) "walker" => "", // (object) Class that collects the menu. Default: new Walker_Nav_Menu "theme_location" => "" // (string) The location of the menu in the template. (the key is indicated by which the menu was registered in the register_nav_menus function)));
In this example, you need to insert into the template approximately (depending on the parameters you need) the following 2 codes:
#one. Display menu by location
Top Menu. Insert into the template header (header.php), where the top (top) menu will be displayed:
"menu", "theme_location"=>"top", "after"=>" /")); ?>
Displays the menu created in the admin, attached to the "Top Menu" location with a similar structure:
Lower menu. Insert into the footer of the template (footer.php), where the bottom (bottom) menu will be displayed:
Displays the menu created in the admin, attached to the "Bottom Menu" location. The structure will be identical to the first.
Please note that in the first variant, the parameters were passed through an array (array). In the second line. Both options are correct. This is common for WordPress functions - parameters can be passed as an array or as a string (the string is then converted to an array).
#2 Display menu by name
To display a menu by its name, you can use the "menu" argument. The name is indicated, the one that was set when creating the menu in the admin panel. In our example (see picture) "Main menu". The menu argument takes precedence over theme_location , which means that if we display by name, the theme_location parameter will be ignored.
You can specify a menu ID instead of a title. So, if you change the name of the menu, the code will remain working. The menu ID can be viewed in the URL while editing the menu:
Notes
Remove wrapper Div
You may have noticed that the menu is often "wrapped" with an unnecessary div tag. It can be removed by specifying an empty parameter "container"=>"" in the arguments to the wp_nav_menu() function.
Changing the default settings
In order not to constantly specify the same parameter for inserted menus, they can be overridden in functions.php . This is done through the wp_nav_menu_args filter:
Register_nav_menus(array("top" => "Top menu", "bottom" => "Bottom menu")); add_filter("wp_nav_menu_args", "my_wp_nav_menu_args"); function my_wp_nav_menu_args($args="")( $args["container"] = ""; return $args; )
By analogy, you can create your own default arguments: $args["argument"] = "value" .
Checking if a menu is registered
WordPress also has a condition function: has_nav_menu("top") - checks if the top menu location has been registered. If the menu is not specified, then the wp_nav_menu() function will work like wp_list_pages() , but the "wrapper" div will remain, despite the fact that we removed it in the arguments. You can solve this problem like this:
If (has_nav_menu("top"))( wp_nav_menu(array("container" => "", "theme_location" => "top", "menu_class" => "menu")); ) else ( echo "
"; }Menus on the site make it easier for visitors to move around the site. Websites with a lot of content can't work with regular menus alone. Most of the content on such a website is unlikely to fit into them. In this case, the mega menu comes into play. The appearance and functions of the menus largely depend on which technology you are using. Many WordPress mega menu plugins promise you so many features that it's hard to find the best one for you.
Out of this large number of mega menu plugins, there is one that suits most users. This is the WP Mega Menu plugin. It offers all the basic features and functionalities, and it's free.
In this article, we will look at the main functionality of the WP Mega Menu plugin, how to install and configure it.
Features of WP Mega Menu
The wide range of WP Mega Menu features includes:
- Menu dragging.
- Visual menu building.
- Widgets in menu items.
- Multiple theme option.
- Export/import menu themes.
- Branding with logo and social icons.
- Menu markings / icons.
- Icon support.
- Stretched menu and a picture in the background of the menu.
- Responsive and mobile menu.
- Unlimited colors and Google font options.
Let's take a look at some of the powerful features in more detail.
Drag menu building functionality
Once you have the WP Mega Menu plugin installed on your site, you can create a menu using drag and drop functionality. Add rows and then drag widgets to the columns of those rows. This WordPress plugin automatically saves changes when editing menu layouts. You don't need to write code or program anything. The powerful drag and drop system of WP Mega Menu gives you the ability to create better menus with minimal effort.
Fully responsive and mobile menu

Menus created with WP Mega Menu will be 100% responsive and mobile friendly. Regardless of the size of the devices your site is running on, it will have no display issues. You can control screen resolution adaptation to automatically switch between desktop and mobile versions. Your website menu will work great on all OSes.
WooCommerce integration

If you have products to display and sell on your site, WP Mega Menu gives you a fantastic way for visitors to directly access product details right from the menu. You have a system for displaying eCommerce products in menu items. Turn your site into a highly organized eCommerce navigation site with Mega Menu.
Layered Dropdown Menus

Create as many menu items as you want. You can design multi-level drop down menus and they will look equally beautiful. Enrich the main menu items with a dropdown submenu. This will give you even more navigation options. Building such multi-level dropdown menus is much easier with this editor plugin.
Advanced Features

Use any short code in the menu. Along with that, you have the option to use two pre-installed advanced widgets: adding photos, captions, and small details that will be displayed while hovering over them.
Social icons and menu search option
![]()
You have the default WordPress search engine right in your menu. With the WP Mega Menu plugin, you can do this with just a few clicks.
Completeness of settings

WP Mega Menu allows you to fully customize your menu. Setting up this menu and making the necessary changes is pretty straightforward. Set padding and margins for any item in the menu. Manage menu visibility according to the devices your menus will run on. You can also apply effects to menu items. Use a variety of elements such as icons, background options when customizing the menu.
Multilingual: WPML compliant

No matter what language your site will run in, WP Mega Menu will have no problem with any languages. It is fully compatible with WPML. Make your menu content in any language and the menu will work.
How to Build a Mega Menu on Your WordPress Site
1. Install the WP Mega Menu Plugin
Just like any other WordPress plugin, you can install it on your site in two different ways. First go to Dashboard -> Plugins -> Add New. Enter "WP Mega Menu" in the search bar and click "Install Now". Then activate the plugin when the Activate button appears.

You can also download WP Mega Menu Plugin from the WordPress directory. Then open the WordPress Dashboard. Go to Plugins -> Add New -> Upload Plugin. Download the ZIP file with the plugin and click "Install Now".

Activate the plugin after the successful installation message. In fact, the system itself will ask you to activate it.
2. Create a menu
First of all, create a menu by going to WordPress Dashboard -> Appearance -> Menu. Then create a new menu. This is how WordPress allows you to create default menus.
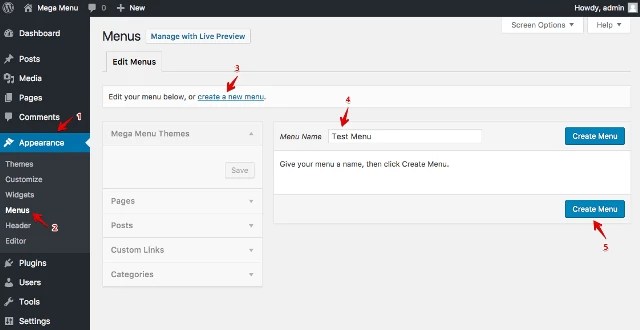
3. WP Mega Menu Global Settings
Find the WP Mega Menu tab on the left sidebar and click on it.

4. Create a Menu Theme
Menu themes define the styles and behavior of the navigation bars in the menu. To create a menu theme, open WP Mega Menu -> Themes. You can either create a new theme or import one. Click the "Import Theme" or "Create New Theme" button to perform the action.

5. Mega Menu item settings
Visit WordPress Dashboard -> Appearance -> Menu. The WP Mega Menu option will appear when you hover your mouse over the menu items.

Click on it to make settings. Set the Mega Menu option to "Yes" and click "Add Row" to select rows and columns. Also select a theme from the menu on the left side.
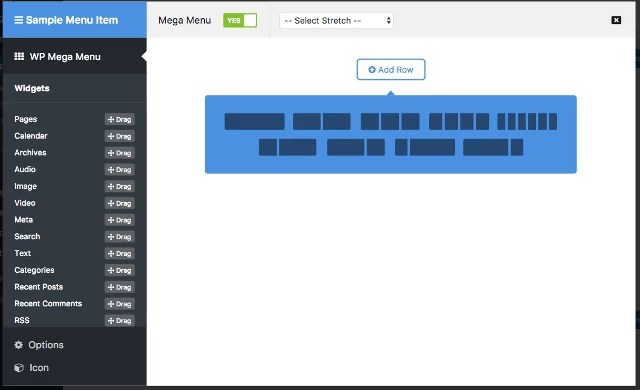
Shop in mega menu
On the left, you'll see useful widgets that you can use to add advanced features. Drag the WPMM Grid WooCommerce Widget and drop it on the column.

Edit the WPMM Grid WooCommerce Widget. Display your products with images and information the way you want shoppers to see them. You can name and select a specific category or all categories to display products from all categories.

You have finished creating your first mega menu for your WordPress site. There is a lot you can do with this revolutionary WordPress menu designer. To find out what else it can do and how to do it, read the detailed documentation to the plugin.
More recently, such a feature as the Mega Menu was the lot of premium plugins and themes only. But today, I will present to you, dear readers, two completely free plugins that will allow you to quickly, easily and of course, completely free of charge, build a powerful navigation menu on your site, not so much inferior to paid counterparts.
What is a Mega Menu anyway? Yes, the same thing, the usual navigation menu with which you have probably come across and configured more than once. Just unlike the standard functionality, there are still additional options for setting up and displaying individual elements. For example, adding not only a vertical, but also a horizontal submenu, adding icons and individual images to the menu, fine-tuning the appearance for all menu items, and so on. All this is in our plug-ins considered today.
Another great opportunity to add an awesome navigation menu to your site with a plugin is Mega Menu by WooRockets.com. Installing and activating the plugin is standard.
This plugin is somewhat more difficult to master, but it also offers more opportunities than the competitor described above. Here the construction of the menu is very similar to the construction of pages in the standard Visual Composer.
Go to the section WR mega menu in your admin panel and click on Add New. We get to a new page to build a new menu. Those who have already dealt with Drag & Drop composers will immediately feel at home. The process of building a menu is not much different from building a page.

At the beginning, make sure that at the top in the menu − location The menu is exactly what you need. Or click on Management Location to select a menu.
Click - Add Element and select in the pop-up window the type of content that you want to add to the menu. At the top left, you can choose one of the standard options or add WordPress widgets.

If necessary, add rows with division into the required number of columns. On the left are tabs for dragging menu items up or down, and on the right are tabs where editing or deleting can be enabled. Do not forget to press the usual button on the right - Publish or - Refresh to preserve the results of their labors.
In general, any texts, pictures, and, if desired, any widgets can easily be placed in your new menu. The appearance of the menu can be changed by clicking on the button. Styling or next to insert your tables by clicking the button Custom CSS.

A very functional thing, in short. It is not for nothing that the authors, in addition to this plugin, also have: a contact form and, of course, a composer, which apparently served as the basis for the mega menu plugin. You can see a working demo in all its glory here.
Gorgeous and powerful plugins with which you can practically create the menu of your dreams. The only thing that can slightly overshadow the joy of users is the issue of compatibility with different themes. Unfortunately, as far as I remember, premium plugins sometimes had this issue. I tested both plugins on the default theme and didn't notice any problems or bugs. What do you want, friends!
Do you want to customize WordPress navigation menus to change their color or appearance? Your WordPress theme handles the appearance of the navigation menu on your site. You can easily customize it with CSS to suit your needs. In this article, we will show you how to customize the style of your WordPress navigation menu.
Method 1: Using Manual Style Change of Navigation Menu in WordPress
This method requires you to edit WordPress theme files. You should only use it if you are comfortable editing the code and understanding how the .
The best way to make customizations in your WordPress theme is . If you are only modifying CSS, then you can see our guide on how to do this without modifying theme files.
The navigation menu in WordPress is displayed as an unordered list (bulleted list).
If you have just used the following tag, then it will display a list without any CSS classes associated with it.
Your unordered list will have a class name of 'menu' with each list item having its own class .
This might work if you only have one menu location. However, most themes have several places where you can display the navigation menu.
Using only the default CSS classes may conflict with menus elsewhere.
That's why you need to define the CSS class and menu position. Chances are your WordPress theme already does this by adding a navigation menu with code like this:
"primary", "menu_class" => "primary-menu",)); ?>
This code tells WordPress that this theme is displaying the start menu. It will also add the primary-menu CSS class to the menu navigation.
You can now style your navigation menu with this CSS structure.
#header .primary-menu() // container class #header .primary-menu ul () // container class first unordered list #header .primary-menu ul ul () //unordered list within an unordered list #header .primary -menu li () // each navigation item #header .primary-menu li a () // each navigation item anchor #header .primary-menu li ul () // unordered list if there is drop down items #header .primary -menu li li () // each drop down navigation item #header .primary-menu li li a () // each drap down navigation item anchor
Replace #header with the container class or ID used by your WordPress theme.
This structure will help you completely change the appearance of the navigation menu.
However, there are other classes that are automatically added by WordPress for each menu item and menu. These classes allow you to further customize the navigation menu.
Current_page_item() // Class for Current Page .current-cat() // Class for Current Category .current-menu-item() // Class for any other current Menu Item .menu-item-type-taxonomy() // Class for a Category .menu-item-type-post_type() // Class for Pages .menu-item-type-custom() // Class for any custom item that you added .menu-item-home() // Class for the Home Link
WordPress also allows you to add CSS classes to individual menu items from within the admin area.
You can use this feature to style menu items, like adding icons to an image using the menu or simply changing the color to make the menu item stand out.
Let's go to the page Appearance » Menus and press the button.
Once you have checked these settings, you will see that an additional field will be added when you edit each individual menu item.
Now you can use this CSS class in your stylesheet to add custom CSS. This will only affect the menu item with the CSS class you added.
Method 2: Customize Menu Style in WordPress Using Plugins
Your WordPress theme uses styling for the navigation menu. Many beginners are not comfortable with editing theme files or writing CSS on their own.
This is where the menu styling WordPress plugin comes in handy. This saves you from editing theme files or writing code.
First you need to install and activate the CSS Hero plugin. For more details see our step by step guide on .
CSS Hero is a premium WordPress plugin that allows you to design your own WordPress theme without writing a single line of code (no HTML or CSS).
Upon activation, you will be redirected to receive your CSS Hero key. Just follow the instructions on the screen and you will be redirected back to your site in a few clicks.
Now you need to click on the CSS Hero button in your WordPress admin panel.
CSS Hero offers a WYSIWYG editor (what you see is what you get). Clicking the button will take you to your site with the CSS Hero floating toolbar visible on the screen.
You need to click on the blue icon at the top to start editing.
Point the mouse to your navigation menu and CSS Hero will highlight it, showing the borders around it. When you click on the highlighted navigation menu, it will show you the items you can edit.
In the screenshot above, it shows us the menu item, menu navigation, menu navigation container, etc.
Let's say we want to change the text color of all items in the navigation menu. In this case, we will select a navigation menu that affects all menus.
Now CSS Hero will show you various properties that you can edit like text, background, borders, margins, padding, etc.
You can click on any property you want to change. CSS Hero will show you a simple interface where you can make your changes.
In the screenshot above, we have text selected and it showed us a nice interface for choosing fonts, changing text color, size, and other properties.
As changes are made, you will be able to see them live in the theme preview.
Once you're satisfied with the changes, click on the Save button on the CSS Hero toolbar to save your changes.
The best thing about using this method is that you can easily undo any changes you make. CSS Hero keeps a complete history of all your changes, and you can go back and forth between those changes.
We hope this article helped you learn how to style your navigation menu in WordPress.
The menu is the basis of all site navigation. Thanks to the menu, the user can quickly navigate the site and find the information he needs. It can be argued that the site "begins" with a menu, because only this element can give the user an idea of the structure of the Internet resource.
WordPress out of the box offers quite a wide range of options for working with menus. So, the built-in tools allow you to create one or more menus, with any nesting, add arbitrary links there, etc. But often the standard tools are not enough for the site owner to build a menu that meets all his needs.
Mega plugin Max Mega Menu
Usually, theme developers do not provide any advanced settings for customizing the appearance of the menu on the site. For example, hover and click effects, etc. The powerful free plugin Max Mega Menu is designed to expand the site navigation tools and offers the following features for this WordPress user:
- based on the standard WordPress system;
- support for multiple menu areas (each with its own configuration);
- providing convenient drag and drop using Drag&Drop;
- the ability to display WordPress widgets in the menu;
- customize menu styles using the built-in theme editor;
- support for submenu styles;
- support Hover, Hover Intent or Click to open a submenu;
- effects Fade, fade up, slide up or Slide when going to a submenu;
- the ability to add icons to menu items;
- advanced menu item options, including “Hide text”, “Disable Communication”, “Hide on mobile” etc.;
- align menu items to the left or right of the row and parent menu item;
- adaptive design for display on any screen;
- support for different filters/hooks;
- high speed of work;
- detailed documentation and support forum.
Max Mega Menu Setting
First, the plugin needs to be installed and activated. Now let's look at what he can do. To do this, go to the admin section Appearance -> Menu. It should be noted that if your site does not yet have a navigation menu, then create it by adding the necessary items. We talked in detail about how to create a menu on a WordPress site in our previous articles. After that, pay attention to the options block on the left, which is called Max Mega Menu Settings.
In order for the plugin to start working, check the option Included.
Let's take a quick look at each of the settings.
Setting Event determines which event triggers sub-menu items.
Effect responsible for animation appearances and its speed.
In option Topic You can choose menu design. By default, there is only one theme. We'll show you how to create your own below.

Click on it, after which a pop-up window with settings will open in front of you.

The settings window is divided into three tabs.
Tab Mega Menu allows you to determine whether a regular menu or a menu with widgets will be displayed. If the latter is chosen, then in the list Submenu display mode must be specified Mega menu and select the necessary widgets in the adjacent list. If a regular menu is required, then select Drop-down menu.
Tab Settings allows you to customize the menu items. There are text options, links, icons, adaptability and more.

On the tab icon you can set an icon for menu items.

It can be concluded that the settings present in the plugin allow you to flexibly configure each navigation item individually.
Now we should consider more global plugin settings. Max Mega Menu. To do this, go to the admin menu in the section Mega Menu -> Basic Settings. It can be seen that there are all sorts of technical options for the plugin. In principle, they can be left by default. Also here you can set the behavior of the menu when the mouse is clicked, its adaptability, settings css etc.

In chapter Mega Menu -> Themes menu, you can change an existing theme or create a new theme. It can be seen that there is a fairly large number of various settings, including color, size, shadow, animation, padding, orientation for computer and mobile views. Also, if necessary, you can use your own css-regulations. Themes created in this way can be applied in the menu editor.

In chapter Mega Menu -> Menu Locations You will be able to create new areas to place the menu. After creation, you will receive a special PHP-code that allows you to publish areas anywhere on the site, in theme files, as well as a shortcode, thanks to which menu areas can be added directly to posts / pages.

Chapter Mega Menu -> Tools serves to export / import previously created themes, and there are also several more technical options (cache clearing, complete deletion of all plugin data).

As a conclusion
plugin Max Mega Menu has a huge number of settings, thanks to which you can make an original and colorful navigation on your site.
Please click on one of the buttons to find out if you liked the article or not.
I like 1 Dislike
