Windows 10 safe mode f8. Using system configuration
When you have problems with your Windows computer, one of the first troubleshooting steps is to boot into Windows Safe Mode. Safe mode is a simple, stripped-down version of the operating system, loading only the most important files and drivers. In safe mode, you can fix a number of errors with drivers and cure your computer of viruses that prevent the system from starting up stably. If earlier you could enter the familiar Windows 7 using the F8 button when you start the computer, then Windows 10, 8 no longer have this function, but there is a trick that will help you return the F8 button to enter safe mode when you turn on your computer with Windows 10 In this guide, we'll look at how to enter and launch Safe Mode in Windows 10 from the desktop and return the familiar F8 button to always enter through it, and we'll look at how to disable Safe Mode to avoid cyclic booting.
The easy ways are at the bottom, provided you can boot into your desktop.
How to start Safe Mode when booting Windows 10
If the Windows 10 system does not boot to the start screen and you need to enter or start safe mode when turning on Windows 10 through the “BIOS”, as for example before in Windows 7, with the F8 key, then you will need to get into the Windows 10 recovery environment using other methods. which are described below. It can be created on another working computer or while yours was still working.
If you can boot to your desktop, then launch Command Prompt as an administrator and proceed to step 3.
Step 1. When you have started from the installation flash drive, go to the installation point and click on the link below " System Restore".

Step 2. You will be taken to the advanced settings of windows 10. Next, go to Troubleshooting > Advanced settings > Command line.

Step 3. Enter the following code into the command line (you can copy it in its entirety, you can enter each command via Enter):
bcdedit /set (default) bootmenupolicy legacy


Step 4. You can now start in safe mode using the key F8 in Windows 10, press the button F8 continuously during system boot until a menu with download methods appears. If you want to go back to how it was, then enter instead of legacy > standard. There will be the following type of command bcdedit /set (default) bootmenupolicy standard .
These methods will help you call up additional Windows 10 menu options and trigger a recovery environment without an installation flash drive:
- Press the restart button on the computer itself many times in a row to trigger an error and bring up the process diagnostic menu.
- Turn on the computer, wait until it boots as much as possible before the error occurs. Next, press and hold the power button on your computer to turn it off completely. Repeat the procedure 3 times, by the 4th time you should see a recovery menu.
- If all else fails, then follow Step 1.
How to add Safe Mode to the OS boot selection menu
Windows 10 now has additional startup options. This will look the same as if you have multiple versions of the OS installed on your computer. If you often use safe mode, then setting up the menu when choosing an OS will be very excellent and convenient. In the picture below I have configured some settings for myself. Let's look at this method.

Before performing this method, read it from the beginning to the end and you will understand the meaning.
Step 1. There will be three commands for the three menus created. Maybe you don’t need three, but only need one menu with safe mode. Launch Command Prompt as Administrator and enter the following commands of your choice.
- bcdedit /copy (current) /d "Safe Mode"- Let's create a safe mode boot.
- bcdedit /copy (current) /d "PSU with network"- Let's create a safe mode boot with a network (Internet access).
- bcdedit /copy (current) /d "BP CMD"- Let's create a safe mode boot with the command line.


Step 3. The system configuration will open, go to the "" tab. We will see the list that was specified via the command line above. Let's customize each menu.
1) . Select "safe mode" from the list at the top and click on the checkmark at the bottom and select " Minimum". Next, check the "" box and click apply. You can also set a menu timer, for example, after 10 seconds it will automatically load just Windows 10. This way the boot menu will appear in safe mode.

2) . Select "PSU with network" from the list and select "Network" from the bottom and check the " Make these boot options permanent". Click apply and this way we can load safe mode with the network, i.e. with the ability to access the Internet.


3) . Highlight "BP CMD", below select " Another shell"and check the box" Make these boot options permanent". Click apply and OK.


How to enter Safe Mode in Windows 10
Step 1. Hold down the buttons windows + X, select and hold the left button Shift before entering diagnostic parameters.
Step 2. You will be taken to the windows 10 recovery environment. In this environment, you can reset settings, restore the system, and much more. In the recovery environment, click on Troubleshooting.


Click on your keyboard F4 to begin the procedure of starting Windows 10 in safe mode.


How to enter safe mode in Windows 7
Method 1. Windows 7 starts when you press a button F8. Once you have turned on or restarted your computer, press the F8 button at 1 second intervals. The method will also work with Windows XP. After calling up the additional settings menu, select the download option.


If your operating system has stopped loading, errors or viruses have appeared in its operation, then only safe mode will help you cope with them (in English it sounds like Safe Mode). Use this boot option to debug the system. Unlike normal OS startup, in safe mode a number of functions are simply disabled, which allows you to access system files and find the problem. In this article we will look in detail at how to enable safe mode in Windows 10, what it is and why it is needed at all.
Safe mode is a special option for launching Windows operating systems. With its help, you can do things that cannot be done in normal mode, for example, fix problems with the system starting or its operation. Safe Mode provides only basic functions, services, and programs. Only the basic driver components that are needed for Windows to function are loaded. As soon as the system starts in safe mode, you will see the corresponding messages on the PC desktop. Sometimes the video driver does not load, as evidenced by incorrect monitor resolution.
What is it needed for
Using safe mode, you can often boot the system when the normal option no longer works. For example, one of your drivers is “broken”. The system tries to boot and when it comes to a non-working component, it crashes. In safe mode, this driver simply does not load - you can log into the system and fix it. You can look for a problem using the method of elimination. You need to turn off various components one by one and try to restart the PC in normal mode until the source of the failure is found. Just enable and disable various programs and drivers, and when it comes to the faulty one, Windows will boot again and the problem will be solved.
Activation methods
After we understood what safe mode is and why it is needed in general, it was time to move on to the instructions for activating it. In previous versions of Windows this was easier. Previously, to enter Windows Safe Mode (up to version 10), you just had to press the F8 key while the computer was turning on. In the latest version of Windows, this feature was disabled by the developers. Now it’s more difficult to get to the settings, but there are still 5 ways to do this. We will look at each of them in detail.
Options for running Windows 10 in SafeMode:
- via reboot;
- using the msconfig utility;
- using the command line;
- special download options;
- using a flash drive or Windows disk.
Attention! At the very bottom of the article there is a video instruction describing the process of entering the mode we need.
Use the reset key to get into SafeMode
This method is the simplest and most convenient, which is why we put it in first place. The sequence of actions will be as follows:
- We do everything as with a normal PC reboot: open the “Start” menu and select the restart item, but at the same time hold down the “Shift” button. After this, the picture on the screen will change color and a notification will appear indicating that you need to wait a little.

- We will be offered several points. The first allows you to start the OS in normal mode, the second opens a new menu, and the third simply shuts down. We need exactly the second way. It's called: "Troubleshooting".

- In the next step, select “Advanced options”.

- Many different options will appear, but we need the boot parameters. Click on the item indicated in the screenshot.

- Everything is ready, you can now start Windows 10 in safe mode. All that remains is to restart our system. Click “Reboot”.

- We will have a screen with a choice of options. There are 3 safe modes at once, these are: simply SafeMode, with network and command line support. To select the one you need, press the corresponding number on the keyboard.

- Windows will reboot into Safe Mode.

- Voila! SafeMode is running, as evidenced by the inscriptions in the corners of the desktop. You can move on to solving the problem that is bothering you.

Launch using msconfig
The msconfig utility is a very useful and functional tool included in Windows. It is she who will help us visit safe mode if the previous method did not work for some reason. Let's get started.
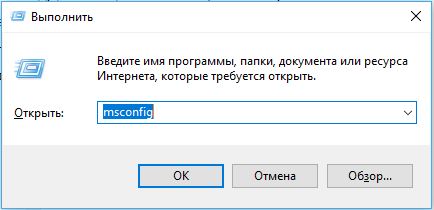
- To launch the utility, we will use the “Run” tool included in Windows. This program is capable of launching many useful functions that many users are not even aware of. We launch “Run” by simultaneously pressing two Win + R buttons and enter “msconfig” in the window that appears, then press the key labeled “OK”.

Note: You can also find the Run tool through the Start menu or Windows search.
- The system settings window opens. There are 5 tabs in total, each of which contains different functions. We need the “Boot” section - this is where you can activate safe mode the next time you start it.

- First, let's select the operating system we want to run in easy mode. To do this, simply left-click on its name. In our case, this is just one record. In the “Boot Options” section, you need to check the box next to the “Safe Mode” entry. There are several variations of it, these are: minimal, another shell, Active Directory recovery and network.

- Safe mode booting can be supplemented with some options, such as disabling the GUI, boot logging, basic video, or displaying OS information. A little to the right there is the ability to set the SafeMode launch delay time.

- After you have finished setting up Safe Mode, you can click the “OK” button. The system will notify us that we need to restart the PC. This can be done later. We click "Reboot".

- Windows 10 will begin to reboot, but we just have to wait a little.

- Ready! Safe Mode is running and ready to troubleshoot your computer.

You can now exit Windows 10 Safe Mode. Reset your msconfig settings and start the system.
Using the command line
Let's describe another method for rebooting a PC or laptop into safe mode. This time we will use a more sophisticated method, namely the command line.
- You can launch it in different ways, but we will choose the simplest one. Left-click on the search button (the icon in the form of a magnifying glass on the taskbar) and enter the words “command line” into the search field. We should run the tool in administrator mode, otherwise we simply won’t have enough authority. To do this, call up the context menu and select “Run as administrator.”

- The program we need opens. Enter the following command into it (copy the text and paste): bcdedit /copy (current) /d “Your name”. Instead of “Safe Mode”, write anything (a name that is clear to you).

- This command will add a new parameter to the “Boot” section of the msconfig utility, which will be called as you wrote it in quotes when entering it into the command line.

- Now you can reboot into safe mode through the entry you created. There is no need to change the boot option of the main system. Let's check how it works. Select the added mode and click “OK”. We will again be asked to restart Windows immediately or postpone the action.

- The computer will reboot and the next time it starts it will show two operating systems at once, one of which will be the one we created via the command line. We select it and go to reboot again.

- As you can see, everything works. We once again found ourselves in safe mode, which was activated via the command line.

- This function will be present on your PC or laptop on an ongoing basis. Now it will be much more convenient for you to reboot into safe mode (this may often be needed when debugging Windows). But after we fix the system, we need to disable safe mode and the second OS. To do this, run the msconfig utility again and go to the “Download” section.

- Select the entry we created and press the key labeled “Delete”.

After this, the unnecessary mode will disappear and the system will start automatically, without selecting it.
How to login via F8
The good thing about the described methods is that if one of them doesn’t work, the second one will help, the second one doesn’t work, then the third one. But how to fix this annoying misunderstanding and revive Windows 10 safe mode when booting using F8? Let's deal with this issue, and the command line will help us with this again, naturally, running in administrator mode.
In order to return the launch of the mode we need using F8, we need to make some changes to the “Tens” registry.
- Launch the command line with administrator privileges. To do this, enter the phrase “command line” into the Windows 10 search located on the left side of the taskbar. Click on the found entry and select “Run as administrator”.

- Paste the following contents: “bcdedit /deletevalue (current) bootmenupolicy” (without quotes) and press Enter. If we did everything correctly, the message “Operation completed successfully” will appear.

- Now you can close the window and restart your computer. As soon as the system starts, click the F8 key until you get into the Windows startup settings mode. From here we can select the safe mode we need. Select it using the arrow keys on your keyboard and press Enter.

To cancel booting Windows 10 into Safemode by pressing the F8 button, you need to open your favorite command line again and paste the code “bcdedit /set (current) bootmenupolicy standard” into it (don’t forget to remove the quotes). After pressing Enter, the system will no longer respond to the F8 key.
Special download options
To complete the picture, we will describe another option for starting Windows 10 in safe mode.
- We need to open system settings. To do this, expand the notification center and click on the “All settings” item.

- In the window that opens, look for the “Updates and Security” item and click on it.

- Next, find and click “Recovery”.

- Click the “Reboot Now” button. Be careful, the computer will restart, save all data and close the programs.

The computer will offer us a choice of boot mode, which we described in detail in the section “Using the reset key.” Then simply select the item (activated by pressing the number button on the keyboard) and go to safe mode.

Using the installation distribution
If the system does not start, applying one of the above methods, naturally, will not work. But even in such a case, we have an option - you need to use Windows 10 installation media. Moreover, what it will be - a DVD or a flash drive - does not matter at all. Follow our instructions.
- First you need to acquire the same carrier. You should not download Windows 10 via torrent or from third-party resources. The “Ten” image should be taken exclusively from the official Microsoft website. We will help you with this: a little lower you can download a program that will automatically download the image and create a bootable USB flash drive. After the media is ready, insert the flash drive into the USB port of the computer or, accordingly, the disc into the DVD and boot from it.

- This is the first stage of Windows installation. Here we just need to click “Next”.

- Now click on “System Restore”.

- Next, select the “Troubleshooting” item (navigation is carried out using the arrows on the keyboard, selecting with the Enter button).

- At the next stage, select the “Command Line” tool.

- Enter an operator like this in the black window: “bcdedit /set (default) safeboot minimal” (don’t forget to remove the quotes) and press Enter.

- Reboot the computer. You can use the mechanical reset button, there will be no harm. Our Windows 10 will start again, but in safe mode.
When the system is fixed, you can turn off safe mode and return the boot to its original state. To do this, again in the command line, enter “bcdedit /deletevalue (default) safeboot” without quotes and press Enter.
If the process will be carried out from the command line under running Windows, do not forget to run the utility as an administrator.
This concludes our story about how to launch Safe Mode in Windows 10. We tested all the methods described in this manual on our PC and each of them worked for us. Depending on the situation, the hardware, or the degree of damage to the system, everything may be different, but in any case, one of the methods we have described will definitely help you.
Video
Experienced PC users know about such a Windows option as “Safe Mode”. It is necessary in modern operating systems, because the latter are by no means infallible. Mistakes happen, and sometimes it’s not possible to correct them in working order. With XP and 7 everything was more or less clear. But with version 10, everything has become much more complicated. The standard safe mode entry has been disabled. Now this is not so easy to do. It is unclear what caused this decision by the developers. But the fact is undeniable that the seventh version was much clearer than the newfangled “ten”. However, even in the times of XP they said so. So, most likely, users will get used to this “miracle”. So how to enter safe mode in Windows 10? Let's talk to them about this.
What is "safe mode"?
Safe mode is a way to boot the system with only the most important drivers. That is, only those components that are necessary for minimal system functionality will be loaded. No additional codecs, flash or other unnecessary nonsense. This mode is used to correct operating system errors and return to an earlier state using system recovery. Also, some viruses can only be removed in this way. Therefore, everyone needs to know how to enter safe mode in Windows 10.
Sometimes this OS condition requires an "accounting" fix or a local conversion. Naturally, to carry out this procedure you need access to the Internet. And here the “Safe Mode with loading network drivers” option will help. Tens users need to choose this option, because there is no way to fix your account without the Internet. And this brings us back to the question of how to enter safe mode
How to log in if the OS is starting?
There are various options for loading "tens" in safe mode, if everything works fine. The simplest one is to click on “Shutdown” in “Start” while holding down “Shift”. You will then be prompted to select a download type. All you have to do is choose the one you need. Also try "returning" the mode launch when pressing F8. You just need to enter the required text in the commander line. How to enter Windows 10 safe mode via command line? More on this below.

There is another option. Enter "Options" and then - A lot of unnecessary text will appear with the available options. Among others, there will be the items “Restart the computer in safe mode” and “Restart the computer in safe mode with network driver support.” We select the one that is needed at the moment and reboot the PC or laptop.
You can try another procedure like this. Go to “Start”, select “Run”, enter “msconfig” (without quotes). A dialog will appear with a “Download” tab. Among a fair number of items there will be “Boot Options” and “Safe Mode” with a bunch of options. This is what needs to be ticked. And then just restart your PC.
Using the command line
Go to “Start”, select “Command Line” and enter the text in Commander: “bcdedit /set (default) bootmenupolicy legacy” (without quotes). Then reboot the machine and press F8. The Windows Start Options window will appear. Here we select "Safe Mode". Whether network drivers will be needed is up to you to decide. This is one of the answers to the question of how to enter safe mode

A variety of problems are usually solved through the commander. But in the “ten” it is best to use Windows Power Shell - a console borrowed from the Linux OS family. This tool allows you to run commands as an administrator and is much faster than the standard commander. And it is clearer to those who have at least once used Ubuntu or Mint. The command line method works on any Microsoft operating system (except XP). The company from Redmond did something adequate. Honor and praise to her!
What to do if the OS does not start?
There is only one way here. There is no way to launch Windows in Safe Mode. Therefore, you need a flash drive with the Tens distribution kit. When loading the installer, you can pull off a trick with the commander and force Windows to boot from the HDD in safe mode. You just need to find the inscription “System Restore” in the installer’s welcome window. A commander will appear there, into which we enter the text we are already familiar with (without quotes). Now reboot your PC or laptop. This is one of the answers to the question of how to enter Windows 10 safe mode through BIOS.

Many people believe that if the operating system does not want to work, then the easiest way is to reinstall the OS. On the one hand, this is true - a clean system always works faster. But on the other hand, frequent reinstallations of the operating system are certain death for the hard drive. Not to mention the fact that a lot of time needs to be spent on fully setting up the system. This does not include the time required to install it. Therefore, it is easier to solve all problems that can be fixed using Safe Mode.
ASUS laptops
There are some nuances here. The fact is that ASUS laptops have a unique entrance to the boot menu (selecting media at boot). Before performing actions with the commander in the "tens" installer, you need to force the laptop to boot from the drive with the distribution kit. To do this, just hold down Tab at startup and select the desired boot type. How to log into safe mode in Windows 10? ASUS is the same PC. That is, the method with the commander from the “tens” installer also works.

In general, Asus laptop manufacturers have their own concept of convenience and ergonomics. That is why the engineers deviated from the standard canons and assigned some crazy keys for low-level laptop control. Therefore, before trying to change the BIOS settings, you need to read the instructions very carefully. Otherwise, your “correct and standard” actions can lead to very sad consequences.
Acer laptops
The most problematic in this regard is the E5-731 laptop. In order to get into the boot menu of this laptop, you need to do a number of operations. First you need to press Enter to get into the laptop BIOS. Then go to the "Boot priority" tab and select our flash drive with the "tens" installer. Now be sure to reboot the device. The laptop will boot from the drive, not from the HDD. How to enter Windows 10 safe mode in Acer E5-731? Using the commander in the installer. Exactly the same as in the previous examples.

With the Acers, everything is somehow unclear. This method of getting to drives with distribution kits was used in ancient system units with processors from AMD, and why manufacturers decided to choose this particular method is unknown. But in this situation, after manipulating the commander, you will have to return to the BIOS again and set the priority to starting from the HDD. And this is completely inconvenient.
Lenovo laptops
How to enter Windows 10 safe mode through the BIOS of Lenovo laptops? It's easiest here. When starting the device, just press the F12 button and the media selection menu will appear. Select the flash drive and boot. And then we proceed according to the already known scenario with the command line and the required command. Laptops from Lenovo are the simplest in this regard. The Chinese company clearly knows a lot about ergonomics.

In general, Lenovo laptops are in no way inferior to more famous brands in terms of quality and layout of control elements. And in the case of Windows 10, they behave more adequately than other models. There is even an interesting option with Safe Mode for those who use UEFI. Just press Delete at startup and launch options will appear. Well, what's not to love?
Conclusion
Of course, entering safe mode in Windows 7 was much easier. But it’s also in the top ten. It’s just that the developers made it less accessible. But with the help of certain commands or actions, it is quite possible to load the operating system in this mode. And after that, you can correct errors in drivers, the operating system itself and its components. The main thing is to do everything clearly according to the instructions. Then there will be no problems.
If none of the above methods helped fix system errors, then there are at least two ways. The first is to reinstall the entire operating system. This advice is not without common sense, since fresh Windows always works better and faster. If you don’t know how to install, or you don’t have free time, then there is only one way out - take your laptop or PC to a professional workshop. They will do everything quickly and painlessly. But it will cost money.
When you have problems with your Windows computer, one of the first troubleshooting steps is to boot into Windows Safe Mode. Safe mode is a simple, stripped-down version of the operating system, loading only the most important files and drivers. In safe mode, you can fix a number of errors with drivers and cure your computer of viruses that prevent the system from starting up stably. If earlier you could enter the familiar Windows 7 using the F8 button when you start the computer, then Windows 10, 8 no longer have this function, but there is a trick that will help you return the F8 button to enter safe mode when you turn on your computer with Windows 10 In this guide, we'll look at how to enter and launch Safe Mode in Windows 10 from the desktop and return the familiar F8 button to always enter through it, and we'll look at how to disable Safe Mode to avoid cyclic booting.
The easy ways are at the bottom, provided you can boot into your desktop.
How to start Safe Mode when booting Windows 10
If the Windows 10 system does not boot to the start screen and you need to enter or start safe mode when turning on Windows 10 through the “BIOS”, as for example before in Windows 7, with the F8 key, then you will need to get into the Windows 10 recovery environment using other methods. which are described below. It can be created on another working computer or while yours was still working.
If you can boot to your desktop, then launch Command Prompt as an administrator and proceed to step 3.
Step 1. When you have started from the installation flash drive, go to the installation point and click on the link below " System Restore".
Step 2. You will be taken to the advanced settings of windows 10. Next, go to Troubleshooting > Advanced settings > Command line.
Step 3. Enter the following code into the command line (you can copy it in its entirety, you can enter each command via Enter):
bcdedit /set (default) bootmenupolicy legacy
Step 4. You can now start in safe mode using the key F8 in Windows 10, press the button F8 continuously during system boot until a menu with download methods appears. If you want to go back to how it was, then enter instead of legacy > standard. There will be the following type of command bcdedit /set (default) bootmenupolicy standard .
These methods will help you call up additional Windows 10 menu options and trigger a recovery environment without an installation flash drive:
- Press the restart button on the computer itself many times in a row to trigger an error and bring up the process diagnostic menu.
- Turn on the computer, wait until it boots as much as possible before the error occurs. Next, press and hold the power button on your computer to turn it off completely. Repeat the procedure 3 times, by the 4th time you should see a recovery menu.
- If all else fails, then follow Step 1.
How to add Safe Mode to the OS boot selection menu
Windows 10 now has additional startup options. This will look the same as if you have multiple versions of the OS installed on your computer. If you often use safe mode, then setting up the menu when choosing an OS will be very excellent and convenient. In the picture below I have configured some settings for myself. Let's look at this method.
Before performing this method, read it from the beginning to the end and you will understand the meaning.
Step 1. There will be three commands for the three menus created. Maybe you don’t need three, but only need one menu with safe mode. Launch Command Prompt as Administrator and enter the following commands of your choice.
- bcdedit /copy (current) /d "Safe Mode"- Let's create a safe mode boot.
- bcdedit /copy (current) /d "PSU with network"- Let's create a safe mode boot with a network (Internet access).
- bcdedit /copy (current) /d "BP CMD"- Let's create a safe mode boot with the command line.
Step 3. The system configuration will open, go to the "" tab. We will see the list that was specified via the command line above. Let's customize each menu.
1) . Select "safe mode" from the list at the top and click on the checkmark at the bottom and select " Minimum". Next, check the "" box and click apply. You can also set a menu timer, for example, after 10 seconds it will automatically load just Windows 10. This way the boot menu will appear in safe mode.
2) . Select "PSU with network" from the list and select "Network" from the bottom and check the " Make these boot options permanent". Click apply and this way we can load safe mode with the network, i.e. with the ability to access the Internet.
3) . Highlight "BP CMD", below select " Another shell"and check the box" Make these boot options permanent". Click apply and OK.
How to enter Safe Mode in Windows 10
Step 1. Hold down the buttons windows + X, select and hold the left button Shift before entering diagnostic parameters.
Step 2. You will be taken to the windows 10 recovery environment. In this environment, you can reset settings, restore the system, and much more. In the recovery environment, click on Troubleshooting.
Click on your keyboard F4 to begin the procedure of starting Windows 10 in safe mode.
How to enter safe mode in Windows 7
Method 1. Windows 7 starts when you press a button F8. Once you have turned on or restarted your computer, press the F8 button at 1 second intervals. The method will also work with Windows XP. After calling up the additional settings menu, select the download option.
Entering Safe Mode on a Windows 10 computer can cause some difficulties for users. The fact is that pressing the usual F8 key (or another key depending on the device manufacturer) during the boot process may no longer launch the troubleshooting mode.
There are several ways to boot into Safe Mode. Some of them are simple, while others are more suitable for experienced PC users. Advanced users will appreciate the special commands that can be used in scripts and batch files (.bat) to easily launch Safe Mode.
1. Easy way
The easiest way to restart the system in Safe Mode is to click the Start menu, go to power options and, while holding down the Shift key, click the Restart link. This will restart your computer and display the advanced options screen as the operating system boots. On this screen, select a section Troubleshooting > Advanced Options > Boot Options > Restart.

You will then be able to select the required boot options in Safe Mode.

The Advanced Boot Options screen also appears automatically if the system fails to boot after several attempts.
2. Start manually
If the first method seems too easy for you, then you will probably like the manual method. Launch the classic System Configuration application by clicking the Start menu and typing msconfig.exe. Then go to the tab. Enable the option Safe mode and, if necessary, select one of the available environment options: Minimal, Other Shell, Active Directory Recovery, or Network. Reboot.

To exit Safe Mode, repeat the steps above and disable the Safe Mode option. The next time you reboot, the system will boot in normal mode.
3. For advanced users
You can use the Command Prompt or Windows PowerShell to boot into Safe Mode. Launch Command Prompt or Windows PowerShell with administrator rights (right-click on the Start menu, select Command Line (Administrator) or Windows PowerShell (Administrator)) and enter the following command:
Shutdown /r/o

Your system will reboot and a boot options screen will appear during boot. Select Troubleshooting > Advanced Options > Boot Options > Restart.
4. For the most advanced
This is the most complex method - it uses commands that must be used in a command prompt with administrator rights.
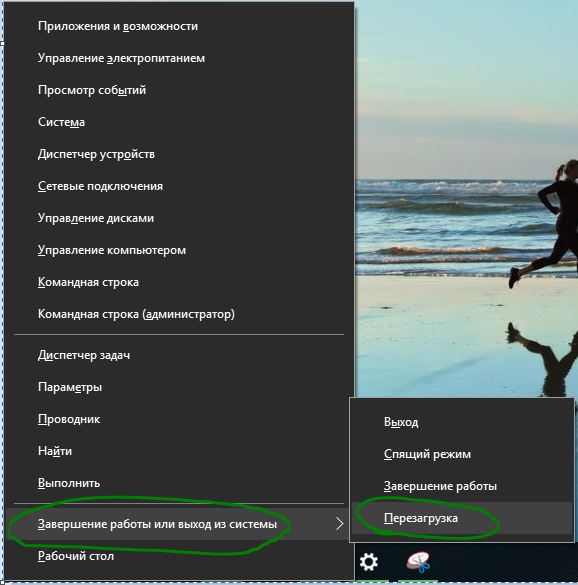
To run an elevated Command Prompt, press the Windows key, type cmd.exe, hold down Shift + Ctrl and select the application Command line.
note
It is important to keep in mind that using these commands will boot the system into Safe Mode an infinite number of times. To exit the boot loop in Safe Mode, you need to use a separate command (listed below).
If you use additional login methods (such as a PIN), after entering the command, you will need to use your Microsoft account password or local account password to log in.
Launch Command Prompt and enter the following command if you want to enter Safe Mode with standard settings:
Bcdedit /set (default) safeboot minimal
If you need to enter Safe Mode with Networking:
Bcdedit /set (default) safeboot network
After using the above commands, reboot the system.

5. Boot type selection mode as in Windows 7
Another command is available that allows you, after a reboot, by pressing the F8 key to get into the standard boot type selection mode as in Windows 7:
Bcdedit /set (default) bootmenupolicy legacy

After entering the command, the boot selection mode will be turned on exactly after pressing the F8 key before starting the system, and not constantly, as in previous commands.
To return to Windows 10's standard boot mode, launch Command Prompt in Safe Mode and enter the command:
Bcdedit /deletevalue (default) safeboot
Found a typo? Select and press Ctrl + Enter
