The best Android apps for system monitoring. how to overclock cpu on android android cpu frequency control
In this article I will tell you how overclocking the android processor affects your animal. Overclocking the Android processor: even a child can handle this if he follows the clear instructions in this article.
Often, owners of Android smartphones express dissatisfaction with the performance of their devices and begin to think about overclocking their device. First, let's define the very concept of processor overclocking. Processor overclocking is the name given to forced operation in a non-standard mode (primarily these are operating modes when the frequency increases). Such overclocking will be advisable in two cases.
First case– this is the user’s desire to get the maximum return from his device, while spending a minimum amount of money on its purchase. In the vast majority of such cases, such acceleration is classified as light. In this case, the main goal is stable operation of the smartphone for quite a long time, and not obtaining the maximum operating frequency of the processor.
Second case- this is ordinary human passion, the desire to squeeze everything possible and impossible out of the device, at the same time surpassing everyone and everything and, thereby, asserting oneself, often only in one’s own eyes. Before starting overclocking, many people ask a completely reasonable question: is overclocking a processor dangerous? For the vast majority of cases, as long as efficient heat dissipation from the overclocked processor is ensured, the risk of processor failure is minimal. It is possible that after overclocking the lifespan of the processor will be slightly shortened, but such a reduction can be neglected in view of the fact that the processor is more likely to become obsolete than to be able to reach at least 50 percent of its resource. There is nothing complicated in the procedure for overclocking the processor of an Android smartphone; the most important thing here is to understand what you are doing and for what purpose.

Of course, you should be warned in advance that incorrect actions when overclocking a processor can lead to premature hardware failure. Therefore, it is immediately necessary to clearly understand that further operation of an overclocked smartphone will be carried out solely at your own peril and risk. If you want to more or less safely overclock the processor of an Android smartphone, then you should start increasing the processor clock speed smoothly, constantly monitoring the indicators using additional software (this can be various tests, benchmarks, etc.). That is, you must constantly test your processor for stability. It is completely safe to increase the processor frequency only by a small amount. In this case, the risk is reduced to almost zero, as is the need for such overclocking. I would like to warn you right away that there is no point in overclocking processors with a frequency of 1 GHz or higher, especially if they are dual-core processors.

As a rule, the performance of a processor is determined by its architecture and declared clock frequency. In this review, we will try to describe in detail the increase in the frequency of the smartphone processor. But first, you must make sure that you have Rooted Android. In order to carry out safe overclocking, we need a program for overclocking the Android processor. In this article we will look at several similar software products. But before you start overclocking, the first thing you need to do is install the selected application on your smartphone. If you are an experienced user of Android smartphones, you can skip the description of the installation process and immediately start reading the review of overclocking programs. For those who have recently become the owner of a treasured device, it will be useful to learn several ways to install programs on smartphones with Android. Below we will look at the two most convenient methods.
Installing applications using apk files
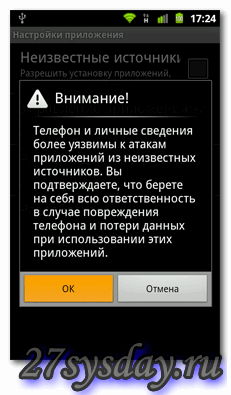
First way is the simplest. To install, you should first allow installation of applications from unknown sources. Go to the Settings -> Applications menu and check the box next to “Unknown Sources” and click OK, as shown in the figure below.


After that, copy the apk file to the SD card of your device. You can install the application from an apk file using any file manager that has a similar function. One of these managers can be ASTRO File Manager or ES File Explorer. Launch the file manager, find the apk file, select it and install it using the standard Android installer. The entire sequence of actions is demonstrated in the photo below.


To simplify the procedure for installing applications via an apk file as much as possible, there are many special programs called “application managers”. The most popular of them is SlideME Mobentoo App Installer. This manager is capable of automatically scanning the SD card of your smartphone for the presence of apk files. Then, with its help, you can quickly, literally in one click, install any application on your device.


If for some reason you do not want to install such programs, then you can install the application using a browser. To do this, enter the following link into the address bar of your browser:
"content://com.android.htmlfileprovider/sdcard/FileName.apk"
After this, the installation process will start automatically.
Installing applications via Android Market
Second way, no less popular is to install the applications you are interested in using the Market program.
Android Market is the official directory of Android applications.
It includes thousands of different programs for every taste. The Market program can be found in all stock and modified Android firmware. Most likely this program is also on your device.
The peculiarity of the Android operating system is that it is highly integrated into Google services. Therefore, Android Market is no exception here either. Therefore, to be able to use the Market program, you need to have a Gmail account.
In order to install an application using the Market program, you first need to launch it. When you first launch the program, you will be prompted to accept the license agreement and fill out the information associated with your Gmail account. After this, you will be able to fully use the program.


As you can see in the photo, Android Market applications are conveniently structured by categories. About the same as the directory with Android applications. After selecting a specific application, you just need to click the “accept and download” button, the system will do the rest automatically.
The main advantage of this method of installing applications is the ability to automatically track updates. All applications that were installed on your smartphone using the Android Market are literally updated with one finger press. The system automatically searches and updates installed programs. But this method also has one significant drawback - high traffic consumption. Therefore, if you do not have unlimited Internet, then it is better to set a ban on the use of mobile GPRS. To make this as easy as pie, go to Settings -> Wireless networks -> Mobile network -> and uncheck the box next to “Data transfer”.


Now that we have figured out how to install applications, we can move on to the processor overclocking programs themselves. First on the list is SetCPU.
The SetCPU program helps you change the processor frequency at your discretion. For example, if you want to increase the battery life of your smartphone, just reduce the clock frequency in the application. The program also has a huge number of profiles and settings. In addition to this, the program has a whole set of tools that can automate the program. SetCPU is capable of automatically lowering the processor frequency when the battery charge level decreases. In this case, the user sets the level himself. The program can also lower the processor frequency when the temperature approaches the upper permissible threshold. But these are not all of its useful options. The SetCPU utility can improve the performance of your smartphone. When creating your own profiles, it allows you to set maximum and minimum processor frequency values, for example, when turning off the screen or connecting a charger. It is of no small importance that the smartphone has a modified kernel. Since overclocking is unlikely to work with a standard core.
After launching the application, the screen immediately begins to display the standard processor frequency. The upper slider is used to set the maximum processor frequency, and the lower slider is used to set the minimum. Here you can adjust these extreme values. In addition to this, SetCPU contains 6 special modes:
- Ondemand – this mode allows the processor to operate at a given low frequency and, if necessary, jumps to the maximum set frequency.

- Userspace – in this mode, control over frequency changes is carried out by the program itself.
- Performance – a mode in which the processor will constantly operate at the highest possible frequency.

- Conservative - if necessary, the processor can step-by-step reach the maximum operating frequency; if not necessary, it will operate at a minimum load.

- Powersave - this mode sets a constant minimum frequency for the processor, which will remain unchanged.
- Interactive – with this choice, the processor will be able to operate at the set lower frequency, and if necessary, it will be able to increase the operating frequency to the maximum value step by step.

In addition to the above profiles, the program allows you to use additional settings to very subtly change various characteristics of the processor.
Another very useful program for overclocking the Android processor is Milestone Overclock. First, you need to upload the apk package with the program to your memory card. Then install it using one of the methods given above. After launching Milestone Overcloc, something like this should appear on your smartphone screen:

Click the “Load module” button. The program will ask for root rights, allow it to use them. Select the “Settings” item and set the desired value. Then click OK.

Then move the slider to the right edge to the “custom” value, as shown in the photo below.

Check the box “Autoload on boot” and exit the program. Now you can run the SetCpu program that is already familiar to us; in the dialog box, select Autodetect Speeds Recommended.

Then, by moving the sliders, you can edit the maximum frequency (during load) and minimum (during idle). In principle, you can leave everything as is, in this case energy saving will increase. The Set on boot checkbox allows you to save the positions of sliders and settings when you turn on/off your smartphone.

To test the stability of your chosen processor overclocking settings, you need to use the Stress test utility.
To do this, in the SetCpu program you need to go to the “Info” tab and run the “Stress test” for 5-6 minutes. At the end of this time, press the Back key and see a window in which the system should report that testing was completed without errors. If the test was passed with errors, you need to change the CPU settings. You may have to set the voltage or clock speed lower. After overclocking, we recommend rebooting your smartphone and checking whether the settings you set are saved.
As you can see, the process of overclocking a processor is quite simple. But you must remember that all overclocking actions must be carried out extremely carefully, gradually increasing the frequency. Typically, with a slight overclock of the processor by 15-20%, an increase in voltage is not required. This option for a smartphone is the safest and most optimal. Below is a link to a video that describes the SetCpu processor overclocking program.
Technical progress does not stand still and almost every day engineers are developing more and more powerful processors; single, dual and quad-core processors are no longer uncommon in tablets. There are rumors about the development of tablets that have six cores. All this is available only in new models of gadgets, which naturally cost a lot.
But what to do with the old device? Not every person has the finances to constantly update their gadget. There are many reasons why there is no desire or opportunity to update a gadget. Today, there are ways in which you can get the most out of your device, and having modern device management software will help you with this. This article will address the question: how to overclock the processor on android and extend the life of your “old man”.
For the tests, we selected a tablet from Samsung that is outdated today in terms of configuration, but not in functionality, whose model is Galaxy Tab P1000.
Antutu Cpu Master - maximum overclocking
To begin with, basic testing was carried out on the phone before overclocking using the Antutu Cpu Master program, which is available for free download from the Play Store.


The inspection score was 2708 points.
Results before and after overclocking
Now, using our program, we will overclock the processor to the maximum value, which the program independently determines


Now the test score is 3409 points. The difference between the initial value and the value after overclocking is as much as 700 points, which is approximately 125% of the initial test.
Now let's compare the results that we received before and after overclocking the processor.

The chart shows that the tablet moved up two places in terms of scores, ahead of Samsung Galaxy S gadgets, as well as Google Nexus S, which is a good indicator.

According to the table, it can be seen that the value of the central processor and RAM has increased, and the value of floating point numbers has also increased, which confirms the beneficial effect of processor overclocking on the system performance of your device.


Almost a complete analogue of SetCPU, only according to reviews it is more stable on some devices. It can limit the min/max processor frequency, the pro version can change profiles and has no advertising. There is a beautiful widget that displays the processor frequency, charge and battery temperature. The program is not intended to overclock the processor, but, on the contrary, to limit the frequency for energy saving purposes.
Description of modes:
- Interactive - interactive mode, speeds up the CPU frequency in real time, almost always at full performance.
- Smartass is a mode based on Interactive. It features a faster reduction in frequency when idle, and also reduces the frequency to a minimum when the screen is off.
- Conservative - runs at the lowest possible CPU frequency and increases step by step if necessary.
- Userspace - allows you to change the CPU frequency, either manually or dynamically, at the discretion of the software.
- Powersave - Reduces the CPU frequency to the lowest possible level.
- Ondemand - runs at the lowest possible CPU frequency and increases to the maximum when the CPU load reaches 100%.
- Performance - sets the maximum value of the CPU frequency, prohibiting changing the frequency value downwards.
Download CPU Master for Android you can follow the link below.
Developer: AnTuTu
Platform: Android 1.6 and higher
Interface language: Russian (RUS).
Root: Required
Status: Full
Surely many users of Android devices have encountered the issue of system performance. For example, the tablet may not be able to handle several simultaneously running applications, or the graphics may begin to slow down. In addition to the amount of RAM, these indicators are significantly affected by the clock speed of the processor of your device.
Third-party apps are best for overclocking
Even if some time ago your Android tablet was the flagship in its niche, progress does not stand still, and new programs and games require more and more hardware resources. On the other hand, this is not yet a reason to change the device to a faster (and more expensive!) one, so it makes sense to think about overclocking the processor.
Special applications have been developed for this procedure; they can be found and downloaded on Google Play. Android programs, using the example of which we will tell you how to overclock a CPU, are quite easy to use, but for them to work correctly you need root rights - superuser rights that allow you to change engineering settings, access to which is usually limited to users.
AnTuTu CPU Master program
Available on Google Play in both paid and free versions. The functionality of the first is a little broader, but for our main task it is quite suitable. After installing and launching the program, we immediately see the main window.

The value on the green background is the current frequency. Below are sliders that adjust the maximum and minimum values. To speed up the operating system as a whole, you need to increase the minimum frequency value. This program cannot change the maximum number.
After setting the desired values, you must save the settings and restart the tablet to apply them.
SetCPU
The SetCPU Android app works in a similar way. When you launch it, we see two buttons: standard CPU overclocking and going to advanced settings. The main function is implemented in approximately the same way as in the previous example: the current frequency value changes in real time as any processes start or stop, and the ability to adjust threshold values.

In addition, the SetCPU program has several other useful functions. In it you can not only overclock, but also create frequency profiles that the processor will use. You can, if necessary, switch between in advance, and also set a profile change depending on the conditions of use: for example, reduce the frequency when the battery charge is low.
It is better to use the advanced functions of this program only for experienced Android users, since it is possible to regulate the level of power consumption for each specific frequency only if the user is aware of what each of his actions can lead to.
Pros and cons of CPU overclocking
The advantages of this procedure include:
- undoubtedly, increasing the performance and speed of the device;
- fast and smooth operation of resource-intensive games and programs.
But there are also some disadvantages that can make the operation of your tablet less comfortable:
- increasing the frequency will inevitably lead to increased power consumption, so be prepared for unusually rapid battery drain;
- Heat transfer will also increase, that is, the device will heat up more than usual, even with a not very high load.

Precautions when overclocking a processor
Remember - each device is individual, and before you think about overclocking the CPU on Android, look for information regarding your model: it may not be possible to overclock it. For example, if your tablet is equipped with a single-core processor, then overclocking it will not give noticeable results. In general, a reasonable increase should be no more than 20-25% of the original figure. Unnecessarily high values may damage your device.
Overclocking the processor will in any case lead to a reduction in the battery life of the device: working at a high frequency, the processor will consume more energy. However, there is another side to this factor: using these same programs, you can extend the battery life if you lower the frequency thresholds. This is relevant for those who do not use resource-intensive programs, rarely play games, but highly value autonomy. After all, most standard processors on our Android devices are quite capable of operating at medium frequencies without any overclocking.

Conclusion
So, if you have decided to speed up your device, any of the programs described above will help you with this - of course, provided. Moreover, they can be useful even for those who do not decide on this procedure: after all, with their help you can not only increase, but also decrease the frequency, thereby saving energy consumption. How did these programs help you? Tell us about your experience in the comments.
If we talk correctly about the modes of the Android kernel, then it would be correct to call it - AProcessor frequency control algorithms or kernel CPU governor. Not all modes listed here may be available on your Android device. Android runs on the Linux kernel.
What are there CPU governor
- OnDemand
- OndemandX
- Performance
- Powersave
- Conservative
- Userspace
- Min Max
- Interactive
- InteractiveX
- Smartass
- SmartassV2
- scary
- Lagfree
- Smoothass
- Brazilianwax
- SavagedZen
- Lionheart
- LionheartX
- Intellidemand
- Hotplug
- Wheatley
- Lulzactive
- AbyssPlug
- BadAss
- Ktoonservative
- AssWax
- sleepy
- Hyper
- SmartassH3
- Smartmax
Details about each mode
OnDemand- “neutral” kernel operating mode, used by default in many Android devices. This mode balances performance and energy consumption, but unfortunately there is no energy saving mode.
OndemandX- an improved version of the ondemand kernel, with the addition of a sleep and wake profile. The quality of its work largely depends on the I/0 scheduler.
Performance- “productive” kernel mode, as you understand from the name. In this governor (mode), the processor almost always operates at the maximum frequency or maximum. Turns on when the device is charging. Not suitable for everyday use, it drains the battery so quickly.
Powersave— “energy-saving” core mode. Unlike Performance, it raises the core frequency very slowly, or rather practically does not raise it and operates at the very minimum frequency. This mode can only be used when the screen is off to save energy. Not suitable for everyday use, as Android becomes unresponsive or freezes.
Conservative— “energy-saving” core mode. Ondemand raises the processor clock speed 2 times slower. At the same frequencies, the performance of ondemand is 2 times lower. Without load, sets the minimum processor frequency. It is also recommended to use when the screen is turned off or on.
Userspace— “neutral” mode of kernel operation. Configured by the user himself. Very rare.
Min Max— “neutral” mode of kernel operation. A modified Conservative kernel mode, but unlike it, it is more productive. Uses either the maximum or minimum core frequency, there are no intermediate ones!
Interactive- “productive” kernel mode. A modified ondemand kernel mode that changes the core frequency faster, but unlike ondemand, allows you to spend more time at the maximum frequency. Therefore less energy efficient.
InteractiveX- “productive” kernel mode. As the name suggests, the modified Interactive kernel mode. More energy saving.
Smartass- “productive” kernel mode. Modified InteractiveX kernel mode. Very popular among Android users.
SmartassV2- “productive” and “energy saving” core mode. Modified Smartass kernel mode, or rather its second version. Many call it ideal. Perhaps it is so.
scary- “productive” and “energy saving” core mode. The modified mode with Smartass and Conservative enabled slowly raises and slowly lowers the processor frequency, but still works more often at minimum frequencies.
Lagfree— “energy-saving” core mode. Was created as an alternative to ondemand. More economical, but in necessary situations quickly raises the maximum frequency. Not recommended for heavy gaming or watching videos.
Smoothass— was developed as an alternative to Smartass. More productive, therefore less energy efficient.
Brazilianwax— was developed as an alternative to SmartassV2. More productive, therefore less energy efficient.
SavagedZen- “energy saving”, developed as an alternative to Smartass. More energy efficient, therefore less productive.
Lazy— ondemand mode with faster frequency increase.
Lionheart- “productive” kernel mode. Similar to Performance, but with faster frequency rise.
LionheartX— an improved version of Lionheart with Smartass inclusions.
Intellidemand- intelligent OnDemand option. Similar to Interactive. Actively increases the frequency in demanding tasks and smoothly in less demanding ones.
Hotplug- another OnDemand option. Disables processor cores when idle
Wheatley- another OnDemand option.
Lulzactive- a mixture of Interactive and Smartass. Increases the frequency by one step when the system load is more than 60%. Decreases by one step if less than 60%.
AbyssPlug—
BadAss— without load, a fairly economical mode; when a large task appears, it quickly raises the frequency.
Ktoonservative— an improved version of Conservative.
AssWax- Interactive option.
sleepy- another option to achieve productivity and autonomy.
Hyper - another version of the main OndemandX
SmartassH3- designed to save battery
Smartmax- is a combination between OnDemand and Smartass2 This is configured by default to save battery power.
What types of I/0 schedulers are there?
Schedulers I/0- I/O schedulers perform two basic operations: merging and sorting. Merging is the process of taking two or more adjacent I/O requests and combining them into a single request. (taken from opennet.ru).
In a nutshell, these are ways to access memory.
- Anticipatory
- Deadline
- Simple or SIO
Details about each I/0 scheduler
Noop- the safest and simplest scheduler, since it only combines requests but does not sort.
Anticipatory— issues requests when the previous one has been processed, after which it waits for some time for the next request; if there is none, it moves on to another request.
CFQ— combines tasks into goals and goes around them in a circle. A balanced and productive option for Android.
Deadline— stores a sorted queue for writing, new requests are sorted and moved to the end of the queue. It surpasses CFQ in its capabilities.
VR— with elements of Deadline. The most unstable scheduler, but still the most productive.
SIO— performs quick queries first, then more capacious ones. Stable, simple and productive.
BFQ- productive, but still worse than VR and SIO
Android kernel modes and I/0 scheduler are worth using
Planners— SIO, VR or Noop
Kernel modes:
For energy saving - InteractiveX, Smartass, SavagedZen (conservativ and powersave were not taken into account since they are not suitable for work)
In terms of performance - SmartassV2, Lionheart, MinMax.
