Screenshot in MacOS: How to take a screenshot of a browser window or a selected area? Screenshot on a MacBook: do it quickly and correctly How to take screenshots on a poppy
Not everyone knows, but the macOS operating system provides several ways to take screenshots. Most users prefer third-party services, despite the fact that pre-installed tools offer the same rich features. Today we will tell you how to realize the full potential of embedded solutions.
The first way - using "Screenshot"
This application can be found using , or in the Applications - Utilities folder.

There are four options to choose from:
- Selected area
- Screen
- Screen with a delay
After selecting the desired option, a window or selection area will appear. After creating a screenshot, select the file format and save location.
In addition, in the settings of this tool, you can enable the display of the cursor on the screenshot.
The second way is using keyboard shortcuts

How to take a screenshot of the entire screen
To do this, use the combination: Command + Shift + 3
After this action, we will hear a sound notification, and the screenshot will be saved directly to the desktop.
How to take a screenshot of an area of the screen
This time the combination will be: Command + Shift + 4
The cursor will change to a "cross", allowing you to select the necessary fragments on the screen. You can change the selection method - if you hold down the Alt key at the same time, the cursor from the center will begin to expand in all directions.
How to take a screenshot of a specific window
We still use the combination Command + Shift + 4, after the cursor appears, press the spacebar. The "camera" icon will appear, select the desired window. A side effect will be a beautiful shadow from the application window on the screenshot itself.
To do this, add the Control key to the existing combinations. For example, Command + Shift + Control + 3
How to take a screenshot of the Touch Bar
The combination will be used here: Command + Shift + 6
In addition, you can customize the Control Strip area by adding a "Screenshot" button for quick access.
How to change where screenshots are saved
All pictures taken with hotkeys are saved directly to the desktop. However, we can always change the save location:

Thus, all new pictures will be saved in the selected folder.
If you need to take a screenshot on a Mac, you can look for a "Print Screen" button like on some keyboards.But you can take a screenshot on an Apple computer a little differently than on a Windows computer.
On a Windows PC, all you have to do is press the "PrtScr" or "Print Screen" key on your keyboard. After you press this key, Windows will automatically take a screenshot in full screen mode and save it to the clipboard.
To export or save this screenshot to an image file, you will need the help of an image editing program such as Microsoft Paint or Photoshop. Just paste the contents of the clipboard into the Paint program (or click Ctrl+V ) and save it as a new image file.
But how do you take a screenshot on a Mac? This page will walk you through 3 keyboard shortcuts that will take different types of screenshots on your Mac.
Mac print screen options
Mac OS X has more advanced screenshot features than Windows. In fact, there are three methods you can use to take a screenshot of your Mac:
- Take a full screen screenshot.
- Take a screenshot of the selected part of the screen.
- Take a screenshot of the selected application.
You can use any methods to take a screenshot and save it to your desktop without using a photo editor (unlike Windows).
There are three keyboard shortcuts that you can use on a Mac OS computer to take a screenshot.Each keystroke does its job - you can take a full-screen screenshot, take a screenshot of part of the screen, or take a screenshot of a specific application, depending on which key combination you use.
How to take a picture (screenshot) in full screen on Mac
If you want to take a screenshot of the entire screen, use this keyboard shortcut:
Command + Shift + 3
When you press command + Shift + 3,your Mac takes a screenshot of the entire screen and saves it to your desktop.
If you are using more than one monitor, this combination will create a larger image file that includes all connected monitors.
How to take a screenshot of only part of the screen on a Mac
If you only want to take a screenshot of a small part of the screen, press this key:
Command + Shift + 4

When you press these keys on your keyboard, a selection box will appear that allows you to select a specific area of the Mac screen to capture. It then automatically saves it as an image file on your Mac's desktop.
So, here is a complete guide on how to take a screenshot on a Mac in a selected area:
- Click Command + Shift + 4and the mouse cursor will change to a crosshair pointer.
- Move the crosshair pointer to the position where you want to take the screenshot.
- Drag to select an area, and then release the mouse button. The screenshot will be automatically captured.
While dragging the crosshair pointer, you can also click Shift , Option or Space (Space) and change the way you select part of the screen to take a screenshot.
If you've selected part of your Mac's screen but change your mind and want to select a different area, simply press the Esc key to undo your actions.
How to take a screenshot of a specific window on Mac
To take a screenshot of a specific application on a Mac OS X computer, simply follow these instructions:
- Press these keys at the same time:Command + Shift + 4 .
- After pressing these keys, the Mac cursor will change to "+ ».
- In the next step, click Spacebar (or Space ), the cursor will change to a camera icon.
- Just move the camera icon and then click on the app where you want to take a screenshot.
How to Find a Screenshot File on a Mac
For all of the above methods, the image file will be automatically saved to your Mac desktop as a PNG (as opposed to JPG) file with a name like " ScreenShot xx-xx-xx ". These "xx-xx-xx" numbers were generated automatically according to the date and time the screenshot was taken.

If you don't want to clutter up your desktop, you canchange the default file save location,using System Setup on Mac.
If you're using a newer operating system like Mojave, the features are more advanced there, but the basic keyboard shortcuts are the same.
Windows users are accustomed to capturing an image from the display with a single button on the keyboard. The print screen on a Mac is much more complicated: not every user remembers how to make it for a full-screen picture or for a separate section, and there is no obvious PrtSc key. If you completely forgot (or didn't even know) how to printscreen on a Mac, the following instructions will be very helpful.
How to take a screenshot on a Mac
Let's start with the most modern version of Mac Os. In the Mojave edition, a combination of Shift, Command and the number 5 is used to call a special tool for taking a screenshot.
Another option on how to take a screenshot on a Mac is to launch the same application through Programs by selecting the "Utilities" sub-item and then the "Screenshot" icon.
In previous editions of Mac OS, the corresponding functions were performed through "Capture".
Regardless of the selected method, a special menu will appear on the display, from which you can perform the following actions:
- create a printscreen of the entire screen area (or several - Mac OS correctly handles such situations);
- capture a separate window or area on the screen;
- record a video (also the entire screen or part of it);
- configure the utility settings.

Capturing the entire display
By default, the full image capture mode is offered, and the cursor is replaced by a camera icon.

It remains only to click in an arbitrary place so that the system saves the picture to a graphic file. Or you can click on the snapshot area from the application toolbar. Please note that unlike Windows systems, when using the utility, images from different displays will be saved to separate files.

If you prefer to use keyboard shortcuts to speed things up, like taking a screenshot on your Macbook, you can use Shift+Command+3. This combination was the main one in early versions of MacOS, but it will work for Mojave as well. The created screenshot will be placed on the desktop. Saving is standardly done in PNG format.
windowed mode
To take a screenshot not of the entire screen, but of the window open on the Macbook, call the utility as described above and select the appropriate icon.

The cursor will also change to the camera view. After that, click on the desired program window to take a picture. Note that the system creates it with shadows by default. To remove them, you can hold down the Option button while clicking on the window.
Please note that some applications may not be able to take a screenshot. For example, a DVD player is seen behind this.
For the print screen of the window on the Mac, there are also hot keys - a pair of Shift and Command, together with which you need to press "4". After that, use the space bar to navigate to the desired mode (the camera icon will appear instead of the mouse pointer), and click the required window. The save will be done in the default folder.
Working with an arbitrary area
Another way to take a screenshot on a Mac is to use selection mode to specify the area to take the screenshot. There is a special item on the utility panel for this.

Next, use the mouse to select the part of the screen that you want to save to a graphic file. The selection can be moved if you first move the cursor to the inside of the selected area and hold it with the mouse there. When you have selected the desired area, click on "Snapshot".
From the keyboard, calling this mode is carried out in almost the same way as for a window. Click on Mac Book Shift-Command and add "4" to them. However, then do not press the spacebar, but immediately select the area to take a screenshot. After releasing the mouse button, the selected area will be automatically saved to a file. You can find it in the default folder (this will also be a PNG).
Menu snapshot
Finally, let's look at how to capture the menu in the screenshot. The sequence of actions will be similar:
- first open the menu whose items you want to remove;
- then use Shift+Command+5 (in Mojave OS) or with "4" (for previous editions of MacOS);
- use the instructions to remove a window or area - select the appropriate mode in Mojave, in earlier ones use the spacebar and click on the menu or select an area.
The print screen on a Mac with Windows stands apart - it is performed using the Fn-Shift-F11 combination.
Image editing
In Mojave, you can go straight to editing a screenshot. To do this, click on the miniature preview window that appears at the bottom right.

Program Options
To change the parameters of the utility itself, use the corresponding menu.

The first section is responsible for the location where the file will be saved. The second allows you to adjust the delay before saving the image. Below you can specify whether the utility should be shown, whether the settings of the previous file should be applied to subsequent ones, whether the cursor image will be included in the file.
For advanced users, setting the format is useful. It is performed in the terminal by running defaults write com.apple.screencapture type format and specifying the desired file type separated by a space (for example, JPEG). Don't forget to execute killall SystemUIServer after it.
Literally, a screenshot is a screenshot. For example, in Windows, for this purpose, you must press the "PrintScreen" key, after which a copy of the content will be copied to the clipboard, in order to get an image, you need to open an editor (for example, paint) and paste the contents of the clipboard and save the image. Since the Mac does not have a "PrintScreen" button, a reasonable question arises - How to take a screenshot/printscreen on a Mac? In Mac OS X, everything is simpler, for this, keyboard shortcuts are used.
For beginners, I’ll tell you a little how to press a key combination correctly, if several buttons are indicated, then the first button is not just pressed - but held down, for example, a key combination
So, in order to take a screenshot in Mac OS, use the following keyboard shortcut:


If to any of these combinations we add
Change extension/format of screenshots in Mac.
By default, all screenshots will be saved with a .PNG extension, if you want to change the extension to any of these: JPEG, TIFF, PDF GIF, BMP, PNG, you need run Terminal and execute commands (note that the terminal is case sensitive, if a command uses a capital letter, then the terminal must also use a capital letter):
defaults write com.apple.screencapture type format<указать расширение PNG, JPEG, TIFF, PDF GIF или BMP>
killall SystemUIServer
For example, below is a command that changes the printscreen extension to JPEG

Change where printscreens are saved on Mac.
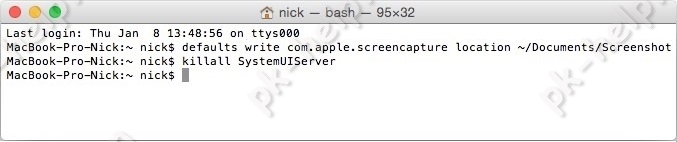
By default, all screenshots are saved to the desktop, which is not very convenient because it gets cluttered. It will be more convenient to specify a different folder for saving screenshots. To do this, run the following commands in the terminal:
defaults write com.apple.screencapture location<путь к папке>
killall SystemUIServer
For example, in the Documents folder, I made a Screeshot folder and executed the commands, after which all print screens are saved to the Screeshot folder in the Documents directory:
defaults write com.apple.screencapture location ~/Documents/Screeshot
killall SystemUIServer
A screenshot on a MacBook is called a "Screenshot" and the principle of taking a screenshot is slightly different from that used in Windows. There are also hot keys here, but you can save it not to RAM, but immediately to a ready-made graphic file on the MacOS desktop. At the same time, there is a choice - to create a screenshot of the entire faucet, a separate part of it, or a specific program window. This is true for both the most massive Macbook Air (Macbook Air) and the Pro version (MacBook Pro).
Full screen screenshot on macbook
The easiest way to take a screenshot of the entire Macbook screen is to press Command + Shift + 3 at the same time.
You will hear the characteristic click of the camera shutter, and a new image will appear on the MacOS desktop with the name "Screenshot date and time." The file format is PNG.

Now you can open it in a graphical editor and change it as you wish.
Screenshot of the selected part of the screen
If you do not need to capture the entire screen, only some part of it, then there is another key combination for this - “Command + Shift + 4”

The cursor will change to a cross, with which we select the desired area of the screen

You can also press the "Option" button during the selection process to center it.

Immediately after that, the sound will be heard again and exactly the picture of this part will be saved as a file on the desktop.

Screenshot of a separate window
When creating some kind of manual for working in a particular program, it is more expedient to take a screenshot of only its active window. This function is also rendered in macbooks as a separate option and is called by the same key combination "Command + Shift + 4", but after it you need not immediately start extracting, but also press "Space"

The cursor will change its appearance to the image of the camera - now it is enough to point it at the desired window and click on the touchpad, or with the left mouse button.

We are looking for the finished image in the same place as usual

How to copy macbook screenshot to clipboard?
There are also situations in which saving a screenshot directly to a file is inconvenient - for example, if you are going to edit the picture later in the same Photoshop anyway. In this case, it is logical to use the function of copying the image to the clipboard, and then paste it directly into the editor. To do this, use the keys "Command + Shift + Control + 3"

As in the first considered option, the entire screen will be copied to the RAM. After that, using the "Command + V" keys, you can import it into a graphics editor and continue working with it.
Screenshot in macOS Mojave
With the release of the next release of macOS Mojave, the principle of calling screenshot creation functions on a MacBook has changed slightly in the direction of improving usability. Now there are no several combinations for different options - they are all called using "Shift + Command + 5".

A graphical menu for selecting the type of screenshot appears:
- Screenshot
- Window snapshot
- Selected area
Numbers 4 and 5 are menu items for recording video from the entire screen or from a separate window, respectively. You can read more about all the innovations in the official instructions from Apple.
Thank you! Did not help
