Setting up mail on Android to connect to Kerio Connect via IMAP. Kerio Connect - corporate-level email Kerio connect webmail mail home money
The use of e-mail has become commonplace in many activities, including in business. In order to create an efficient and secure structure for the exchange of official information, it would be rational to buy a personal corporate server for storing and forwarding mail - Kerio Connect Server. The Kerio trademark specializes in creating functional, but at the same time, simple and intuitive communication systems for the average user.
Kerio Connect Server is a modern example of a mail server application that can be customized to meet the needs of a particular organization. Unlike publicly available user-grade programs, this provides significant opportunities for deep and flexible administration. The developers have made sure that their product meets the high requirements of consumers for modern information solutions, is distinguished by reliability, stability and productivity.
Kerio Connect is not just a client-server mail system that provides the user with access to a personal mailbox and stores valuable service information on a dedicated server. Kerio Connect is a self-contained structure that allows you to log in to your corporate mail from anywhere in the world without worrying about the safety of your data.
The system administrator can independently specify the level of access for each user group to the mail service, address book, calendars, task lists and service folders.
Scope of Kerio Connect Server
The development company has been specializing in the creation of software corporate class, while focusing on consumers from the segment of small and medium-sized businesses.
In this market share, for a long time the monopoly belonged to the package solution, which was quite demanding on hardware. The administration of such mail systems was a difficult technical task for qualified specialists.
 The Kerio Connect Server package has become a profitable compromise solution, providing the user with wide functionality for creating a mail server, while having a flexible configuration system and an intuitive interface for working.
The development of virtualization technology has become the main direction of modern developments by Kerio, the Connect Server software product current version 6 with a flexible configuration system is ideal for integration into the functionality of virtual machines.
Such server systems represent a leased segment of the resources of a separate physical equipment. The client is allocated computing power and space on memory drives for autonomous use. Virtualization technology is an opportunity for relatively little money to create an information space for the needs of the company with the possibility of independent and deep administration. Postal service Kerio Connect fits perfectly into this concept of rational economy.
This brand of software is low maintenance, saves resources, has a simple and easy deployment system, and supports many modern mobile platforms.
Kerio Connect corporate mail functionality
 This software product is distinguished by its versatility and a wide range of possibilities for solving a variety of communication and service tasks. It can be conditionally divided into several modules:
- Kerio Connect Mail is a convenient mechanism for official e-mail correspondence with a modern search system and effective filters for sorting messages, reliable spam protection, a notification mechanism and many other functional innovations and settings that make it easier to work with addresses and attached files;
- The calendar allows you to quickly create a structure of corporate events and reminders with the ability to provide access to information to any number of employees, partners or clients, as well as create a mechanism for personal mailing for a specific date and time;
- The contacts module allows you to quickly and conveniently create new address positions, combine them into groups, edit lists and provide access to them to other users.
Benefits of using Kerio Connect mail server
One of the significant advantages of software from this developer is its multiplatform nature. Kerio Connect Server works effectively in combination with any application for the three main operating systems: Windows, Linux and Mac, and also supports the ability to transfer from one operating system to another. In addition, the system provides functionality for implementing remote access to the corporate mail service from mobile devices or through a web interface.
Lyrical digression. Any gurus and pros do not need this article, well, they don’t work with kerio. I think it will come in handy for beginners in system administration, there are always not enough step-by-step manuals. Well, I also wanted to show how to set up Kerio Mailserver as a full-fledged mail server, working through mx records, using users from Active Directory, connecting Outlook via MAPI, etc., because very often KMS is used as a simple POP3 / SMTP server, when in fact it can compete with Exchange in small companies.
A task: install a mail server based on Kerio MailServer (KMS), to ensure the receipt and sending of mail in the organization, the access of employees to mail inside and outside the organization.
What you need before installing the mail server:
- The presence of a registered domain name of the second (well, or at least third 🙂) level, in our case, this testcompany.com.
- In the case of working through MX records, you will need access to edit these records. Usually the hoster or name registrar provides this service.
- The actual server that meets the requirements: http://www.kerio.com/mailserver/requirements .
Installing Kerio MailServer
So we have an Active Directory domain, let's say testcompany.local, there is a domain controller dc01, there is a separate server for KMS, with installed Windows Server 2003 (or 2008), server name mail. If there is no domain, in principle everything will be similar, only a little simpler, since you will not need to configure a connection to AD.
We start the installation of Kerio MailServer, at the first steps everywhere Next, Next, etc. I usually choose English (because the translation is lame, to be honest) and the Custom installation type, but this is optional.
In the installation step of the Administrative Account, specify the name account mail server administrator and since it will be created in local database KMS, I advise you to give it a name other than the name of the domain administrator, for example kmsadmin. This will allow the domain administrator to have normal full-fledged mail. If the names match, this will not work.
The next step, (Email Domain) is very important, there we specify the name of our mail domain ( testcompany.com):

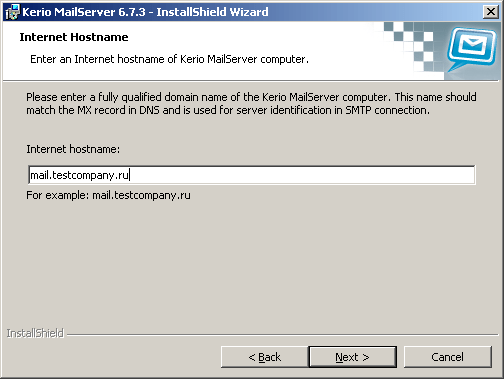
At the Internet Hostname step, specify the external name of the mail server (the one that appears in the mx records, see below), in our case mail.testcompany.ru(under this name our server will be identified when establishing SMTP sessions). You can then check this using the HELO / EHLO commands for example.
Next, at the Store Directory installation step, we specify the path to the mail storage, it makes sense to place it on a separate physical disk/array to increase performance. If there are many users and they work intensively with mail, then it is highly desirable that this array be on SAS / SCSI disks.

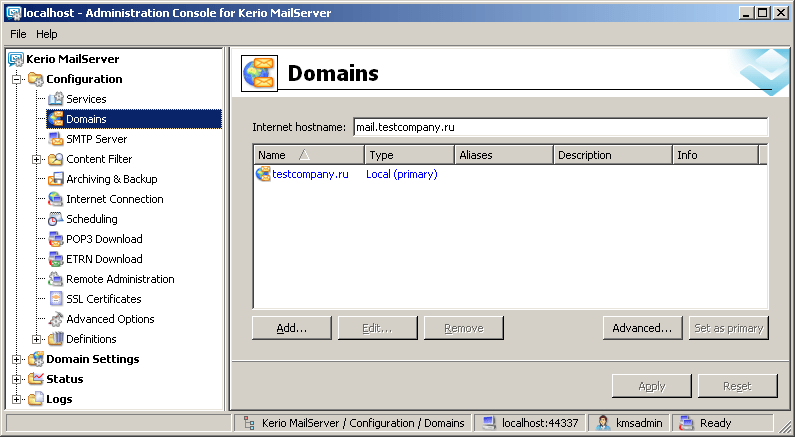
As a result, when entering the KMS console > Configuration > Domains, we get something similar to this:
Everything, the installation is finished, Kerio MailServer is ready to go. But there is one important point that I must warn you about. In the Configuration > SMTP Server > Relay Control tab, the default selector is selected Allow relay only for and checkbox is set Users authenticated through SMTP server for outgoing mail. There is also an item Users from IP address group and there is a great desire to use it and allow the relay from your local network. You should not do this, because if you check this box, then the presence or absence of a checkbox in the second item, Users authenticated through SMTP server for outgoing mail, will no longer matter, oddly enough, apparently this is how the KMS developers intended. And after that, any unauthenticated client from your network (including viruses and network worms) will be able to send spam from your network without any problems, and your server will very quickly be blacklisted. Therefore, I strongly advise you not to check the checkbox in the Users from IP address group item and leave the default settings:

It is worth mentioning here that if you use clients on the local network that use the SMTP protocol to send mail, they will need to check the box “SMTP server requires authentication”, otherwise they will not be able to send mail.
All settings in other items are by default quite functional and it is worth changing them, only being aware of what you are doing.
Creating Users
There are three ways to create users in Kerio MailServer:
- In the local Kerio MailServer database.
- Connect users from Active Directory (so-called mapping).
- Import users from Active Directory.
The first method is usually used if you do not have a domain, in which case you have no other options but to use a local (Internal) KMS database.
The second method is logical to use if you have a domain structure.
With the third method, accounts are imported from the Active Directory domain and users are created based on them in the local KMS database (as in the first option).
Creating users in the local Kerio MailServer database
To create a user when using a local database, you just need to go to the KMS console in Domain Setting > Users and add a user by clicking on the Add ... > Create local user button.
The second method is more complicated, for it you need to configure automatic mapping of users from AD.
Mapping users from Active Directory
To configure KMS to work with Active Directory users, you must first install Kerio Active Directory Extensions on the domain controller. If there are several controllers, then it is not necessary to install them on all, only on those to which Kerio MailServer will connect (actually, in KMS it is possible to specify only two maximum). After installing them, go to the KMS > Configuration > Domains > Directory Service tab and enter the data we need there:

hostname- the name of the domain controller (just the one on which Kerio Active Directory Extensions was installed).
username- domain username for connecting to the AD database (normal user rights are enough, but ... if you want to add users from the KMS console, you will have to add this account to the Account Operator group at least). I recommend creating a special user to connect to (for example, kms_service) and check the “Password never expires” and “User cannot change password” checkboxes so that at one fine moment your connection to Active Directory does not fall off.
Password- the password of this user.
Secondary (backup) directory server- we register a backup domain controller here, if there is one, of course. Don't forget to install Kerio Active Directory Extensions on it too.
Active Directory Domain Name- in this paragraph, put a daw and write the name of the local domain, testcompany.local in our case, because the name of our mail domain is different from the Active Directory domain.
Click the Test Connection button and make sure everything is OK. If not, then something was entered incorrectly, check everything again.
To check that everything is functioning properly, on the domain controller, go to the Active Directory snap-in, select some user (created before installing KMS), right-click on it, select Kerio MailServer Tasks and create a mailbox:

We go back to KMS > Domain Setting > Users and make sure that our newly created user is present in the console.
In general, you should create a user immediately with a mailbox, if it was not created immediately for some reason, you can create it either from Active Directory using Kerio MailServer Tasks, or if the kms_service account is included in the Account Operators or Domain Admins group in AD, then this can be done directly from the KMS console. KMS > Domain Setting > Users > Add… > Activate Active Directory user. Similarly, you can assign an email address to groups.
Practical advice, immediately create a distribution group, which will include all users of the company, it is convenient to use it to send any announcements to all company employees.
Import Users
If for some reason you need to import AD users into the local KMS database, then this is how you do it - go to KMS > Domain Setting > Users > Import button > Import from directore service:

The name of the domain, controller, user for connecting to AD is the same as in the previous paragraph when mapping users from Active Directory. As a result, KMS prompts us to select users for import, select the necessary ones and click OK:

Everything, users are created. As a result, in KMS > Domain Setting > Users you get something like this:
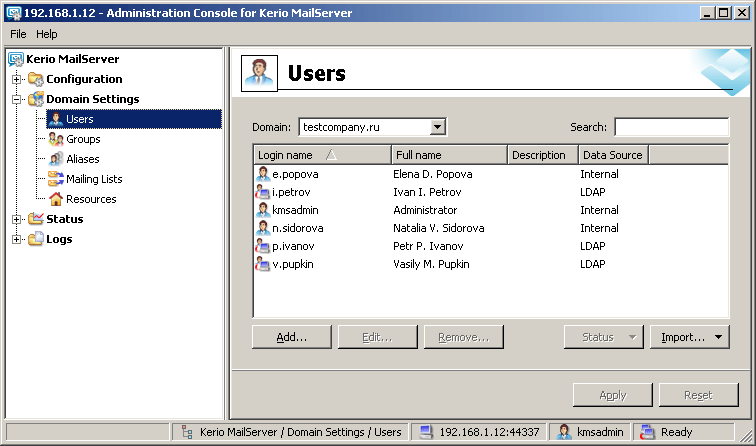
e.popova and kmsadmin are users created in the local KMS database
i.petrov, p.ivanov and v.pupkin are users connected from Active Directory
n.sidorova - user imported from AD
Please note that in the properties of users imported from AD, authentication via Kerberos 5 is set by default, i.e. c the user is authenticated using AD when he logs into his mailbox. Naturally, you can change the authentication method to another - Internal or Windows NT domain (due to the fact that Windows NT is very outdated, this method is not considered in this article). For users connected in the second way, this cannot be done.
Setting up mx records
What are these records? An MX record is a special record on DNS servers that, for a given domain (testcompany.ru in our case), specifies the mail server to which you want to send email destined for addresses in this domain.
Access to editing these entries is located where you actually acquired this name, most likely from the hoster or, say, from a name registrar, for example, nic.ru.
We go to the control panel of the testcompany.ru zone. If you already had a company website there, for example, then you will see that there are already A-records there that point to the IP address of this site. We also need to create an A-record that will point to our server. Actually, this record will be needed in order to use it in the MX record and so that it points to the web interface of our server.
Therefore, we introduce a new entry:
mail.testcompany.ru type A IP address 88.88.yyy.xxx
where 88.88.yyy.xxx is your external IP address given to you by your ISP. Often you do not need to enter mail.testcompany.ru completely, just mail is enough.
@ type MX mail.testcompany.ru. priority 10
@ means the testcompany.ru domain itself. For different name registrars, these records are entered a little differently, but the meaning is this, for the testcompany.ru domain, we create an mx-record pointing to the mail.testcompany.ru A-record. That's it, the records are created, after some time (up to two days, usually less), they are replicated to all DNS servers on the Internet and will be available. Therefore, it is advisable to do this item in the first place, even though it is my fourth in a row.
We check with nslookup (how to use this command - http://support.microsoft.com/kb/200525/), it should be something like this:
C:\Documents and Settings\Admin>nslookup
Address: 192.168.1.10> set q=a
> mail.testcompany.com
Address: 192.168.1.10Non-authoritative answer:
Name: mail.testcompany.ru
Address: 88.88.yyy.xxx> set q=mx
> testcompany.ru
Server: dc01.testcompany.local
Address: 192.168.1.10Non-authoritative answer:
testcompany.ru MX preference = 10, mail exchanger = mail.testcompany.rutestcompany.ru nameserver = ns2.zzz.ru
testcompany.ru nameserver = ns1.zzz.ru
mail.testcompany.ru internet address = 88.88.yyy.xxx
>
where 192.168.1.10 is the address of the domain controller dc01.
You will also need to create PTR record for your external IP address. It is needed so that messages from your server are not considered spam (many mail servers have a PTR check). PTR records are usually created by an ISP that provides you with a static IP address, there is usually no access to edit PTR records. Therefore, we write a letter to the provider with the following content:
Please create a PTR record for the address 88.88.yyy.xxx corresponding to the mail.testcompany.ru domain
You can check whether a record has been created or not, again, through nslookup, something like this:
C:\Documents and Settings\Admin>nslookup
Default Server: dc01.testcompany.local
Address: 192.168.1.10>set q=ptr
> 88.88.yyy.xxx
Server: dc01.testcompany.local
Address: 192.168.1.10Non-authoritative answer:
xxx.yyy.88.88.in-addr.arpa name = mail.testcompany.ru
>
Everything, everything is fine with the records, now you need to map (or publish) the SMTP and HTTP ports (as well as HTTPS, POP3, IMAP, etc., if you are going to give access to these services from the outside) on your corporate firewall. And also from the mail server you need to open the SMTP port to the outside. For example, in Kerio Winroute Firewall it will look like this:
where 192.168.1.12 is the IP address of the mail server.
For a quick check outside, use telnet:
telnet mail.testcompany.ru 25
which should produce:
220 mail.testcompany.ru Kerio MailServer 6.7.3 ESMTP ready
Client Setting:
We check the web interface, on some workstation on the local network or on the server itself, in the browser line, we type the name of our mail server:
http://mail/ (or http://mail.testcompany.ru/ if you're trying outside)
We should get to the login page of the KMS web interface:

Then everything is standard, we enter the user name and password with an existing mailbox, we enter and we are surprised that everything works 🙂 You can also try to log in via HTTPS, by default KMS creates a certificate during installation, so in this case everything should work.
First you need to install on the workstation Kerio Outlook Connector (with offline caching). You can do it manually, you can install the MSI package through group policies.
After installing the Kerio Outlook Connector, launch Outlook, if there were no accounts, then the wizard will start, if there were, you will need to start it manually from the menu Tools > Account Settings > Create ...
On the Account Settings page, click Yes, of course, then on the Automatic account settings page, check the box "Manually configure server settings or additional types of servers" (since we do not have Exchange 🙂). Next, on the Select e-mail service page, select Other and Kerio Mailserver (KOC Offline Edition):

Server name - mail.testcompany.local
Account name - p.ivanov
Password - the password of this account in AD and check the Save password box.

Click the Detect button, the correct information about the user should be displayed. Next, OK, OK, Done and go to Outlook. This completes the initial Outlook setup, the user can send and receive mail.
To check, send a few test letters within the organization and to some external addresses, as well as back 🙂 If everything was done correctly, then the mail should function without problems.
Corrections and additions are accepted.
I got tired of setting up mail in my office, so I decided to write this article. All office mail was previously received by the provider, then distributed via the Kerio Mail Server mail server over the local network to clients.
For many years everything worked fine, recently the provider's technical support decided to save their resources and transferred all mail to Yandex.Mail. Moreover, they did not even inform about the changes: not by an official letter and there was no phone call. After that, the "rake" in the work of the office began, incoming and outgoing mail ceased to work, respectively. However, we quickly managed to set up the work of incoming mail on Kerio Mail Server, but I had to suffer with outgoing mail.
Incoming mail in the office via Kerio Mail Server with Yandex.Mail
In the Kerio Mail Server settings: Menu Configuration - POP3 Download edit the line on the right. Clicking the "Edit" button will open the "POP3 Account" window.
1. In the "POP3 Server:" field, enter pop.yandex.ru.
2. In the "POP3 username:" field, enter the old postal address of your office, the same E-mail that we use on Yandex mail.
3. Your ISP saves the password, so you can enter the old password. If you want to change it, you first need to do it in the Yandex.Mail settings (link Settings, path Mail > Settings > Security).
Incoming mail must be accepted on computers on the local network. Account settings on local computer remain the same in the program that previously received mail.

Outgoing mail in the office via Kerio Mail Server on Yandex.Mail
We configure outgoing mail in Kerio MailServer by analogy with incoming mail. In Kerio Mail Server: Menu Configuration - SMTP Server edit in the window on the right, "SMTP Delivery" tab. Check the box "Use SMTP relay server". Most likely, you have the checkbox set.
1. In the field "Relay server name:" smtp.yandex.ru
2. In the "Relay server port:" field, specify the port number 25
3. In the "User:" field, enter the old postal address of your office and the password below.
If the SSL protocol is used, check the box below, the port will change to 465. The Yandex general settings say: In case you cannot use a secure connection, you can connect to the SMTP server on ports 25 or 587.

4. And now the important point: in the mail program, in the account settings on the local computer, we change the "E-mail" field on the E-mail of the mailbox that you have located on Yandex.Mail. The same E-mail was entered in Kerio MailServer, in the "POP3 username:" field and in the "User" field in the SMTP settings. Leave the rest of the settings in the mail program on the local computer the same.

You can leave your comments below:
Kerio Connect is a mail server for small and medium-sized businesses that allows employees to access their mail in any conditions, as well as work with collective tools - mail, calendars, notes and tasks.
Opportunities
- Installation on Windows, Linux, Mac OS X, virtual machines VMware, as well as in the Cloud.
- Access to mail through an email client, mobile phone or web browser - so your employees will always be in touch, no matter where they are.
- Support for many email clients (MS Outlook, MS Entourage, WebMail, Apple mail, the Bat!, etc.).
- Support for the most popular smartphones and mobile models operating systems(iOS, Android, Symbian, Windows Phone, Blackberry) - your mail will always be with you.
- Effective spam protection (15 spam filters).
- 2 options for anti-virus protection:
- integrated Sophos antivirus;
- the presence of an open SDK for creating your own plug-in for the anti-virus solution used - as a result, the possibility of using double anti-virus filtering. At the moment, using plugins, you can connect such antiviruses as ClamAV, NOD32 and DrWEB.
- Integrated mail archiving module.
- An integrated backup module that allows you to configure backup scheduled (full or partial).
- Distributed mail domain.
- The built-in instant messaging server not only increases the efficiency of employee interaction, but also allows you to take control of such communication.
Benefits of Kerio Connect
- Low demands on hardware and multiplatform - an opportunity to save on a new server and server operating system.
- Security of your mail provided by the anti-spam module and optional double anti-virus check.
- An excellent alternative to MS Exchange in terms of license costs and maintenance costs. For example, the cost of a 4-year ownership of Kerio Connect is 2 times lower than the cost of a 4-year ownership of MS Exchange without maintenance costs.
- Quick installation and setup - the first email is sent half an hour after the installation starts. Get free updates during the Software Maintenance period.
- Quick and easy migration from other products (MS Exchange and IMAP) using free utilities migrations.
- Better integration with iPhone and MAC.
- Ease and convenience of administration; the possibility of remote administration of the product through the web console (web browser) - no need for a dedicated specialist or the presence of an administrator in the office.
- Russian-speaking technical support.
Additional modules
Sophos Antivirus
Sophos Antivirus is an add-on that can be purchased with a new Kerio Control license or later.
Protecting all email passing through Kerio Connect:
- Checking incoming, outgoing and forwarded mail messages, as well as their investments.
- Viruses found in attachments are removed, and an information mark about this action is added to the message.
- Ability to filter attachments.
Active Sync
Active Sync is an optional module that can be purchased with a new license or later. Microsoft Exchange ActiveSync® is a server-side technology that allows Kerio Connect to directly synchronize your mailbox with mobile devices that support Exchange ActiveSync
Software Maintenance (SWM)
An active subscription (Software Maintenance, SWM) provides the user with the following benefits:
- the possibility of a free transition to new versions during the validity period of SWM;
- the operation of those modules that require constant database updates (Sophos, Gray Listing, Active Sync).
The user will receive technical support only if the SWM is valid.
The initial purchase already includes SWM for 1 year (valid from the moment the server license is activated). With the initial purchase of Kerio Control, you can additionally purchase an extension for another 1 year, which in total will give 2 years of a valid subscription.
SWM extension
If the user does not renew SWM, then Kerio Control continues to work and perform basic functions. However, the signature databases for Sophos antivirus and the Gray Listing spam filter will no longer be updated, and after 60 days these functions will no longer work at all. Also, the user will not be able to update the product to new versions, synchronize mobile devices via the Active Sync protocol and receive technical support.
The total number of subscription renewal licenses must be equal to the total number of product licenses. That is, the SWM renewal is purchased for both the server license and additional user licenses.
The start date of the SWM renewal is counted from the end of the previous subscription, i.e. if after the end of the SWM the next subscription was issued only after 2 months, the user will have to pay for these 2 months.
Licensing
Kerio Connect calculates the required number of licenses based on the number of physical mailboxes required. Aliases and mailing lists do not count.
When purchasing a new product, a server license is required, which includes 5 users. If more than 5 users will use Kerio Control, then additional license packages for 5 users are purchased.
A fully functional 30-day trial version of Kerio Connect is available at the company's office
Kerio® and related services are trademarks of Kerio Technologies Inc.
A complete mail server with contacts, calendar, tasks, chat, spam and virus protection. Installed on any OS. GFI Web and email protection">Web and email protection 0
Description of Kerio Connect
Description of Kerio ConnectWhat is Kerio Connect

BYOD - bring your own device
Do your employees bring their devices to the workplace? Kerio Connect adds convenience to corporate communication and supports mobile phones based on iOS and Android out of the box

Support for any platform
Kerio Connect is not only reliable mail and flexible settings!
Available for Windows and Mac and as a web application, Kerio Connect Client enables employees to see online colleagues, write real-time messages, set up meetings and send emails securely.

Safe and secure email
Your mail is protected from hacking and attacks with SSL/TLS, S/MIME encryption, anti-spam filters, antivirus and multiple layers of checks. Automatic backup with the ability to partially restore from backup allow you to quickly restore data even in the event of a critical failure.

Unparalleled Simplicity
Kerio Connect is a complete collaboration and messaging solution that is easy to use and low cost. With the centralized MyKerio web interface, you can manage all your Kerio Connect devices from anywhere on the network, even from a tablet.
