How to stop iOS update even if the download has already started. How to remove an iOS update downloaded (downloaded) on an iPhone or iPad, freeing up space How to remove an ios 11 update on an iPhone
You can set up iOS devices and install many new programs through jailbreak to remove restrictions from your iOS devices. But if you decide to remove the jailbreak and would like to return your device to its original state, then you should not miss this article. Just follow this post to learn how to safely remove iOS 12/11 from your iPhone XS/XR/X/ 8/7/6/5s.
Part 1: How to Remove iOS 12 Jailbreak without Restoring
After jailbreak, the iPhone does not turn on and after the jailbreak, the standard icons disappeared. If you want to remove iOS 11/12 jailbreak without restoring the device, please follow the steps below to achieve it.
Step 1. First of all, you need to remove as many settings from Cydia as possible and please make sure that you don't remove standard/system packages like Cydia Installer, APT, etc. Remove only those packages that have been installed by you otherwise, they may cause problems.
Step 2: Restart your iPhone/iPad/iPod touch to disable the jailbreak.
Step 3: Make sure Find My iPhone is enabled on your device and WiFi is enabled.
Step 4: Go to iCloud.com and sign in with your account, then click Find My iPhone.
Step 5: After that, iCloud will find your device and display its location on the map. Click on the All Devices drop down menu at the top and select the jailbreak device

Step 6: A window will appear with several options in the upper right corner of the screen. Select the "Erase iPhone" option.

iCloud will remotely send a command to your iPhone to reset its contents and delete all data, including the jailbreak. The device will still remain on its current firmware without restoring to the latest version of iOS.
Part 2: How to Remove iOS 12 Jailbreak Properly by Restoring Your Device
Below are two ways to help you remove iOS 12 jailbreak.
Method 1. Return from jailbreak to the official firmware through iTunes
Below are the detailed instructions and then recover iPhone data.
Step 1. Connect your iOS device to your computer and launch iTunes and enter the passcode, if you like, you can use another computer that you have synced with your iPhone.
Step 2: Wait a few minutes for your iPhone to sync with iTunes and then back up.
Step 3: Once the sync process is complete and the backup is complete, select "Restore [your device]".
5. Once the setup screen appears on your iPhone, click "Restore" from iTunes backup.

If you've never synced with iTunes or set up Find My iPhone in iCloud, you'll need to use recovery mode to restore your device. Connect your iOS device to your computer and open iTunes.
Then do a forced reboot:
You need to press and quickly release the volume up, then press and quickly release the volume down button. After that, press and hold your finger on the power button until the recovery mode screen appears.
After that select "Restore"

Once everything is done, just follow the instructions on the iOS device screen and you can either set your device as new or restore from a pre-jailbreak backup.
Method 2. Erase Jailbreak from iPhone and iPad with UltData Jailbreak without Data Loss
After or during the jailbreak, if there are problems, you don't want to keep jailbreaking. The program offers the possibility to get out of this state and retrieve your lost and deleted data. It is better to restore the iOS system and go to the past.
Step 1. First of all, connect your iPhone to your computer with a USB cable and start the problem. After connecting, switch to "Fix Operating System" on the main interface and click the "Fix Now" button to continue the process.
Step 2. To restore the operating system, you need to download the compatible firmware for your iOS device initially. Just click the "Browse" button to select the save path on your computer and save the firmware files, then you need to click the "download" button and wait.

Step 3. When the download is completed, the program continues to restore the iOS system. Do not unplug your device during the process or your iPhone may freeze. In less than 10 minutes, your abnormal iOS device can be fixed back to normal.

If System Restore to Normal does not work, we suggest you use "Advanced Mode" which will increase the chance of a successful repair. Whereas, "advanced mode" will wipe data on the device, so we suggest you try "advanced mode" after 4-5 failures with standard mode.
After exiting Jailbreak, it's easy to help you find your data and files, 3 ways to recover important contacts, messages, photos, music, videos, etc.
Step 1. Run UltData and choose a recovery method, UltData (iPhone Data Recovery) offers 3 ways to recover data, you can choose the method you want on the main window.
Step 2. Preview before recovery, iPhone Data Recovery will intelligently read files by file type, so you can find and preview files easily.

Step 3. Select items to restore. Select the items you want and click Restore. Straight messages, contacts, and notes restored.

If after jailbreak or , then you can use Tenorshare ReiBoot, which will specifically fix problems with iPhone, iPod and iPad.
Apple's operating system update policy is fairly simple and clear. For security reasons, any update, regardless of the number of innovations, must be installed on all compatible devices. Only in this way, according to the developers, will it be possible to avoid fragmentation and protect users from all kinds of vulnerabilities. But there are times when you want to avoid just updating. This is possible even if the process has already started.
You can cancel the update process at any time during the download stage. If the download has already completed and the installation status indicator appears on the screen, it can no longer be prevented.
How to prevent iOS update from downloading
To stop the download of an update and thus prevent it from being accidentally installed in the future, you need to check at what stage the update process is.
- To do this, go to "Settings" - "General" - "Software". There you will see the characteristic inscription "Loading ...";

- Now go back to "General" and go to the "Storage" section;
- Scroll down the list of installed applications until you find the update tab;

- Open it, and then click "Uninstall update".

Now, when you return to the updates section, you will see that the current build of iOS has not yet been downloaded.
How to Permanently Disable iOS Updates
If necessary, you can permanently disable operating system updates.
- To do this, download the current tvOS 12.1.2 beta profile to your device from here (yes, it’s tvOS!);
- Confirm installation;

- Wait for the reboot;

And then go to the "Software Update" section and make sure that the system no longer offers you updates, saying that you have the latest version installed. Of course, you can understand that the trick worked only if your device is running one of the previous OS builds.
All owners of Apple technology are constantly being pushed to update software. So the company is struggling with the fragmentation of gadgets and firmware, which Android suffers from, and collect amazing statistics for the next presentation. However, at the same time, our devices are slowly killing us so that we run after new and fast gadgets.
It turns out that you can disable obsessive offers to update iOS on any device, even without a jailbreak.
Why is it needed
Although Apple insists on the need to update the software on the device to the latest current version, we know that this is not always necessary.
For example, the first-generation iPad Air still performs well and runs briskly on the latest versions of iOS. But after a couple of updates, he will begin to think, lag and freeze. At the same time, the device will not receive all the new features of the system, which, as always, will work only on top models.
The situation is similar with the iPhone 6. The smartphone is still pretty good, but by iOS 11 Apple will definitely try to “kill” it in order to force device owners to buy new models.
So why not just stop updating the firmware on the device?
If earlier it was possible not to connect your iPhone or iPad to iTunes, now the Over The Air update arrives on the device and reminds you of the need for an update every day. You have to regularly refuse new firmware, and the files for updating have already been downloaded and take up space on the device.
There is an exit
Enthusiasts have come up with a curious way to trick the iOS update system. With a custom profile, you can redirect your iPhone or iPad to the tvOS update server. The device will not find the required firmware there and will not offer to update.
Everything is simple and legal, the method will work on any device, even without a jailbreak.
Here's what to do


1. Delete the update downloaded to the device if it has already arrived by air. To do this, go to Settings - General - Storage & iCloud - Manage (storage), find the update and delete it.
hikay.github.io/app/NOOTA.mobileconfig
and navigate to it in Safari on your mobile device.
4. Reboot iPhone or iPad as required by the system.
Now you can safely enter Settings - General - Software Update and check for a new version of iOS. The device will not find any updates and will report that the installed firmware version is up to date.
Unfortunately, the annoying red badge will not disappear, but these are already trifles.

How to get everything back
To redirect the device back to the correct update server, just remove the installed profile tvOS 10 along the way Settings - General - Profiles.
After the reboot, the smartphone or tablet will see all available firmware updates.
Get real iOS-Jedi.
I continue to experiment with users iPhone. Last time I brought together almost three hundred beginners who practically do not understand the intricacies of iOS and gave five simple tips that have already made their lives easier. If you missed it - , and smart comments under the topic are very welcome.
There are fewer users who consider themselves real geeks. Maybe most of the respondents simply did not understand the meaning of the very word that I tried to call them, but this does not change the essence of the matter much. I will try to deal with the top five of their problems, which generally have a solution.

I'm sure it will be interesting for all of us to adopt extraordinary skills so that we don't look so stupid anymore.
1. Hiding the iOS Update Notification

The network has repeatedly raised a storm of discussion about the inappropriateness of installing new versions iOS to older devices. Of course, especially the ancients begin to work too slowly and very clumsily. It is on them that the notification about the system update and the update itself I advise delete altogether.
To do this, go to the device settings, select the storage menu and iCloud in the main section, go to management and erase the information from the new unnecessary item - after that iPhone should be reloaded.
Thus, two birds with one stone were killed at once: they got rid of the annoying badge and cleared the memory.
2. Delete the App Store cache in ten taps

sorry work iOS 9.x.x leaves much to be desired. I think this revision of the platform turned out to be the most buggy among all those released before. Many of the people I interviewed this time specifically complained about App Store- they say, it hangs, then something else. I myself have faced this many times.
Prudent programmers from Apple prepared a solution to any problems with the app store. You just need tap ten times by any icon of program sections - for example, by "Selection".
Cache App Store will be cleared, and the glitch will most likely be resolved.
3. Clear the RAM completely

Despite the huge amount of relevant materials that only the lazy did not publish, many still do not understand that deleting applications from the multitasking menu iOS doesn't make any sense. At the very least, it doesn't affect device battery life or system performance.
However, in cleaning RAM burnt out geeks still sometimes need a device. It is for them in iOS there is a hidden feature. To do this, go to the shutdown menu iPhone long press on the power button, and then hold down the key Home.
After a few seconds, the device will go to the home screen, and its RAM will indeed be completely free.
4. We remember what happened exactly a year ago

With the advent of the service Google Photos I uploaded the entire family photo archive of a couple of hundred GB there - absolutely free of charge and without SMS. However, what pleases me most of all is not even the storage system itself, but the "smart" assistant built into it. Favorite feature is "What was the day like" a year or two or more ago.
As it turned out, in iOS there is exactly the same feature. But it is available only to owners iPhone 6s And 6s Plus- hidden in gallery quick action menu via 3D Touch.
Please note that there will be no corresponding label if the photos a year or more ago not in device memory.
5. We finally deal with the dialer

I was surprised, because several users who were advanced in their opinion noted the inconvenience of the built-in iOS dialers - especially in terms of repeated calls. They wrote that they are nostalgic for the times of push-button Nokia, where for this it was only necessary to press the call key twice.
I inform you in iOS there is a similar possibility. If you click on the button with the phone in the empty dialer, the field will be filled with numbers last call which is very convenient.
Already knew? Handsome!

I'm sure not everyone knew, right? I myself was not aware of the existence of most of these features until recently, so do not be discouraged.
![]()
Website Become a real iOS Jedi. I continue to conduct experiments on iPhone users. Last time I brought together almost three hundred beginners who practically do not understand the intricacies of iOS and gave five simple tips that have already made their lives easier. If you missed it, here's the link, and smart comments under the topic are very welcome. There are fewer users who consider themselves real geeks....
Apple constantly modifies and supplements the operating systems of its devices by releasing new firmware versions. If the iPhone constantly offers updates, or even freezes when trying to install them, this problem is fixed in the following ways:
- disable downloading updates;
- delete already downloaded files;
- replace the new version server.
There are tips on the Internet to prevent downloading by disconnecting from wireless Wi-Fi. This is illusory, as the update will continue when the connection reappears. Therefore, more efficient methods should be used.
Disabling the download of updates is easy. To do this, go to Settings and open the AppStore menu. In the Automatic downloads section, move the slider next to Updates and Programs.

How to Delete and Prevent Updates from Downloading on iPhone
To delete existing downloaded update files that take up a lot of free space, you need to go to "Settings" -> "General" -> "iPhone Storage".
The vault lists your apps, updates, and other files. The volume of new firmware versions is large, so it is usually at the top of the list, but not always. Find it and click "Uninstall update".


After that, the large update file will be deleted.
There are recommendations on how to downgrade the firmware version, but without proper experience, it is not advisable to perform such manipulations.
An effective way to get rid of annoying updates is to replace servers. This requires a browser download tvOS11 Beta Software app . The next step is to change the update check address. iPhone will contact the server AppleTV, respectively, the system update will not occur.

If in the future you need to download a new firmware, go to the settings menu and remove the above sentence. The device will automatically find the desired server and update itself.
Recently, Apple began to force all iPhone, iPad and iPod Touch owners to install new software. Almost every day, a notification arrives on the device with a proposal to install the latest version of the iOS operating system, and you cannot refuse it. There are options: update now and remind at night. If you choose the second option, you have the option to close the notification, but it will reappear the next day. For this reason, the editors of the site began to look for a solution that would prevent the automatic updating of the iOS operating system on all iPhone, iPad and iPod Touch.
Such a solution was found and it became a rather non-standard solution, but completely working. As you know, even before a message appears with a proposal to upgrade to a new OS, the firmware is already loaded into the permanent memory of the iPhone, iPad and iPod Touch, thereby taking up free space and consuming extra Internet traffic on the Wi-Fi network. To prevent automatic updates to iOS 10 or iOS 11, just install the tvOS Beta profile. To do this, open the Safari web browser on the desired "apple" device, and then in the "Settings" application that appears, click on the "Install" button. You may need to enter a password and then reboot your device.
These simple measures will prevent any iPhone, iPad and iPod Touch from not only automatically downloading new versions of iOS operating systems, but also disable the intrusive notification that occurs every day. Note that if some new firmware has already been downloaded to a smartphone or tablet, then even after installing this profile, it will still be in permanent memory, taking up precious space.
In order to delete the new version of the iOS operating system already loaded into the device’s memory, you should launch “Settings” and follow the path “General” - “Storage and iCloud” - “Storage” - “Management” “iOS 10.XX”, and then select "Delete update" item. To start receiving updates "over the air" again, go to "Settings" - "General" "Profiles" and remove the installed tvOS Beta profile from there. After that, be sure to reboot the device.
Such a simple instruction allows you to permanently solve one of the main problems of the iOS operating system, which millions of people face every day and cannot solve it, as Apple makes every effort to ensure that iPhone, iPad and iPod Touch owners install the latest software on the device, even if it works worse than the old one.
Until March 10, inclusive, everyone has a unique opportunity to Xiaomi Mi Band 3, spending only 2 minutes of their personal time on it.
Join us at
Automatic system updates is one of the many new features in iOS 12. When enabled, the device is automatically updated to the latest version of the operating system. In this guide, we'll show you how to disable this option.

When it comes to software updates, it's best to be in control of the process. As a rule, new versions of iOS come out without major bugs. But there are unsuccessful releases that spoil the feeling of using the device.
Prior to iOS 12, Apple had an interim automatic update feature. Users were notified if they wanted to update their iPhone or iPad at night. If the answer was yes, the device would automatically update when the owner was asleep. In iOS 12, Apple removed this feature.
The new feature responsible for automatic updates is disabled by default. But if it was activated earlier, for example, during the initial setup of an iPhone or iPad, you can quickly disable it.
Deleting the firmware file
- Open settings.
- Select the "Basic" submenu.
Device recovery
To return the phone or tablet to a working state, you need to remove the update and roll back to the previous stable version of iOS. This can only be done in recovery mode via iTunes.
- Turn off the device.
- Hold down the Home button. While holding it, connect your phone to the computer (on the iPhone 7, you need to hold the power and volume down buttons).
Refresh disabled
- Launch Safari.

To make sure that the method worked, go to the "Software Update" section and start searching for a new version of iOS. The phone/tablet will not find anything as it will connect to the tvOS servers. The badge about the availability of updates will be displayed in the settings, but it can also be removed - however, for this you will have to delve into the system files through the iBackupBot program.

And not only does it eat up free memory, it also signals with an annoying number “1” on the settings icon that it’s time to update the gadget. Yes, this can be explained by concern for users, because the newer the software, the better and safer it is (according to Apple developers). On the other hand, this is my device and I have to decide whether it can load something there itself (even if it's a firmware file) or not.
So, what to do if you don’t need such independence, you want to stay on the old version of iOS and don’t want to know about any updates?! Now I'll tell you how to remove an already downloaded firmware and make sure that it no longer loads automatically. Let's go! :)
As you know, Apple smartphones and tablets need Wi-Fi to download the firmware “over the air”. And rightly so, since the files are often very large in volume, and if they were downloaded via cellular networks, then it would cost a lot of money.
- appldnld.apple.com
- mesu.apple.com
Updated! As I was quite rightly asked in the comments - what will happen if the iPhone or iPad checks for an update via the mobile Internet?
After all, it is impossible to block servers on the side of a mobile operator!
For such cases, there is another way to prevent the iPhone or iPad from updating - through the configuration profile:
- What should be done?
- What for?
- Where to get it? Download the latest Apple TV configuration profile for iPhone and iPad
Apple constantly modifies and supplements the operating systems of its devices by releasing new firmware versions. If the iPhone constantly offers updates, or even freezes when trying to install them, this problem is fixed in the following ways:
- disable downloading updates;
- delete already downloaded files;
- replace the new version server.
There are tips on the Internet to prevent downloading by disconnecting from wireless Wi-Fi. This is illusory, as the update will continue when the connection reappears. Therefore, more efficient methods should be used.
Disabling the download of updates is easy. To do this, go to Settings and open the AppStore menu. In the Automatic downloads section, move the slider next to Updates and Programs.
How to Delete and Prevent Updates from Downloading on iPhone
To delete existing downloaded update files that take up a lot of free space, you need to go to "Settings" -> "General" -> "iPhone Storage".
The vault lists your apps, updates, and other files. The volume of new firmware versions is large, so it is usually at the top of the list, but not always. Find it and click "Uninstall update".

After that, the large update file will be deleted.
There are recommendations on how to downgrade the firmware version, but without proper experience, it is not advisable to perform such manipulations.
An effective way to get rid of annoying updates is to replace servers. This requires a browser download tvOS11 Beta Software app . The next step is to change the update check address. iPhone will contact the server AppleTV, respectively, the system update will not occur.

If in the future you need to download a new firmware, go to the settings menu and remove the above sentence. The device will automatically find the desired server and update itself.
After the release of iOS 7, about half of the incoming correspondence in our editorial mail comes down to two questions:
- how to roll back to ios 6.x
- How to remove an iOS 7 update downloaded over the air from a device
We have already voiced the answer to the first question more than once - unfortunately for us and for readers, for all devices, except for the iPhone 4, a rollback from iOS 7 to iOS 6 is impossible. On iPhone 4, saved SHSH hashes from iOS 6.1.2 or older firmware versions can help if you have them - take a look at (but be aware that any version of iTunes before 11.1 is needed for experimentation). We cannot guarantee 100% success, but it is unlikely to get worse.
As for the second question, there are solutions. Recall that the problem is that iOS, in the presence of Wi-Fi in the background, independently downloads an update weighing about 780 MB and unpacks it on its own, after which it eats off more than 3 gigabytes of free space. At the same time, jailbroken devices are technically impossible to update over the air, so the downloaded update is a loss of free space + an annoying badge on the settings icon. How to delete the downloaded iOS update?
Anyone who uses a jailbreak needs to remember: iOS updates are downloaded to a folder /var/MobileSoftwareUpdate/, inside which you will find a subfolder containing the version number of the downloaded firmware in the name. Clear the contents of this folder = free up space.
But this is only a half measure, because the persistent iOS will download the update again at the first opportunity. In order to completely block the ability to download OTA updates and remove the badge from the settings icon, you need a tiny but extremely useful tweak. no update from Cydia (located in the standard ModMyi repository).
What about those who do not use jailbreak? It is impossible to organize access to the /var/MobileSoftwareUpdate/ folder without a jail, to clear the firmware through tweaks like iLEX R.A.T. Moreover, manually deleting the downloaded iOS update will not work. The only way to erase the downloaded update is to do a complete reset of the content or restore the firmware, but in this case you will no longer be able to install the same version of iOS that you had, you will have to flash on iOS 7.
There is only one trick: the update will not be able to unpack if it initially does not have enough space. So if you fill your iPhone, iPod touch, and iPad with movies, games, and other heavy content so that it has less than 3 GB of free space, iOS 7 will not decompress. But this way of solving the problem cannot be called convenient either;)
When Apple releases the next iOS update, many users are tempted to try it out immediately by installing the developer beta. It is worth remembering that these are not the final builds of the operating system, so they may contain a significant number of bugs and be unstable.
If you have installed iOS 11 beta and are experiencing problems with your device, the best solution is to upgrade to the release version. There are two options for how to do this.
Option 1: Downgrade to the latest final version of iOS
Probably the most correct solution would be to install the previous assembly. For example, if you've already installed iOS 11 but are experiencing bugs, you can downgrade to iOS 10.3.2.
In this case, you will have to restore the iPhone or iPad, which entails data loss. It's also worth keeping in mind that a backup made on iOS 11 doesn't work on iOS 10.
How to downgrade from iOS 11 beta to the official version
Step 1. First, make sure you back up all your important data on your device.
Step 2. Download for your iPhone or iPad to your computer.
Step 3: If Find My iPhone is enabled in settings, go to Settings -> Apple ID -> iCloud and turn it off.
Step 4. Connect your device to your computer and launch iTunes, then open the tab with information about your device in iTunes.
Step 5: Hold down the Option key on Mac or Shift key on Windows and select Restore iPhone….
Step 6. A new window will open where you can specify the path to the previously downloaded IPSW file.
Step 7. Select it, iTunes will do the rest for you.
Step 8. After iOS 10.3.2 is installed, you will have to set everything up again or restore from a backup made before installing iOS 11.
Option 2: Upgrade to the official version
If you have installed the iOS 11 beta, in the future you will be able to update to the final version and delete the developer profile so that you no longer receive prerelease builds of iOS.
How to upgrade from beta to the latest public release
Step 1. Go to Settings -> General -> Profiles & Management. device. And select "iOS Beta Software Profile".

Step 2. Click the "Delete profile" button and confirm the operation by entering your password. iPhone or iPad will restart. Keep in mind that you are still using the developer preview, but since the certificate has been removed, you will not receive new versions.
Step 3. Go to Settings -> General -> Software Update. If any update is available, install it - this will be the final build of iOS.
As you can see, there are several options to opt out of the iOS beta test. If you want to install the latest available version of iOS 10, use the first method. If you want to switch to the new iOS and opt out of testing, then the second method will suit you.
How to uninstall the iOS 11 update if you decide that the capabilities of the previous version are enough for the normal operation of the iPhone? Removing the update before installation on the phone and rollback after installation.
Deleting the firmware file
First, let's figure out how to remove an uninstalled iOS 11 update that has already been downloaded to your phone. The update will be downloaded only after you confirm your desire to install it. The firmware file is then stored in the device's memory until you start installing a new system. All this time, on the icon of the "Settings" application, a unity will be lit, signaling the need to make changes to the configuration.
If you want to upgrade to the new version, go to the "Software Update" section in the "General" settings submenu, and click "Download and Install". After downloading the firmware file, two options will appear in the same section: “Install” and “Later” (start the installation at night or remind later). If you click "Install", then you will have to restore the device to remove iOS 11. If you click "Later" and select "Remind me later", you can easily delete the firmware from the iPhone memory.
To remove the downloaded firmware:
- Open settings.
- Select the "Basic" submenu.
- Go to the "Storage and iCloud usage" section, click "Manage".
- Find the downloaded file and tap "Uninstall update".

Done, the update is deleted, the system will not be updated. But this is only temporary peace: the next time you connect to Wi-Fi, iOS will again signal the presence of an update. You can completely ignore updates only after they are banned.
Device recovery
If the user has already updated the system, then no deletion of the firmware file will help - it is already installed. On iPhone 5S and other models, this can cause annoying crashes and errors. Users report that after installing the update, the touchscreen does not work, Wi-Fi and Bluetooth devices do not connect, and battery problems occur.
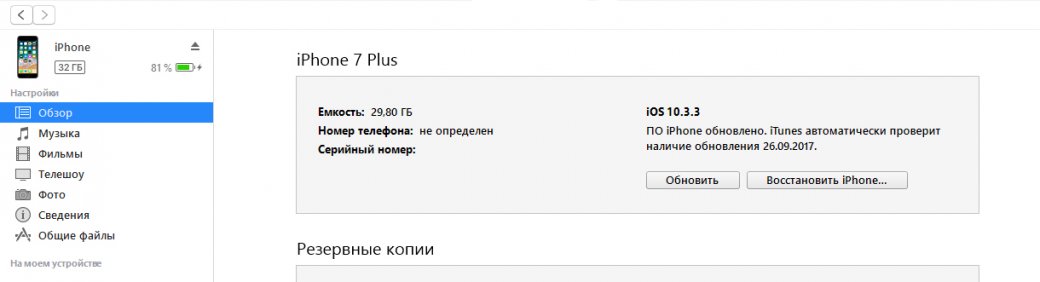
To return the phone or tablet to a working state, you need to remove the update and roll back to the previous stable version of iOS. This can only be done in recovery mode via iTunes.
Be sure to back up your data before restoring your device.
- Download the appropriate version of iOS 10.3.3.
- Launch iTunes on your computer.
- Turn off the device.
- Hold down the Home button. While holding it, connect your phone to the computer (on the iPhone 7, you need to hold the power and volume down buttons).
- Wait until the connect screen appears in iTunes.
- Hold Shift on your keyboard (Alt/Option on Mac) and click Restore.
- Select the iOS 10.3.3 firmware file you downloaded earlier.
- Click "Restore and Update".

You are again on the usual tenth iOS, but this will not save you from notifications about updates. You can ignore them, or you can ban them - temporarily or permanently.
Refresh disabled
To prevent the device from searching for and downloading updates, add an Apple TV profile to it. In this case, the update server will change to tvOS and the device will not look for new versions of iOS. To do this:
- Launch Safari.
- Download the NOOTA.mobileconfig file through it (for example, from hikay.github.io/app).
- Select a device and save the profile in settings.
- Reboot the device as requested by the system.

To make sure that the method worked, go to the "Software Update" section and start searching for a new version of iOS. The phone/tablet will not find anything as it will connect to the tvOS servers. The badge about the availability of updates will be displayed in the settings, but it can also be removed - however, for this you will have to dig through the iBackupBot program.

If you decide to get rid of the ban, then it will be simple: you just need to go to "Settings" - "General" - "Profiles" and remove the account from tvOS10.
This is the easiest way to disable updates and does not require jailbreak or tweaks. If there is a jail on the phone / tablet, then the number of options for preventing the update increases, but breaking the system just for the sake of it is not worth it, especially considering the fact that you can disable the update by simply adding an Apple TV profile.
How to rollback from iOS 11 to iOS 10? The only correct way.
iOS 11 is certainly an interesting update, but for many it seemed raw, and some of the system's features were not the most convenient. Fortunately, downgrading from iOS 11 to the stable and fast iOS 10 is very easy. This guide tells you how to do it.
Attention! October 5, Apple sign iOS 10.3.3. It is no longer possible to roll back to firmware from iOS 11.
Important!Rollback from iOS 11 to iOS 10 without data loss will only work if you have a backup of your iPhone or iPad saved in iTunes or iCloud, made specifically for iOS 10. In the event that a new backup created under iOS 11 replaces the old one, restoring to this backup with iOS 10 will not be possible.
Important! Before you can downgrade from iOS 11 to iOS 10, your iPhone or iPad must be cleared of password protection. You can remove the password in the menu " Settings» → « Touch ID and password».
Step 1: Turn off your iPhone or iPad.
Step 2. Hold down the " Home” (volume down button on iPhone 7 and iPhone 7 Plus).
Step 3: Hold down the " Home”, connect your mobile device to your computer with a USB cable . Hold the button for a few seconds until the iTunes icon appears on the screen.

Step 4Launch iTunes. The utility recognizes your iPhone or iPad in recovery mode. In the warning window that opens, click " Cancel».

Step 5. Download the iOS 10.3.3 firmware version for your device from the following links:
Step 6: Hold down the key Shift(Alt on Mac) click on the " Refresh«.

And select the previously downloaded firmware file.

Step 7. Confirm the start of recovery on iOS 10.3.3 and wait for the procedure to complete. Important! Do not disconnect your iPhone, iPad, or iPod touch from your computer while the firmware is being installed.

Ready! You have rolled back from iOS 11 to iOS 10.3.3. After the device turns on, you need to perform its initial settings and restore from a backup.
Hello! The release of new software is not always a good thing. It happens that the latest version of the firmware carries such errors, bugs, glitches (like) that you don’t want to install it. However, here the user has little choice - Apple did everything in its own way, and when fresh software is released, it is automatically-compulsorily downloaded to the device.
And not only does it eat up free memory, it also signals with an annoying number “1” on the settings icon that it’s time to update the gadget. Yes, this can be explained by concern for users, because the newer the software, the better, safer it is, etc. On the other hand, this is my device and I have to decide whether it can load something there itself (even if it's a firmware file) or not.
So, what to do if you don’t need such independence and you want to stay on the old version of iOS and don’t want to know about any updates?! Now I'll tell you how to delete an already downloaded firmware and make sure that it no longer loads automatically - well, let's go! :)
How to delete an already downloaded firmware file in iPhone and iPad
In order to get rid of the number 1 in the settings and delete the already downloaded firmware, you need to do the following:
- Go to settings and select "General".
- Then "Storage and iCloud usage" - "Manage".
- Find the downloaded firmware file and click "Uninstall update".
Just? Elementary! And there was more free space and the callus figure disappeared. Beauty... But unfortunately that's not all, because it will soon re-boot. But this can also be dealt with.
How to disable automatic download of a new version of iOS in iPhone and iPad
If you have a jail installed, then such issues are solved very simply - there are many tweaks that wean the gadget from amateur performance. But “hacking the device” just because of this is not a good idea, because Jailbreak ... Therefore, we will learn how to make sure that the firmware in the iPhone and iPad does not load on its own, without using a jailbreak.
As you know, Apple smartphones and tablets need Wi-Fi to download the firmware “over the air”. And rightly so, since the files are often very large in volume, and if they were downloaded via cellular networks, then it would cost a lot of money.
It turns out that our task is to make sure that Wi-Fi does not see the Apple update server. To do this, in the router settings, you need to block two addresses - here they are:
- appldnld.apple.com
- mesu.apple.com
Please note that these two addresses are solely responsible for checking for updates - all other functions will work as they should.
After access to them is closed, through this Wi-Fi network, the iOS device will not be able to check for updates on its servers, which means it will always think that you have the latest version of the software, and, accordingly, no more automatically downloaded firmware and annoying units in the settings calling for an update.
Now, when charging a device with Wi-Fi enabled, only backup will be performed and that's it. And if you still want to update later, you can always remove these addresses from the blocked ones or simply find another Wi-Fi network.
Updated! As I was quite rightly asked in the comments - what will happen if the iPhone or iPad checks for an update via the mobile Internet? After all, it is impossible to block servers on the side of a mobile operator!
It is for such cases that there is another way to prevent the iPhone or iPad from updating - through the configuration profile. What should be done?
Just install an Apple TV software profile on your device.
The iPhone or iPad will look for a suitable update for itself, but since the profile from Apple TV is installed, they will not be able to find it. That will save you from the annoying requirement to update iOS.
Hello! The release of new software is not always a good thing. It happens that the latest version of the firmware carries such errors, bugs, glitches (like) that you don’t want to install it. However, here the user has little choice - Apple did everything in its own way, and when fresh software is released, it is automatically-compulsorily loaded onto the device.
And not only does it eat up free memory, it also signals with an annoying number “1” on the settings icon that it’s time to update the gadget. Yes, this can be explained by concern for users, because the newer the software, the better and safer it is (according to Apple developers). On the other hand, this is my device and I have to decide whether it can load something there itself (even if it's a firmware file) or not.
So, what to do if you don’t need such independence, you want to stay on the old version of iOS and don’t want to know about any updates?! Now I'll tell you how to remove an already downloaded firmware and make sure that it no longer loads automatically. Let's go! :)
How to delete an already downloaded firmware file in iPhone and iPad
In order to get rid of the number 1 in the settings and delete the already downloaded firmware, you need to do the following:
- Go to settings and select "General".
- Then "Storage and iCloud usage" - "Manage".
- Find the downloaded firmware file and click "Uninstall update".
Just? Elementary! And there was more free space and the callus figure disappeared. Beauty ... But unfortunately that's not all, because it will soon be loaded again. But this can also be dealt with.
How to disable automatic download of a new version of iOS in iPhone and iPad
If you have a jail installed, then such issues are solved very simply - there are many tweaks that wean the gadget from amateur performance. But “hacking the device” just because of this is not a good idea, because Jailbreak ... Therefore, we will learn how to make sure that the firmware in the iPhone and iPad does not load on its own, without using a jailbreak.
As you know, Apple smartphones and tablets need Wi-Fi to download the firmware “over the air”. And rightly so, since the files are often very large in volume, and if they were downloaded via cellular networks, then it would cost a lot of money.
It turns out that our task is to make sure that Wi-Fi does not see the Apple update server. To do this, in the settings of the router, you need to block two addresses - here they are:
- appldnld.apple.com
- mesu.apple.com
Please note that these two addresses are solely responsible for checking for updates - all other functions will work as they should.
After access to them is closed, through this Wi-Fi network, the iOS device will not be able to check for updates on its servers, which means it will always think that you have the latest version of the software, and, accordingly, no more automatically downloaded firmware and annoying units in the settings calling for an update.
Now, when charging a device with Wi-Fi turned on, only backup will be performed and that's it. And if you still want to update later, you can always remove these addresses from the blocked ones or simply find another Wi-Fi network.
Updated! As I was quite rightly asked in the comments - what will happen if the iPhone or iPad checks for an update via the mobile Internet?
After all, it is impossible to block servers on the side of a mobile operator!
It is for such cases that there is another way to prevent the iPhone or iPad from updating - through the configuration profile:
- What should be done? Just install an Apple TV software profile on your device.
- What for? The iPhone or iPad will look for a suitable update for itself, but since the profile from Apple TV is installed, they will not be able to find it. That will save you from the annoying requirement to update iOS.
- Where to get it? You can download the current Apple TV configuration profile for iPhone and iPad from this link.
- How to install? .
